Show Subjects' Cursors: Multi-User Demo
Overview
In a multi-user experiment where multiple participants are taking part in the experiment in real time, you may want to make their cursors visible to each other. In this demo, we will show you how to set that up.
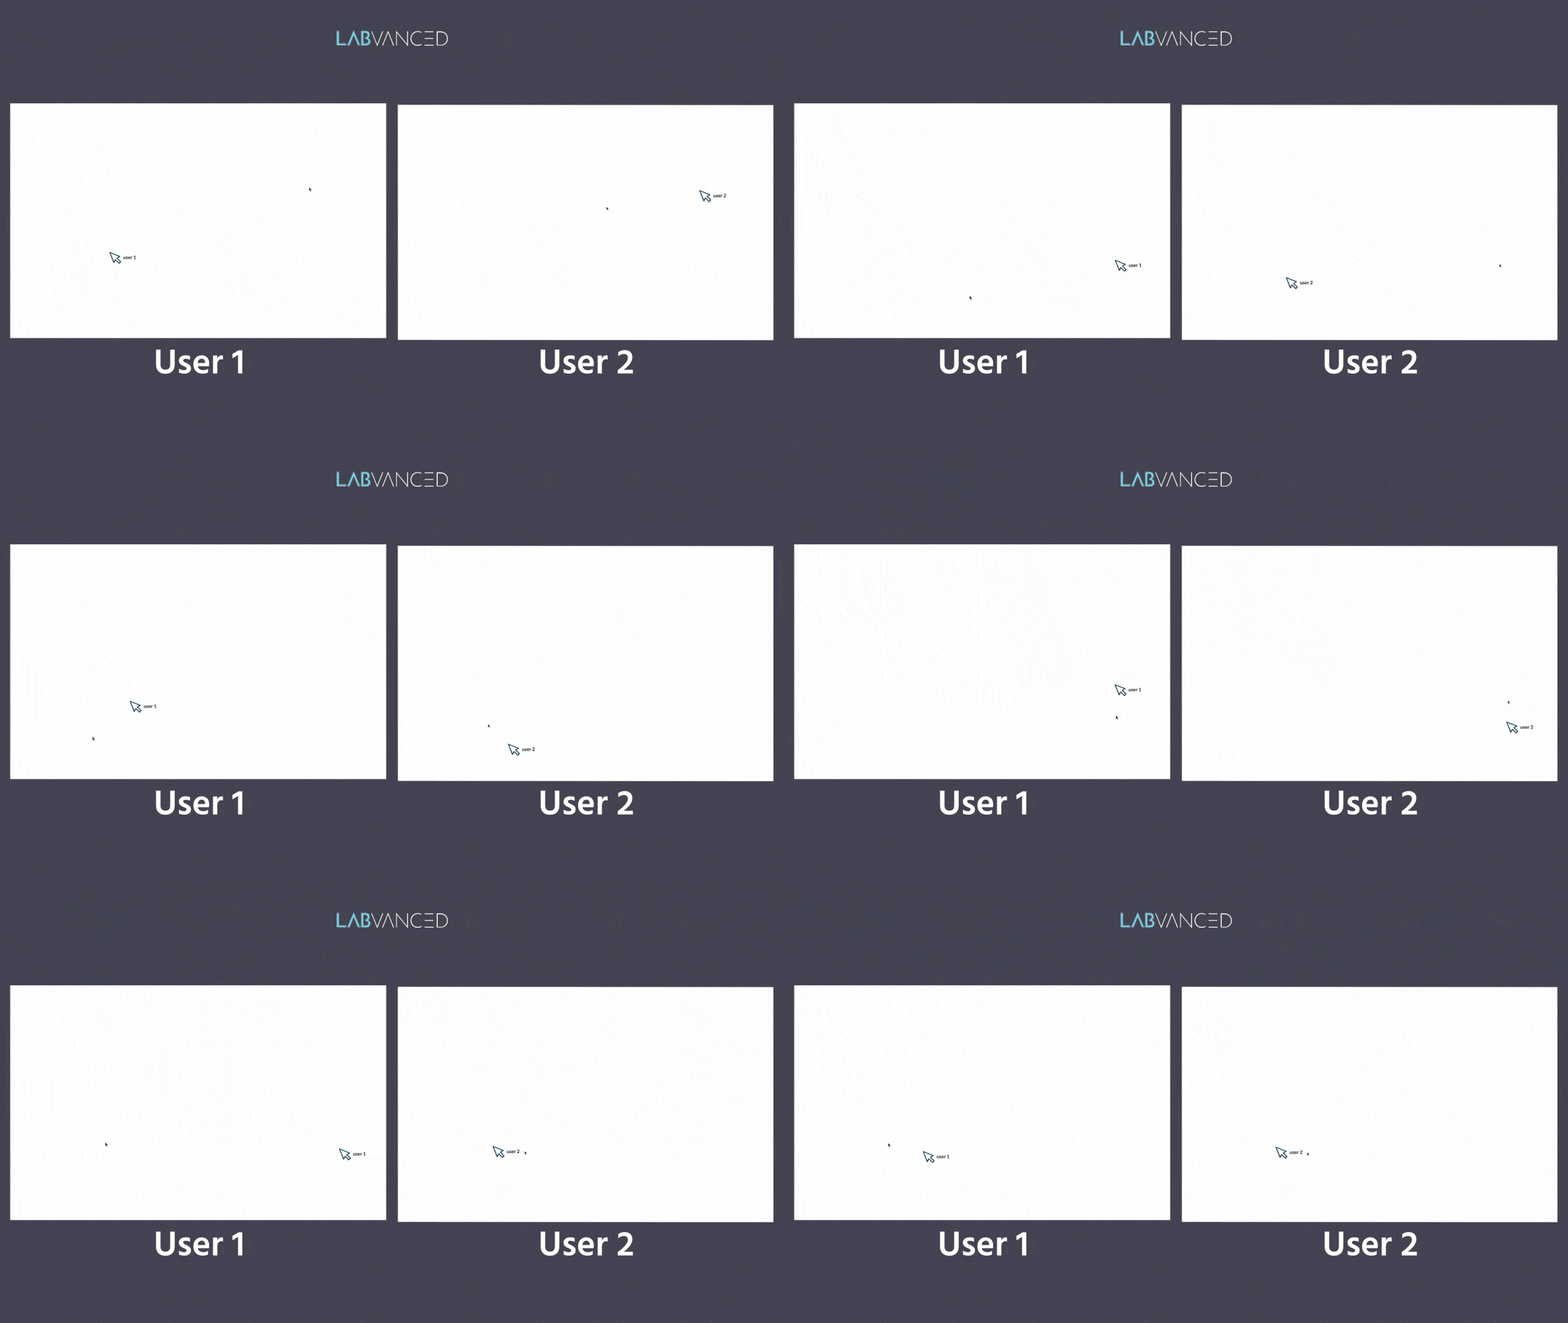
Note on Implementation
Please note that there are several approaches you can implement sharing cursor locations of multiple participants in Labvanced since the platform is flexible and thus it’s important to consider your experimental design before committing to an approach.
To make this point clear, we will present two approaches for accomplishing this:
- Approach 1: a demo that utilizes arrays for distributing the cursor position
- Approach 2: in a section further down, we will discuss a demo where single values for x- and y-coordinates can be used as well
Approach 1: Cursor Display Using Mouse Tracking and Arrays
This demo includes two objects (one mouse per user) and are listed on the side panel in the Object panel. This approach can be used for multi-user studies where there are 2+ participants.
Objects
Underneath is the Object Properties panel where all visual styling can be handled. Currently, both cursors have a Visibility of 1 (this means opacity =100%) as shown below:

For this demo, we will change the Visibility to be 0, as shown below. Later, when the experiment starts, we will make one of the cursors visible. ie, if you are Participant 1, then you will see the cursor object here of Participant 2 and vice versa. This is described under the Event:Init section below.

If you don’t want to have two objects for cursors. Refer to this section to see an alternative method with just a single cursor object.
Custom Variables
Here we are listing all the custom variables that were created for the purposes of this demo. You can create them in advance or within the editor while building your experiment.

Events Overview
To add an event click the [+] Frame Event (on this frame only).
We have the following events in this demo:
- Event:Init: Making the other participant’s mouse visible
- Event: sendMove: Sending the mouse coordinates
- Event: receiveMove: Receiving the mouse coordinates
Below, the structure for each of the events is described.
EVENT: init
This event specifies what will happen when the frame initiates. In this case, our goal is for Participant 1 to see Participant 2’s mouse and vice versa.
Trigger
The trigger for the event is On Frame Init because we want to assign the cursor object visibility as soon as the frame initializes.

Action
After specifying this and clicking the ‘Next’ button, you can select the actions that will occur upon Frame Initialization.
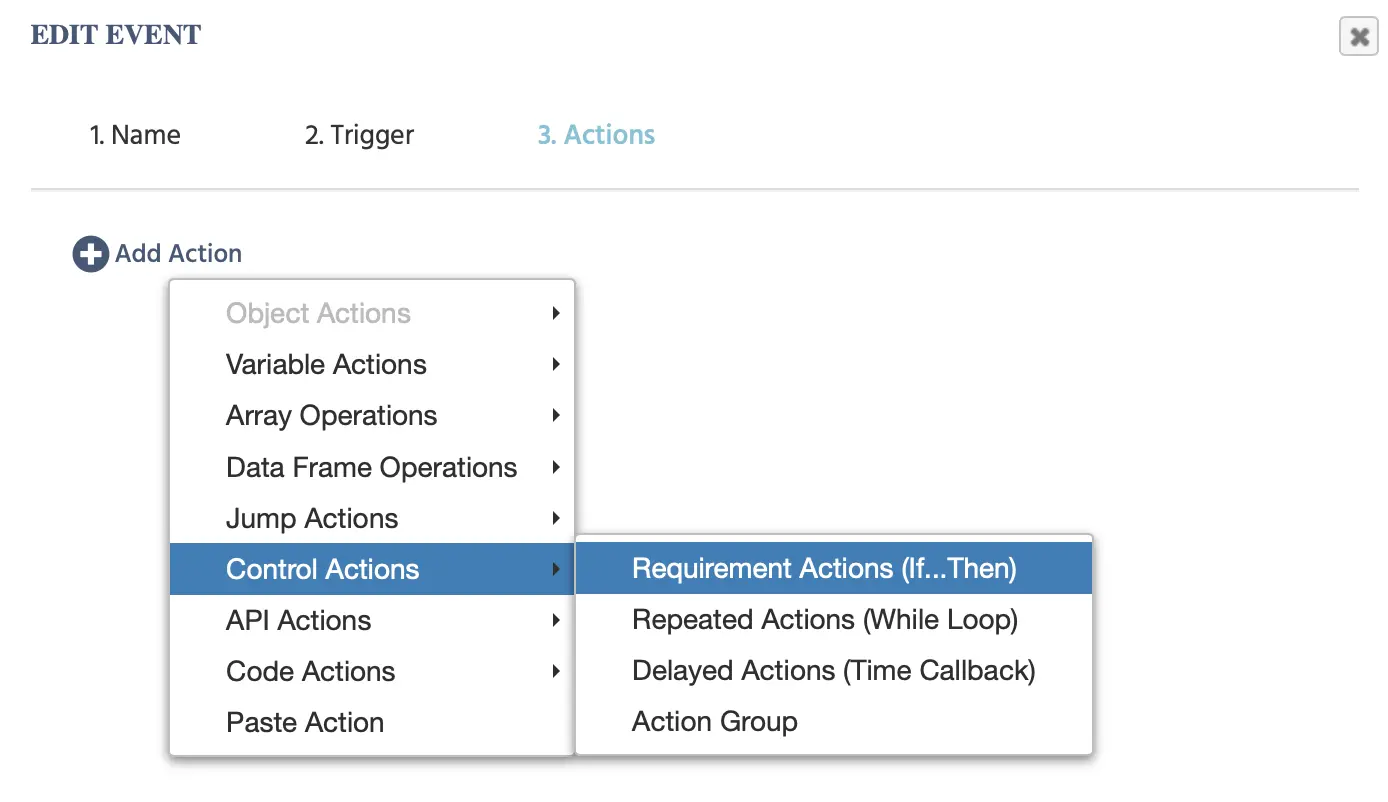
Below, we show that the action we use is a Control Action → ‘If… Then’, so:
- If
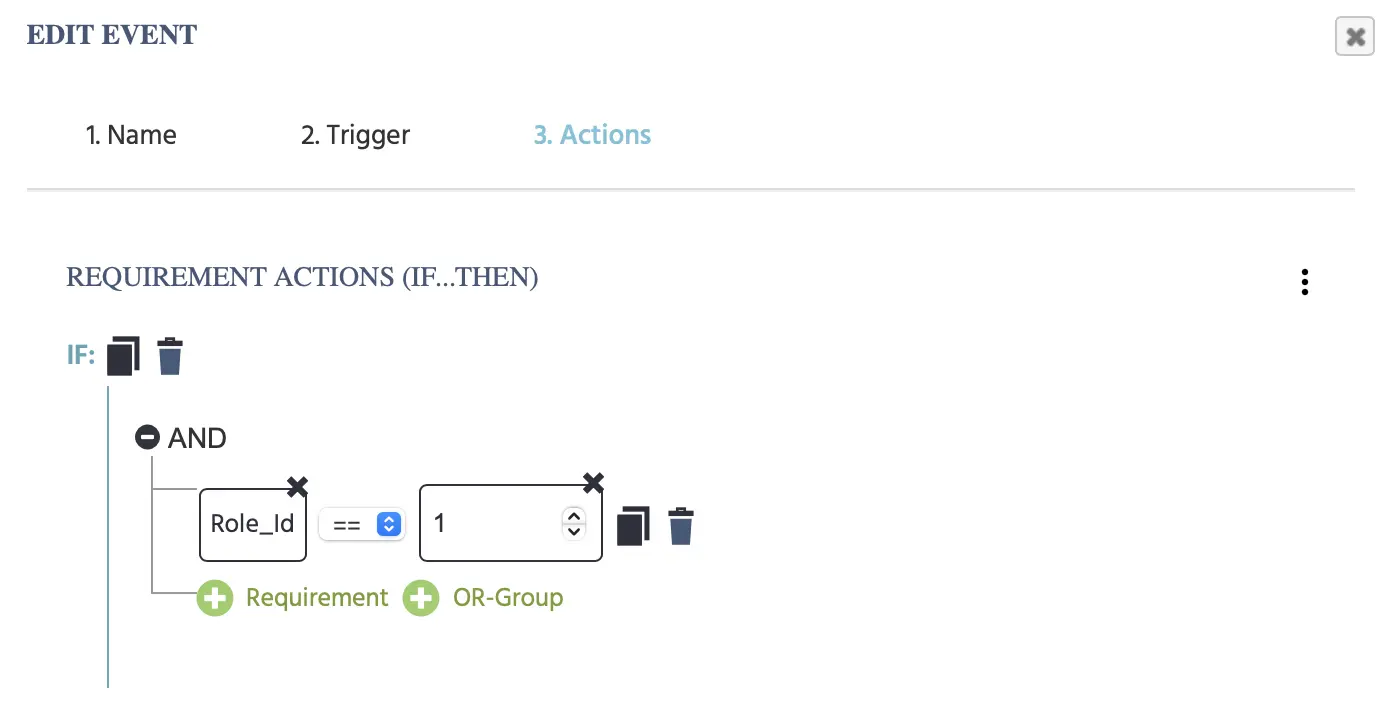
Role_Idis equal to 1 (Note: Role_Id is a variable that is unique to multi-user studies and assigns the participant their ID). - Then,
Set Object Propertyof themouse_user_2object’sVisibilityto 1. - Note: The combination of these two actions essentially means: “If you are Participant 1 (Role_Id==1), then you will see the mouse_user_2 object.”
- Note: How is the
Role_Id == 1specified in the editor? Refer to the step-by-step section below where this is explained in finer detail.

Under the Else If section we do the same thing but for participant 2 (Role_Id==2). The target object is mouse_user_1 which should have the Visibility value of 1.

EVENT: sendMove
Next, we have to establish a ‘bridge’ between the two participants where if you move your mouse, those values are tracked/stored and sent over to the other participant.
Trigger
Thus, the Mouse trigger is used for this event where any ‘Move’ that is being done will trigger the event.

Actions
Again, a Control Action → If…Then command is needed:


Where if your Role_Id==1, then the following Variable Actions take place:
Set / Record a Variable: Point / define the variablemoveMouse1and set it to equal to the trigger-specific value ofMouse [X,Y] Array.Distribute Variable:Share this variable with Participant 2.
Else if, your Role_Id==2 …

Then:
- The
moveMouse2will record the Mouse [X,Y] Array (just like in the previous example above) but we will use it to store the mouse tracking values of Participant 2 and set it to equal to their Mouse [X,Y] Array. - Then, distribute this variable to participant 1.

Summary- Up to this point we have:
- Created variables to store the mouse tracking [X,Y] array of each participant (moveMouse1 for Participant 1’s cursor and moveMouse2 for Participant 2’s cursor)
- And have established a bridge where the mouse tracking value is sent over to the other participant using the Distribute Variable action.
EVENT: receiveMove
Next, we need to specify what will happen with these mouse tracking values. In this case, upon receiving the mouse movements in an array format, we want to change the mouse cursor object to reflect the movements! In other words, using the [X,Y] array, we will bind those values to the mouse cursor so that it essentially moves, showing what the other participant is doing on the screen! Thus, to accomplish this, the trigger and actions described below will be used.
Trigger
Since the mouse tracking values are being stored in variables, any time these variables change, it means that the mouse is moving. Thus we can use the Variable Value Changed trigger to update the cursor location on the screen by selecting the two specific variables that hold the mouse tracking values as shown below:

Action
Next we want to use the Select From Array (Read) action in order to fetch the x- and y-coordinate values from the variable arrays of the cursor because we plan on using them to set the coordinates of the object.
Thus, we select the moveMouse1 variable which has the array of the [X,Y] of participant 1 and call on the first value which was a Fixed Index of 1 and store that value in a numeric variable called x_mouse1 because the x-values are listed 1st in the array.

We add another Select From Array (Read) action and for the Fixed Index write 2 because we want to call on the second array value which are the y-coordinates and store that in the y_mouse1 variable.
In order to make the cursor image move, we need to update its image coordinates in real time by having it take on the x- and y-values that are equivalent to the x- and y-coordinates from mouse tracking (which we fetched and stored in variables x_mouse1 and y_mouse1 in the actions above).
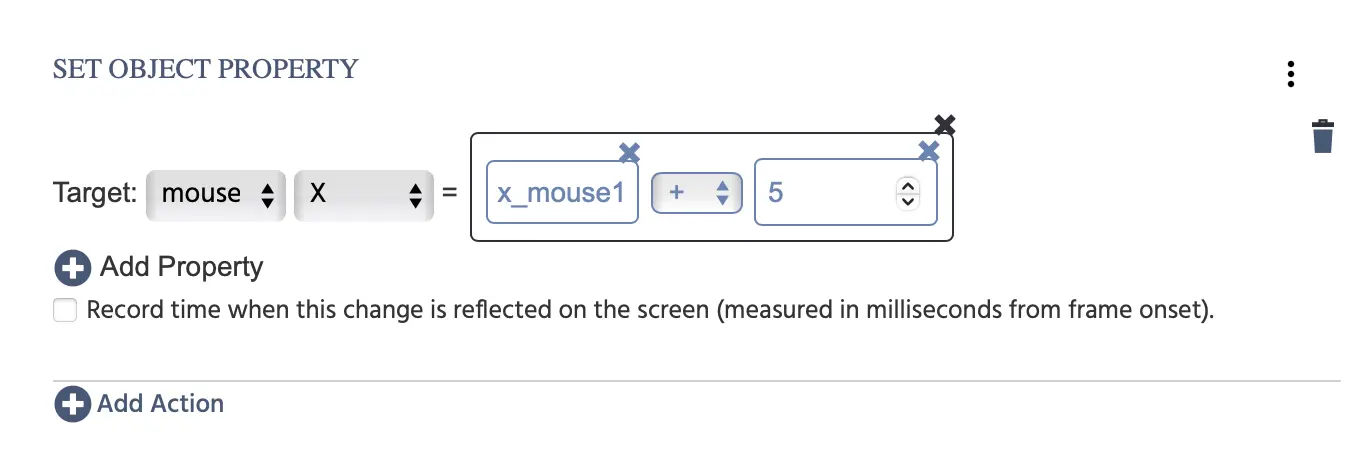
To accomplish this, we need to chose the Set Object Property action so that the Target of the mouse_user_1 (in the image below it’s just written as ‘mouse’ because the dialog box shortens the title) and its property X has a value (=) of x_mouse1+5 which is an arithmetic operation. Refer to this step-by-step explanation of how this is set up.

At this point you may be wondering why the +5 appears in the input field… This is because we need to create an offset since this object is actually a text object that includes an embedded image (as described at the beginning of this walkthrough). So, if you need to build your study and have the users see their own customized cursors as we do here but also to click on other objects in the study, then it won’t be possible unless you create this offset (unless you choose to omit the image of the cursor and just keep the text label).
Moving on, we choose +Add Property and point to the same image object, select the Y property and set it equal to the variable y_mouse1.
We repeat the same process but just select the other variables which we have dedicated for participant 2:

Here we point to the object mouse_user_2 and assign the respective variables:

Together, all these actions make the two cursor objects move for both participants by reading values from the array variable and then using these numeric values to set the x- and y-values of the object.
EVENT: end
Next we create an event to officially end the data recording process and store the data by inserting an ‘end’ button which when it’s used as a trigger it will lead to a Control Action where the Accept/End Session action takes place.
Trigger
To end the session, the button trigger is where clicking the End Button will trigger the session to end.

Action
The action is the Accept/End Session.

Again, please note that this demo is for learning purposes and is just one method of many for sharing the mouse and cursor location in a multi-user study setting. Another example of how this effect can be accomplished is described in the upcoming sections.
Approach 2: Single Variable Approach for Sharing Cursors in Multi-User Studies
In this other demo, instead of arrays, we show how you have the option of using single values (ie. calling on X- and Y-coordinates directly).
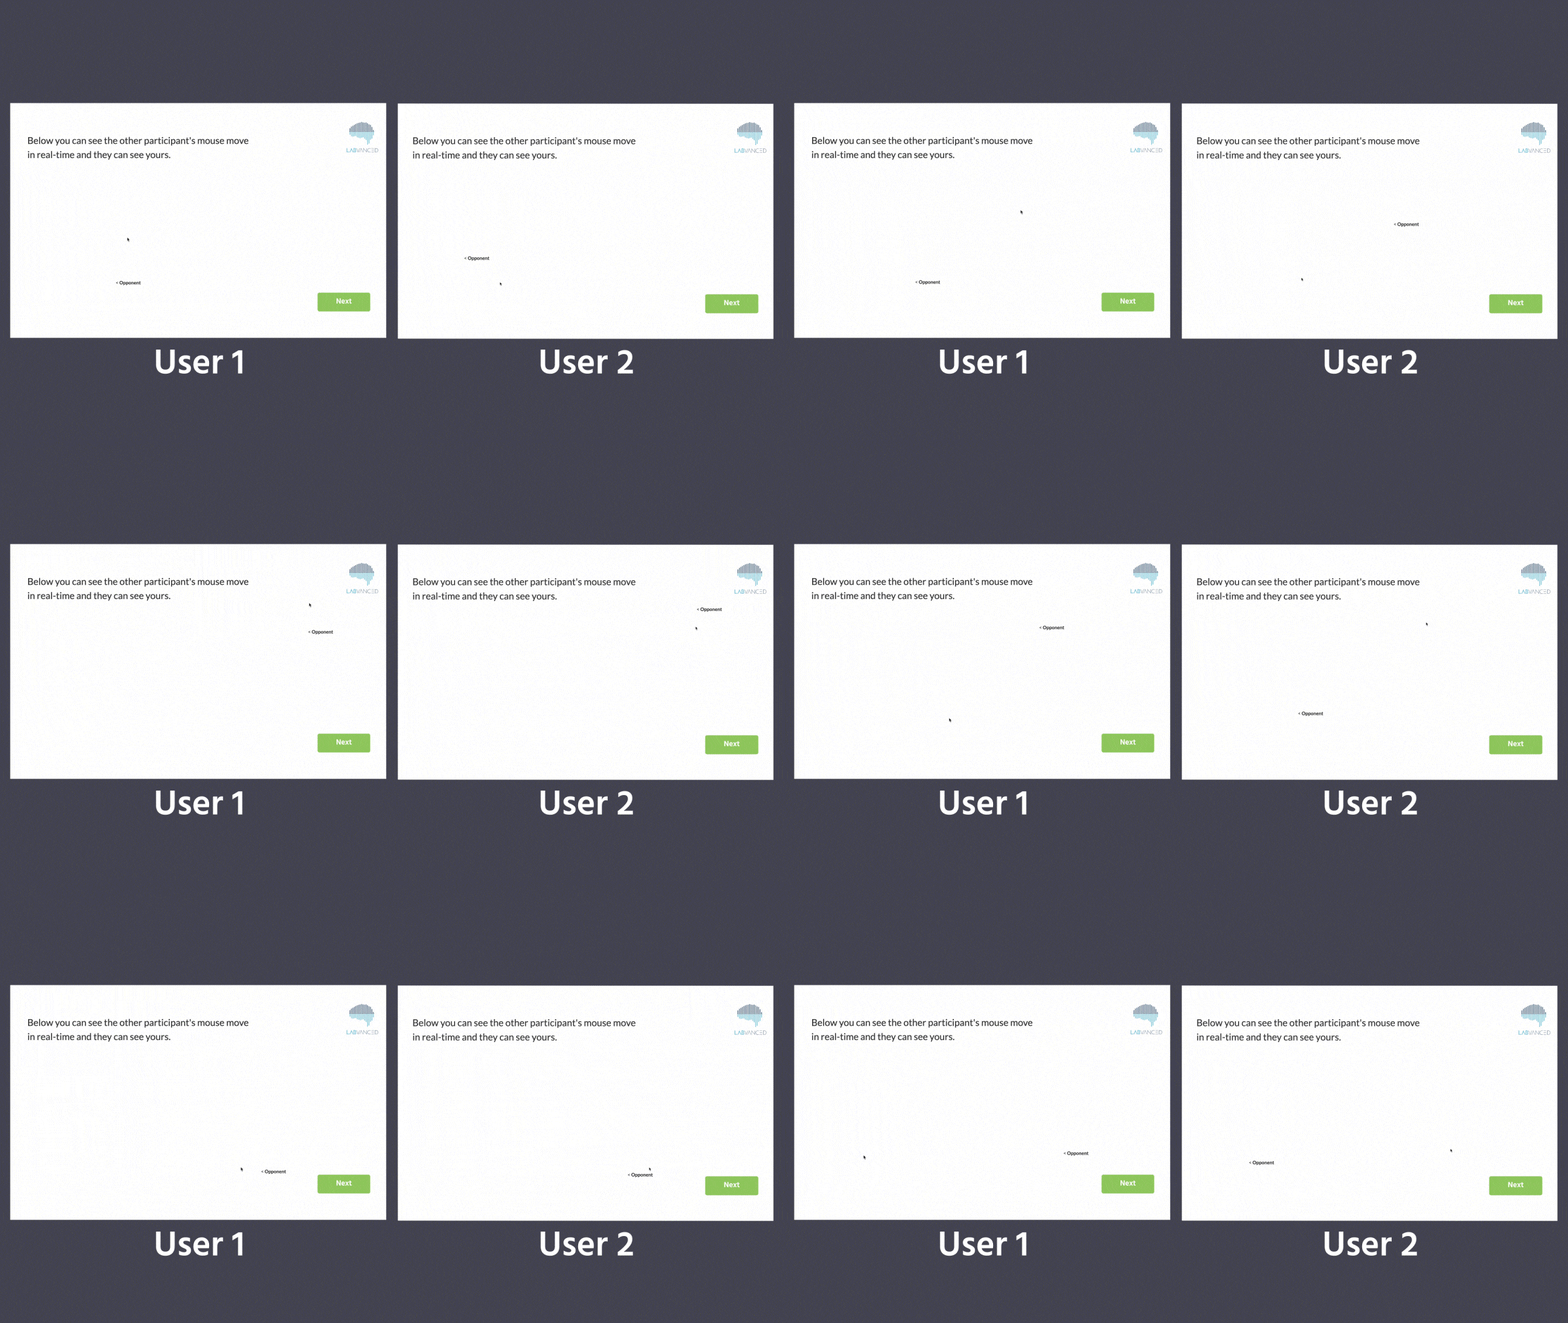
Here is a full preview of this demo, including a preview of the data recorded at the end:
Single Object for the Cursor
This demo also differs from the previous one in the sense that instead of two objects for the cursor there is only one. This approach is great for multi-user studies that just want to show where the cursor of the ‘opponent’ or ‘teammate’ is located.
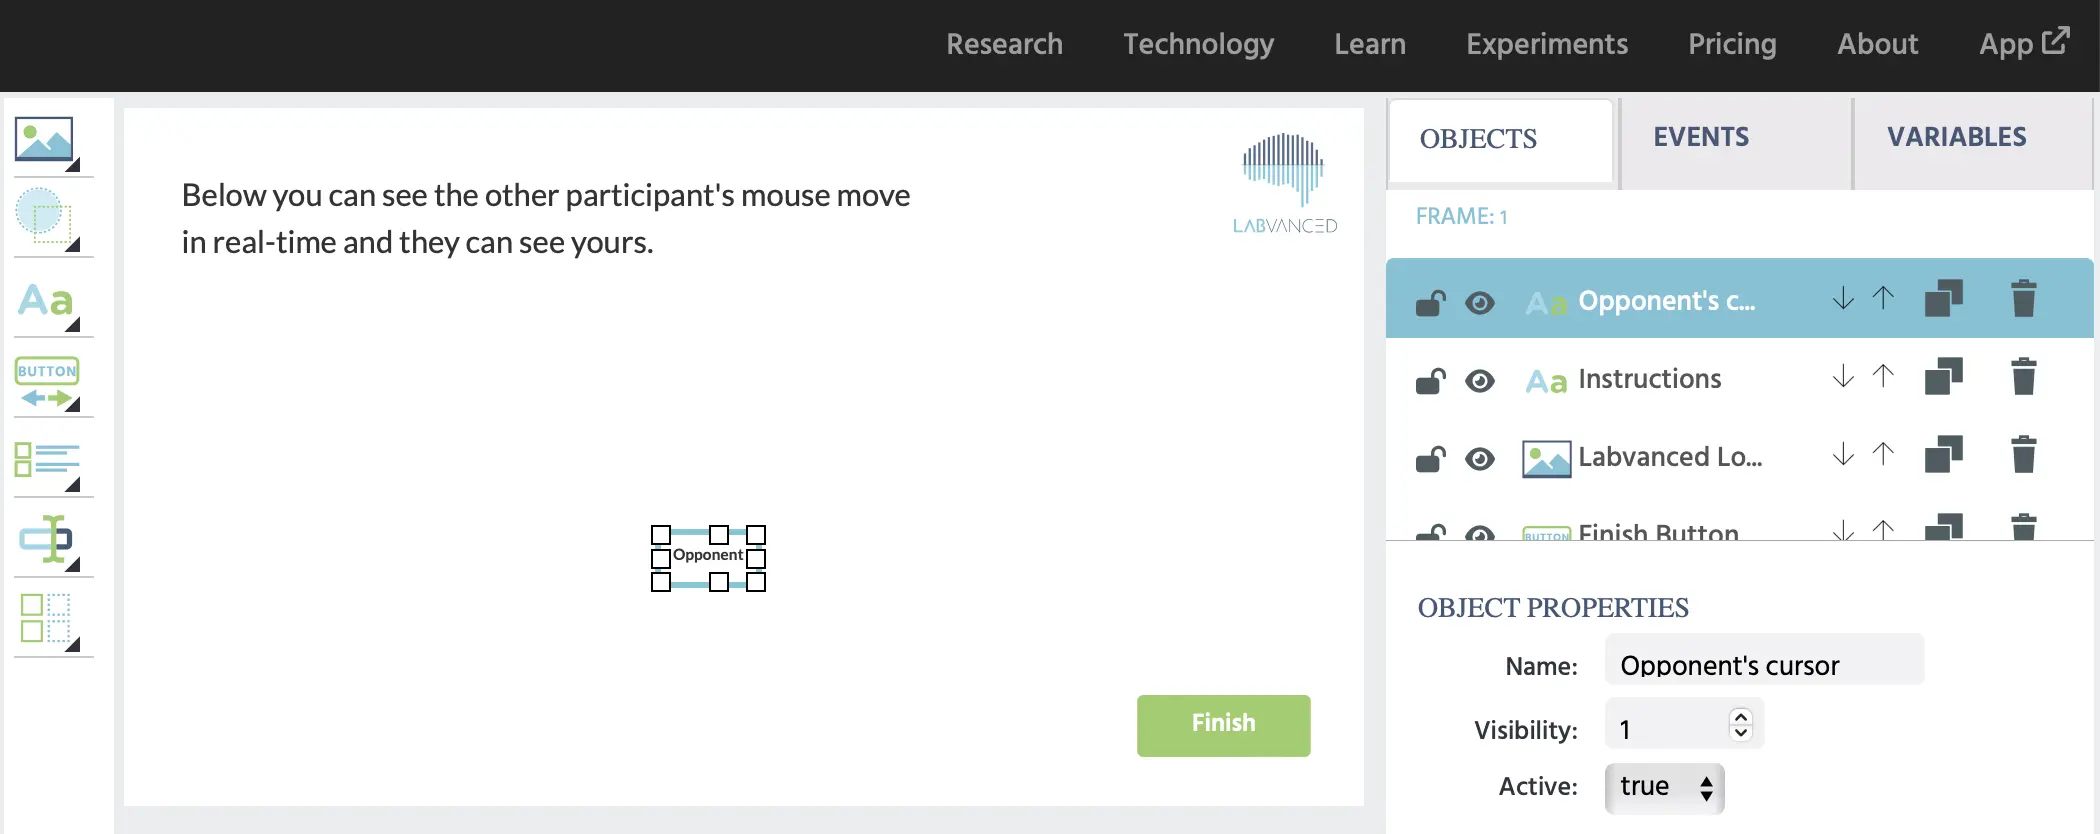
Custom Variables
This other demo includes the following custom variables and their specifications. While this demo has less variables, it requires more events / actions being used as opposed to the previous example with arrays.

EVENT: sendMove
The trigger is the mouse moving:
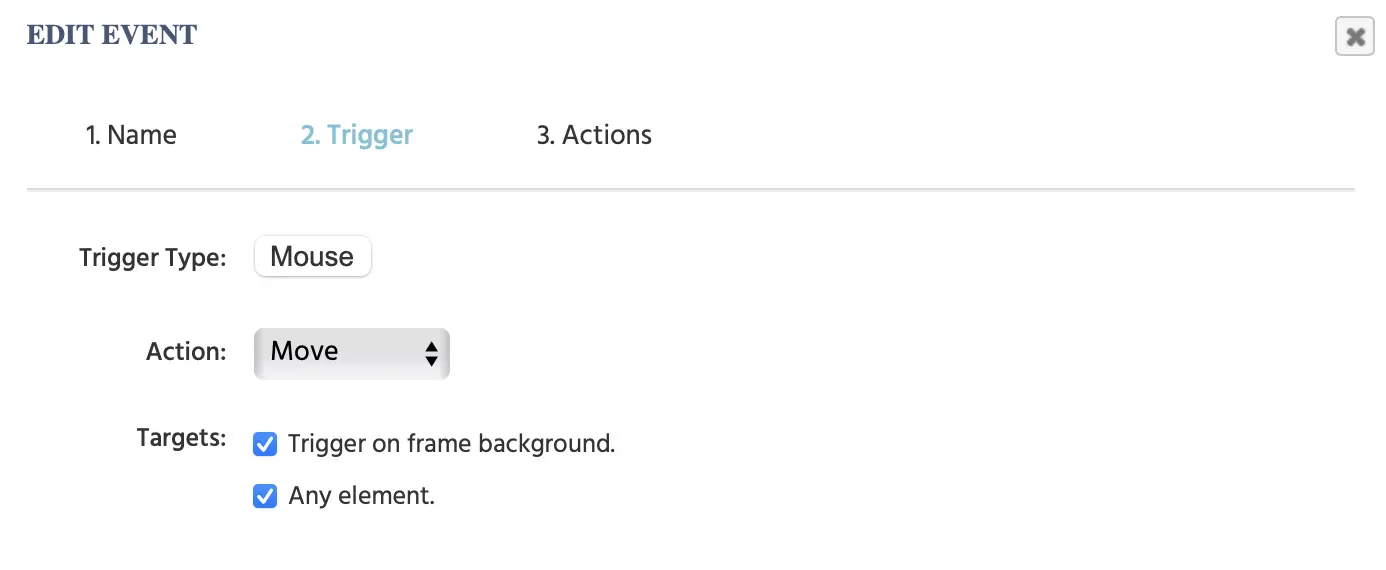
The action is to record the trigger-specific values of the mouse’s X-coordinate and Y-Coordinate in two separate variables which are specifically named to indicate participant 1.
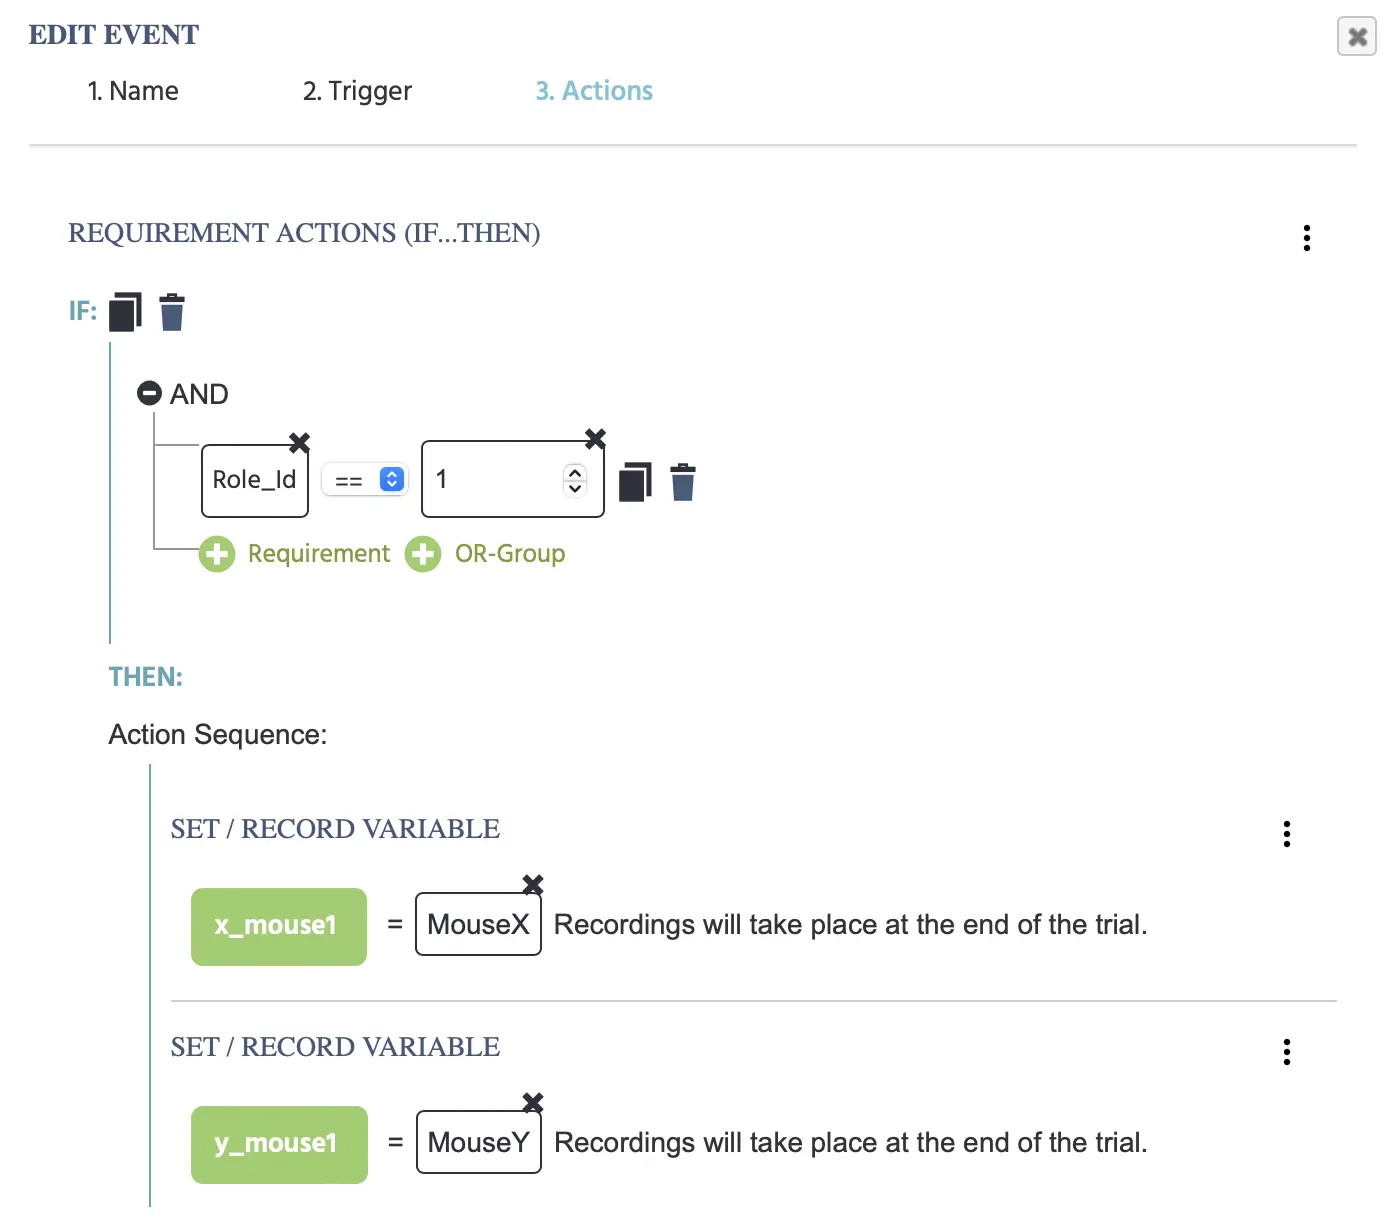
The next actions under this if/then condition serve to distribute these two values to participant 2.
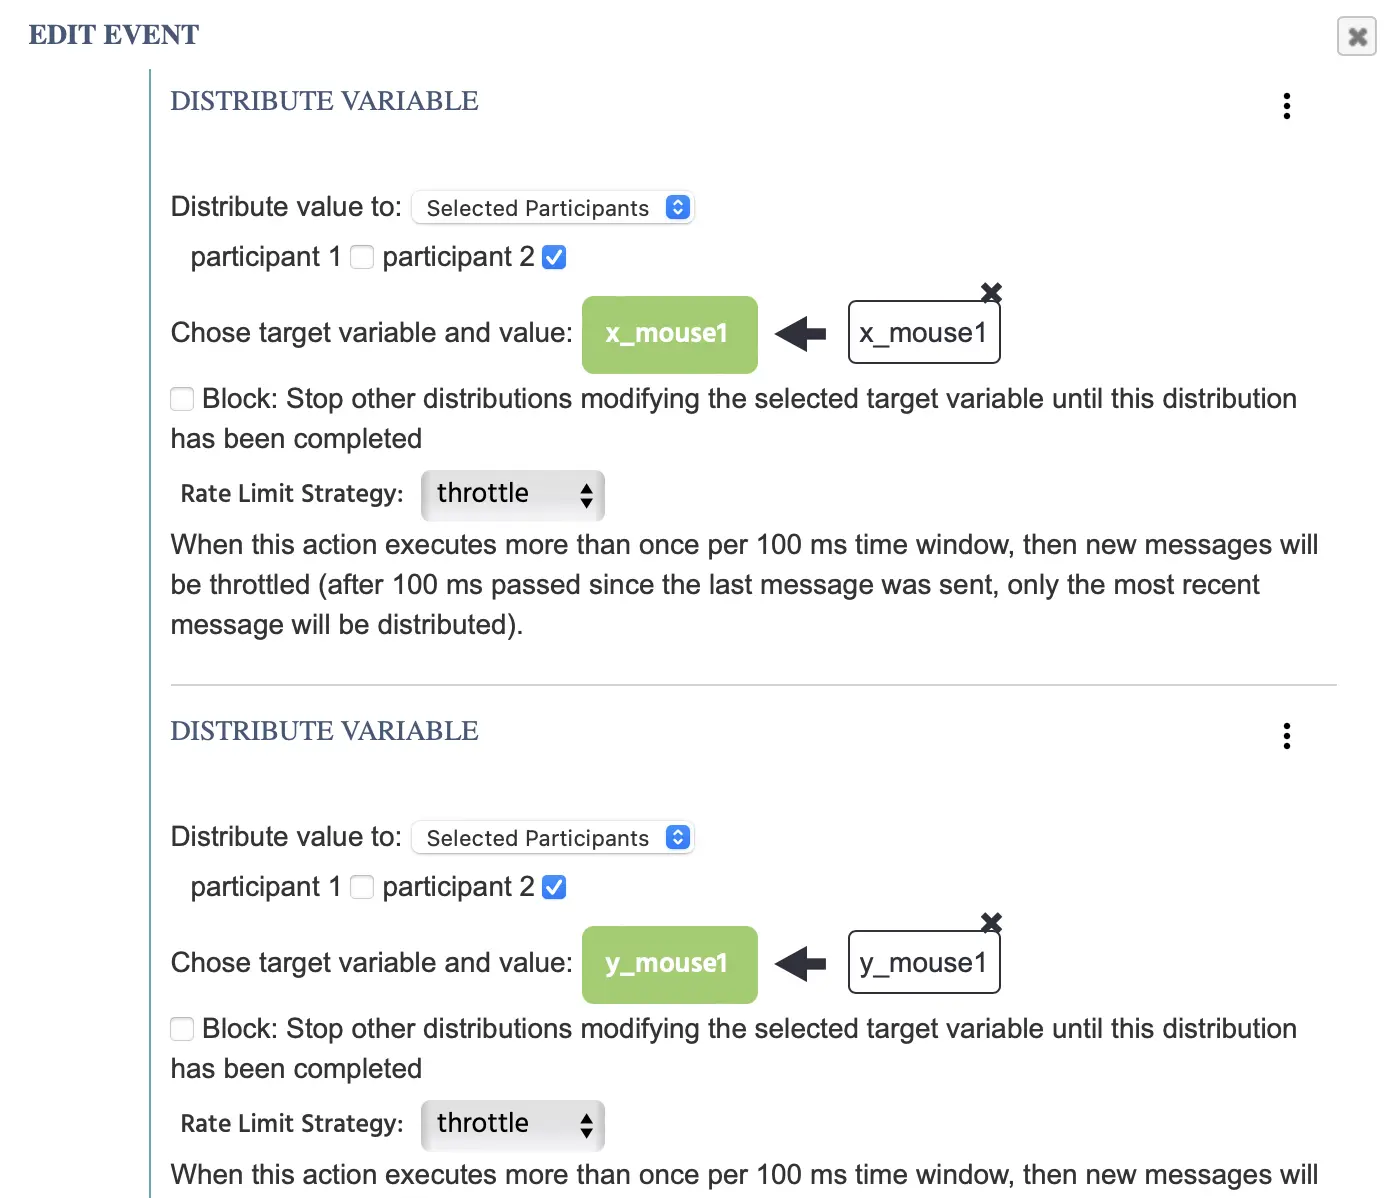
Then we add an ‘Else If’ condition to record the trigger-specific values of the mouse’s X-coordinate and Y-Coordinate in two separate variables which are specifically named to indicate participant 2.
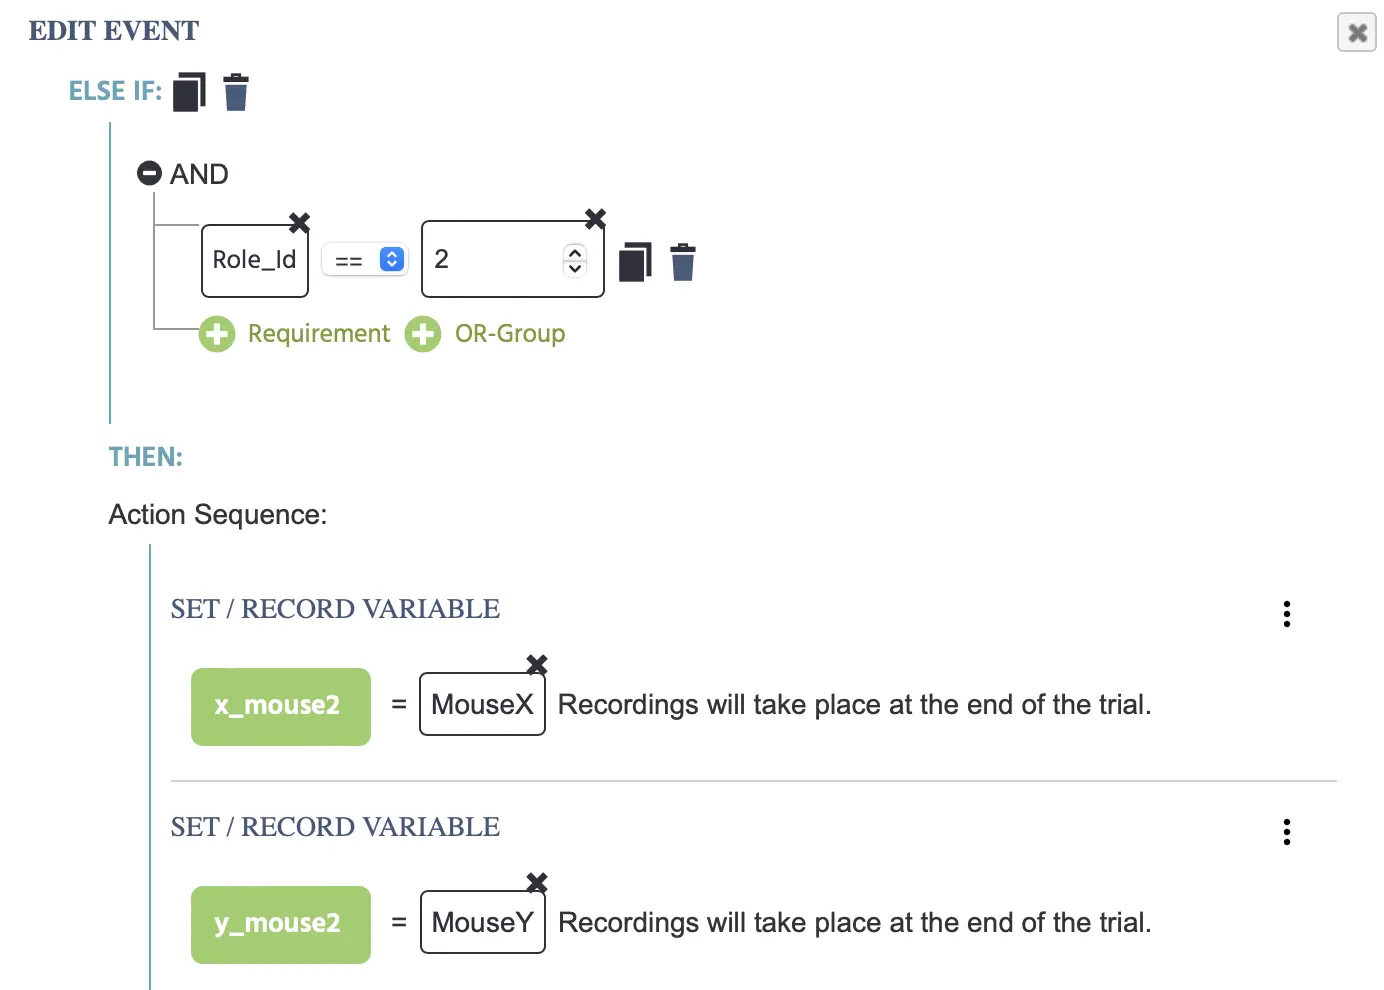
The next actions are used to distribute these two values to participant 1.
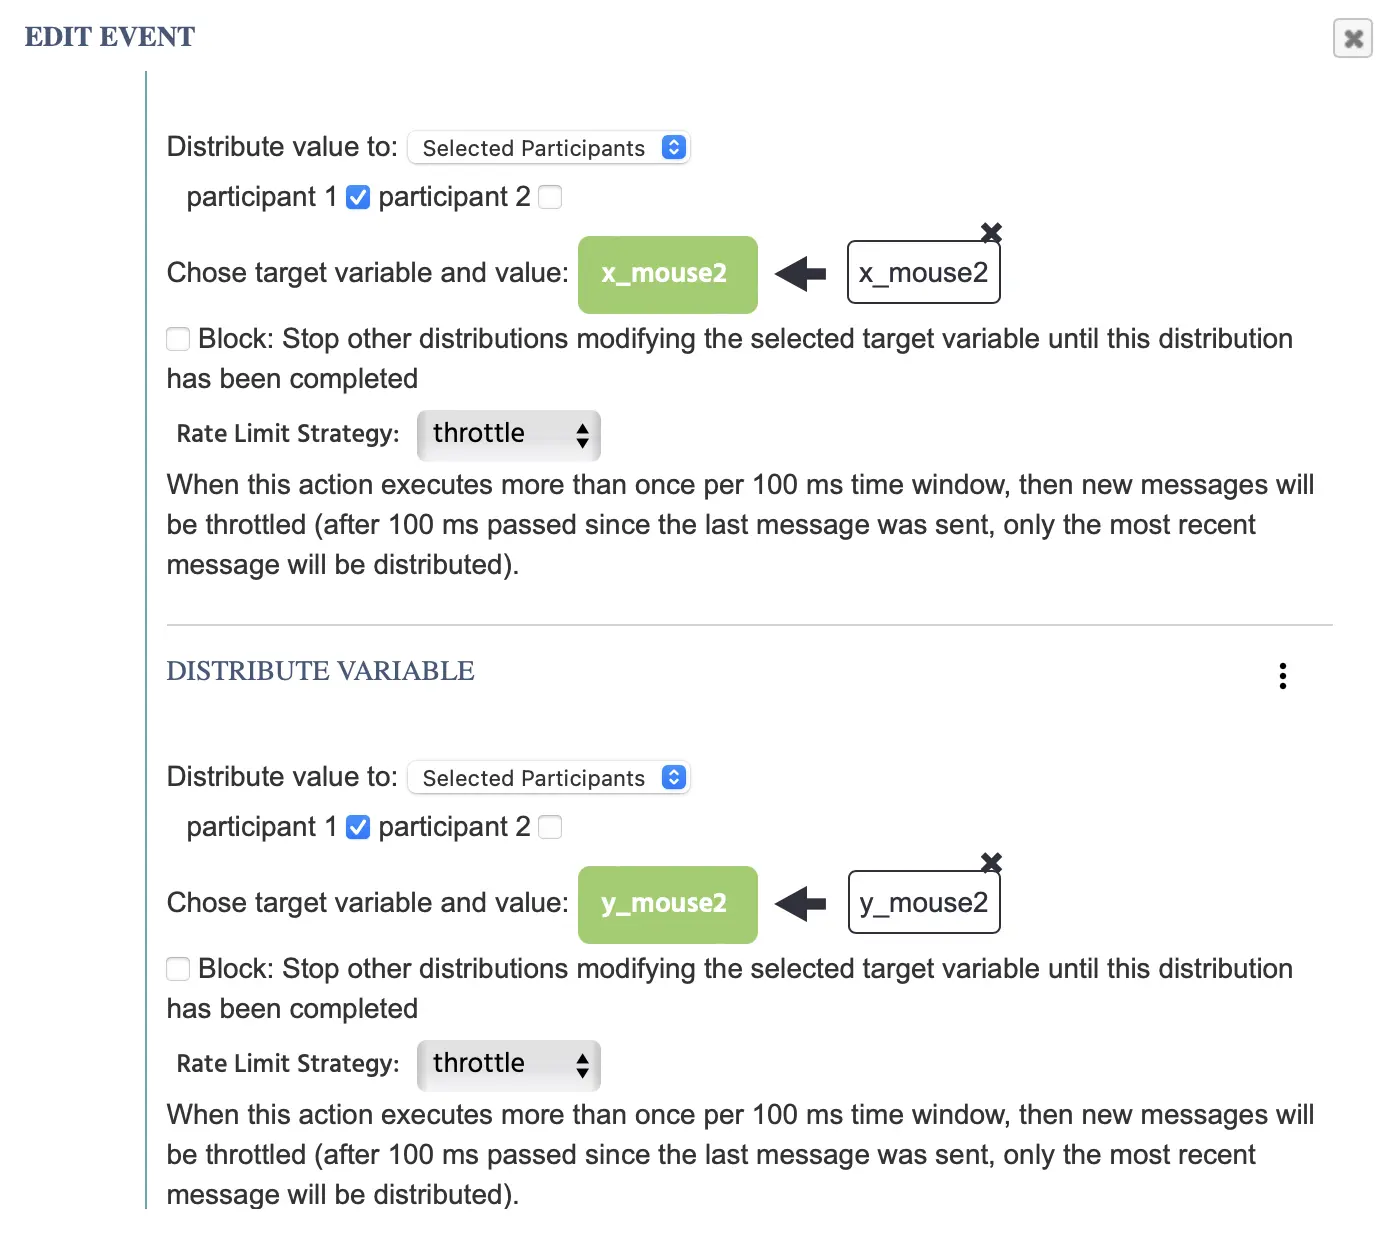
EVENT: receiveMove1
Now we need an event to transmit the mouse coordinates. Thus, if these specific variable values associated with Participant 1 change, they will be used as a trigger:
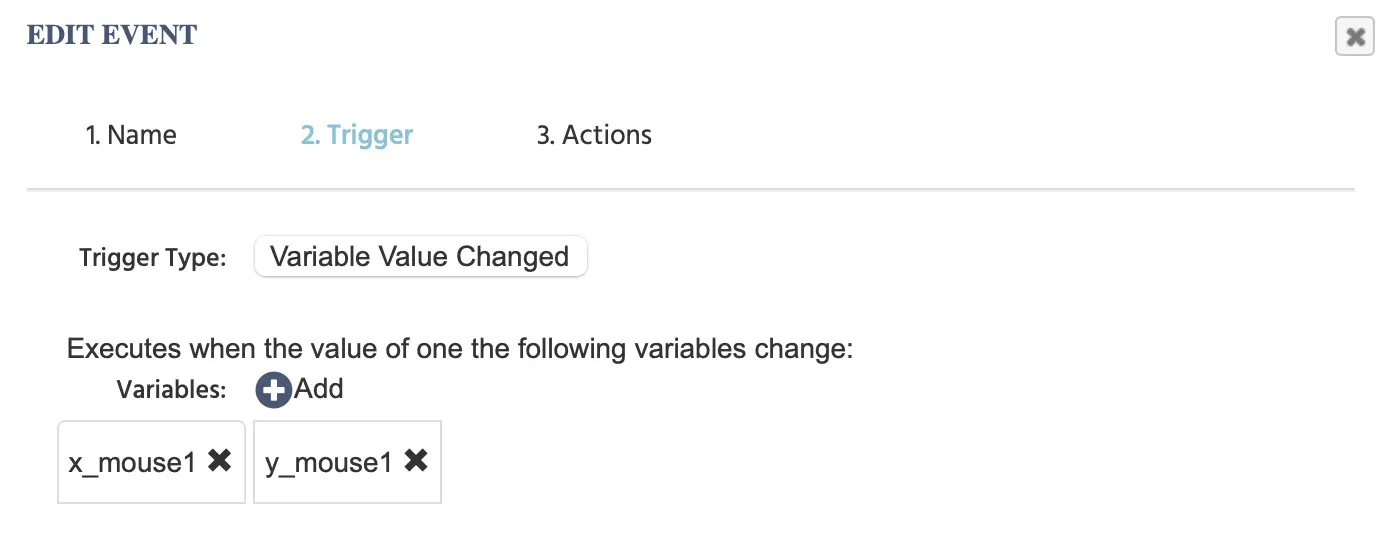
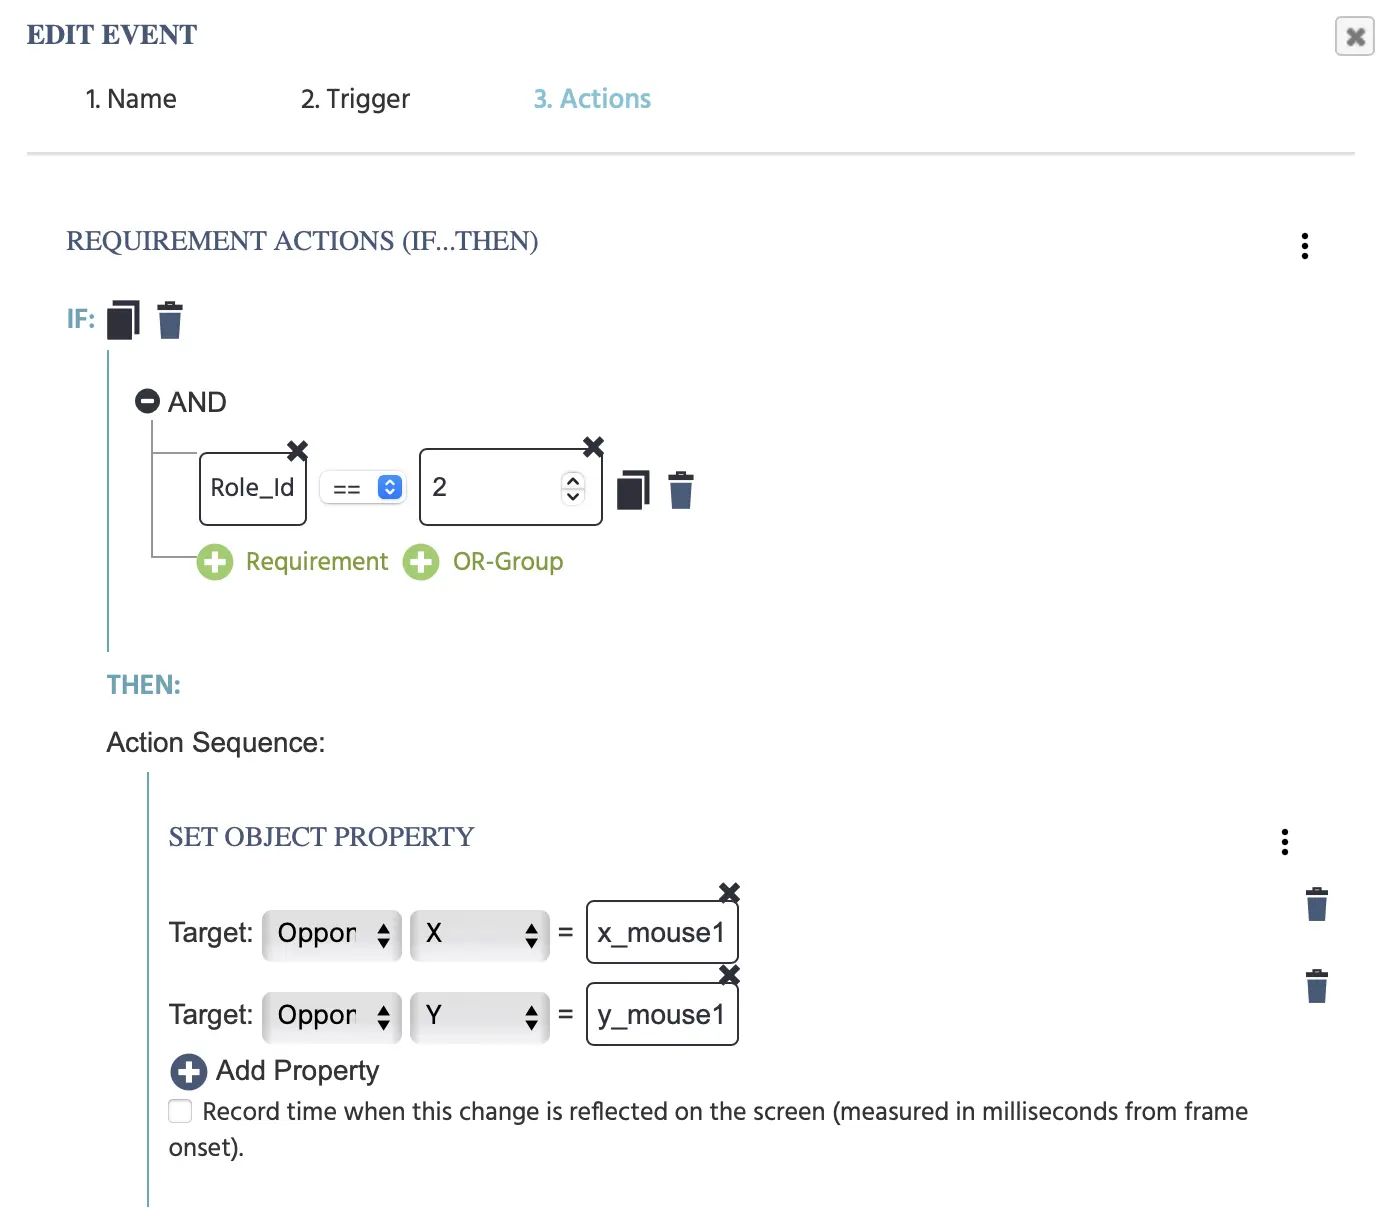
Then we update the cursor location’s object property to take on these values using an action. In essence, if you are Participant 2, then the Opponent object takes on the coordinates of the variables of Participant 1:
EVENT: receiveMove2
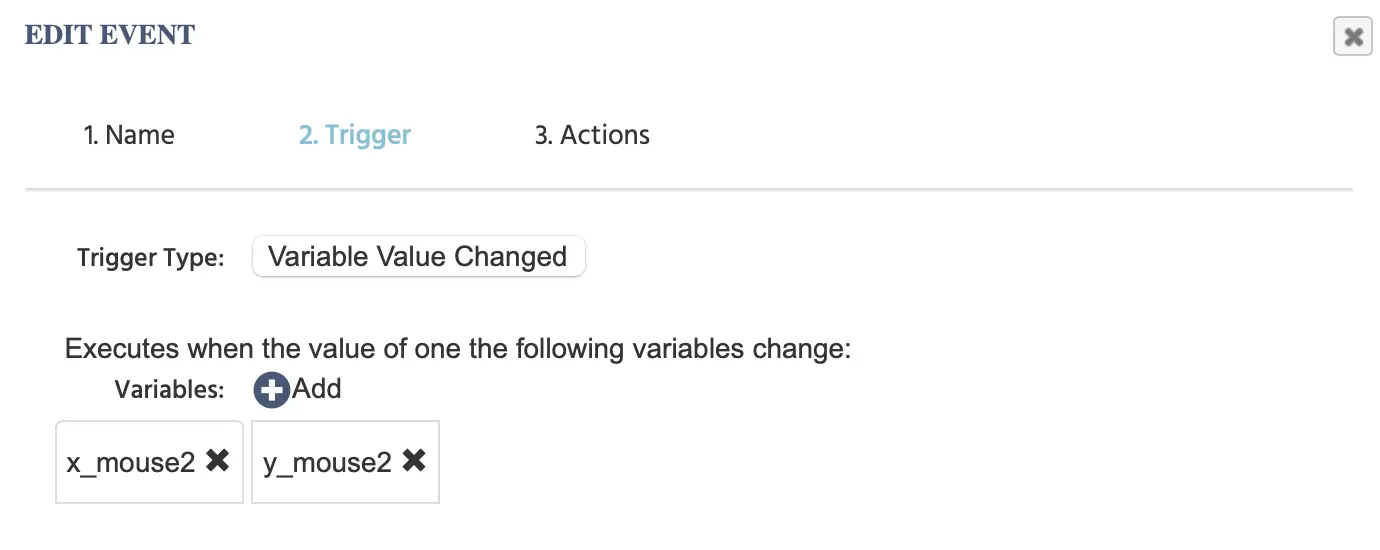
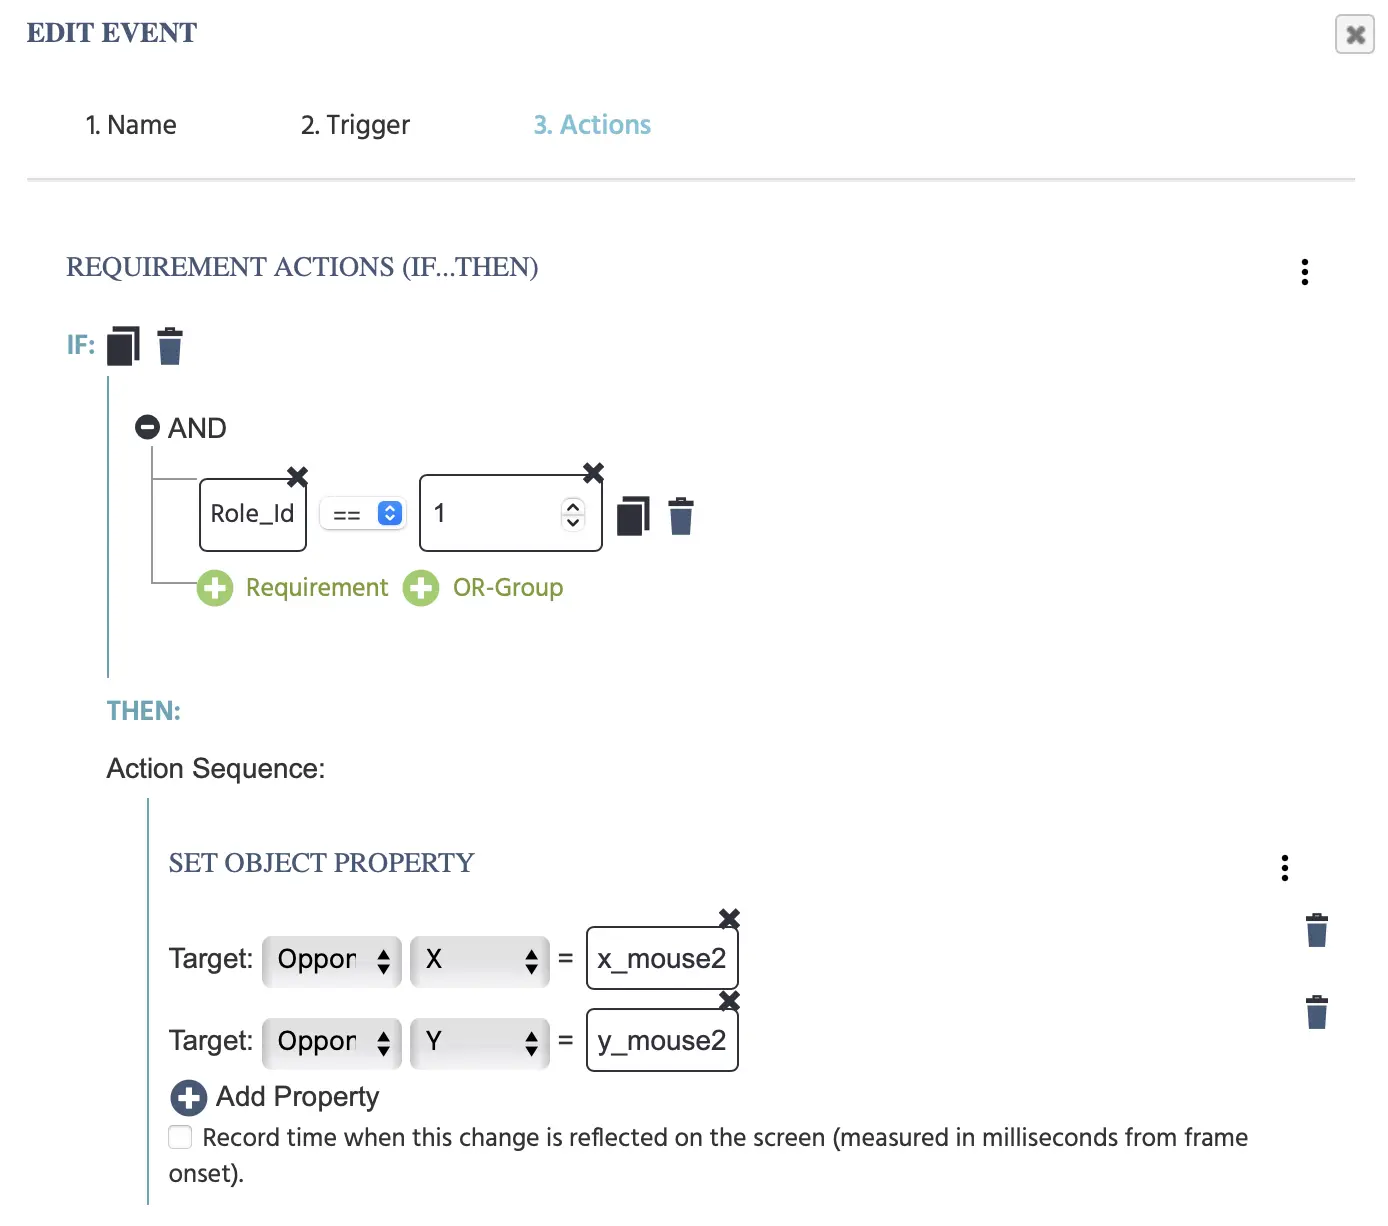
We do the same thing here. If you are Participant 1, then the Opponent object takes on the coordinates of the variables of Participant 2:
Conclusion
This demo shows two of the many ways that mouse coordinates can be used to update object properties in order to transmit cursor location in a multi-user study set up. You can use arrays
Demo Details: Inputting Values Step-By-Step
If you are still finding your way around Labvanced or just need some extra clarification, the sections below show you, step-by-step, how to implement certain commands and the steps you need to take using the menus to implement them:
- Specifying
Role_ID==1in a Requirement Action - Selecting the Mouse [X,Y] Array to be Recorded in a Variable for Mouse Tracking
- Using Arithmetic Operations to Set an Object Property
Specifying Role_ID==1 in a Requirement Action
In the demo above, this line appears frequently, so how can you get it like that?
First +Add Action and selection Control Actions → Requirement Actions (If…Then) because this is the context in how it frequently appears in this demo.
Next, + Requirement so you can specify the If Condition in greater detail.
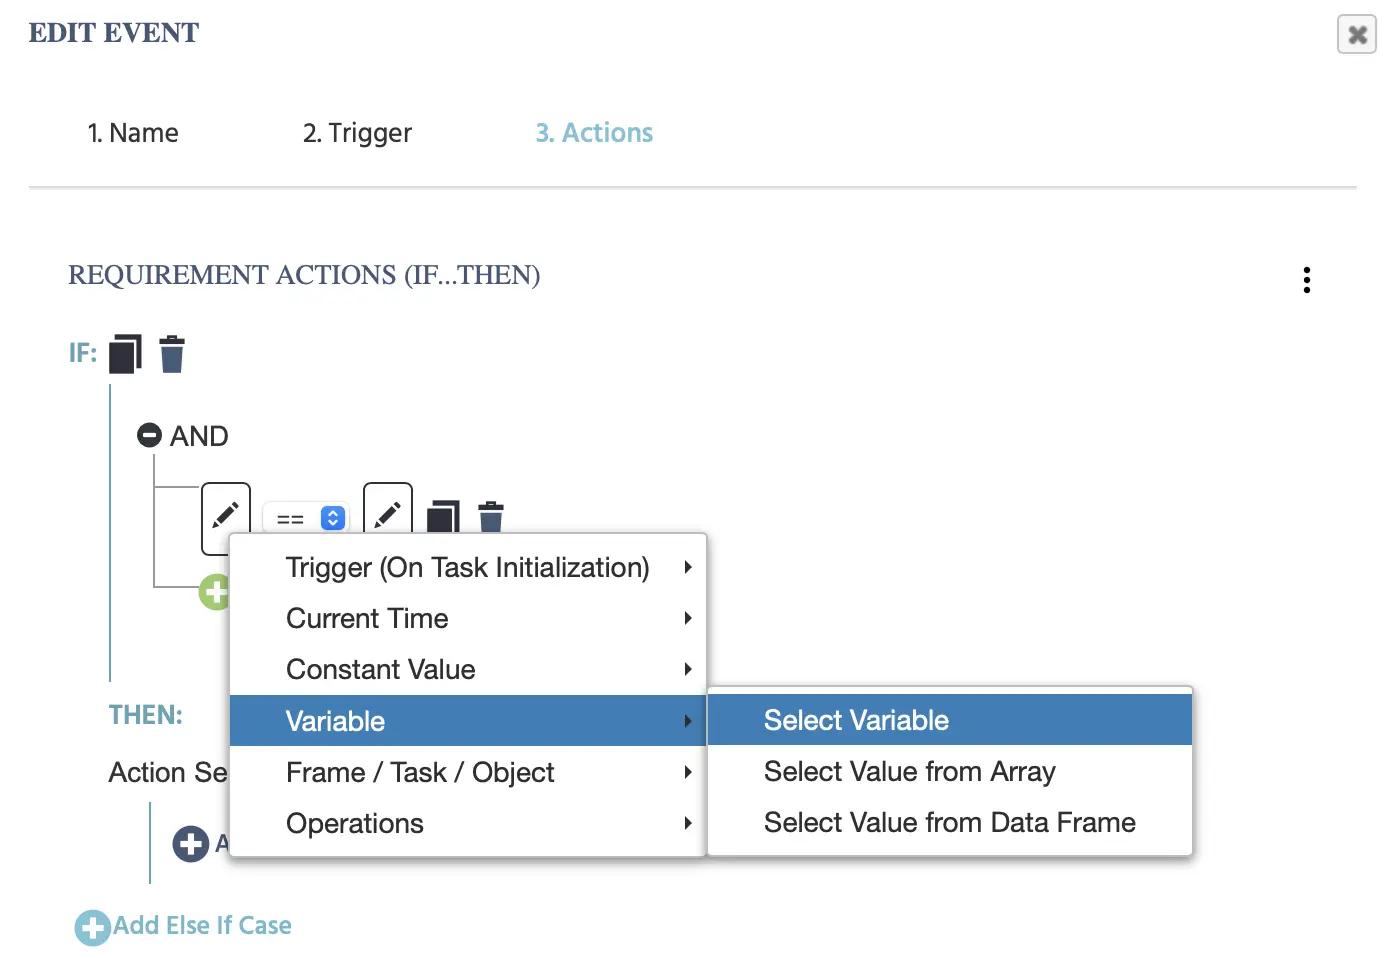
For the first pencil icon (formally known as The Value Select Menu) choose Variable → Select Variable in order to point to the Role_Id variable.
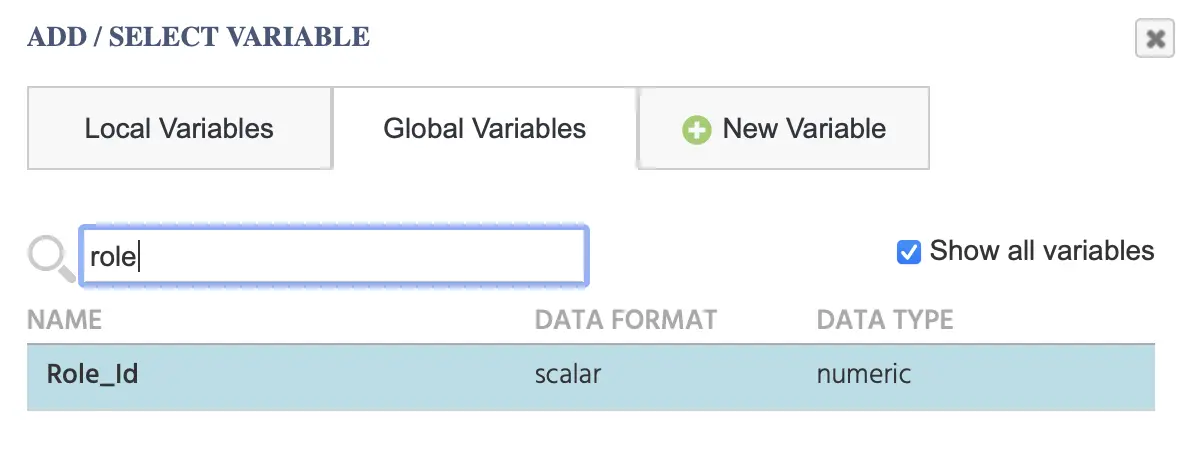
This will open the Variable menu where all local / global variables are stored. At the top panel, under Global Variables you will find the Role_Id variable. Select it.
Next, on the other pen icon, you need to specify the value of the participant's role id. So, go to Constant Value → Numeric.
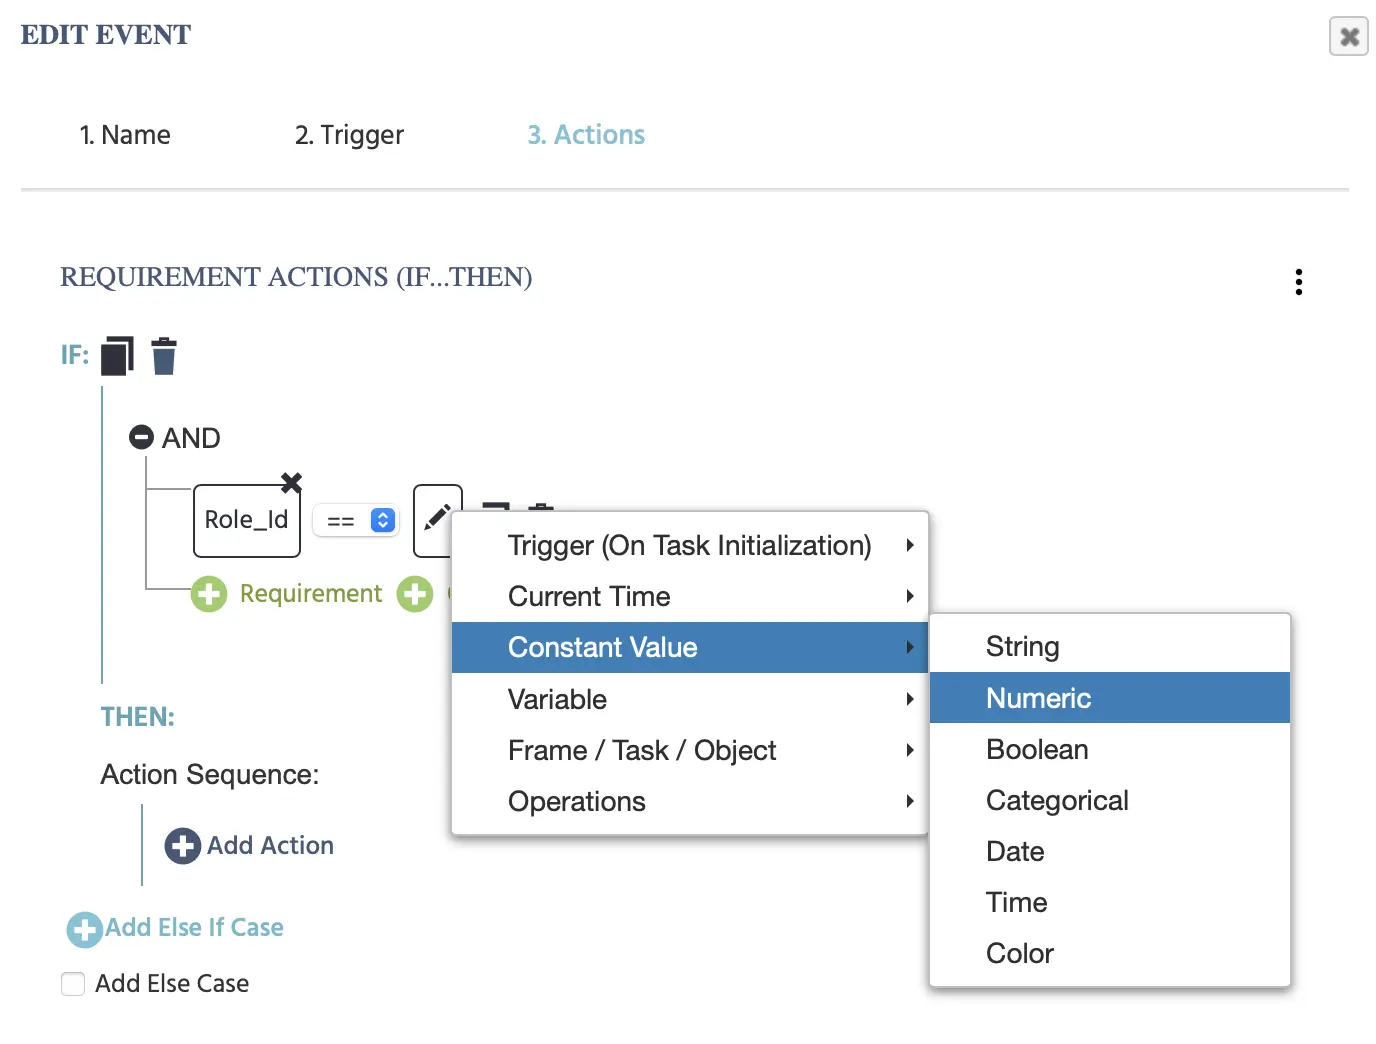
And simply type in the number 1. Ta-da!

Using Arithmetic Operations to Set an Object Property
Setting the cursor location is done by using the Set Object Property action, specifying the target object, its property, and then specifying the variable value that is to be used as the new value for the object property.

Select the Object Action:
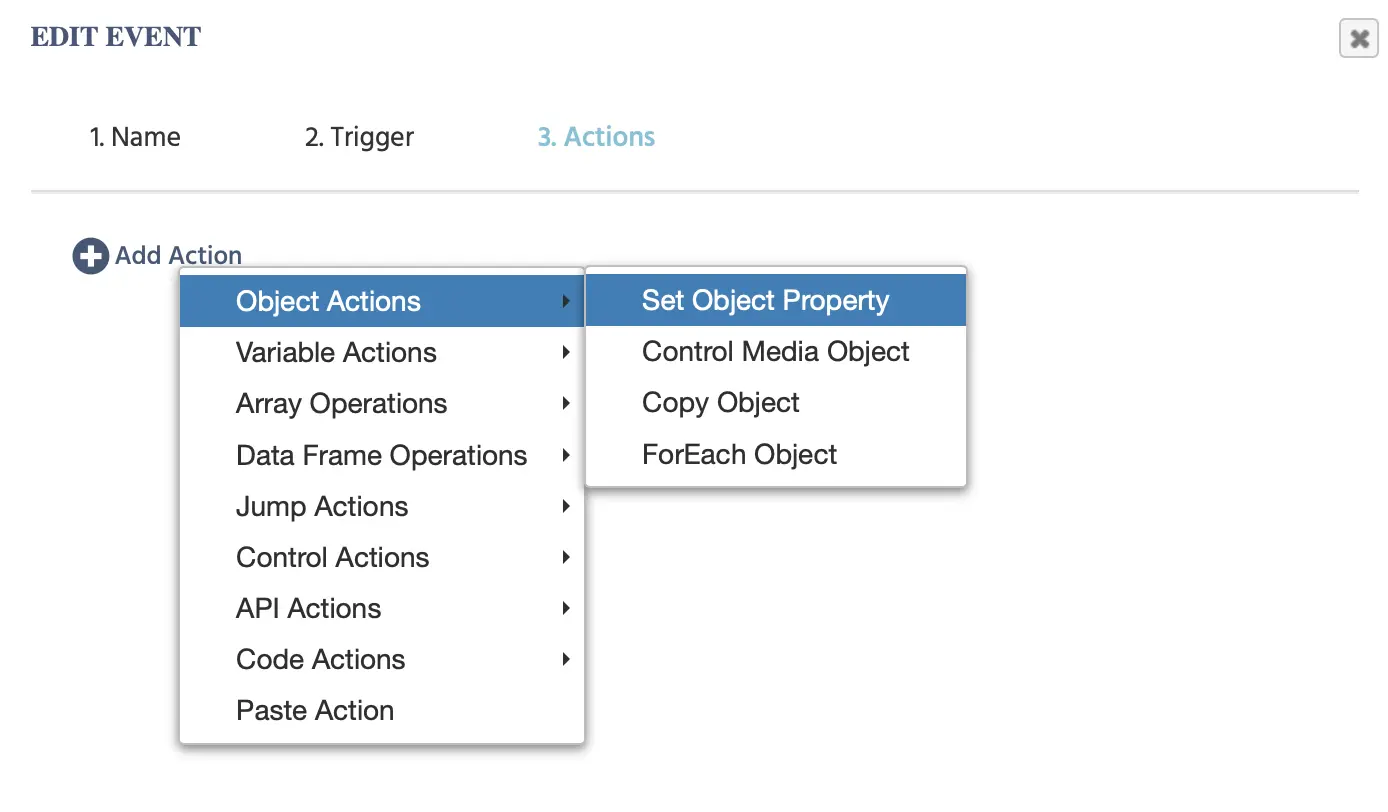
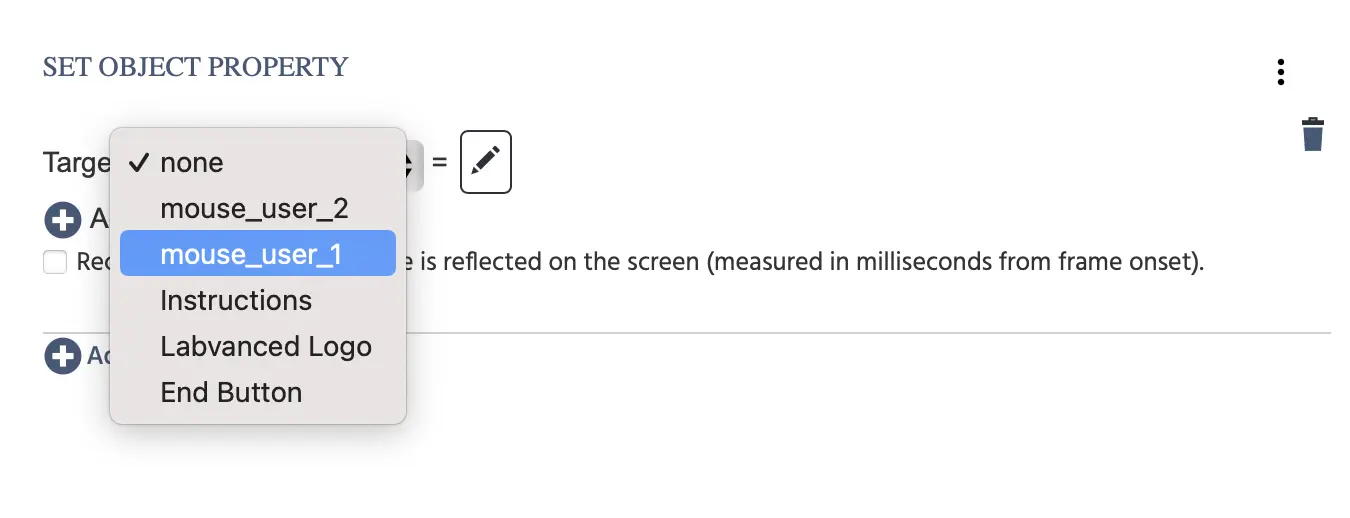
For the Target click the first none and select the first cursor object mouse_user_1 from the list. For the second list of the object properties, select the X option:
Then, click the pen icon. Choose Operations from the menu and select Arithmetic option:
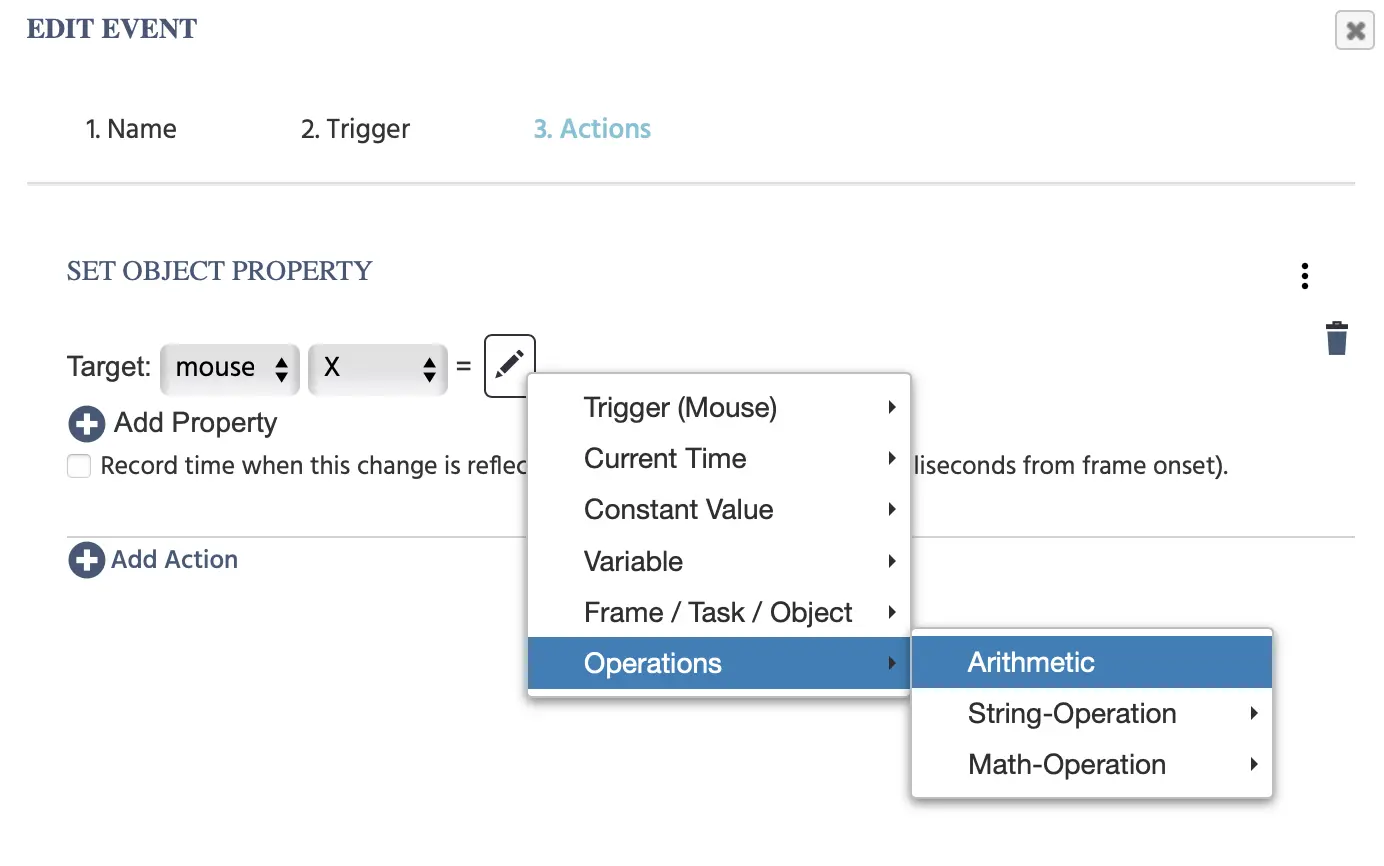
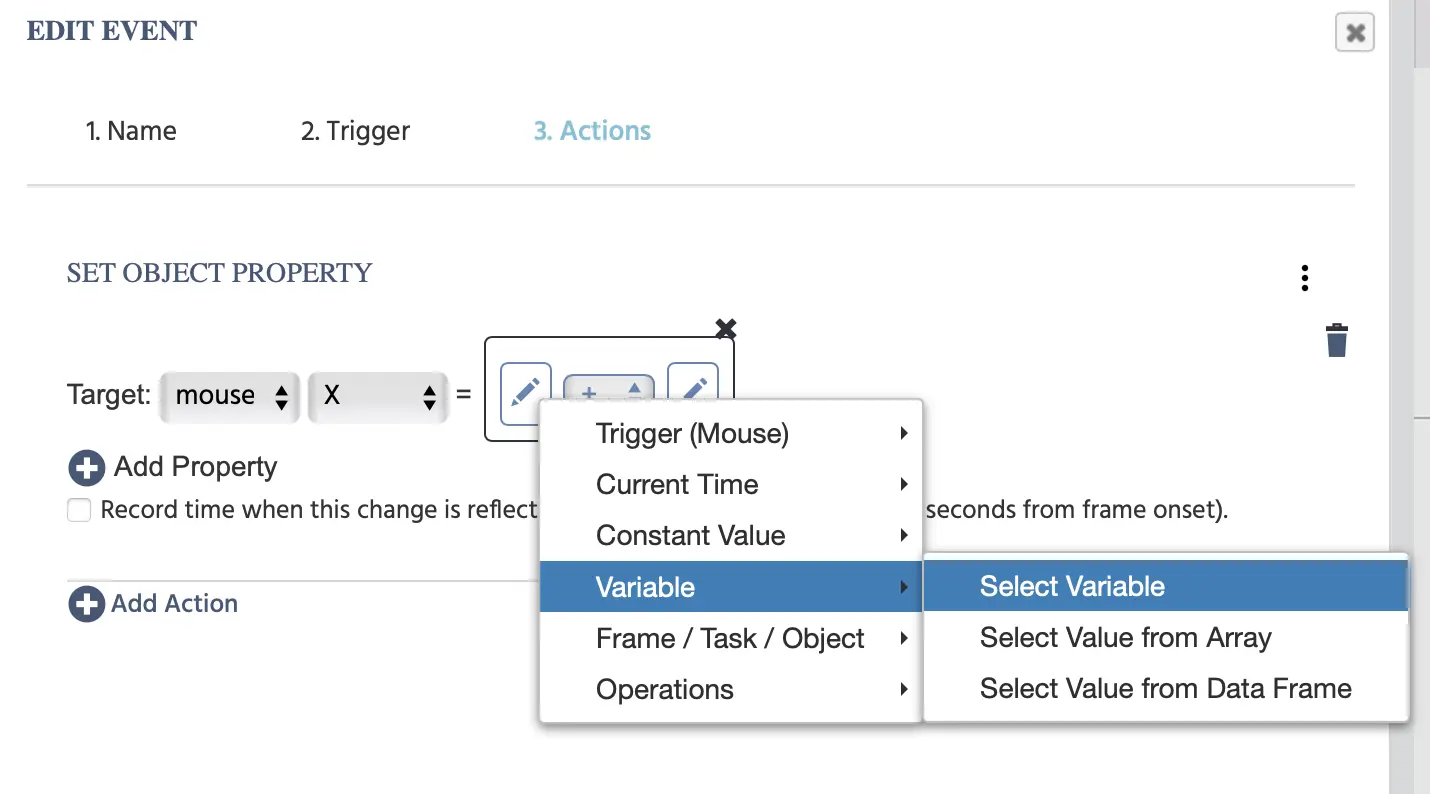
Click the first pen icon and choose Variable → Select Variable and a dialog box of the variables will appear from which you can select the x_mouse1 variable:
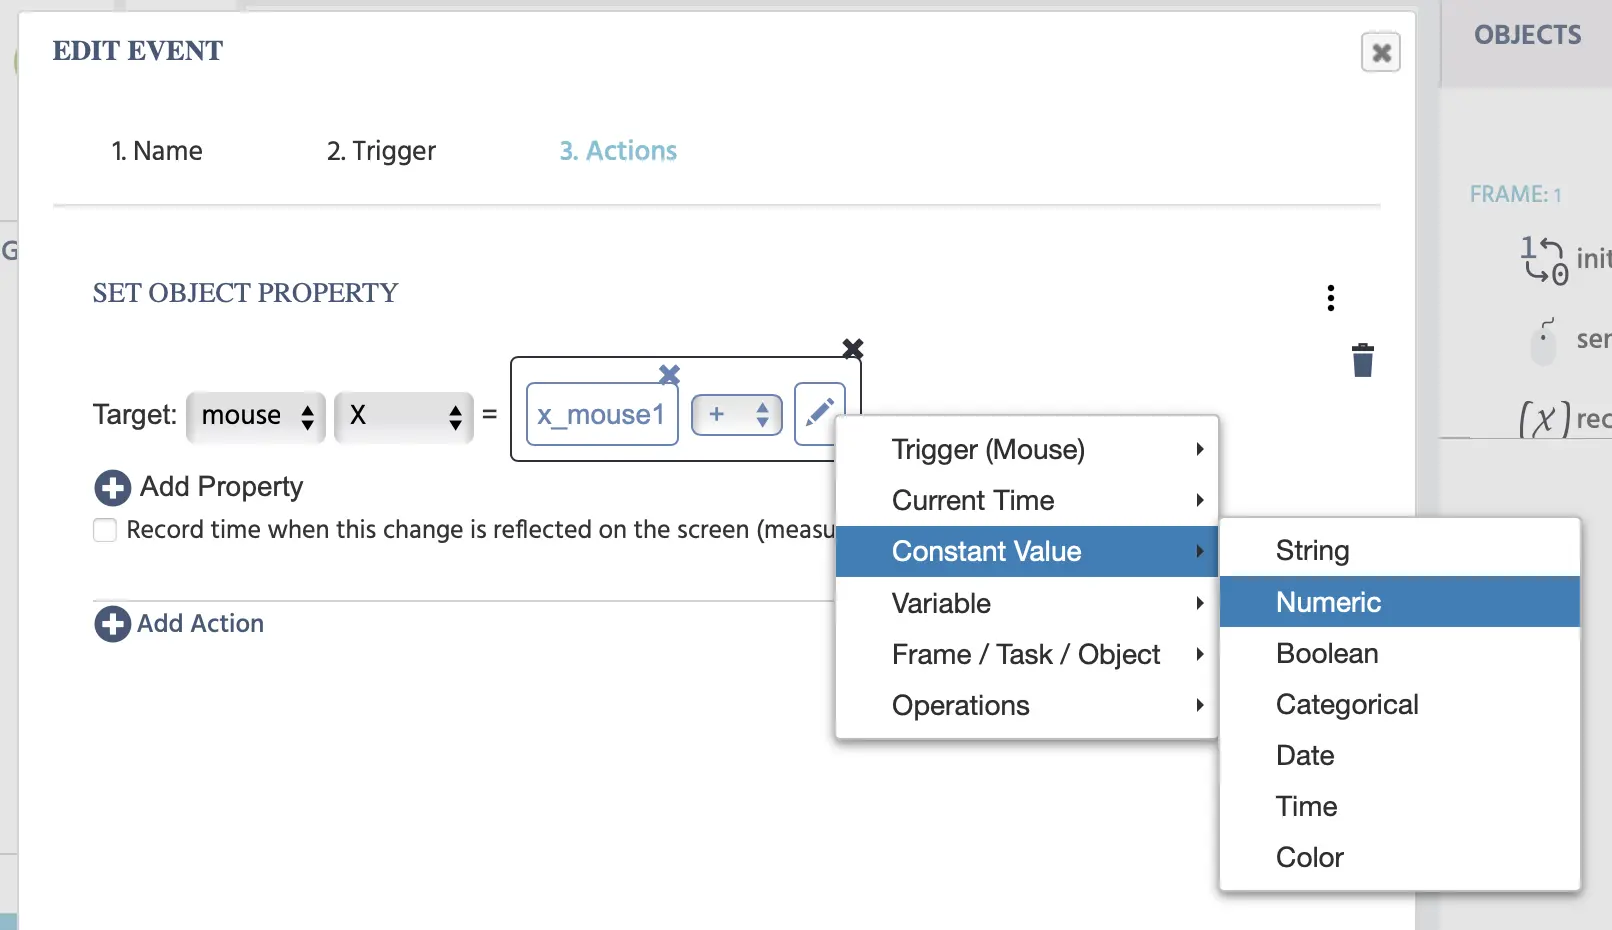
Then, click the second pen icon and choose Constant Value → Numeric and type in the number 5 in the field that appears.
Because this relates to the demo where the object is a combination of an image plus text, we need to offset the value by 5 points so that the object underneath is clickable:
Click the +Add Property underneath and indicate that the y_mouse1 variable will be assigned to the Y object property of the mouse_user_1 object.
