labvanced logoLabVanced
Contact
    • Remote Physiological Measurements
    • Eye Tracking
    • Head & Face-Tracking
    • Emotion Detection
    • Heart Rate Detection (rPPG)
    • Generative AI
    • Audio Transcription
    • EEG & Hardware Integrations
    • Decision Making
    • Reaction Times
    • Keyboard Inputs
    • Mouse Tracking
    • Mobile / Touch
    • Questionnaires
    • Gamepad / Joystick Integration
    • Audio Recordings
    • Audio Transcription
    • Video Recordings
    • Screen Recordings
    • Photos / Snapshots
    • Video Conferencing
    • Canvas Drawings
    • Build with AI
    • Build with Spreadsheets
    • Using the Experiment Editor
    • Coding
    • Creating Questionnaires
    • Balancing & Randomization
    • UX & Website Testing
    • Single Session Studies
    • Factorial Designs
    • Longitudinal & Multi-session Studies
    • Individual & Case Studies
    • Real-time Multi-user Studies
    • Interviews & Video Calls
    • Surveys & Questionnaires
    • Experience Sampling & Diaries
    • Classroom & Group Testing
    • Interventions & Clinical Trials
    • In the Browser
    • Mobile App
    • Desktop App
    • WebBridge Chrome Extension
    • Stroop Test
    • Flanker Task
    • N-back Task
    • Implicit Association Test
    • Trail Making Test
    • Digit Span
    • Corsi Block Tapping
    • Tower of London
    • Balloon Analog Risk Task
    • Preferential Looking
    • Browse more →
    • DASS-21
    • GAD-7
    • Rosenberg Self-Esteem Scale
    • PHQ-9
    • Ten-Item Personality Inventory
    • Big Five Personality Test
    • Adult ADHD Self-Report Scale
    • Browse more →
    • Building a Multi-user Study
    • Webcam Eye Tracking with AOIs
    • Website Frame Eye Tracking
    • Conditional Eye Tracking Opt-in
    • ChatGPT Study
    • Desktop App Study with EEG
    • Between-subjects Group Balancing
    • Building a Reading Study
    • Stroop Task
    • Lexical Decision Task
    • Browse more →
    Public Experiment Library
    • Arts Research
    • Clinical Psychology & Neuropsychology Medicine
    • Cognitive Psychology
    • Developmental Psychology
    • Behavioral Economics & Decision Science
    • Educational Research & Psychology
    • HCI & Human Factors
    • Linguistics & Language Sciences
    • Consumer & Marketing Research
    • Social & Personality Psychology
    • Sport & Movement Science
    • UX & Website Testing
    • Executive Functions
    • Language & Reading
    • Decision-Making & Reasoning
    • Attention
    • Overview
    • HCI & Human Factors
    • UX & Website Testing
    • Consumer & Marketing Research
    • White-Label App
    • PageGazer
    • Webcam vs. Lab Eye Tracking in InfantsAnna Banki & Gabriela Markova
    • Eye Tracking for Influencer MarketingDr. Alexander Edeling
    • Eye Tracking Infant Word ComprehensionDr. Giulia Calignano
    • Sentence Reading and Grammar JudgmentsDr. Jonathan Mirault
    • Regulating Emotions with MusicDr. Katrin Starcke
    • Game-Based Grammar Learning in ChildrenDr. Mireia Marimon
    • Gaze Cueing and AutismMax Soares Miehstein
    • Personality and Hearing in NoiseDr. Malte Wöstmann
    • All interviews →
    • Lab Notes
    • How to Cite Labvanced
    • Labvanced Platform Paper (2017)
    • Webcam Eye Tracking Validation (2024)
    • Webcam Eye Tracking Studies
    • Cognitive Psychology Studies
    • Developmental Psychology Studies
    • Linguistics Studies
    • See all publications →
    • Getting Started
    • Guide
    • Video Tutorials
    • Walkthroughs
    • Live Chat
    • Webinars & Onboarding Calls
    • AI Assistant
    • FAQ
    • Importing Templates Guide
    • Test Templates
    • Live Eye Tracking Metrics
    • Mouse Tracking Demo
    • ChatGPT Demo
    • Audio Recording Object Demo
    • Adding Image Stimuli Demo
    • Score & Feedback Demo
    • Browse all technical demos →
    • Timing Precision
    • Stimuli Presentation
    • Headphone Checks
    • Bot Checks
    • Participant Management
    • Comparisons
    • Research Blog
    • Prolific Integration
    • CloudResearch Integration
    • Sona Systems Integration
    • BeSample Integration
    • Panelabs Integration
    • Clickworker Integration
    • Labvanced Webhook API
    • Labvanced REST API
    • About Us
    • Newsletter Archive
    • Terms & Conditions
    • Data Security & Data Privacy
    • Technical & Organisational Measures
    • Accessibility
    • W-8BEN-E Form
    • Data Processing Agreement Template
    LinkedInYouTubeDiscord
    • Individual
    • Lab
    • Department / Consortium
    • Teaching
    • Campus
    • Commercial
    • Browse recording top-ups →
    • Browse AI token top-ups →
    • Overview
    • Study Building
    • Subject Recruitment
    • Dedicated Support
    Checkout
  • Contact
    • EN
      • 中國人
      • Deutsch
      • Français
      • Español
      • English
      • 日本語
    • Logout
    • Loginlogin icon
    Platform
    Labvanced makes it easy to implement the most advanced study design and reliably collect your data.
    Biosignals & AI
    Remote Physiological MeasurementsEye TrackingHead & Face-TrackingEmotion DetectionHeart Rate Detection (rPPG)Generative AIAudio TranscriptionEEG & Hardware Integrations
    Behavioral Recordings
    Decision MakingReaction TimesKeyboard InputsMouse TrackingMobile / TouchQuestionnairesGamepad / Joystick Integration
    Media Recordings
    Audio RecordingsAudio TranscriptionVideo RecordingsScreen RecordingsPhotos / SnapshotsVideo ConferencingCanvas Drawings
    Implementation Techniques
    Build with AIBuild with SpreadsheetsUsing the Experiment EditorCodingCreating QuestionnairesBalancing & RandomizationUX & Website Testing
    Study Formats

    Your study can take whatever format your research needs. Here are a few popular examples.

    Single Session StudiesFactorial DesignsLongitudinal & Multi-session StudiesIndividual & Case StudiesReal-time Multi-user StudiesInterviews & Video CallsSurveys & QuestionnairesExperience Sampling & DiariesClassroom & Group TestingInterventions & Clinical Trials
    Where Studies Run

    Run your study online in the browser, on mobile or tablet with the mobile app, or in-lab with the desktop app.

    In the BrowserMobile AppDesktop AppWebBridge Chrome Extension
    Tests
    Explore cognitive tests, questionnaires, walkthroughs, and our public experiment library: a starting point for your next study.
    Popular Cognitive Tests
    Stroop TestFlanker TaskN-back TaskImplicit Association TestTrail Making TestDigit SpanCorsi Block TappingTower of LondonBalloon Analog Risk TaskPreferential Looking
    Browse more →
    Questionnaires & Scales
    DASS-21GAD-7Rosenberg Self-Esteem ScalePHQ-9Ten-Item Personality InventoryBig Five Personality TestAdult ADHD Self-Report Scale
    Browse more →
    Public Experiment Library

    Take a look at what other researchers in the community are doing through our extensive, open catalog of shared studies.

    Open the public library →
    Walkthroughs

    Step-by-step builds of complete studies, from a blank project to a running experiment, that you can follow along or adapt.

    Building a Multi-user StudyWebcam Eye Tracking with AOIsWebsite Frame Eye TrackingConditional Eye Tracking Opt-inChatGPT StudyDesktop App Study with EEGBetween-subjects Group BalancingBuilding a Reading StudyStroop TaskLexical Decision Task
    Browse more →
    Research
    One platform for students, academics, and industry researchers studying human behavior.
    Harvard UniversityStanford UniversityCambridge UniversityUCLNYUMax Planck InstituteUCLATU Munich

    Trusted by researchers at 1,500+ universities worldwide

    Academic Research
    Arts ResearchClinical Psychology & Neuropsychology MedicineCognitive PsychologyDevelopmental PsychologyBehavioral Economics & Decision ScienceEducational Research & PsychologyHCI & Human FactorsLinguistics & Language SciencesConsumer & Marketing ResearchSocial & Personality PsychologySport & Movement ScienceUX & Website Testing
    Research Areas
    Executive FunctionsLanguage & ReadingDecision-Making & ReasoningAttention
    Industry / Commercial
    OverviewHCI & Human FactorsUX & Website TestingConsumer & Marketing ResearchWhite-Label AppPageGazer
    Researcher Interviews

    Conversations with researchers about the studies they ran with Labvanced, what worked, and what they learned.

    Webcam vs. Lab Eye Tracking in InfantsAnna Banki & Gabriela MarkovaEye Tracking for Influencer MarketingDr. Alexander EdelingEye Tracking Infant Word ComprehensionDr. Giulia CalignanoSentence Reading and Grammar JudgmentsDr. Jonathan MiraultRegulating Emotions with MusicDr. Katrin StarckeGame-Based Grammar Learning in ChildrenDr. Mireia MarimonGaze Cueing and AutismMax Soares MiehsteinPersonality and Hearing in NoiseDr. Malte Wöstmann
    All interviews →
    Our Research
    Lab NotesHow to Cite Labvanced
    Peer Reviewed Studies

    A selection of peer-reviewed work built on Labvanced: our own platform and validation papers, and studies by the research community grouped by area. Hundreds more are listed on the full publications page.

    Labvanced Platform Paper (2017)Webcam Eye Tracking Validation (2024)Webcam Eye Tracking StudiesCognitive Psychology StudiesDevelopmental Psychology StudiesLinguistics Studies
    See all publications →
    Resources
    Valuable resources to help you learn the platform, stay updated, and more.
    Documentation
    Getting StartedGuideVideo TutorialsWalkthroughs
    Support
    Live ChatWebinars & Onboarding CallsAI AssistantFAQ
    Templates & Demos

    These are a few popular examples. Browse our guide and a selection of technical demos to get started with implementation.

    Importing Templates GuideTest TemplatesLive Eye Tracking MetricsMouse Tracking DemoChatGPT DemoAudio Recording Object DemoAdding Image Stimuli DemoScore & Feedback Demo
    Browse all technical demos →
    Methodology
    Timing PrecisionStimuli PresentationHeadphone ChecksBot ChecksParticipant ManagementComparisonsResearch Blog
    Integrations & APIs
    Prolific IntegrationCloudResearch IntegrationSona Systems IntegrationBeSample IntegrationPanelabs IntegrationClickworker IntegrationLabvanced Webhook APILabvanced REST API
    Company & Legal
    About UsNewsletter ArchiveTerms & ConditionsData Security & Data PrivacyTechnical & Organisational MeasuresAccessibilityW-8BEN-E FormData Processing Agreement Template
    LinkedInYouTubeDiscord
    Pricing
    Our licenses and additional services at a glance.
    Licenses
    IndividualLabDepartment / ConsortiumTeachingCampusCommercial
    Top-Ups

    Need more recordings for your lab or your own research? Simply use one of these recording top-up packages.

    Browse recording top-ups →

    Need more AI tokens for the AI assistant and study translations? Simply use one of these AI token top-up packages.

    Browse AI token top-ups →
    Additional Services

    Hire Labvanced’s expert team to quickly bring your project to the level of rigor it needs.

    OverviewStudy BuildingSubject RecruitmentDedicated Support
    Checkout

    Ready to purchase a license or top-up? Head straight to checkout.

    Go to checkout →
    • 中國人
    • Deutsch
    • Français
    • Español
    • English
    • 日本語
    • Getting Started
    • Guide
      • GETTING STARTED

        • Task Editor
        • Frames
          • Canvas Frame
          • Page Frame
          • Website Frame
          • Overlays & Dialogs | Labvanced
        • Trial Timeline
        • Stimulus Presentation
        • Correctness of Response
        • Objects
        • Events
        • Variables
        • Task Wizard
        • AI Assistant
        • Trial System
        • Experiment Design
          • Creating a Study
          • Importing Templates in Labvanced
          • Data Frame Patterns
          • Multi-user Experiment Design
          • Longitudinal Experiment Design
      • FEATURED TOPICS

        • Randomization & Balance
        • Eye Tracking
          • Presenting Stimuli in an Eye Tracking Task
          • How to Choose Eye Tracking Calibration Settings
          • Setting Up Eye Tracking in a Task
          • Recording and Exporting Gaze Data
          • Using Shapes as Areas of Interest (AOI) for Eye Tracking
          • The Participant Calibration Experience
        • Web Bridge
          • Selecting Website AOIs | Anchor, Adjust, and Verify AOI Tracking
          • Tracking Mouse Behavior on a Website AOI | Web Bridge Guide
        • Questionnaires
        • Desktop App
        • Sample Studies
        • Participant Recruitment
        • API Access
          • REST API
          • Webhook API
          • WebSocket API
        • Other Topics

          • Precise Stimulus Timings
          • Multi User Studies
          • Head Tracking in Labvanced | Guide
      • MAIN APP TABS

        • Overview: Main Tabs
        • Dashboard
        • My Studies
        • Shared Studies
        • My Files
        • Experiment Library
        • My Account
        • License & Services
      • STUDY TABS

        • Overview: Study-Specific Tabs
        • Study Design
          • Tasks
          • Blocks
          • Sessions
          • Groups
        • Task Editor
          • Task Controls
          • The Trial System
          • Frame Types
          • Objects
          • Object Property Tables
          • Variables
          • System Variables Table
          • The Event System
          • Text Editor Functions
          • Eye Tracking Options in the Task Editor
          • Head Tracking in a Task
          • Multi-User Studies
        • Settings
        • Variables
        • Media
        • Texts & Translate
        • Launch & Participate
        • Subject Management
        • Dataview and Export
    • Video Tutorials
      • Video Overview
      • Getting Started in Labvanced
      • Creating Tasks
      • Element Videos
      • Events & Variables
      • Advanced Topics
    • Walkthroughs
      • Introduction
      • Stroop Task
      • Lexical Decision Task
      • Posner Gaze Cueing Task
      • Change Blindness Flicker Paradigm
      • Eye-tracking Sample Study
      • Infant Eye-tracking Study
      • Attentional Capture Study with Mouse Tracking
      • Rapid Serial Visual Presentation
      • ChatGPT Study
      • Eye Tracking Demo: SVGs as AOIs
      • Multi-User Demo: Show Subjects' Cursors
      • Gamepad / Joystick Controller- Basic Set Up
      • Desktop App Study with EEG Integration
      • Between-subjects Group Balancing and Variable Setup
      • Building a Multi-user Study
      • Website Frame Eye Tracking Walkthrough
      • Conditional Webcam Eye Tracking
      • Text Segmentation Study Building
      • Building a Study with AI
    • FAQ
      • Features
      • Support Policy & Guidelines
      • Security & Data Privacy
      • Licensing
      • Precision of Labvanced
      • Programmatic Use & API
      • Using Labvanced Offline
      • Troubleshooting
      • Study Creation Questions

    ChatGPT Study | Walkthrough

    Overview

    In this ChatGPT demo, which you can also import into your account and use as a template for building your ChatGPT study, you can see that when a participant writes a prompt, the answer from ChatGPT appears right in Labvanced!

    As shown below, there is a chat area where all the history is shown and an input field where the participant writes in their prompt:
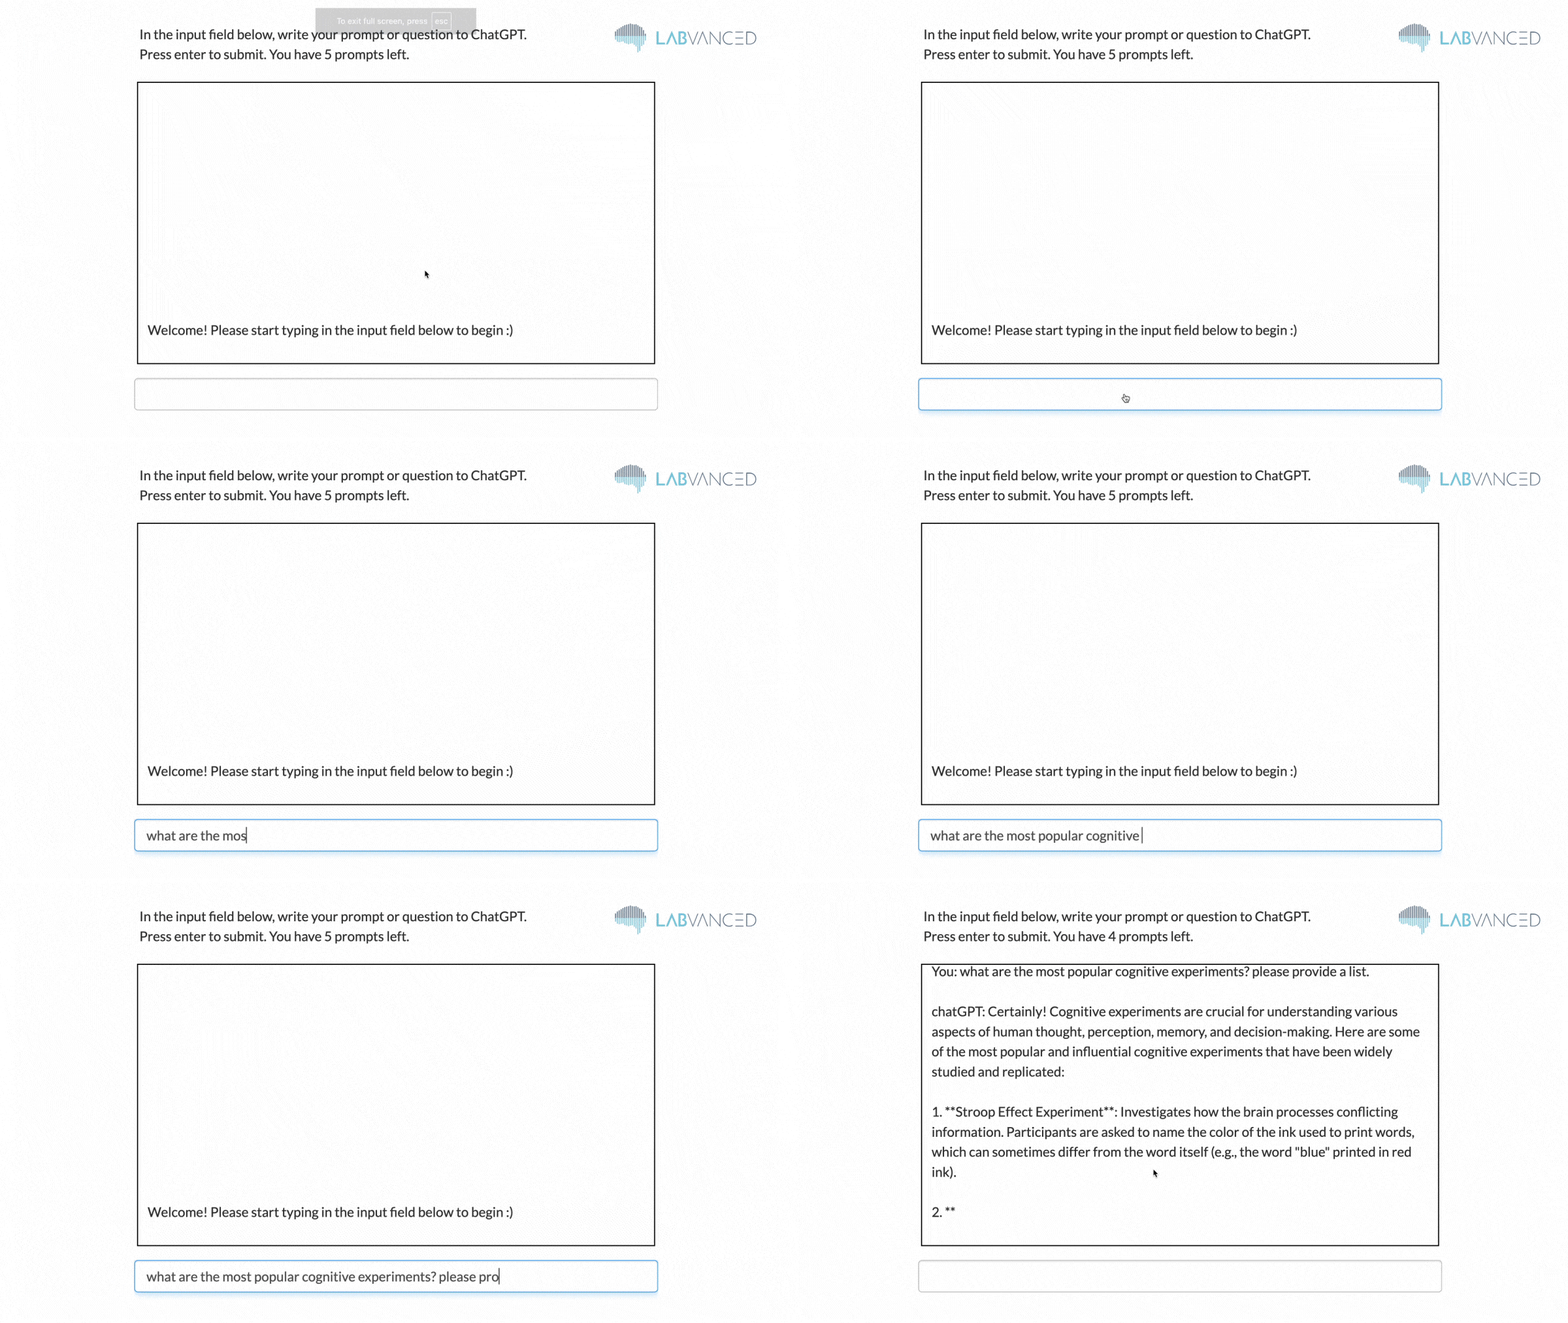
    user input trigger menu

    This is how the demo looks like in action together with the recorded data which is shown at the end of the video:

    In this walkthrough, we will discuss step-by-step how to set up a ChatGPT study so you can get familiar with its contents and start incorporating this powerful feature in your next study!

    Note: In order to establish a connection with ChatGPT in your study, you need to input your own, unique API key in the Settings tab under Special Features dedicated to Open AI Integration.

    Variables in the ChatGPT Task

    Variables hold and store recorded data, including string and numeric values. Very often, researchers that are comfortable with using Labvanced, will create a variable right on the spot, like when creating an event.

    For the purposes of this demo, we will list the variables in advance as described by the upcoming section:
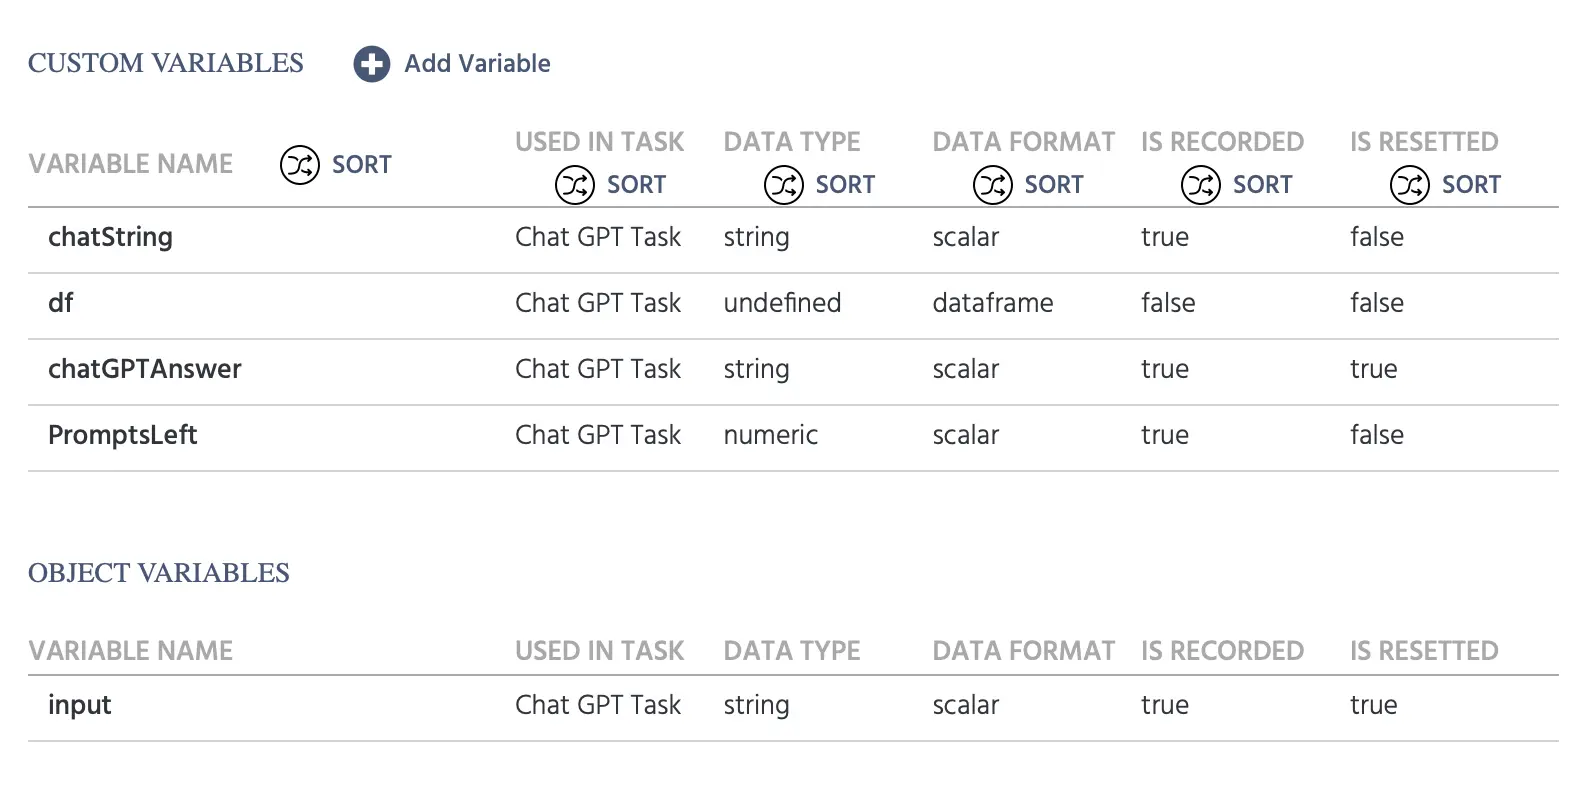
    variable table listing the custom variables used in this ChatGPT Study
    Variable NameDescription
    chatStringThis is the variable that will hold the entire chat string and essentially format the line in the chat that shows the prompt from the participant and the message from ChatGPT which will be explained in greater detail in the events section below.

    Additional Variable Settings:
    • Start Value: Welcome! Please start typing in the input field below to begin : ) <br><br>
    • Record type: Final value only
    dfThis is a 2-column .csv file that is uploaded as a data frame variable.
    chatGPTAnswerThis variable is automatically recognized by the system when you call on it [explained further down]. No need to create it at this point but we are listing it as it will be mentioned later.

    Additional Variable Settings:
    • Record type: Final value only
    PromptsLeftFor this demo, we want to allot participants 5 prompts. So we need to create a numeric variable that starts off with a value of 5 and then use events to decrease that counter each time a prompt is sent over to ChatGPT.

    Additional Variable Settings:
    • Start Value: 5
    • Record type: Final value only
    InputThis variable will be created as soon as you enter the input field object onto the editor. This stores the value of what the participant types in as their prompt to ChatGPT.

    Additional Variable Settings:
    • Record type: Final value only

    Add Objects to the Canvas

    To set up the chat interface and present the instructions, several different types of objects need to be added to the canvas, as will be described below.
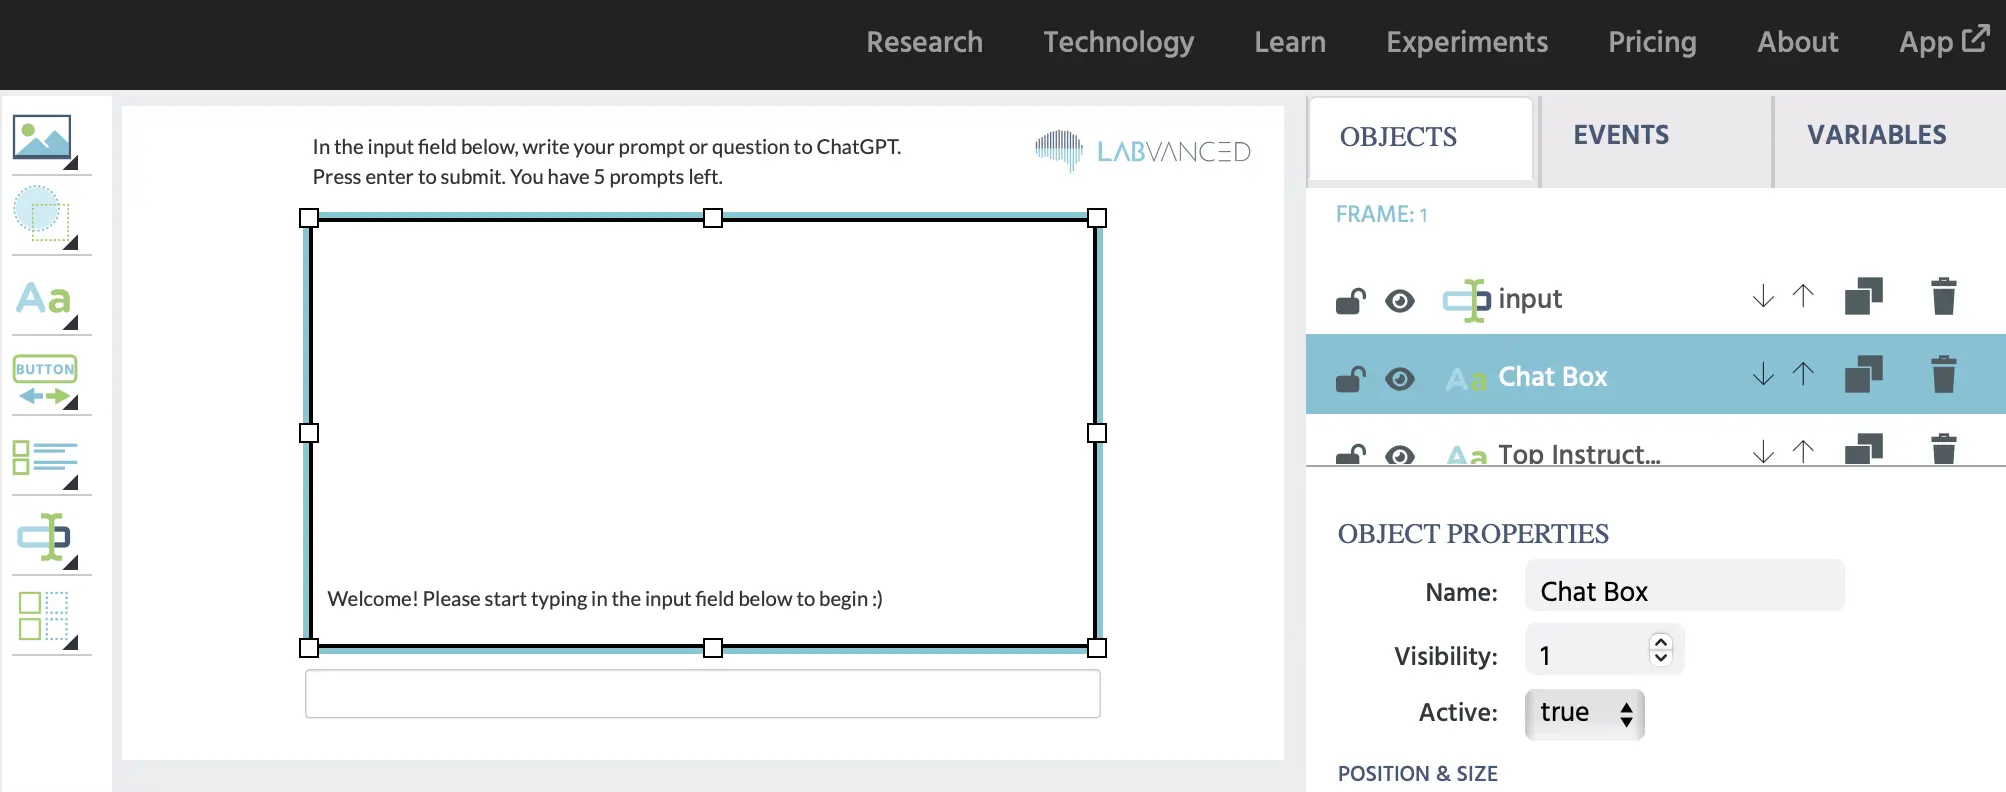
    View of the objects on the canvas frame for the ChatGPT study

    Display Text Objects

    Display text objects are necessary for this ChatGPT study in order to:

    1. Present instructions
    2. Show the chat history on the screen

    In this demo we have created and named the following display elements:

    Display Text NameDescription
    Chat BoxThe Chat Box is essentially where all of the prompts from the participant and the answers from ChatGPT will appear in a chat-like format. Inside this element, there is a linked variable called chatString that will display the chat strings from the participant and the ChatGPT answers.

    Directions: Add the display element, resize it to be large, change the placeholder text to say something else like ‘text’, highlight it, in the text editor click the red [x] at the top and select the ChatString variable from the menu. The Start value text will now appear.
    Top InstructionsThe Top Instructions contain the instructions for the participant and include a linked variable called PromptsLeft that will show how many prompts the participant has left to use.

    Creating a Chat Box Effect

    Before we dive in deep, let’s talk about the chat box where the conversation will be displayed.

    As Labvanced is an app that works in the browser, it renders from the top of the screen to the bottom. This influences how information is presented. In order to create a chat-like effect, we have to input a CSS command for the Chat Box object in order for the chat text to be reversed, with newer text being displayed at the bottom (we want this because this is how chat looks like in real life with the newer messages appearing at the bottom).

    To create this effect, you simply select the Chat Box object and on the right panel where the object properties are listed, scroll down to the area for Change CSS Properties and insert this snippet of code: p{ height: 300px; overflow: auto; display: flex; flex-direction: column-reverse; padding: 10px }

    This is accomplished with the column-reverse CSS style option which essentially reverses the flow of the text, ultimately showing the newer message at the bottom of the chat, instead of the top.

    This should look like this:
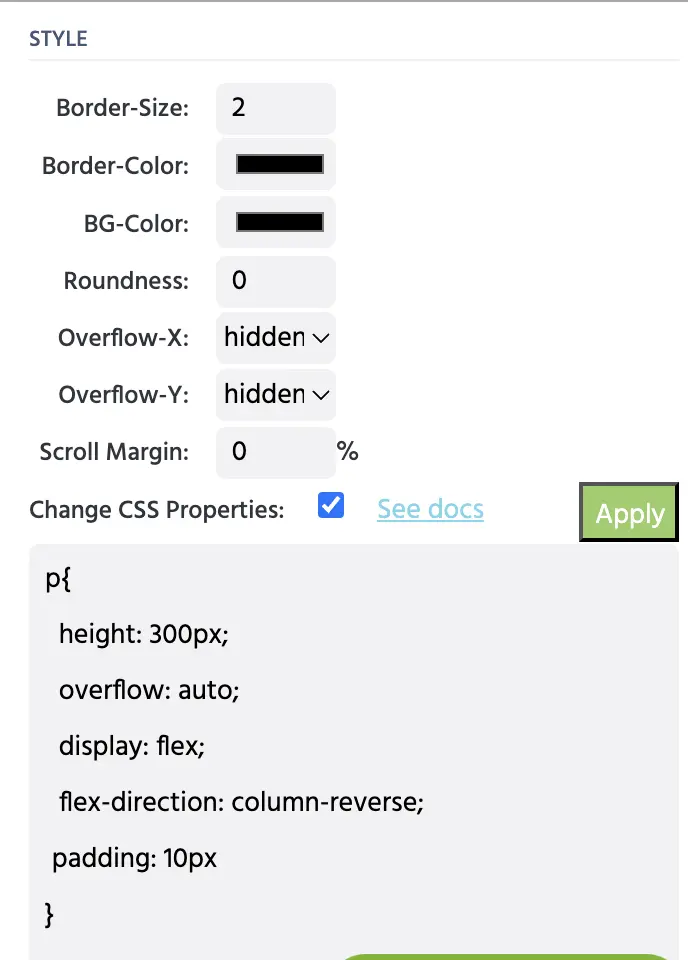
    The object properties in the side menu for inputting code to create a chat like effect.

    As soon as you input this snippet of code, the name of the ChatString variable will jump to the bottom of the object.

    Using this same Object Properties panel, you can also also specify the style of the chat box by assigning a Border-Size and Border-Color which, in the example above, has the Border-Size set to 2 and the Border-Color as black.

    Starting Value: Text Inside the Chat Box

    Generally speaking, when someone accesses ChatGPT, there is some kind of prompt message, along the lines of ‘Hi, how can I assist you today?' You can add such a starting message by accessing the created variable (that is linked within the Chat Box object) and giving it a Start Value by typing it in under the Variable Properties.
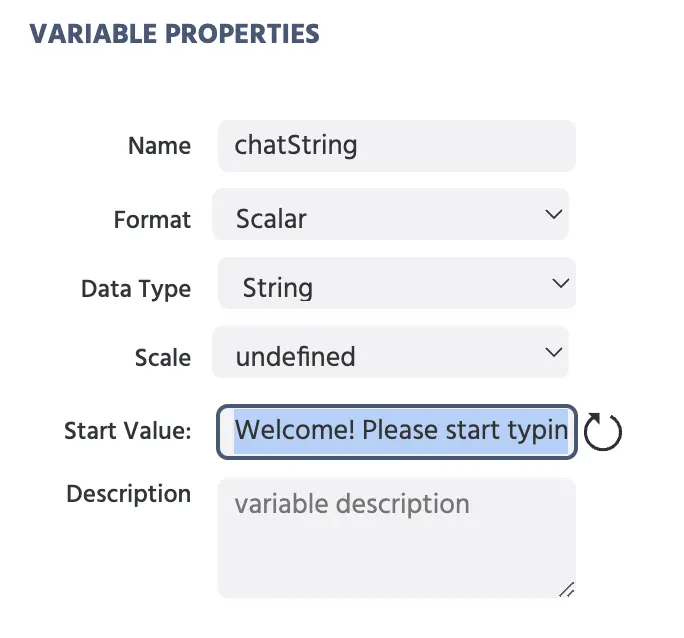
    Input a start value in a variable.

    As shown above, we use the following starting message in this demo: Welcome! Please start typing in the input field below to begin 😃 <br><br>

    Note: The <br> is an HTML tag for creating a line break in the text so that a new line is created when a new line of the chat is created and appended within the chat box.

    Input Field

    The input field is where the participant will write their prompt which will be sent to ChatGPT. To create one, simply insert an input object from the object panel on the side of the editor.

    Upon inserting it, you will be prompted to name the variable that is associated with this object. For this demo, we named this object input.

    IMPORTANT: Also, to further control the options associated with this particular object, under the Object Properties right-side panel, when this object is selected, make sure that the following options are indicated:

    • Show Question Header: option is deselected
    • Input type is selected to be text.
    • Focused is marked as true which will make the typing field active (ie. the participant doesn’t have to click in it every time in order to be able to type).

    Events Overview

    Events are necessary in this ChatGPT study in order to accomplish the following actions:

    1. Display and send the participant’s prompt to ChatGPT
    2. Receive and display the ChatGPT answer
    3. Record the chat strings (written by the participant and created by ChatGPT)
    4. Progress to the next trial

    For the purposes of this walkthrough, we created and named two main events under which the above actions will be addressed:

    • Outgoing event: ie., sending a message to ChatGPT and displaying it in the chat
    • Incoming event: ie., receiving a message from ChatGPT and displaying it in the chat

    OUTGOING EVENT

    The outgoing event refers to actions that will happen when the participant sends out his inquiry to ChatGPT, ie. it’s the information that is outgoing from Labvanced and to OpenAI.

    With this event we aim to:

    1. Present the written text from the input field in the chat area
    2. Save the participant’s written prompt as variable data
    3. Send it to ChatGPT

    Trigger

    The trigger that activates this event is the Enter on Input trigger type with the specific target being the input object we created previously. Thus, when the participant presses enter while using this object, this event will trigger.
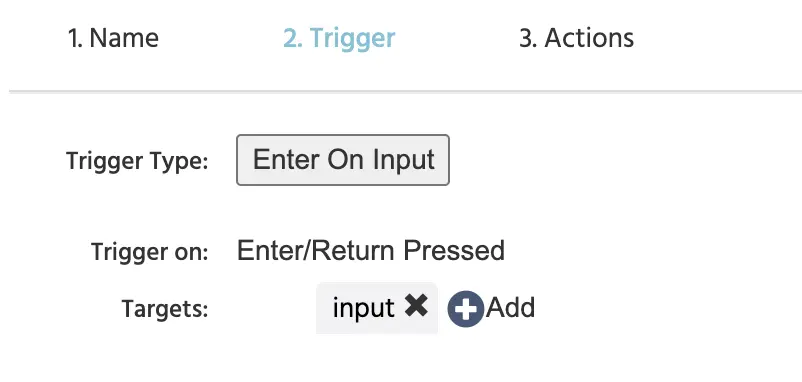
    The enter on input trigger

    Actions

    Upon specifying the above, we move on to define the actions that occur as a result of this trigger.

    Together, this variable will package the participant’s query (the input) into a chat-like format by preceding it with the text ‘You:’ and then adding a breaking space in order to start a new line.
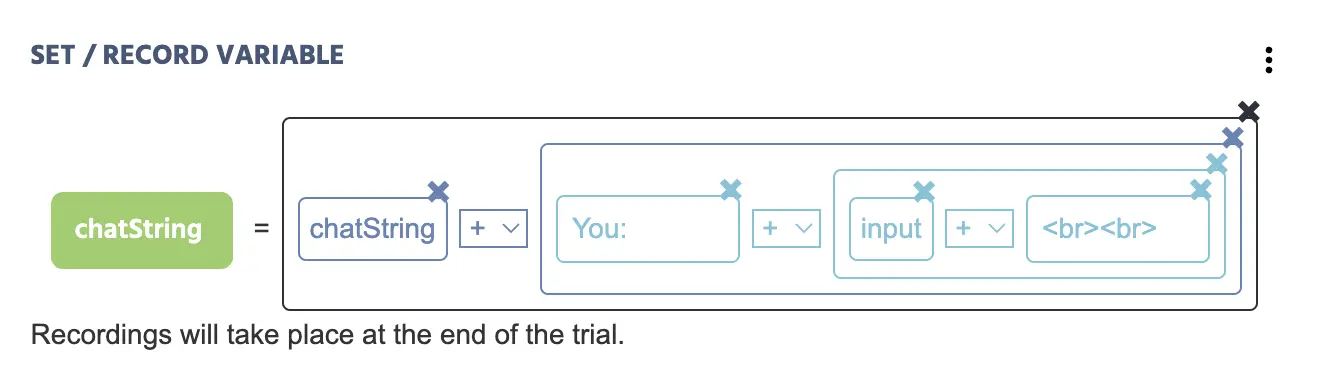
    Setting up the chatstring variable to record the chat exchange in a ChatGPT study.

    • The Set/Record Variable action contains the chatString variable that we have created previously.
    • There are several Arithmetic operations within it which essentially create the effect of a chat. When combining string elements with the (+) you are appending and making the string longer by combining variables and values.
    • Here is an explanation of the values within this arithmetic operation:
      • ChatString: Calls on the specific variable and then the rest that follows will append to it.
      • You: A constant string value that you just type in to give the participant their label.
      • input: The Variable named input ie. what the participant typed into the input field will now display here in the chat box.
      • <br><br>: A constant string value that is how a new line is created using the HTML <br>.

    The second action we have in this event is the Send to OpenAI action which utilizes an API to send what the participant wrote (ie. the input variable’s contents) to OpenAI.
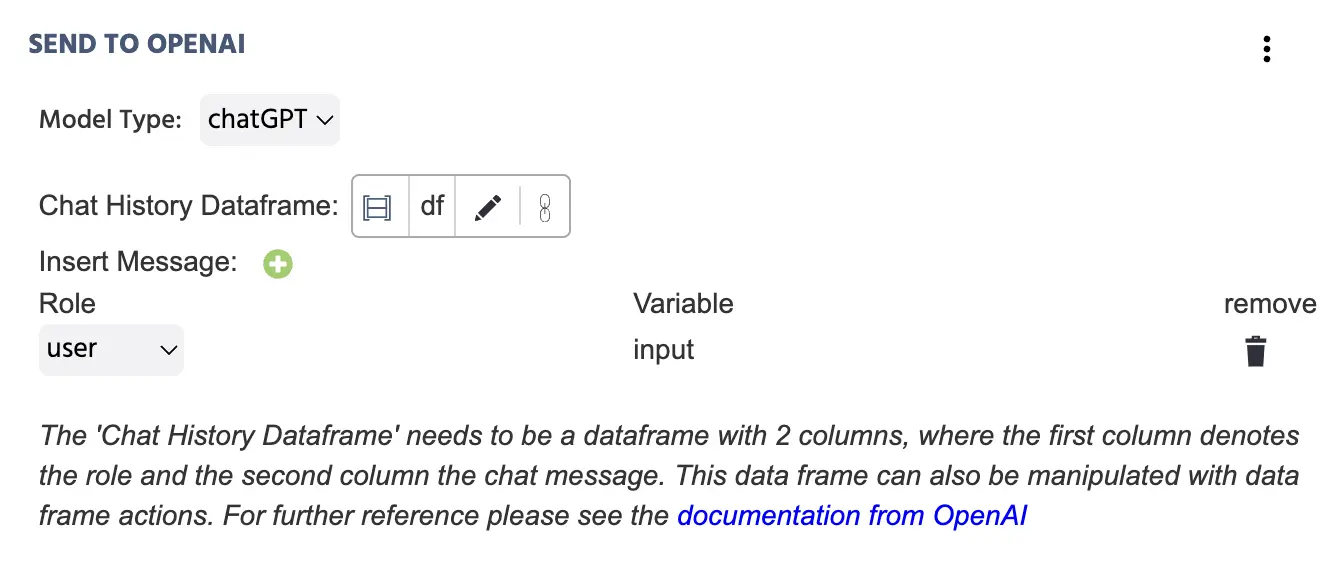
    Send to OpenAI action which utilizes an API to send what the participant wrote

    We also want to decrease the variable value of PromptsLeft by 1 (remember at the beginning we allotted the participant to be able to send 5 prompts).
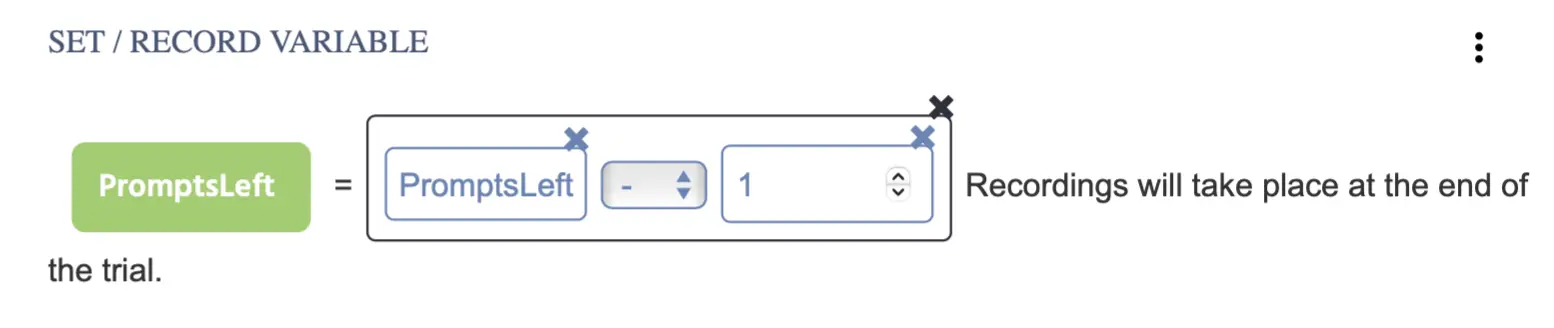
    Setting up the variable to count how many prompts are left

    Once the participant presses enter we also want them to move on to the next trial. So for that we used a Jump Action and specified Next Trial.
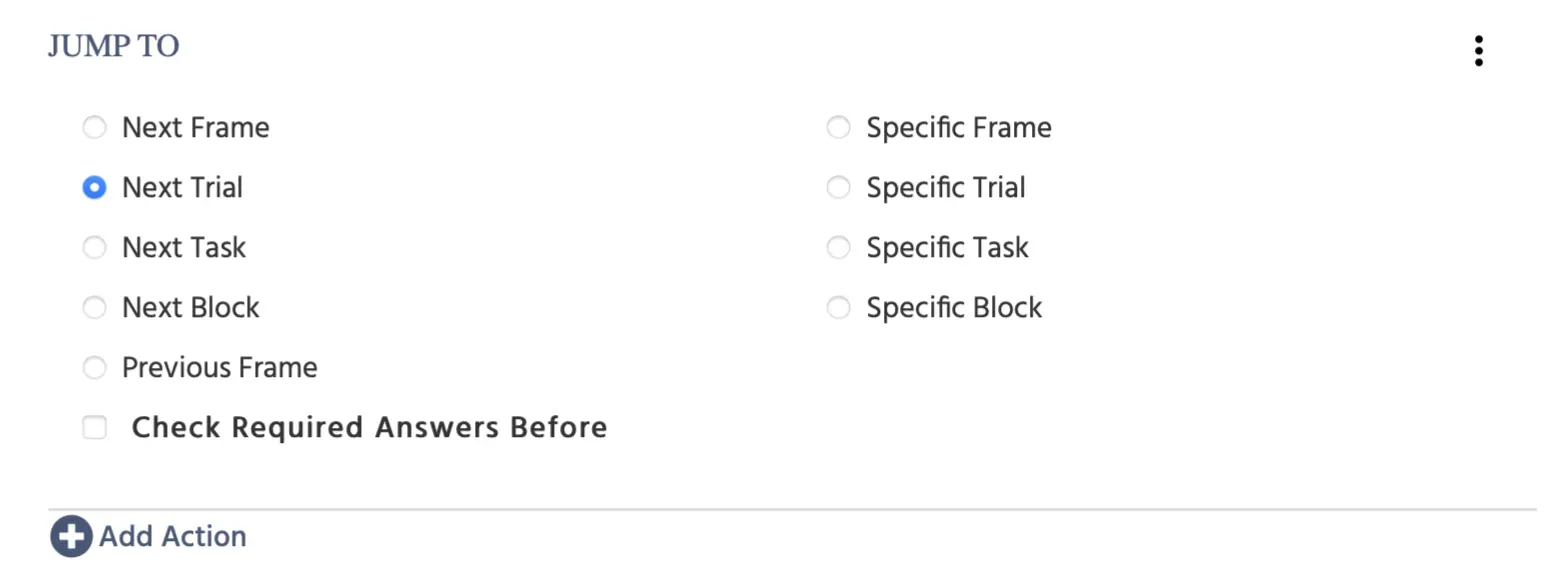
    The next trial option under the Jump Action

    NOTE: We created 6 trials for this ChatGPT study and you will understand later in the section below that shows the data recorded. Of course there are many ways to handle how trials are used and for this demo we chose this approach. If you have any questions, please reach out to us!
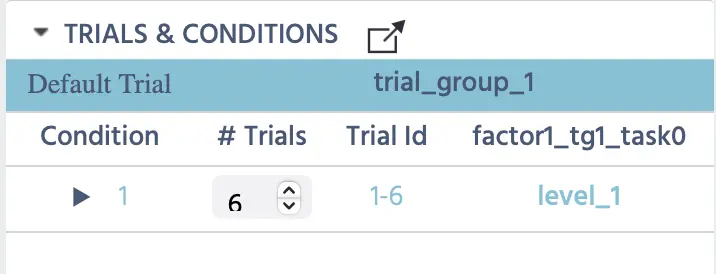
    Selecting 6 trials in order to align with the prompt count

    INCOMING EVENT

    Typically, it takes time, about 100-500 milliseconds to get a response from ChatGPT. Once the response is received, then it can be used as a trigger to:

    1. Record the response as a stored variable
    2. Present the answer visually in the chat
    3. Navigate to the next trial

    Trigger

    The OpenAI Trigger utilizes the API to receive the answer from ChatGPT and then store that value into the 2-column data frame (named df here) that we created previously.
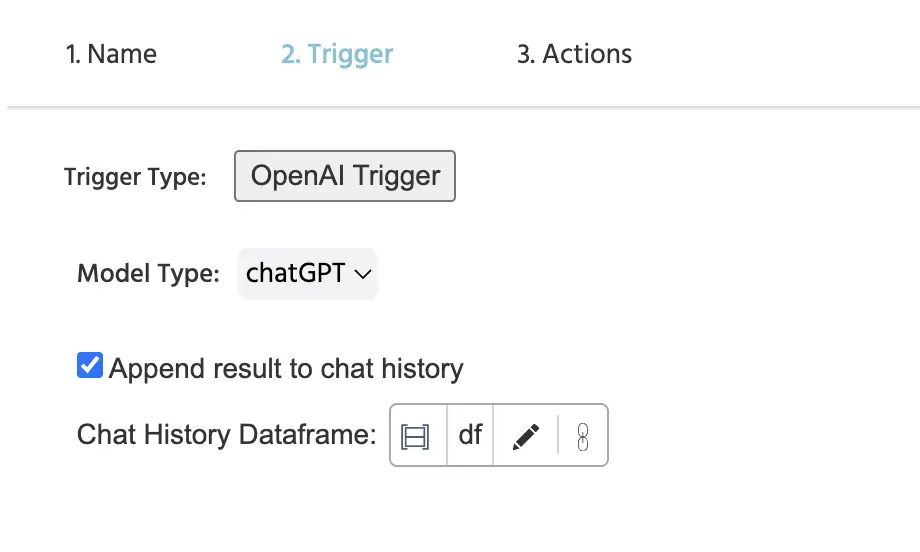
    The OpenAI Trigger for sending the prompt to OpenAI

    Actions

    Upon specifying the above, we move on to define the actions that occur as a result of this trigger.

    In a similar way that we displayed the participant’s input in the previous step, we will now do the same to show ChatGPT’s answer in the chat.

    The difference here is that instead of ‘You:’ we write ‘chatGPT:’ as the constant string value to preface the answer in the chat… and instead of the ‘input’ variable we call on the Chat GPT Answer by choosing it as the trigger-specific value that is listed when clicking the pen icon.
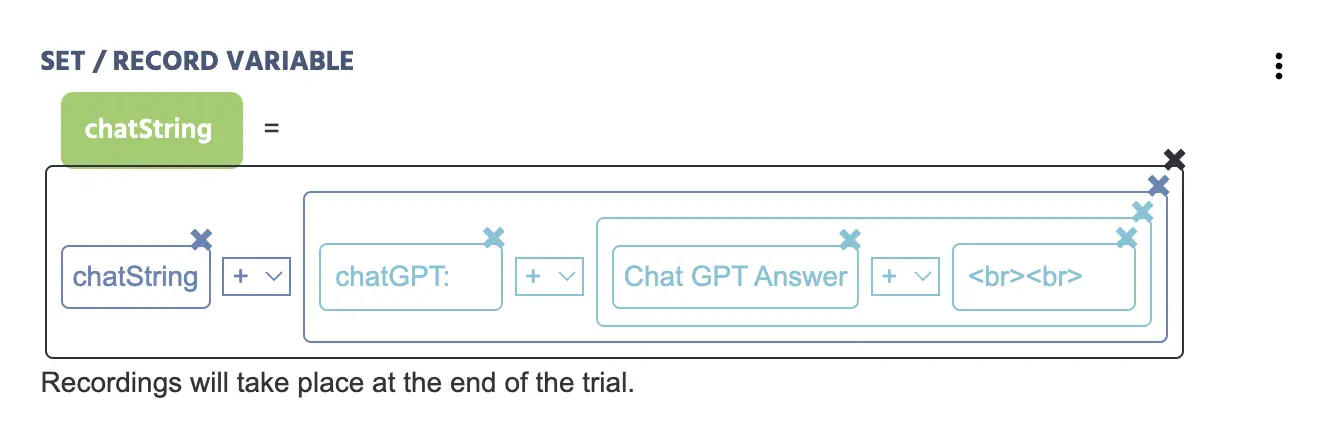
    Setting up the chat string variable to append the answer from ChatGPT

    The action below is also added in order to record the ChatGPT Answer (that is automatically received from the API) as its own value.

    Creating a variable to store the Chat GPT answer

    Because the task will automatically end when the number of Prompts reaches to =0, we want to give a participant the chance to read the last answer from ChatGPT, so we delay the last trial ending by 3000ms using a Control Action called Delayed Action where the Requirement Action stipulates that if the PromptsLeft variable is equal to 0 then the experiment progresses to the Next Task.
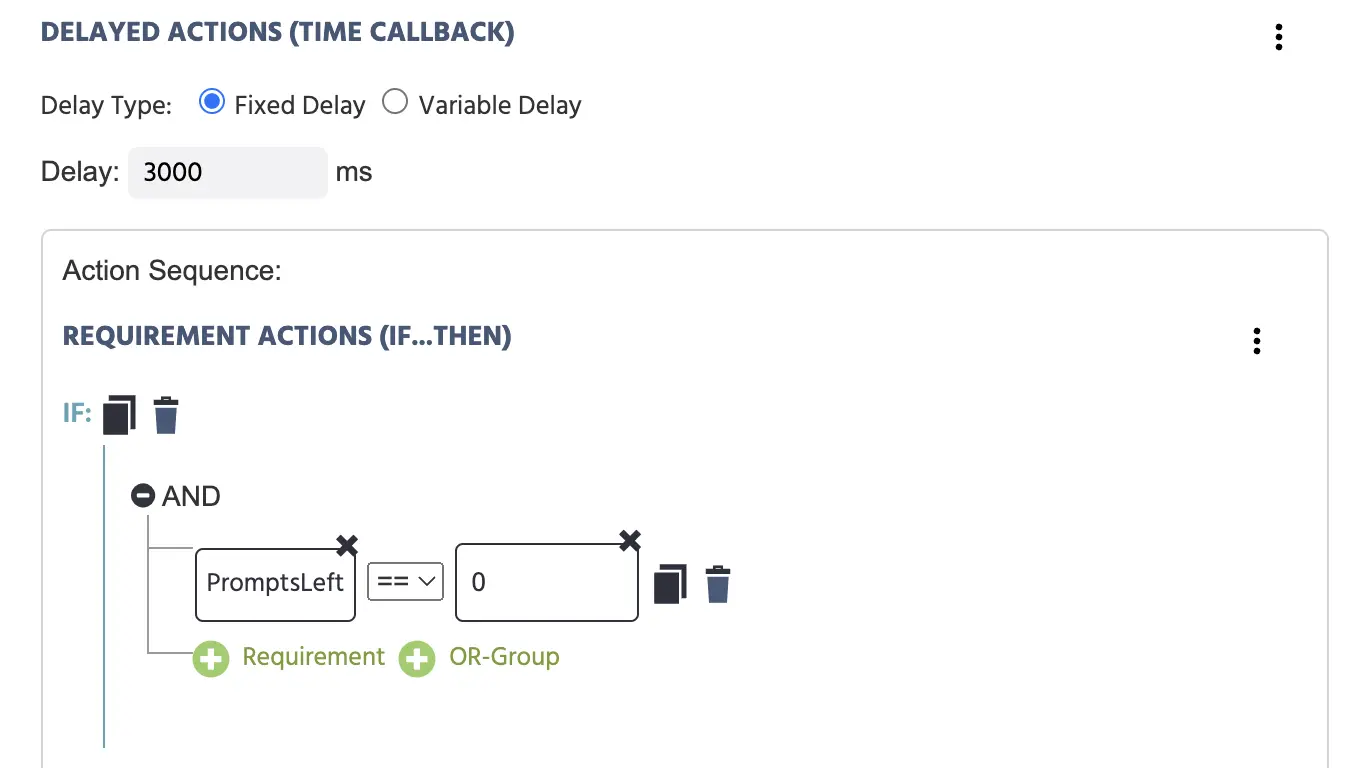
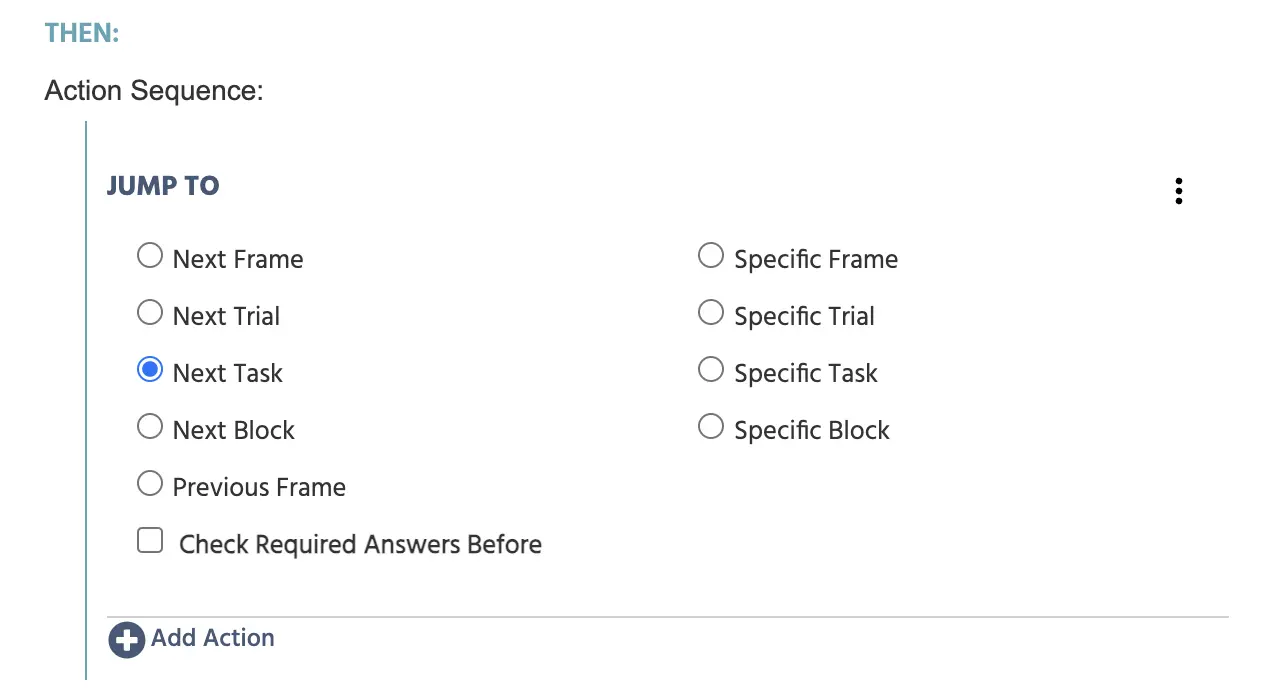
    The Delayed Action where there is a delay of 3000 milliseconds when prompts count reaches zero.

    Specifying that as a result, the experiment will jump to the next task of the ChatGPT study.

    End Screen and Saving Data - Task 2

    In our case the next task is called ‘End’ and is a thank you screen where the experiment is set to accept the session, ie. the study is over.
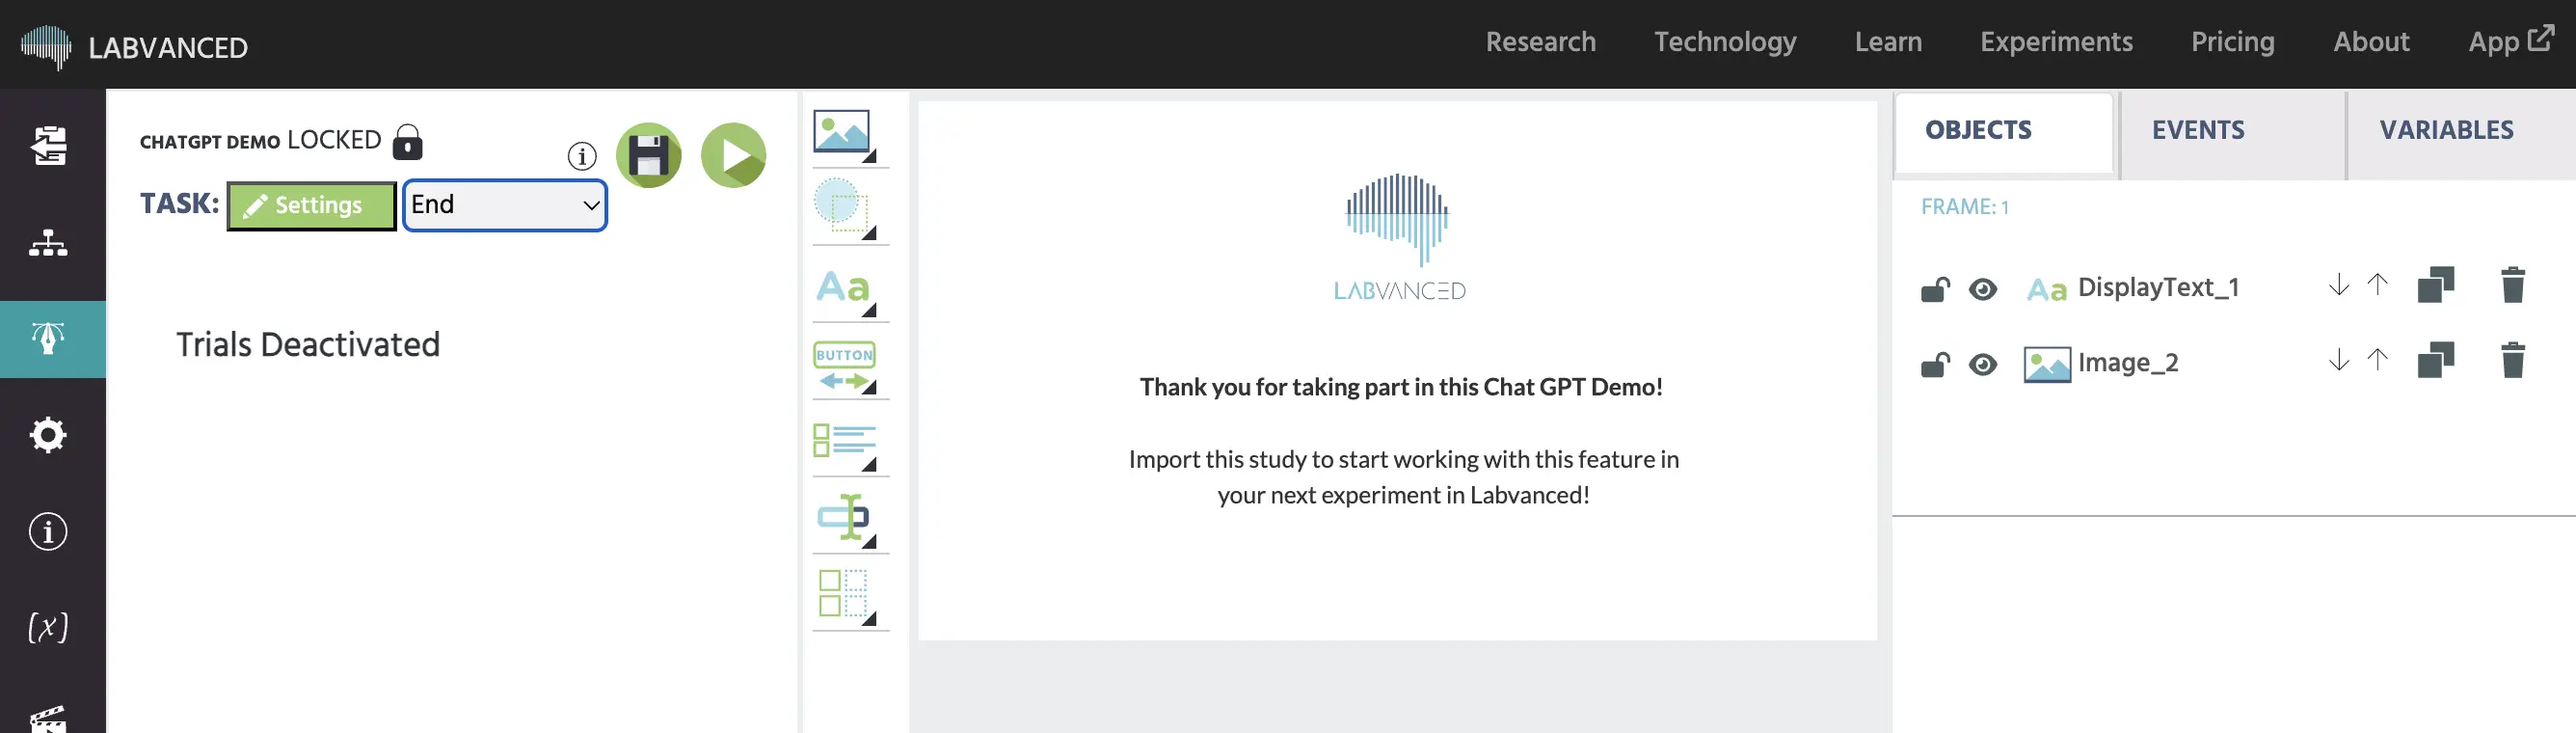
    The view of the second ChatGPT Study in the task editor

    Accept Session Event

    In order to save the data from the study, we want to accept the session and end the study when the participant reaches this point.

    Trigger

    Thus, the trigger is On Frame Start:
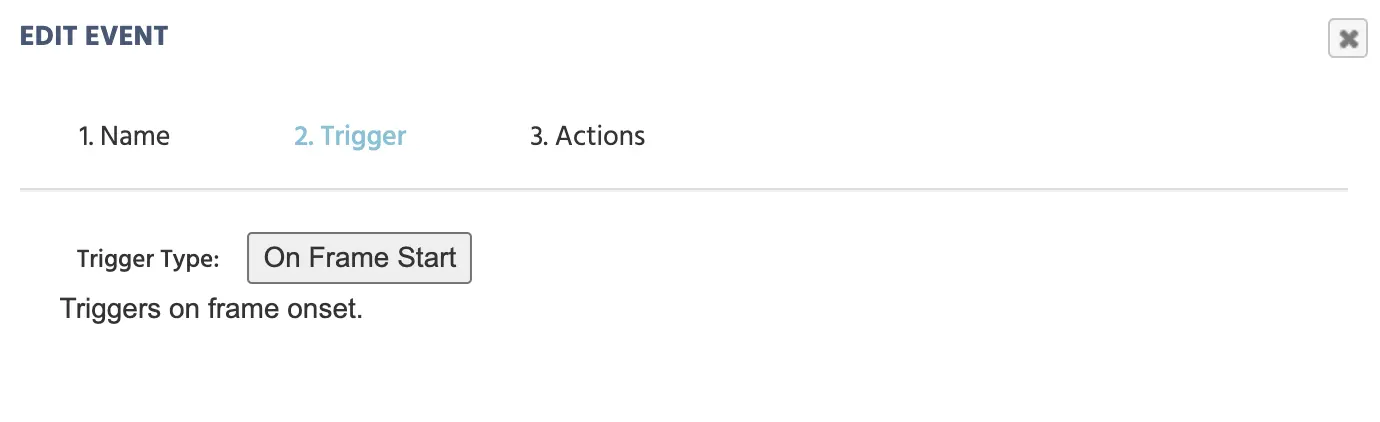
    The On Frame Start trigger

    Action

    Using another Delayed Action the Jump Action → Accept / End Session is used to save the data.
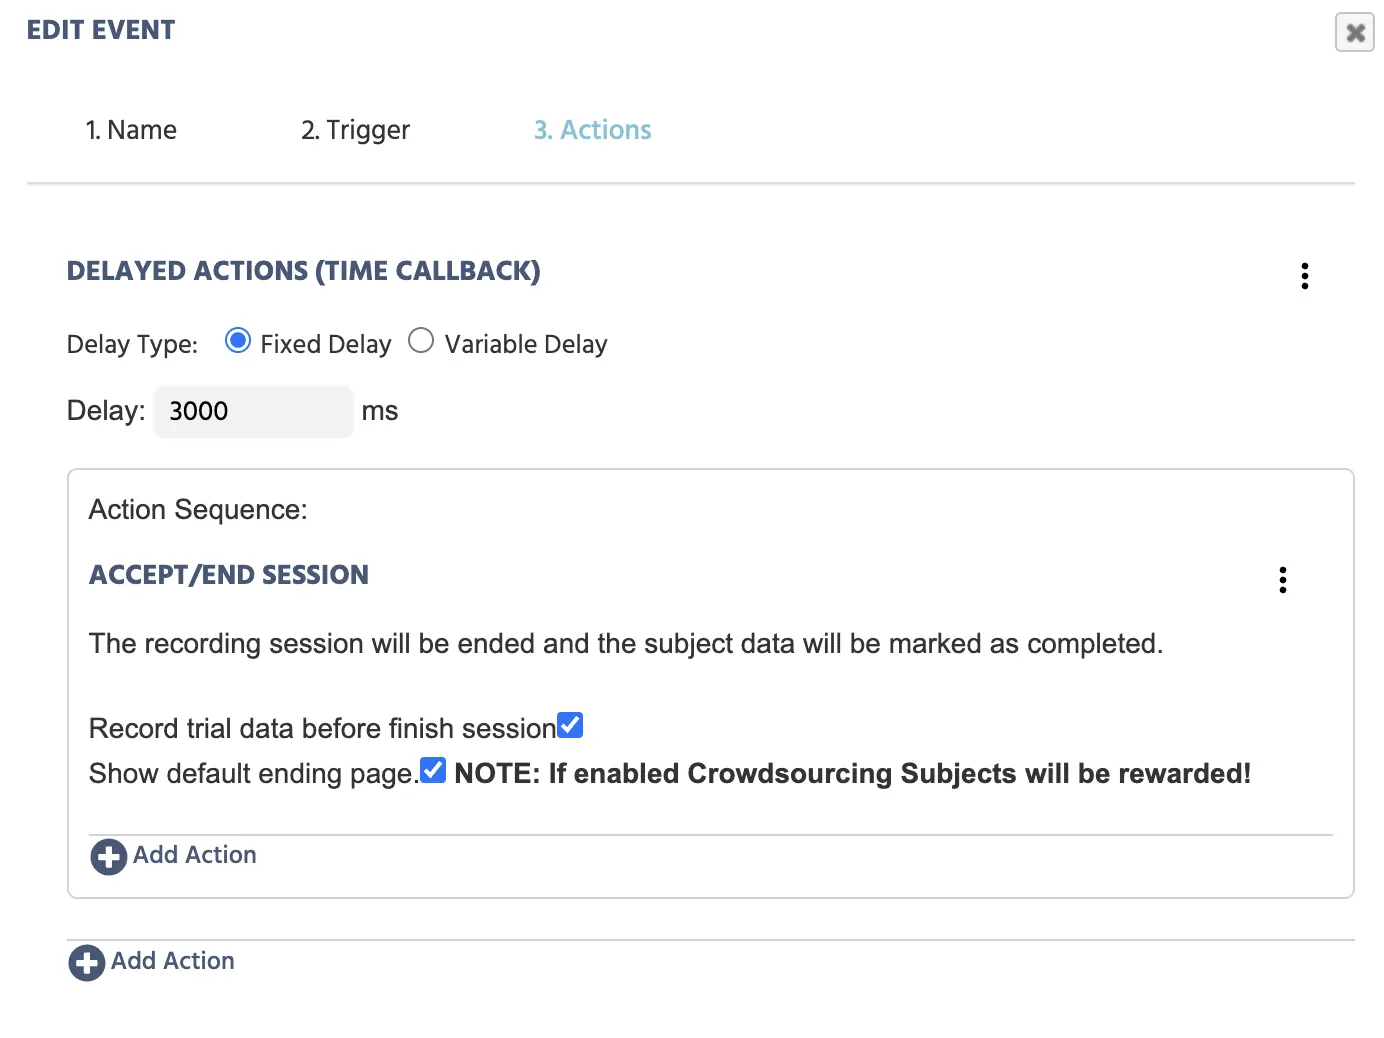
    The Delayed Action where the session is accepted.

    We use the Delayed action because the study will automatically close/end after the time has passed and we want to give the participants the time to read what is on the screen before the study ends.

    Recorded Data Preview of ChatGPT Demo

    The image below captures how the data from this study set up will look like in the Dataview and Export Tab where the trial numbers (Trial_Nr), task name (Task_Name), chatGPT Answers, and participant prompts (input), as well as the number of prompts left (PromptsLeft) are shown:
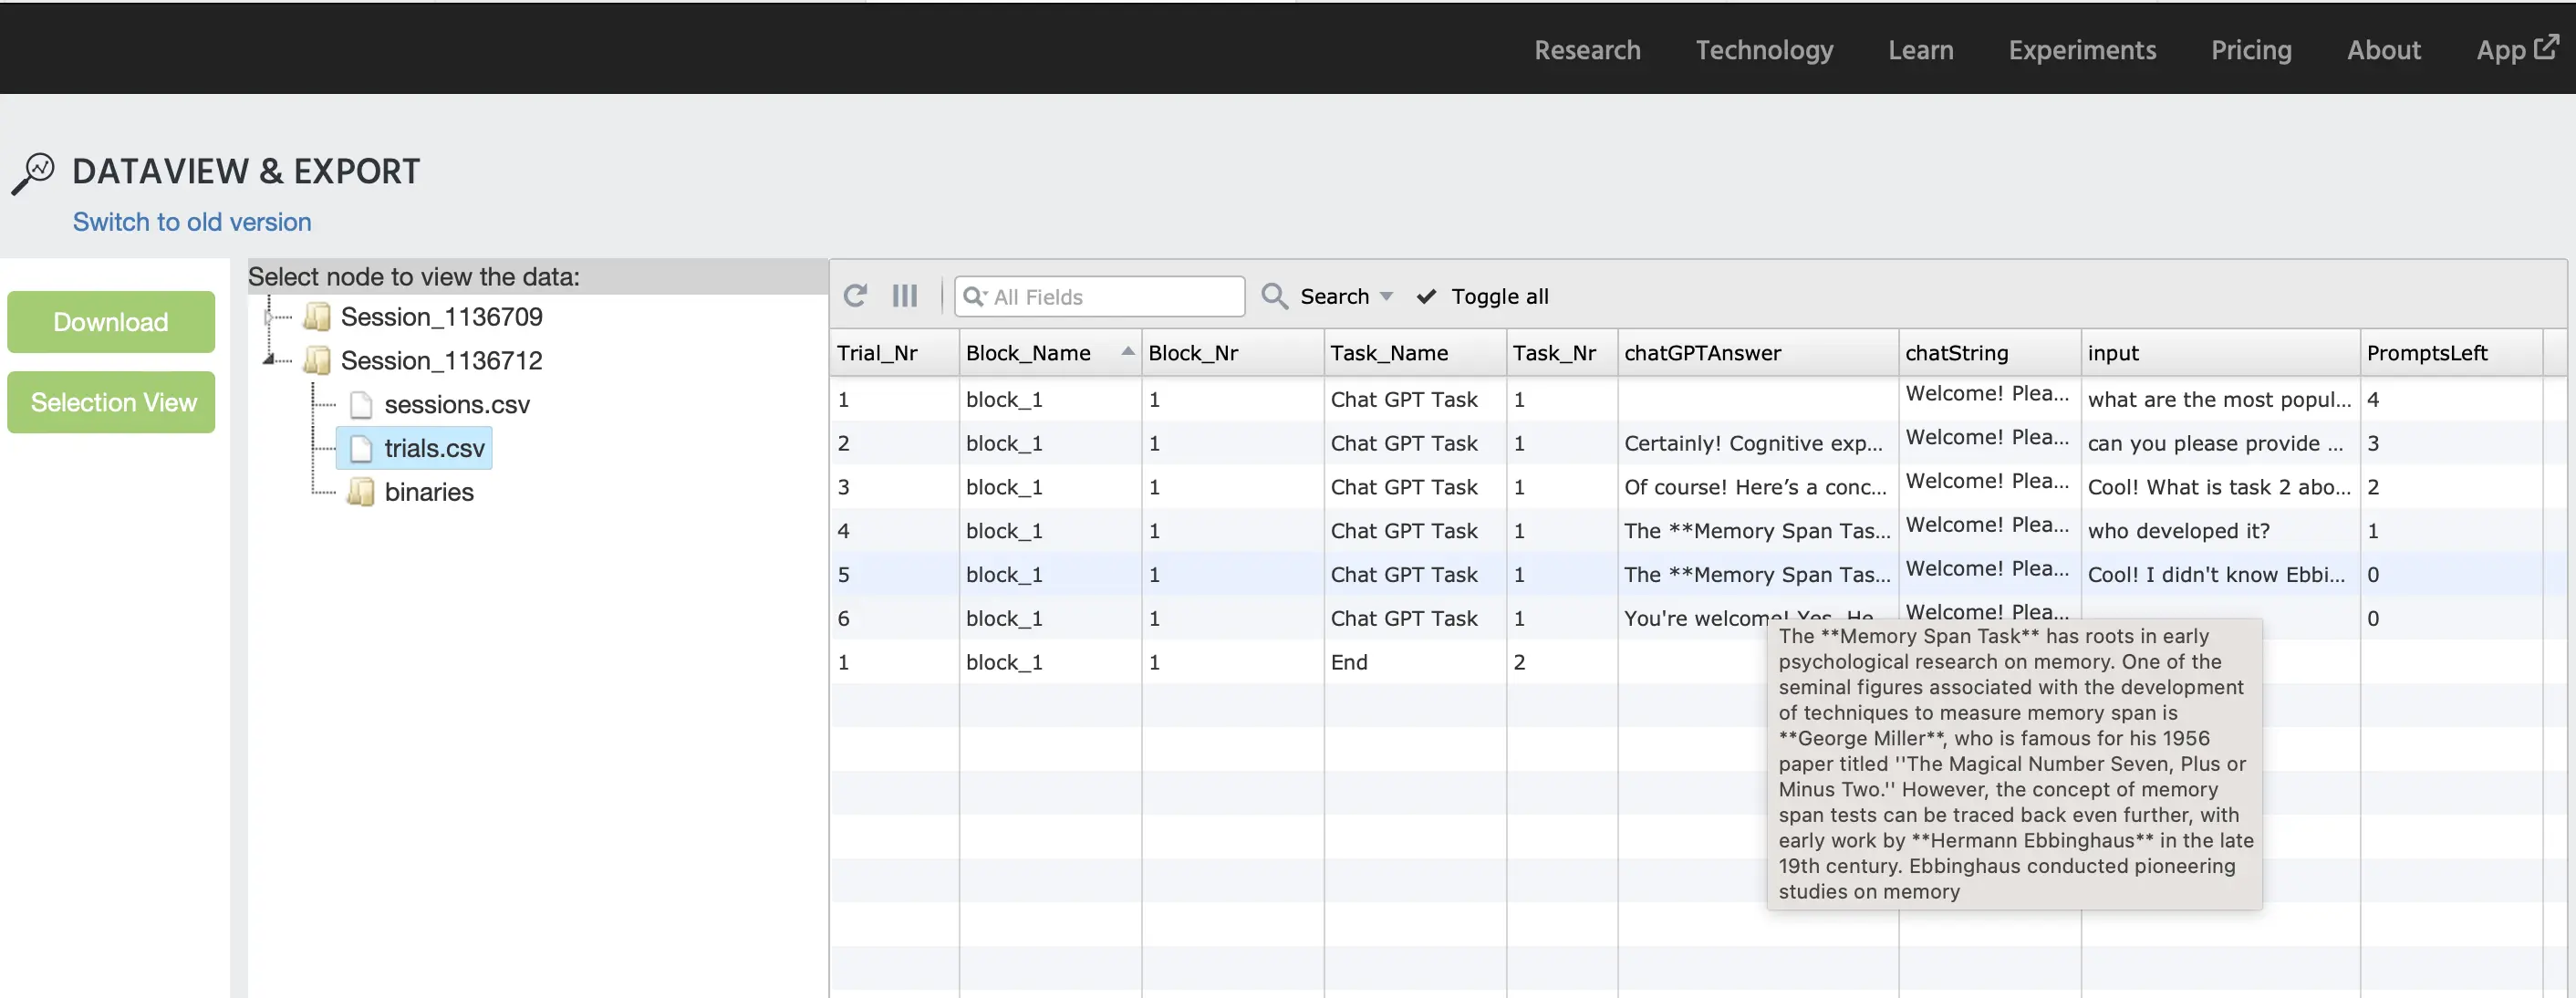
    View of the Dataview and Export tab where the data recorded for each variable of the ChatGPT study is displayed.


    Conclusion

    All in all, this demo showcases how you can utilize the ChatGPT feature to create an interaction and dialogue between the participant and ChatGPT while saving the inputs and responses as variable values.

    There are many approaches and ways that this feature can be used to build a ChatGPT study. So please reach out to us if you have any questions!

    Prev
    Rapid Serial Visual Presentation
    Next
    Eye Tracking Demo: SVGs as AOIs