Objects
Description: Working with Objects
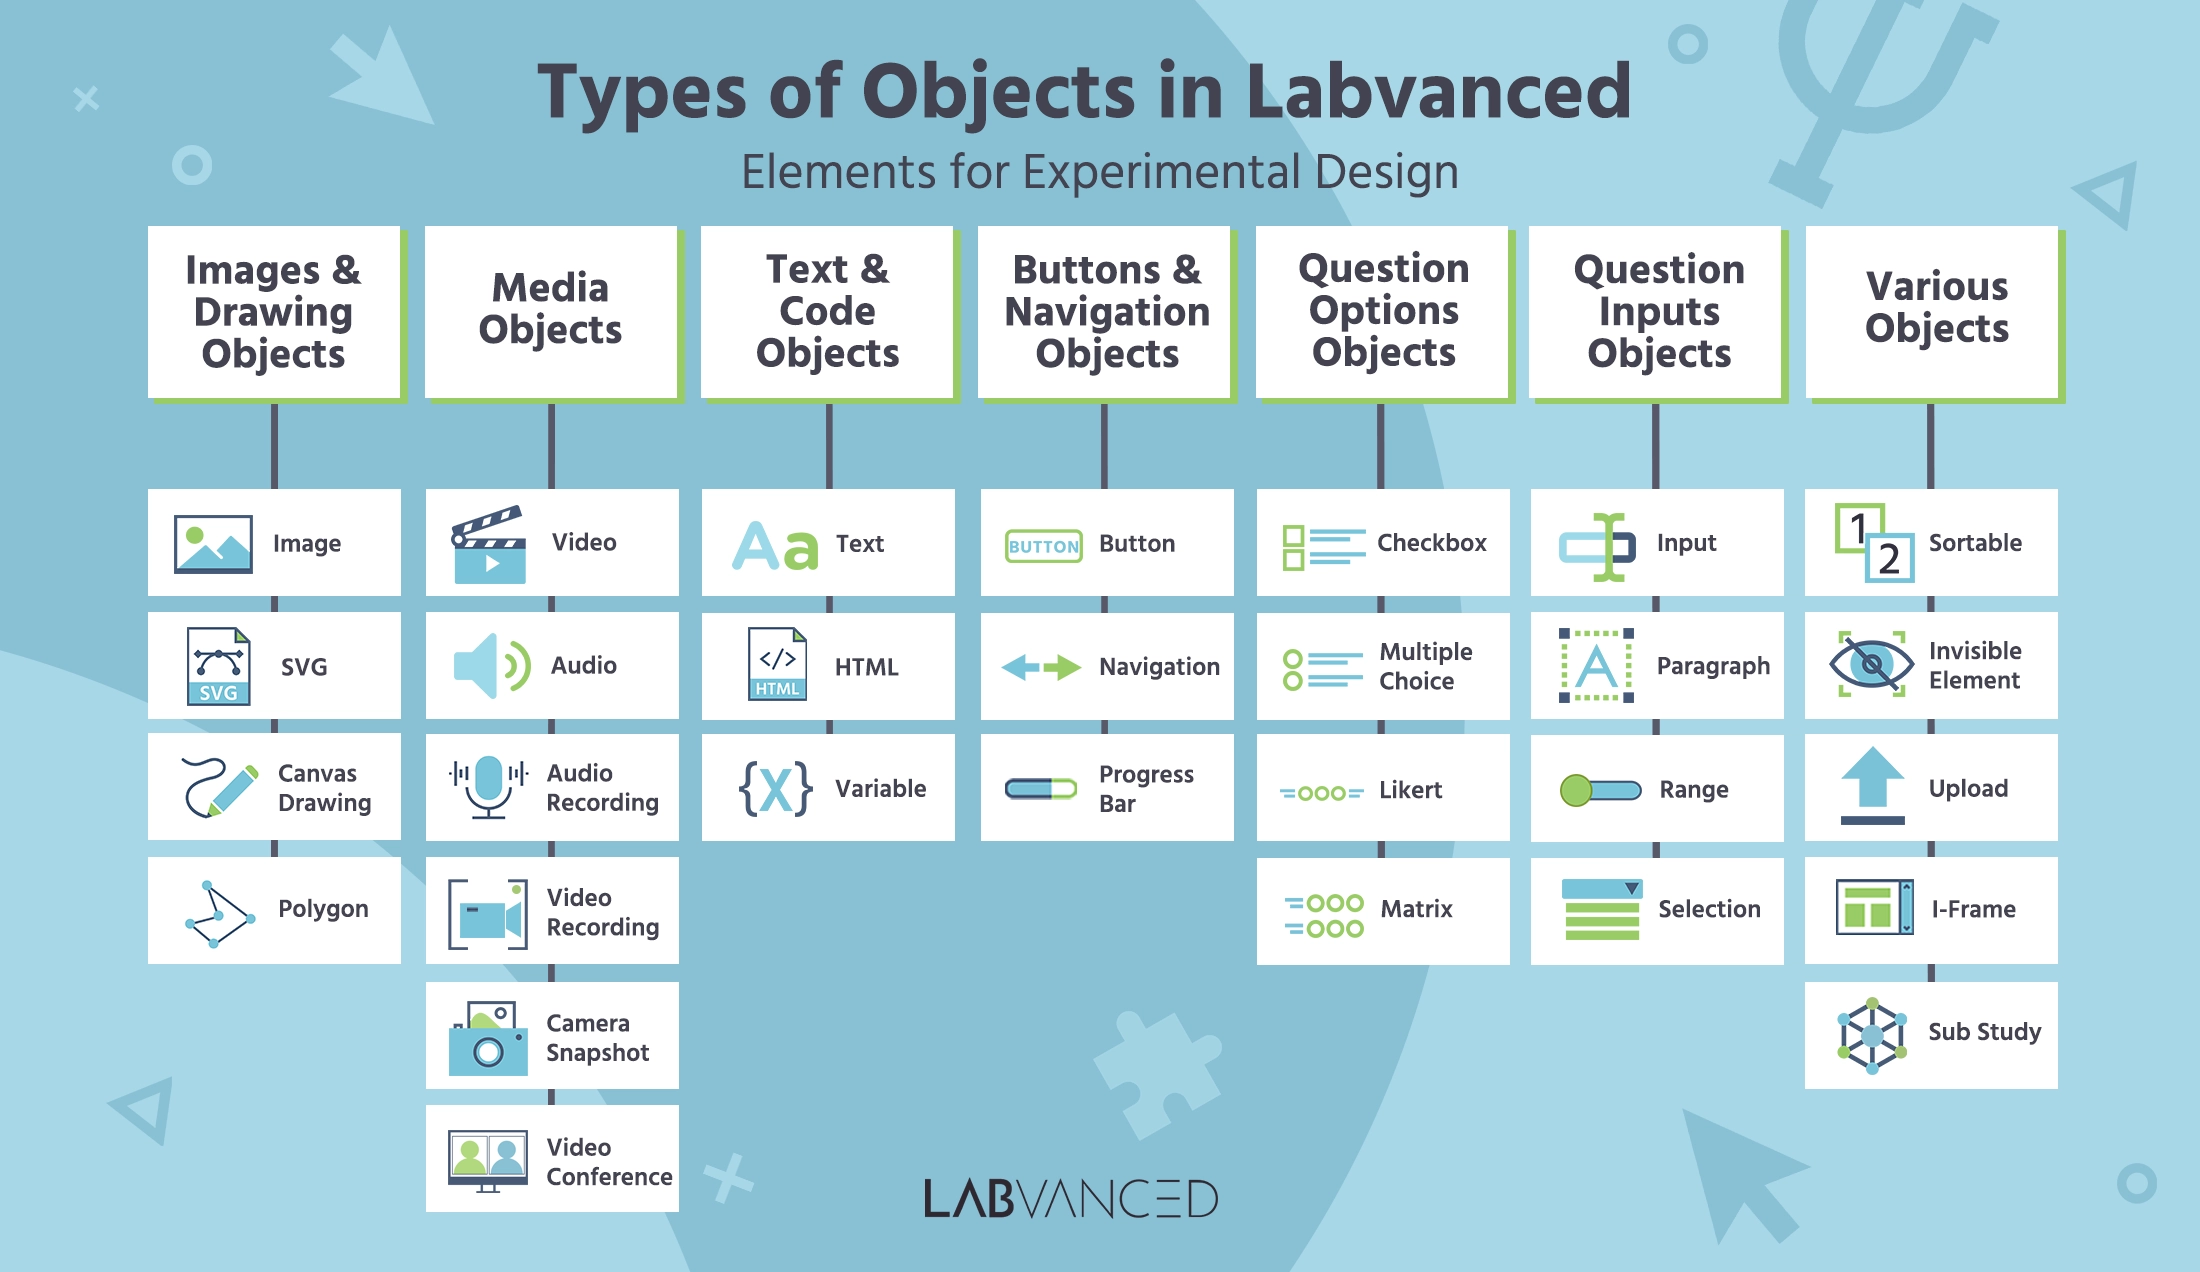
Objects are the lowest instance in the task hierarchy and are placed onto frames. In the task editor, objects are grouped into 7 groups: Media, Shapes, Text, Buttons & Navigation, Question Options, Question Inputs, and Question Various. These elements are used as building blocks from which you can create your experimental task and stimuli.
For an overview of objects available in Labvanced, please watch this introductory video:
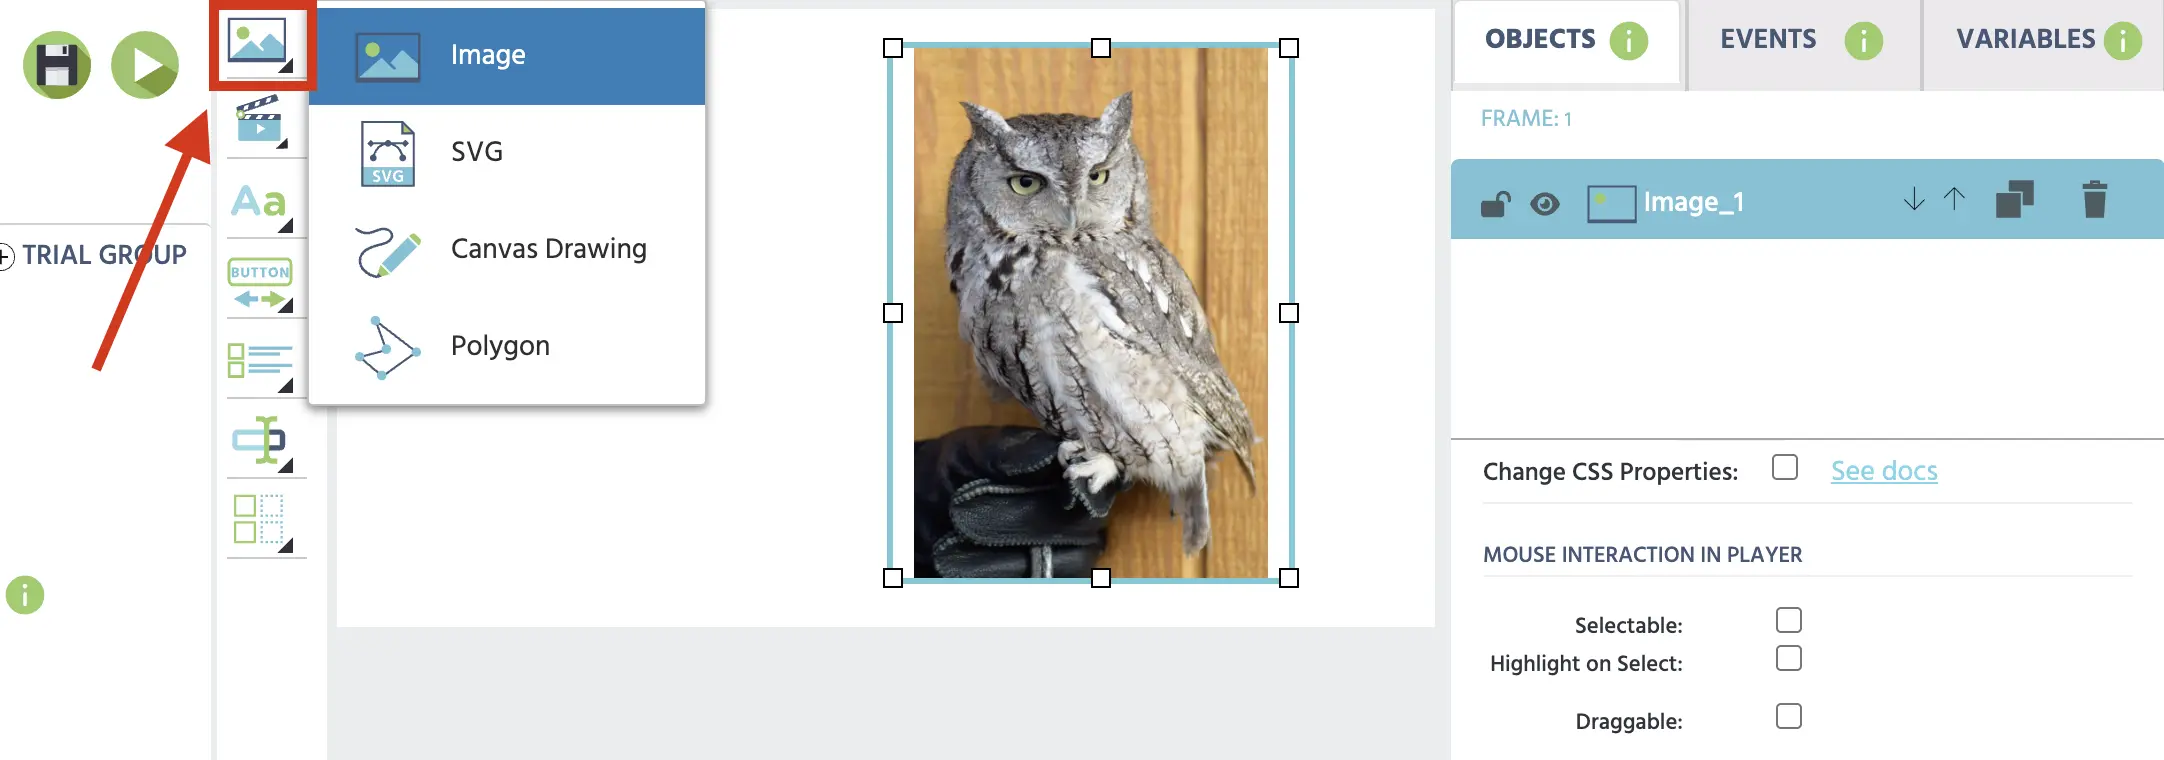
Objects can be added to the frame via the object toolbar, which is located to the left of the frame.
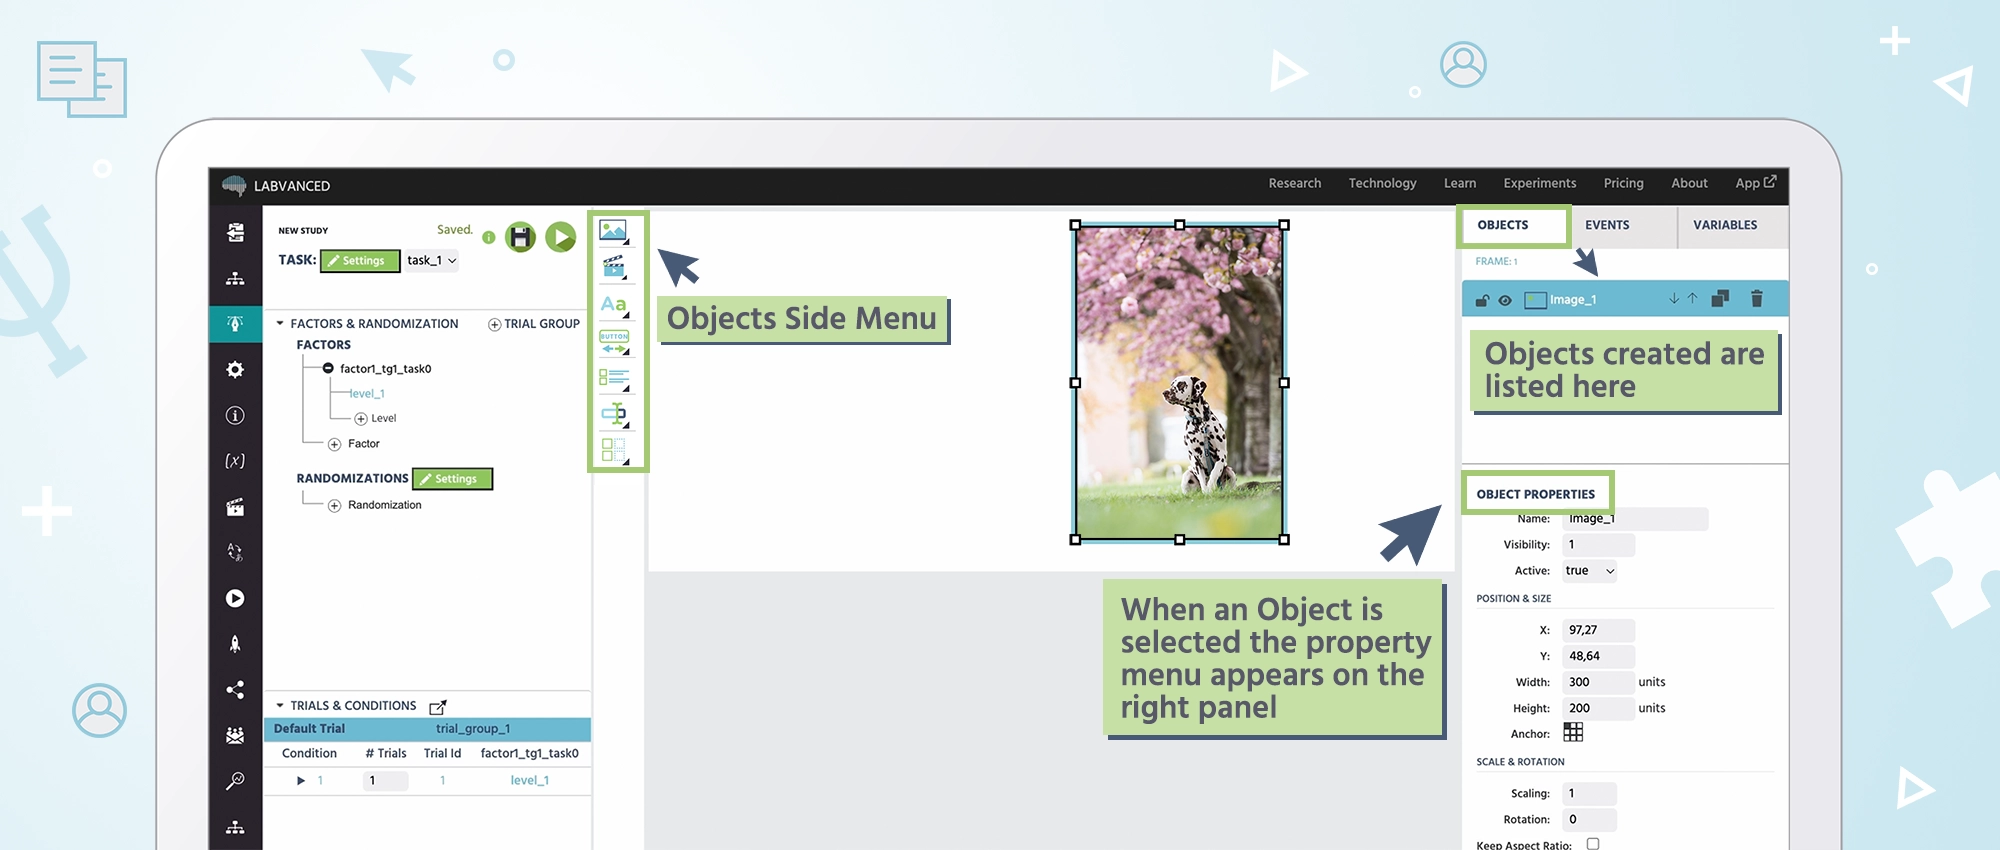
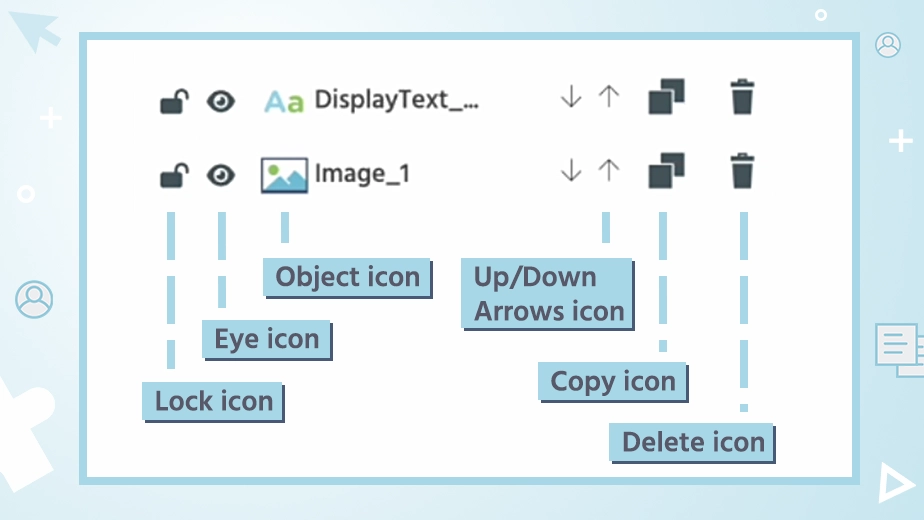
A list of all objects that have been placed on the current selected frame is shown on the right side of the editor under the "Objects" tab. Users can change the z-index of an object (which object is shown in front of others), copy, and delete objects.
Objects can be used as a part of the Event System so that when certain actions occur the stimuli are manipulated in some way. For example, if you want an image to increase in size when the participant clicks on it, that is handled by an event.
The "currently selected object" can be chosen either by clicking on it directly on the frame, or by clicking on the respective object in the object list.
After selecting an object and the appropriate modifier (Default Trial, Factor Level, Condition or Single Trial), modifications can be made directly on the canvas or by using the "Object Properties" panel on the right. In this panel, all properties of the currently selected object are displayed and can be modified using the input fields, checkboxes, etc. Read more about Object Properties here.
Object List and Custom Properties
A full overview of the available objects and their descriptions follows:
Images and Drawing Objects
By clicking the first icon on the Objects side menu, a list of available Images and Drawing Objects will appear. This is where you can add image stimuli, SVGs, allow for canvas drawing, or make a polygon.
The following table gives an overview of the Images and Drawing Objects available in Labvanced:
| Interface | Object Name | Description |
|---|---|---|
Image Object | The image object can be used to show an image on a canvas frame. The image can be set manually via the file manager, but can also be changed dynamically during experiment execution using events and variables (data type file). Learn more. | |
SVG Object | An SVG can be uploaded to the canvas editor. This object is popular with eye tracking studies based in Labvanced. An SVG can take a complex shape and be used as a ‘mask’ to trigger eye tracking-related events like counting the number of fixations over the particular SVG area. | |
Canvas Drawing Object | The Canvas Drawing element allows participants to “draw” on the screen using their mouse, finger, or trackpad on their device. The drawing space can be resized if you enable this feature using the checkboxes in the Objects tab. Participants can draw, erase, and add shapes such as a triangle, rectangle, or circle. Shapes can be dragged around the drawing after being added. Participants can also change the color of the pen or shape(s). Researchers can use this tool to draw static images for their experiments if they wish by unchecking the box labeled “allow drawing by participant” so that the participants cannot draw in the box. Either way, the drawing will be saved in the Private files of each participant as an image, similar to a Camera Snapshot object. Each toolbar can be enabled or disabled by checking the corresponding boxes. | |
Polygon Object | Polygon Objects can also be used for eye tracking studies in order to create a mask or AOI right within the Labvanced editor by clicking to create complex shapes. This object can also be used to create polylines. This demo demonstrates how Polygon Objects can be used as a part of an eye tracking study to count fixations. |
Media Objects
Clicking on the second icon on the side menu displays all of the available Media Objects.
The following table gives an overview of the Media Objects available in Labvanced:
| Interface | Object Name | Description |
|---|---|---|
Video Object | The video object can be used to present a video on a canvas frame. The video can be set manually via the file manager, but can also be changed dynamically during experiment execution using events and variables (data type file). | |
Audio Object | The audio object can be used to present an audio file on a canvas frame. The audio file can be set manually via the file manager, but can also be changed dynamically during experiment execution using events and variables (data type file). | |
Audio Recording Object | The audio recording object acts as a visual interface / handle for sound recordings during the experiment execution. The recording can be started and stopped via buttons, frame events, or other object-triggered events, and can be uploaded to the secure Labvanced server. | |
Video Recording Object | This object can be used to record a video of the participant, a recording of their screen, or both at once. There are several options that can be enabled/disabled: showing the recorded video to the participant live or later in the experiment (or not at all), allowing the participant to control the start/stop/upload of the video, and determining where the video is stored as a variable. Using a video recording object also records audio from the participant. Learn more. | |
Camera Snapshot Object | This object can be used to take a picture snapshot of the participant. To do this, video recordings must be enabled for the experiment. Options to show the camera button, snapshot button, and upload button can be hidden or shown to the participant. Events can be used to trigger the camera snapshot, or the participant can control it themselves. This tool is useful for verifying identity/demographic information of the participant, but should be treated as highly sensitive information. The snapshot is stored as a file variable. Note 1: Recording a video/image of a subject or their screen can be highly sensitive. Please ensure participants are fully aware of what the experiment entails before they begin. Note 2: When a webcam of any kind is used in a study (for eyetracking, video, snapshot, etc.), participants will be prompted to select which camera they would like to use at the start of the study. This allows participants to select a connected external camera if they do not wish to use a built-in webcam system. | |
Video Conference Object | The video conference object allows you to embed or host a video or audio call between participants during the experiment duration. Learn more. |
Text & Code Objects
The third option from the Objects side menu is Text & Code and the objects there are the following:
| Interface | Object Name | Description |
|---|---|---|
Text Object | This object presents text and/or variables to participants on a frame. Users can type and edit texts using the "Word-like" text editor (toolbar) on top of the frame (see image below). Variables can be inserted into text elements so that their current value will be shown (and automatically updated) on the screen. Learn more. | |
HTML Object | This object renders HTML that you have inserted. Add this object to the canvas editor then, while it is selected, go to the Object Properties (the right side panel) and at the bottom insert your HTML code. | |
Variable Object | By adding this object, you can display a specific variable value in the editor in real-time. |
Buttons & Navigation Objects
| Interface | Object Name | Description |
|---|---|---|
Button Object | A standard button whose label can be edited and can trigger events using the trigger "ButtonClick". A button click can also be recorded as a participant response variable. | |
Navigation Object | This object appears as two buttons with two pre-created associated events, allowing the subject to navigate back to the previous frame or forward to the next frame. | |
Progress Bar Object | The progress bar can be used to display the progress of the experiment in percentages. |
Question Objects
| Interface | Object Name | Description |
|---|---|---|
Checkbox Object | A question element where participants can select one or more responses. | |
Multiple Choice Object | A question element where participants must select only one choice. Learn more. | |
Likert Scale Object | A question element often used to indicate level of agreement with a statement. Participants can choose a response that falls somewhere in between two prompts. | |
Matrix Object | An element where several questions or statements can be shown as rows. Each statement is answered within same scale, shown in the columns. | |
Timer Object | Displays a visible countdown or count-up timer on screen during a trial. Control it using Start, Pause, and Reset actions, and use the current time value as a readable and writable variable to branch experiment logic based on elapsed time. Learn more. |
The "required" property of these objects can be changed dynamically during runtime of the study. Objects will only be shown as required as long as they are not hidden (visibility = 0).
The order of responses can be randomized for these objects using the "randomize item order" checkbox in the Object Properties window. If you wish to record the order that the choices are presented in after setting them to random, you can check the box labeled "Link Order to Array." This will create an array variable that stores the order of the choices presented for that element, called "itemOrderArrVar" by default. The array records the integer value of the choices as defined in the editor in the order that they are shown from top to bottom of the element. The positions and values of the entries can be edited in the Variables tab for each of the "itemOrderArrVar" variables.
Question Input Objects
| Interface | Object Name | Description |
|---|---|---|
Input Object | Used for participants to insert short responses. This element can collect responses in the form of numbers (numeric), text (string), dates, times, and colors. Learn more. | |
Paragraph Object | Similar to the Input object, but used for longer responses. Responses are text (string) variables. | |
Range Object | Using this element, participants can give a response using a sliding tool. Users can set this object to show numeric values (left bound, right bound, and the participant’s response as a number above the slider) or choose to leave it blank. Note 1: Hide handle initially: This option hides the handle (the circle that participants slide to make their response) until the participant clicks on the object. This removes the potential bias that may exist when participants first see the handle in the center of the range object. | |
Selection Object | A question element where responses are picked from a dropdown menu that the experimenter populates with possible responses. Note: This object can be translated into different languages. Note 2: Available responses can be changed dynamically by linking the object to an array variable. |
Various Objects
| Interface | Object Name | Description |
|---|---|---|
Sortable Object | A question with several elements that can be sorted using drag & drop methods. | |
Invisible Element Object | The Invisible Element is never visible to participants but can trigger events, so that events can be triggered by mouse events on seemingly empty regions on the canvas. | |
Upload Object | Participants can use this object to upload files into the experiment (which are then stored in the Labvanced server) for the experimenter to access later. | |
i-Frame Object | The I-Frame Object can be used to display an I-Frame (embedded other website) inside the experiment. IMPORTANT: In order for the I-Frame to be displayed, the server controlling target URL must set the http header "Access-Control-Allow-Origin" to be either "*" or it must include "labvanced.com" NOT set the http header "X-Frame-Options". | |
Sub Study Object | This powerful object allows you to embed other Labvanced studies within a single ‘parent’ experiment. Learn more. |