The Dataview and Export Tab
Under Dataview & Export, every recording collected in your study can be inspected, filtered, and downloaded. The tab is split into three sections: choose which recordings to download, configure the export's file structure and format, and (optionally) choose which variables to include.
Table of Contents
Select Recordings
The Select Recordings panel is open by default when you enter Dataview & Export. It's where you browse every recording session your study has collected and choose which ones to work with, whether that means downloading them, unlocking quota-locked data, or deleting recordings you no longer need. Everything else in this panel acts on whatever rows you check here.
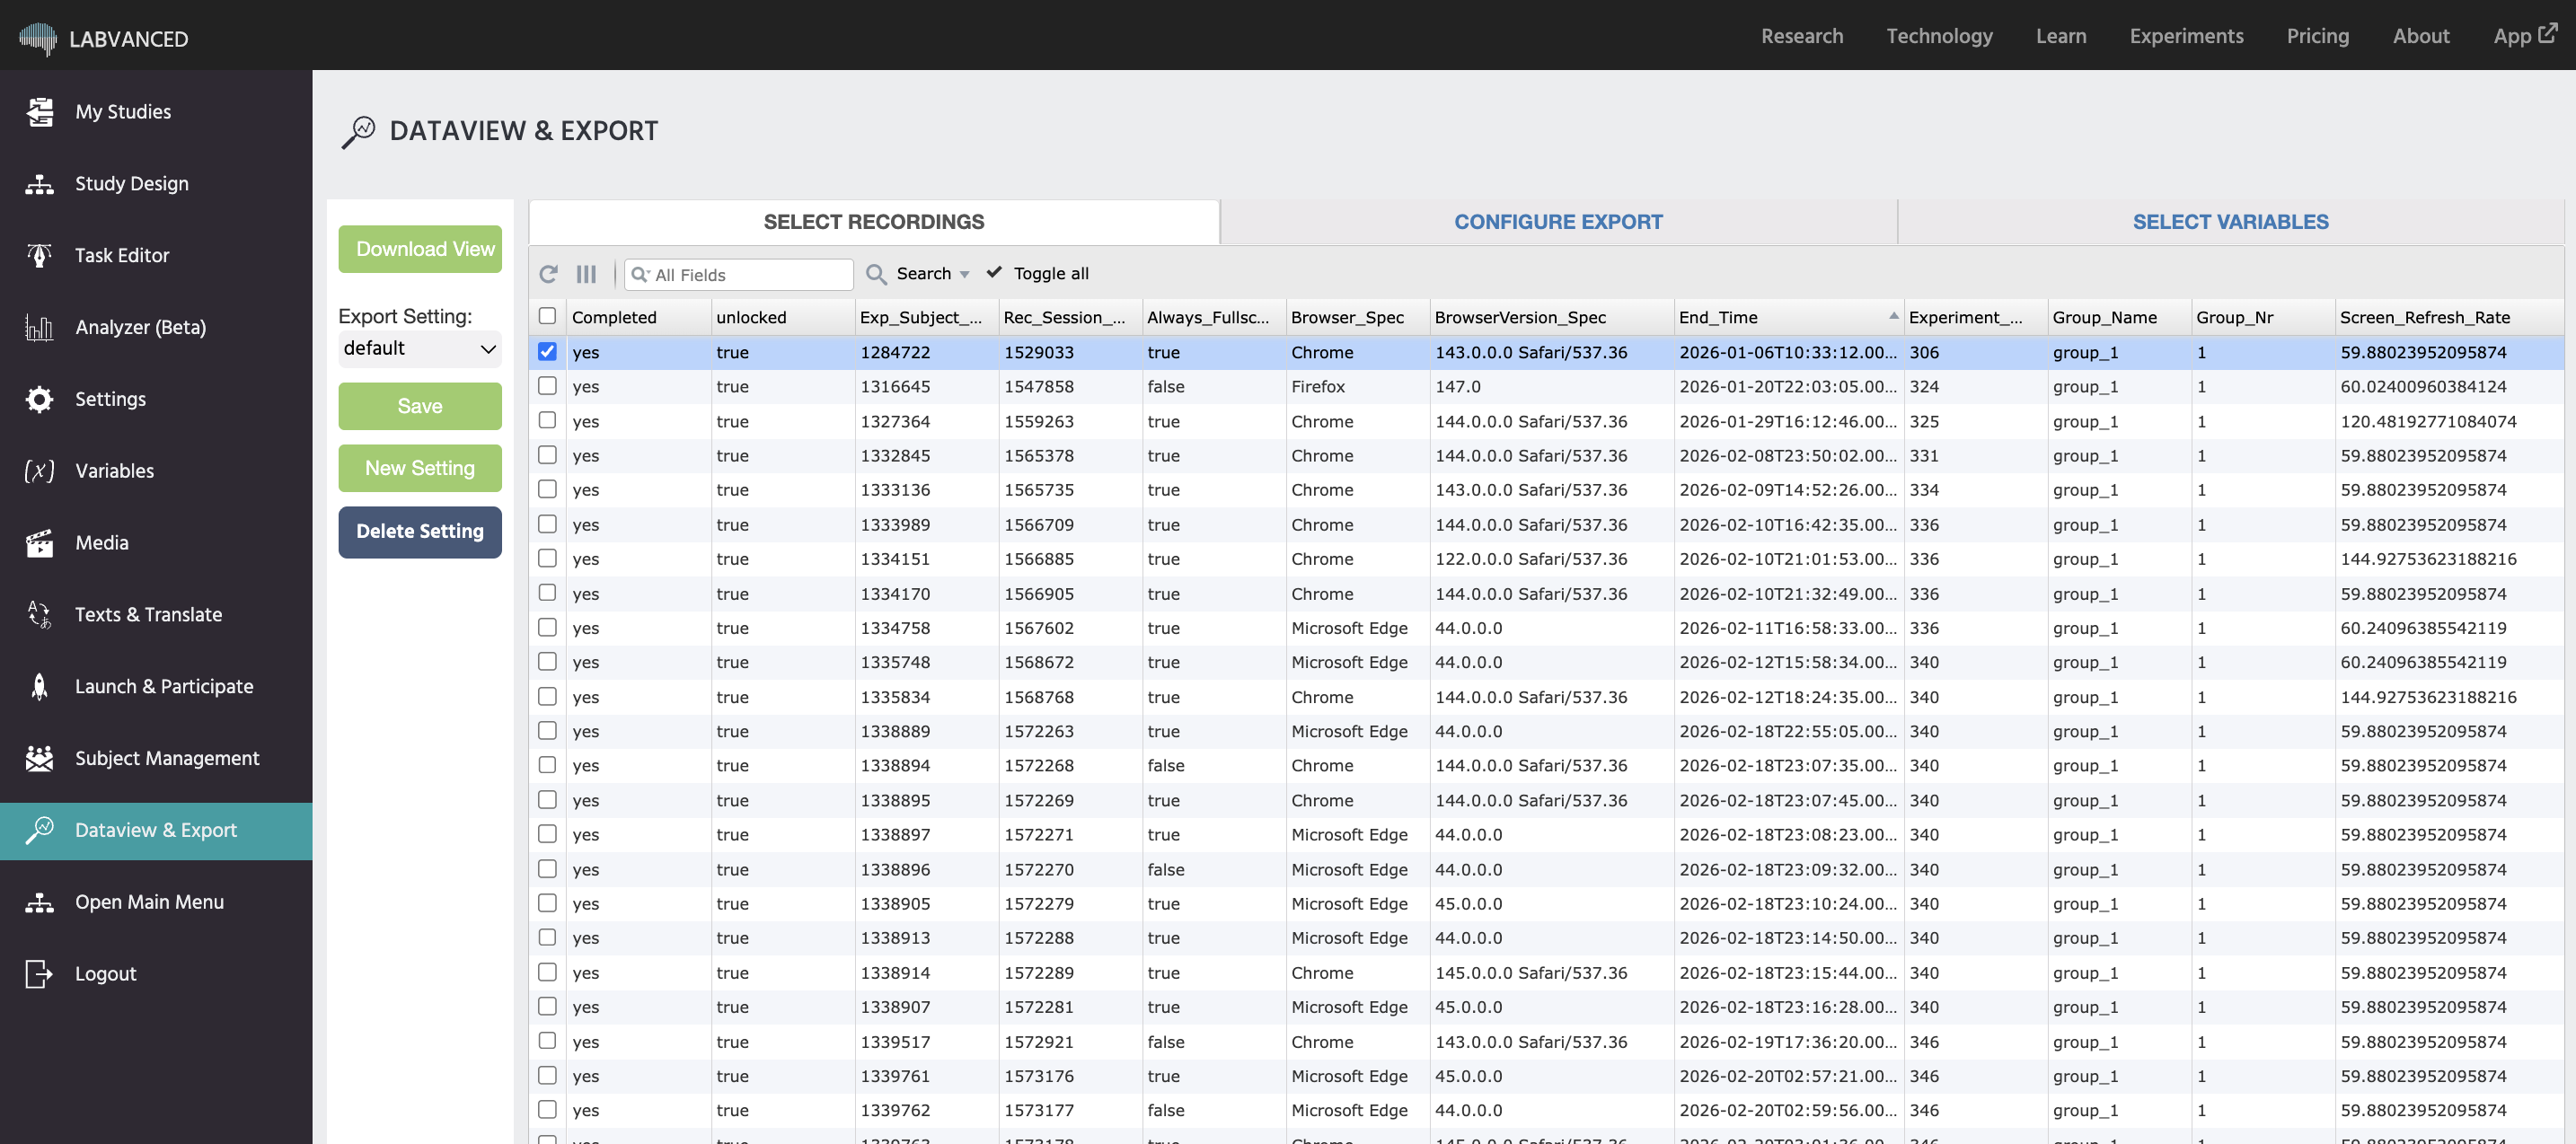
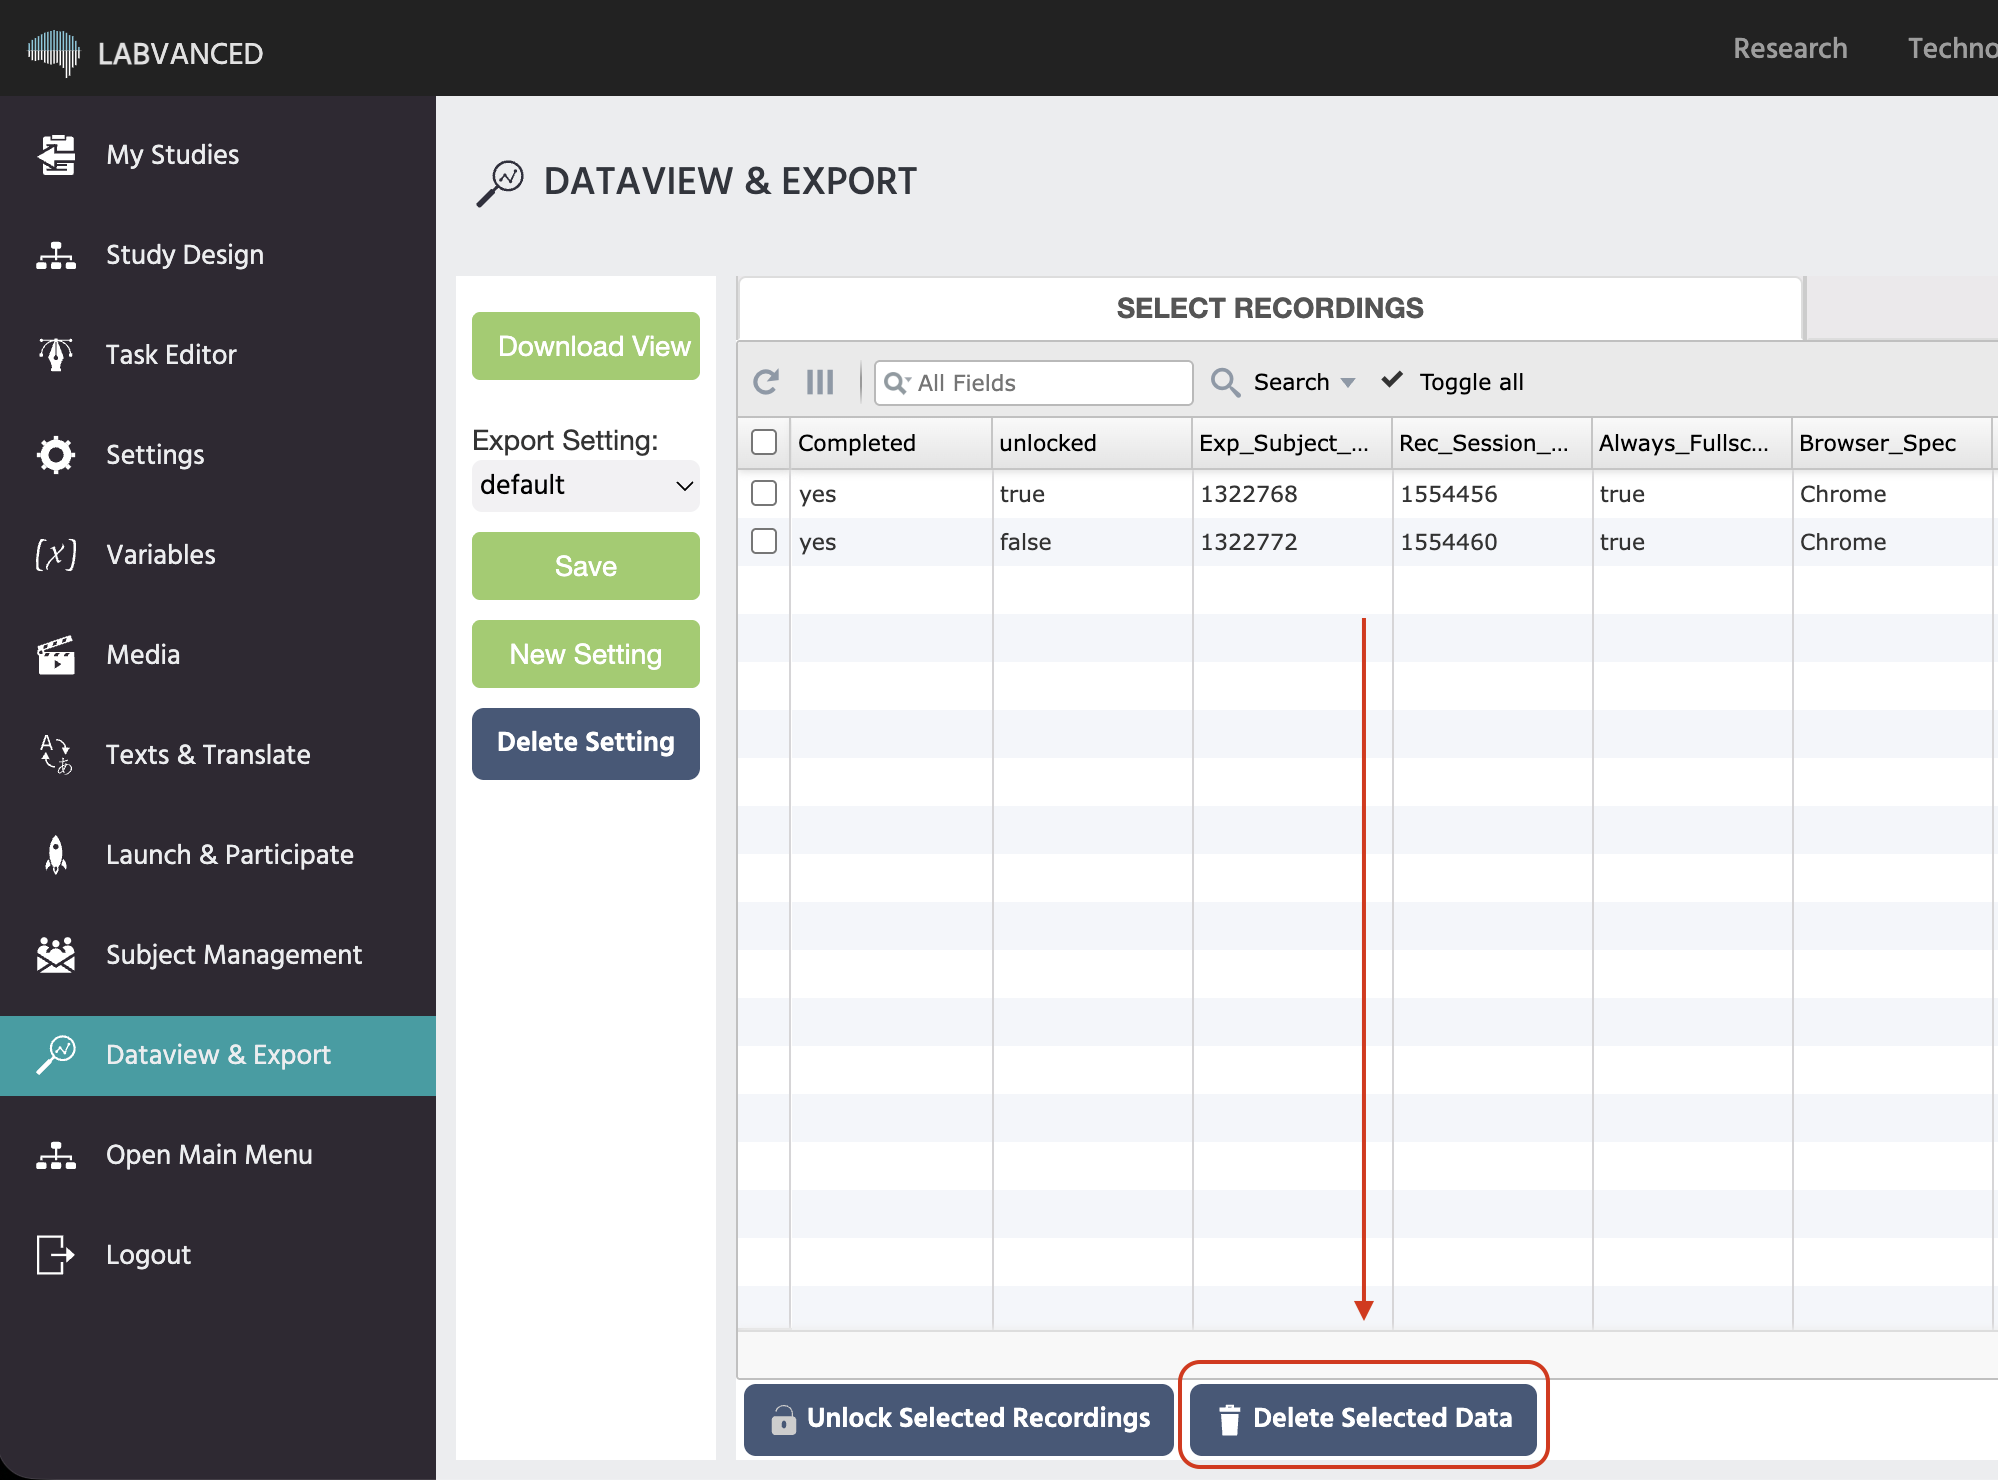
Select Recordings is the panel Labvanced opens on. Each row is one recording session, with columns such as Completed, unlocked, Exp_Subject_Id, Rec_Session_Id, Browser_Spec, and End_Time. Check the box on any row to include that recording; the grid toolbar's Toggle all button shows or hides every column at once, and the search field next to it filters rows by any field.
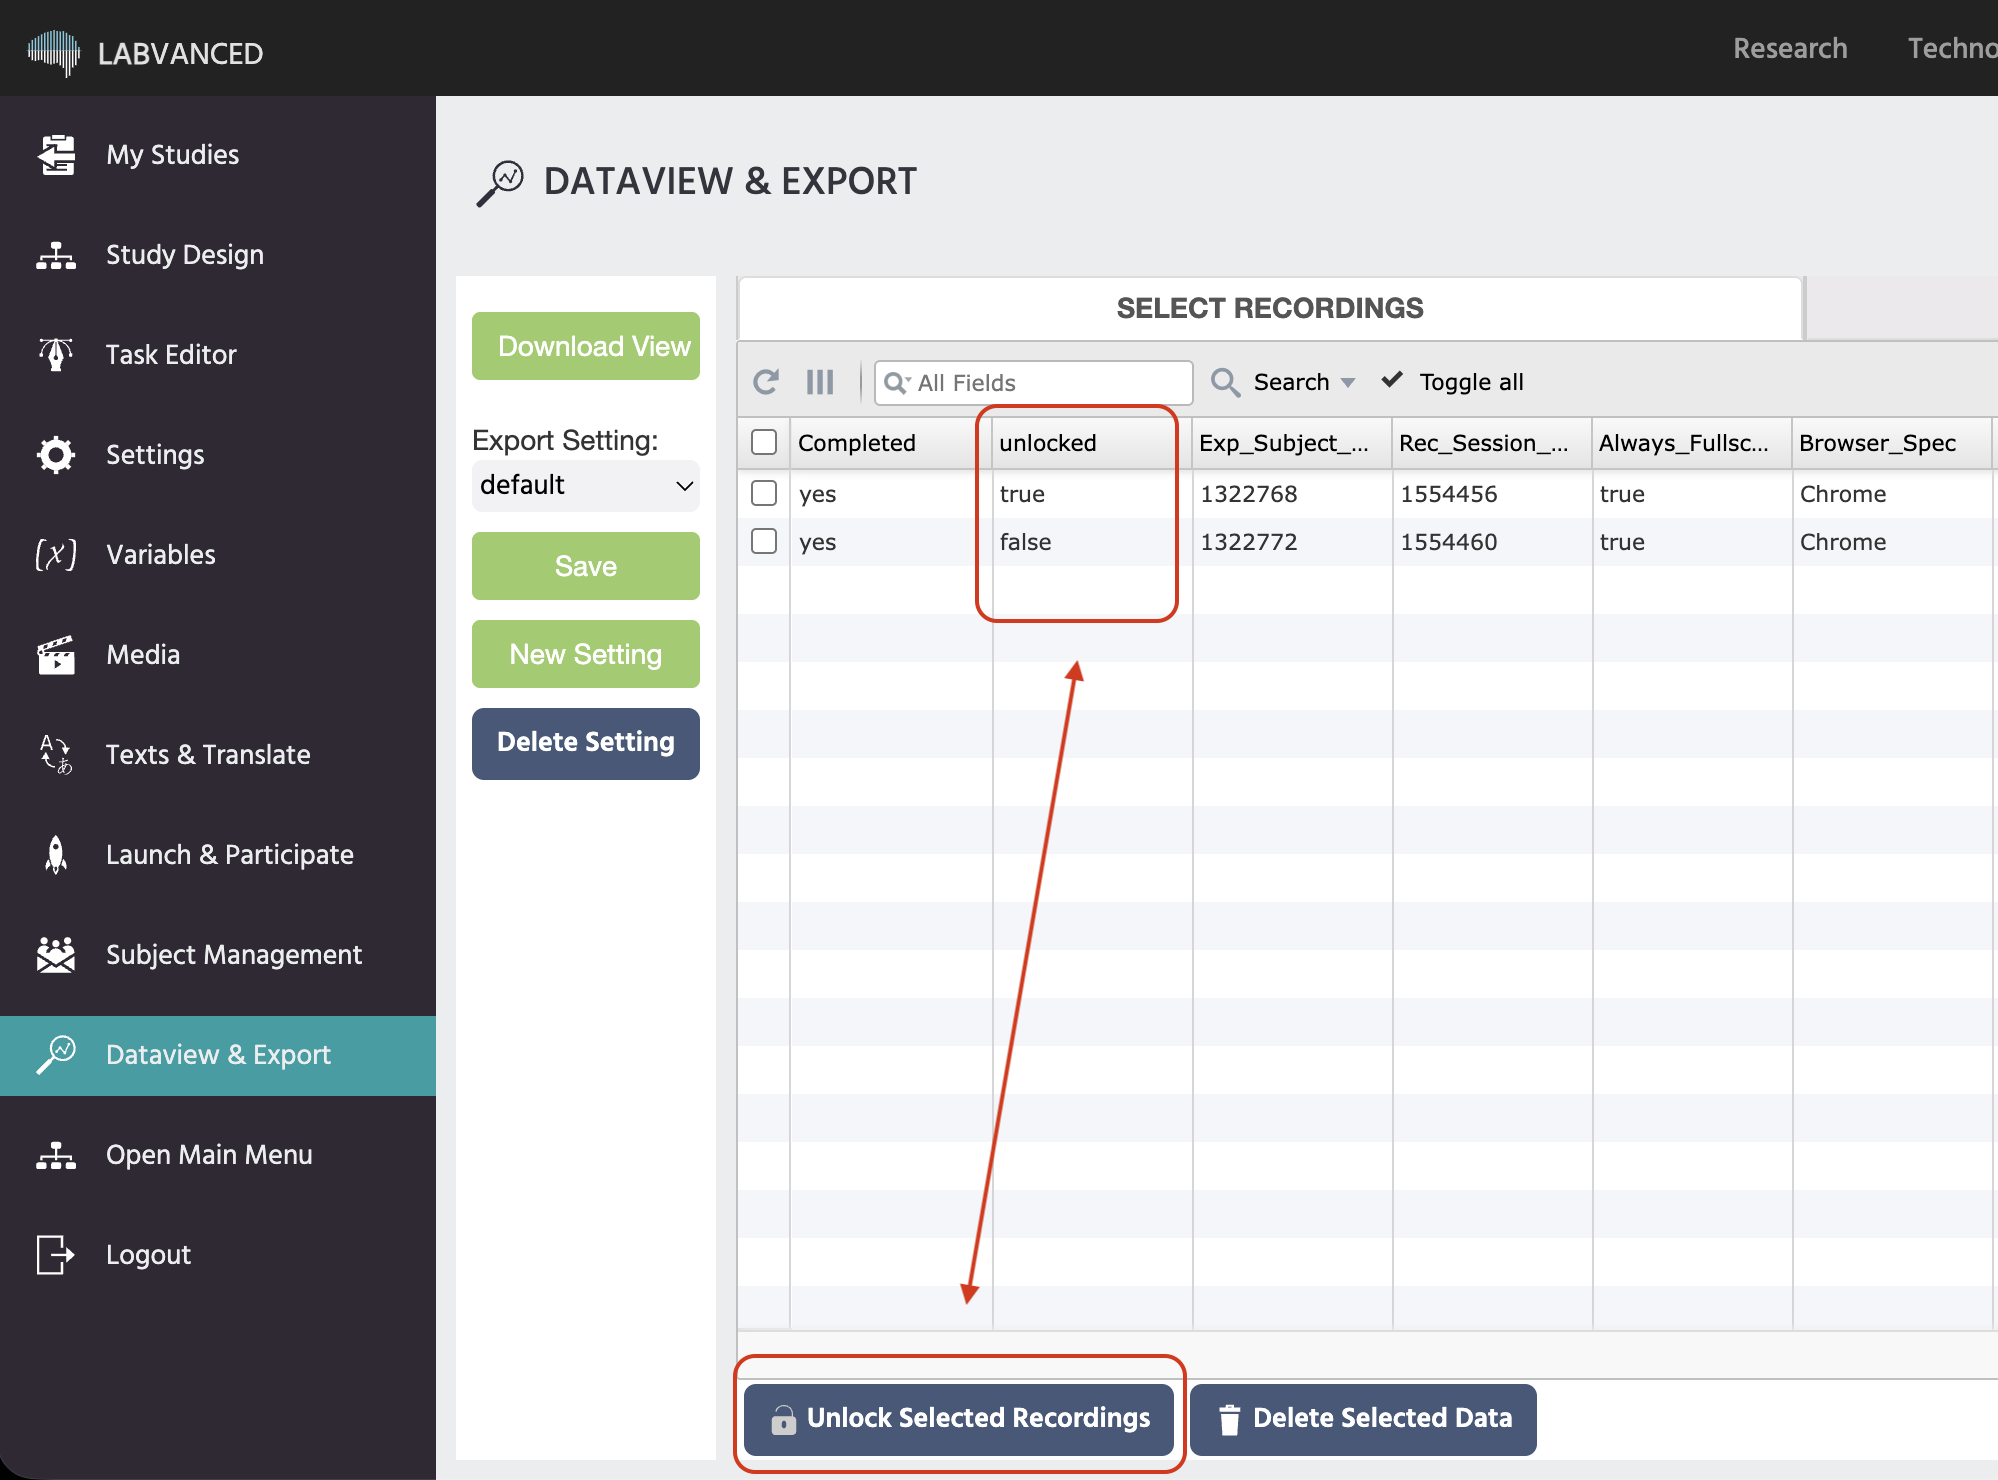
Below the grid sit two buttons that act on whatever rows are checked above: Unlock Selected Recordings and Delete Selected Data.
Unlock Selected Recordings
Unlock Selected Recordings unlocks data recorded beyond your license's quota, consuming that quota to do it. A Researcher Trial account starts with only 10 recordings, and once the 7-day trial ends and the account drops to the Free plan, that quota does not renew.
Warning
Recordings spent via Unlock Selected Recordings on a Free account do not come back.
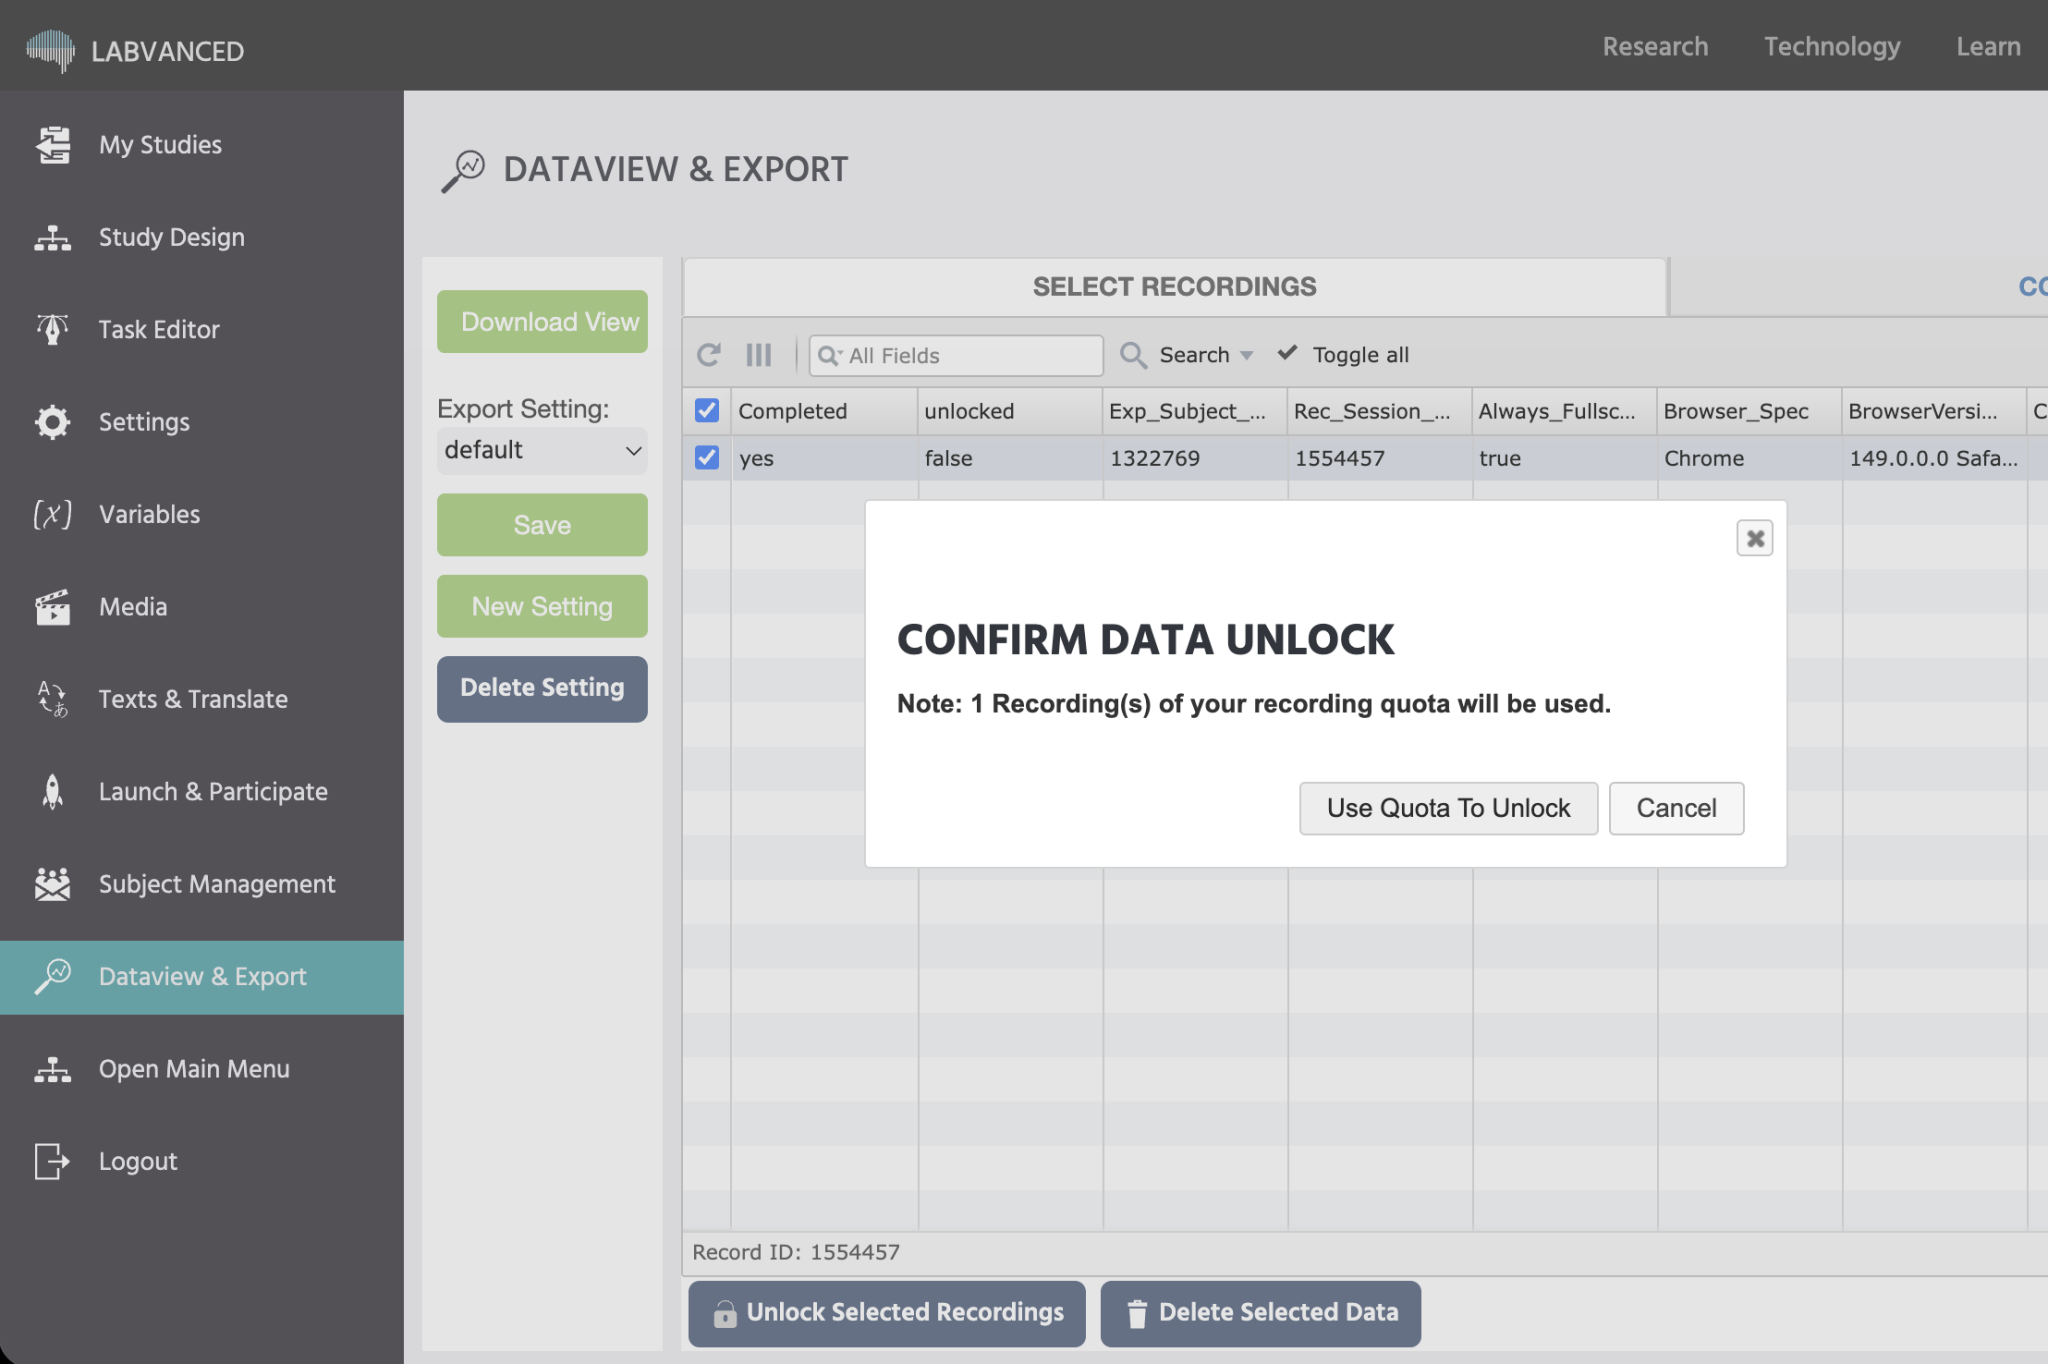
It opens a confirmation dialog before spending any quota:
Delete Selected Data
Delete Selected Data deletes the selected recordings immediately. This is not the same as the soft-delete behavior described under Accidental Deletion, which only applies when a study is switched from a recording state back to an editing state and gives you a one-month recovery window.
Warning
Delete Selected Data cannot be undone.
The left panel manages named export configurations: the Export Setting dropdown switches between saved settings, Save writes your current selections and export format into the active setting, New Setting duplicates it under a new name, and Delete Setting removes it.
Clicking Download View switches from selecting recordings to previewing them:

The file tree on the left lists every file the export will generate for a session (for example sessions.csv, trials.csv, and a binaries folder for any recorded media). Clicking a file previews its exact contents in the table on the right, letting you confirm the output before spending a download. Download starts the download; Selection View returns you to the recordings grid to change your selection.
Configure Export
The Configure Export panel decides what the downloaded files contain and how they're structured, from which variables and directory layout down to the file format itself. Its settings apply to every recording selected in Select Recordings, and are saved as part of whichever named Export Setting is currently active. It's worth getting these right before downloading, since they determine exactly what you'll be working with afterward in your analysis software.
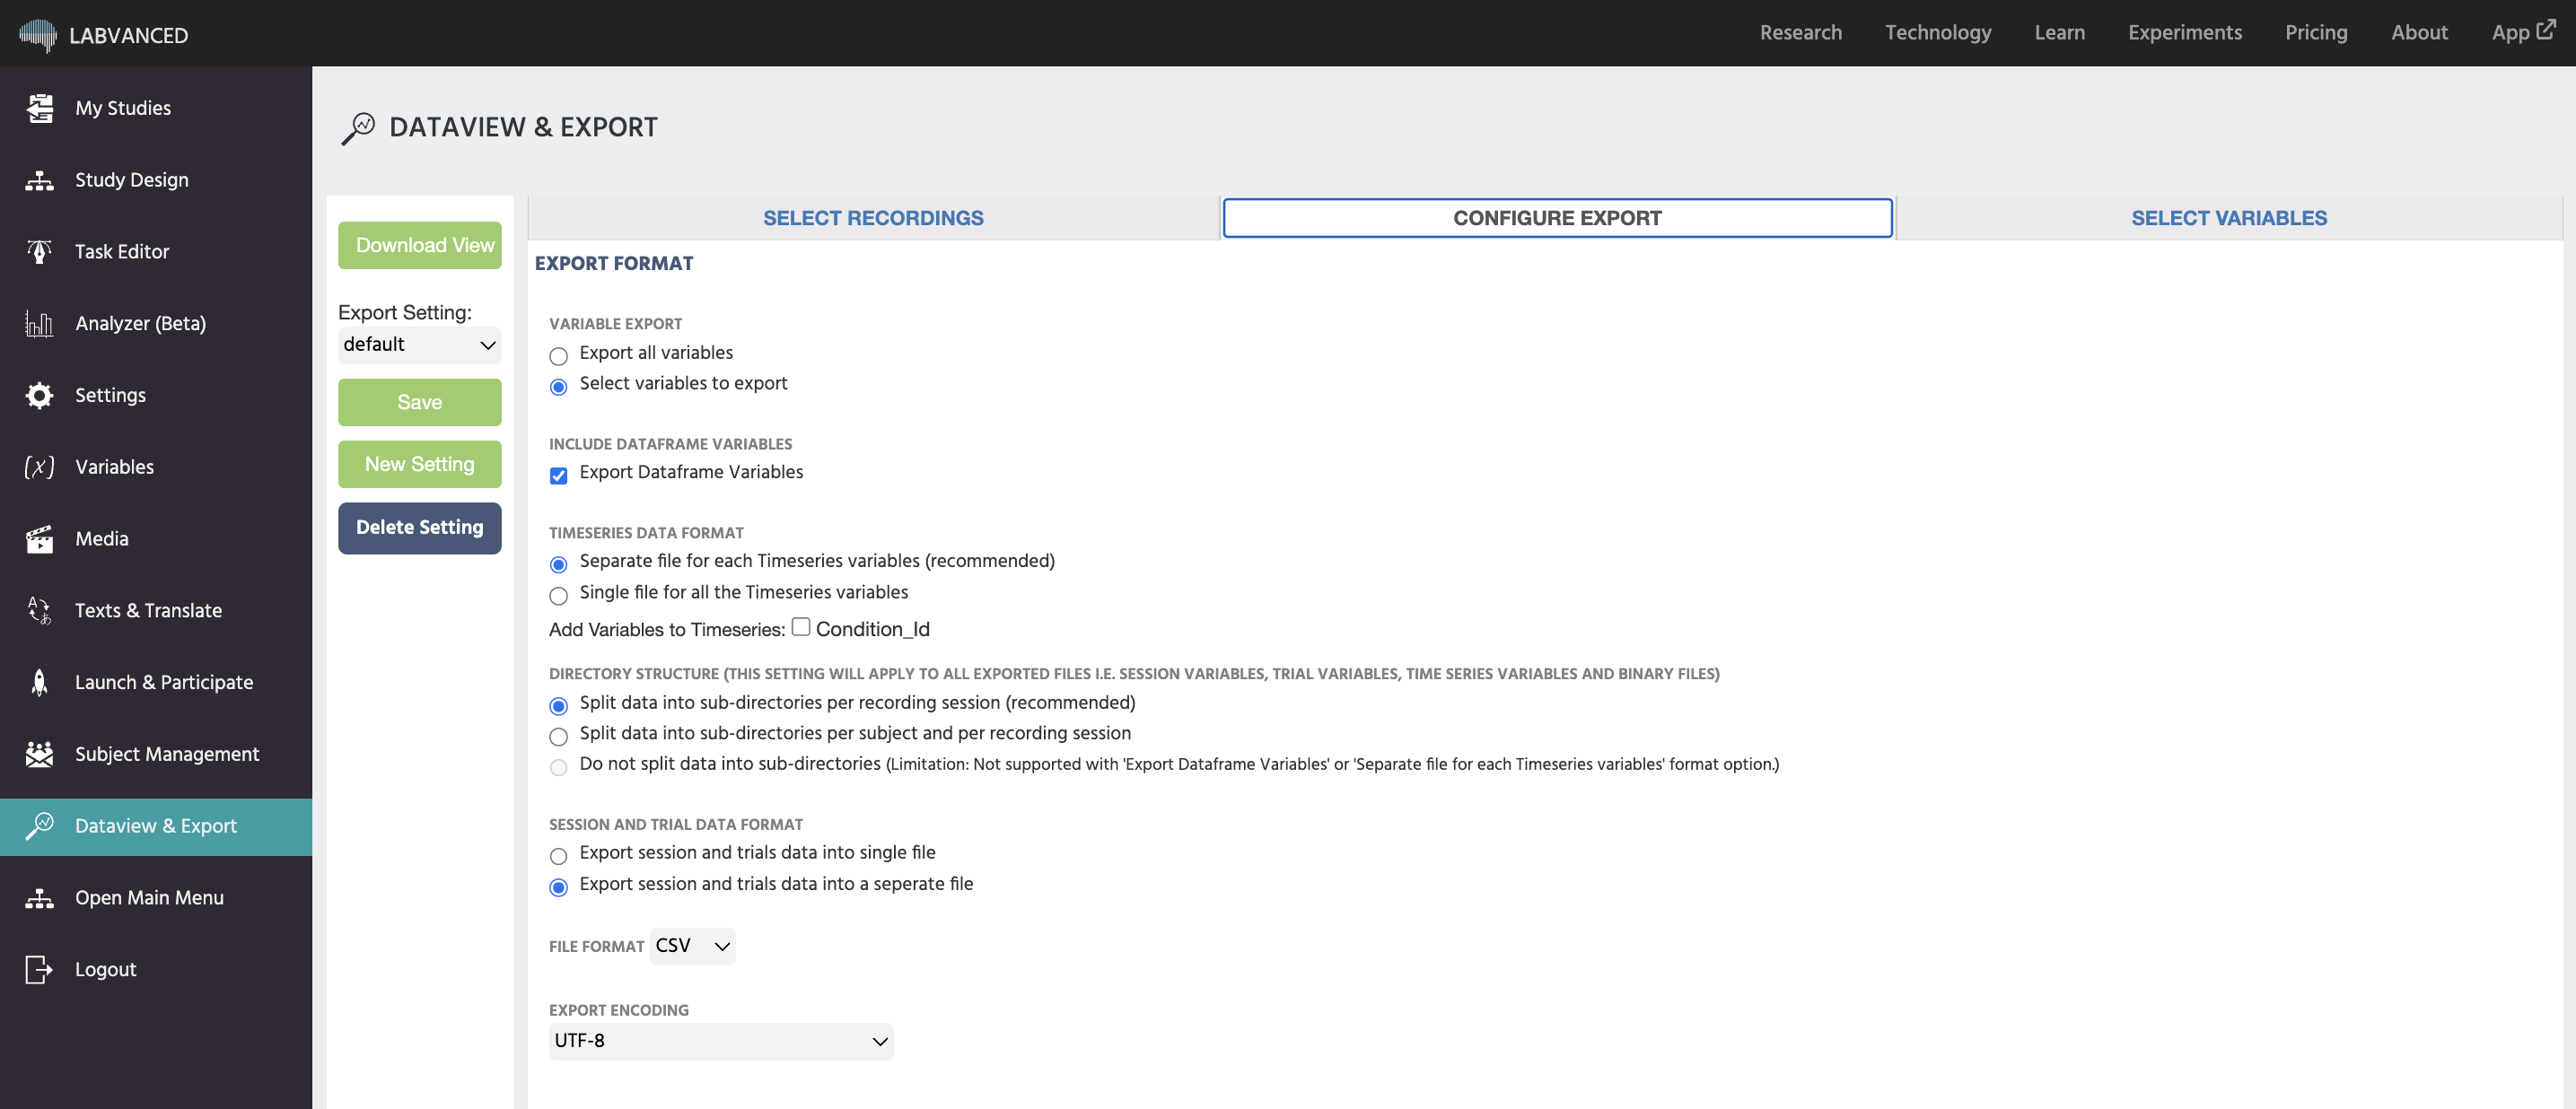
Configure Export holds every setting that shapes the downloaded files:
Variable Export
Controls whether the export includes every variable recorded in the study, or only a hand-picked subset.
Export all variablesSelect variables to export: makes the Select Variables panel appear, where you choose exactly which variables to include.
Path: Dataview & Export tab → Configure Export panel → Variable Export
Include Dataframe Variables
A checkbox that includes data frame variables, values read in from an uploaded .csv file, in the export alongside the study's own recorded variables.
Path: Dataview & Export tab → Configure Export panel → Include Dataframe Variables
Timeseries Data Format
Controls how continuously recorded variables, such as eye tracking or mouse tracking, are split into files.
Separate file for each Timeseries variables (recommended): each timeseries variable gets its own file.Single file for all the Timeseries variables: every timeseries variable is combined into one file, organized by time, so variables may alternate by row.
An Add Variables to Timeseries: Condition_Id checkbox adds the condition ID as an extra column in the timeseries output.
Path: Dataview & Export tab → Configure Export panel → Timeseries Data Format
Directory Structure
Controls how the downloaded files are organized into folders. This setting applies to every exported file: session, trial, timeseries, and binary.
Split data into sub-directories per recording session (recommended)Split data into sub-directories per subject and per recording sessionDo not split data into sub-directories: not available together withExport Dataframe VariablesorSeparate file for each Timeseries variables.
Path: Dataview & Export tab → Configure Export panel → Directory Structure
Choosing Do not split data into sub-directories reveals one more option:
‣
Convert to long format / flatten trials
Collapses each subject down to a single row, with a separate column per variable and trial. With this checkbox on, a row of identifier checkboxes lets you choose which of Block, Block Nr, Task, Task Nr, Trial Id, and Trial Nr label each flattened column's header.
Path: Dataview & Export tab → Configure Export panel → Directory Structure is Do not split data into sub-directories → Convert to long format / flatten trials
Session and Trial Data Format
Controls whether session-level and trial-level data are combined into one file or kept apart.
Export session and trials data into single fileExport session and trials data into a seperate file
Path: Dataview & Export tab → Configure Export panel → Session and Trial Data Format
File Format
CSVTSVXLSX
Path: Dataview & Export tab → Configure Export panel → File Format
Export Encoding
UTF-8UTF-16: recommended for Microsoft Excel.
Path: Dataview & Export tab → Configure Export panel → Export Encoding
Select Variables
This panel is conditional
Select Variables panel only appears if the option for Variable Export is set to Select variables to export under the Configure Export panel. Leaving it on Export all variables skips this panel entirely, it won't show up in the tab bar at all.
The Select Variables panel lets you narrow the export down to only the variables you actually need, instead of every variable Labvanced recorded. It's most useful for studies with a large number of variables, where only a handful matter for a given analysis.

It lists every variable recorded in the study, with its name, dataType, format, scope, recordType, and isDiagnostic status shown as columns. Check the box on any row to include that variable in the export.
Accidental Deletion
We understand that data can be accidentally deleted before it has been downloaded. To combat this, there is a backup feature called the soft delete provision.
With this feature, data is only "soft deleted" when the study is switched from "recording" back to "editing" mode. The data is considered soft deleted for one month only. Within that month, if you need to recover lost data, simply write to the Labvanced support team with the study ID (the 5-digit number in the URL), your name, and the title of the study. An administrator will assist you in recovering the data. This will only be possible for data that is less than 1 month old.