Attentional Capture Study with Mouse Tracking Walkthrough
Welcome to another Labvanced walkthrough for study creation! In this walkthrough, we will create one of the notable visual search paradigm, the Attentional Capture paradigm. But beyond the standard response measurements, we will also implement the mouse tracking feature to measure mouse movement events. Attentional capture is a notable task examining the viewer’s attention when they observe both the target and the abrupt distractor that could capture their attention (see Figure 1 below). This paradigm is often used to assess how our goal-oriented attention could be modulated by the stimulus-driven events (e.g., distractors) and how different populations may exhibit different patterns of attention control based on previous conditions (i.e., disorders, TBIs) and experiences (e.g., expertise, multilingualism, video game experience, etc.).
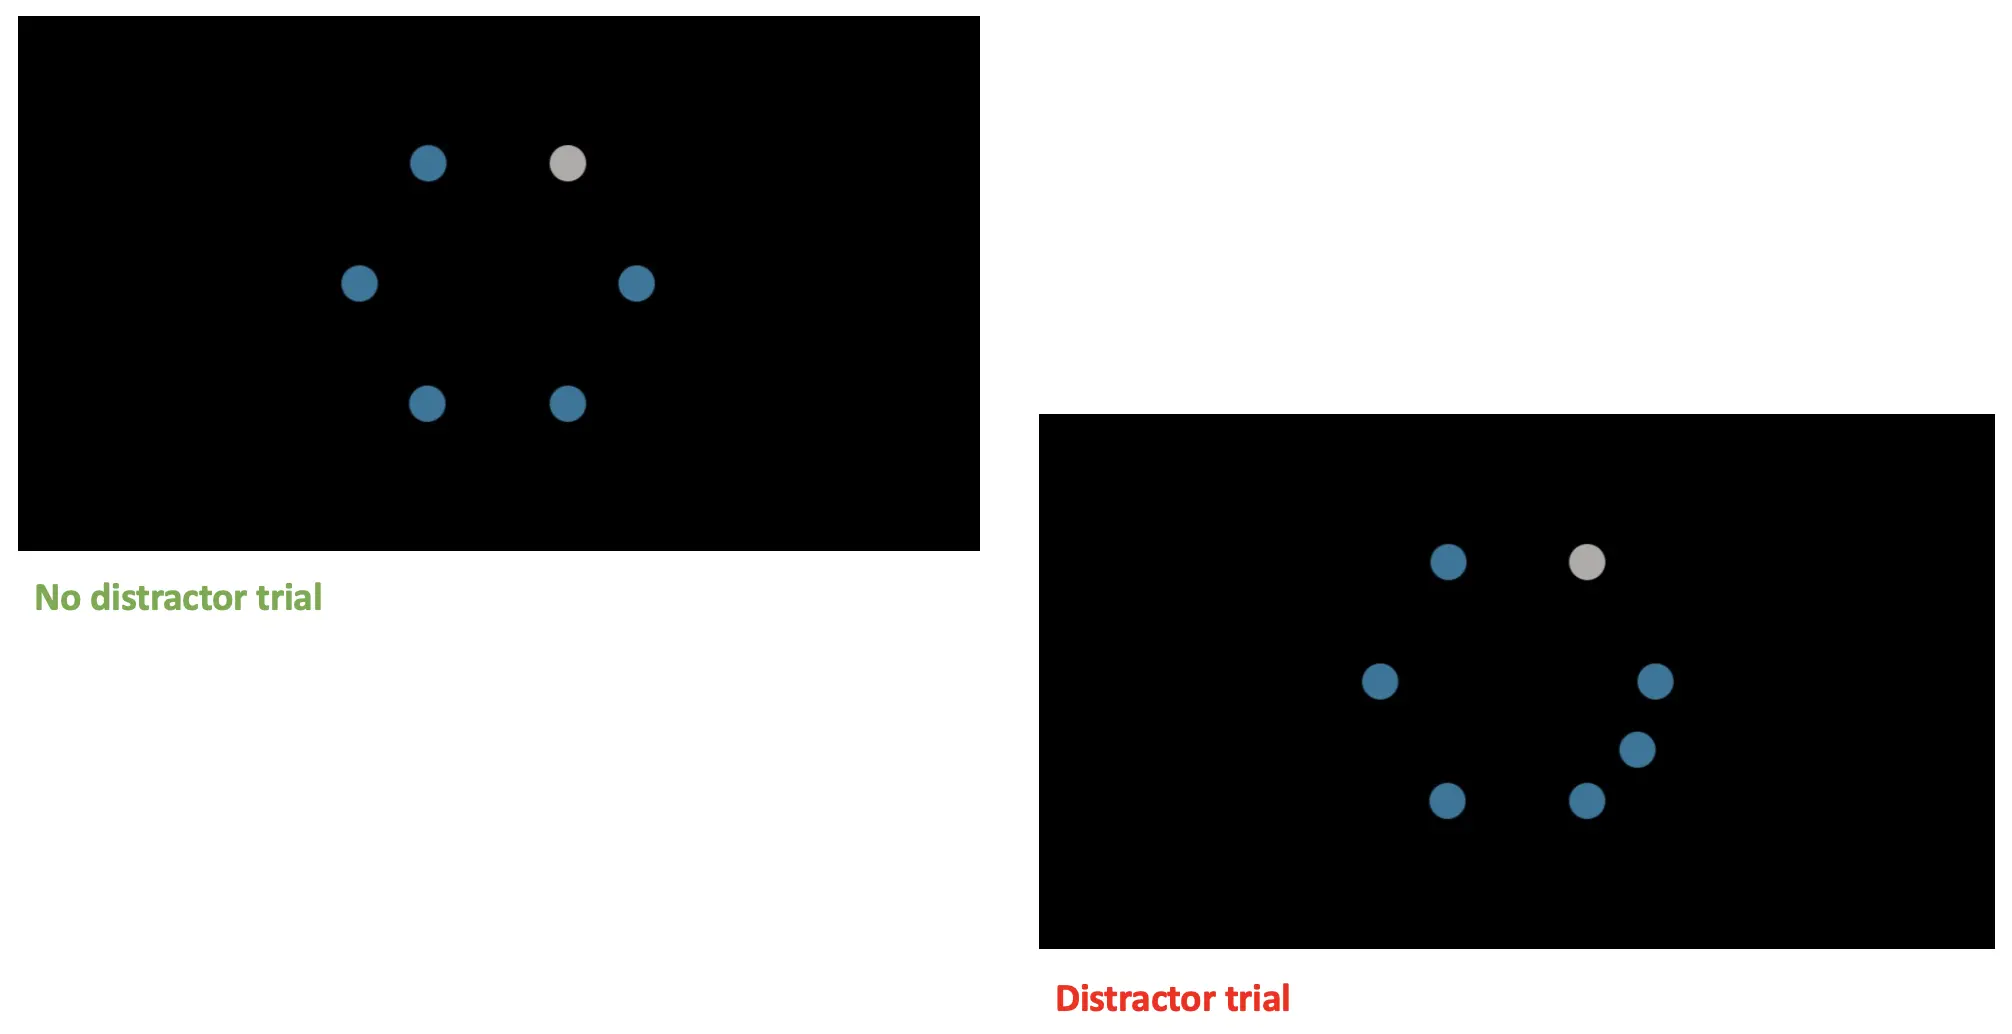 Figure 1. Display sample trials with no distractor on top and distractor present at 90 degrees from the gray target at the bottom.
Beyond the standard behavioral reaction time and accuracy measurements with which this paradigm is conventionally measured, this paradigm will also involve measuring the mouse movements during the primary target detection task while avoiding the onset distractors. More specifically, we will measure the X & Y positions of the mouse for the start of every trial and display the mouse movement events on the screen as a feedback display. As with other study creations, we will approach creating this study in 5-parts, comprising:
- Variable determination (IVs & DVs)
- Frames setup
- Stimuli setup
- Events setup
- Block setup
For the display sequence that the participants will see (see Figure 2 below), the trial will comprise of:
- Frame 1: 150ms of the fixation cross
- Frame 2: Display of 6 gray circles
- Frame 3: All gray circles except for 1 (target) changes to blue
- No distraction trials - no presentation of the extra blue circle
- Distraction trials - presentation of the extra blue circle in either 90 degrees or 150s from the target
- Frame 4: Message screen prompting to move the mouse cursor to the central display
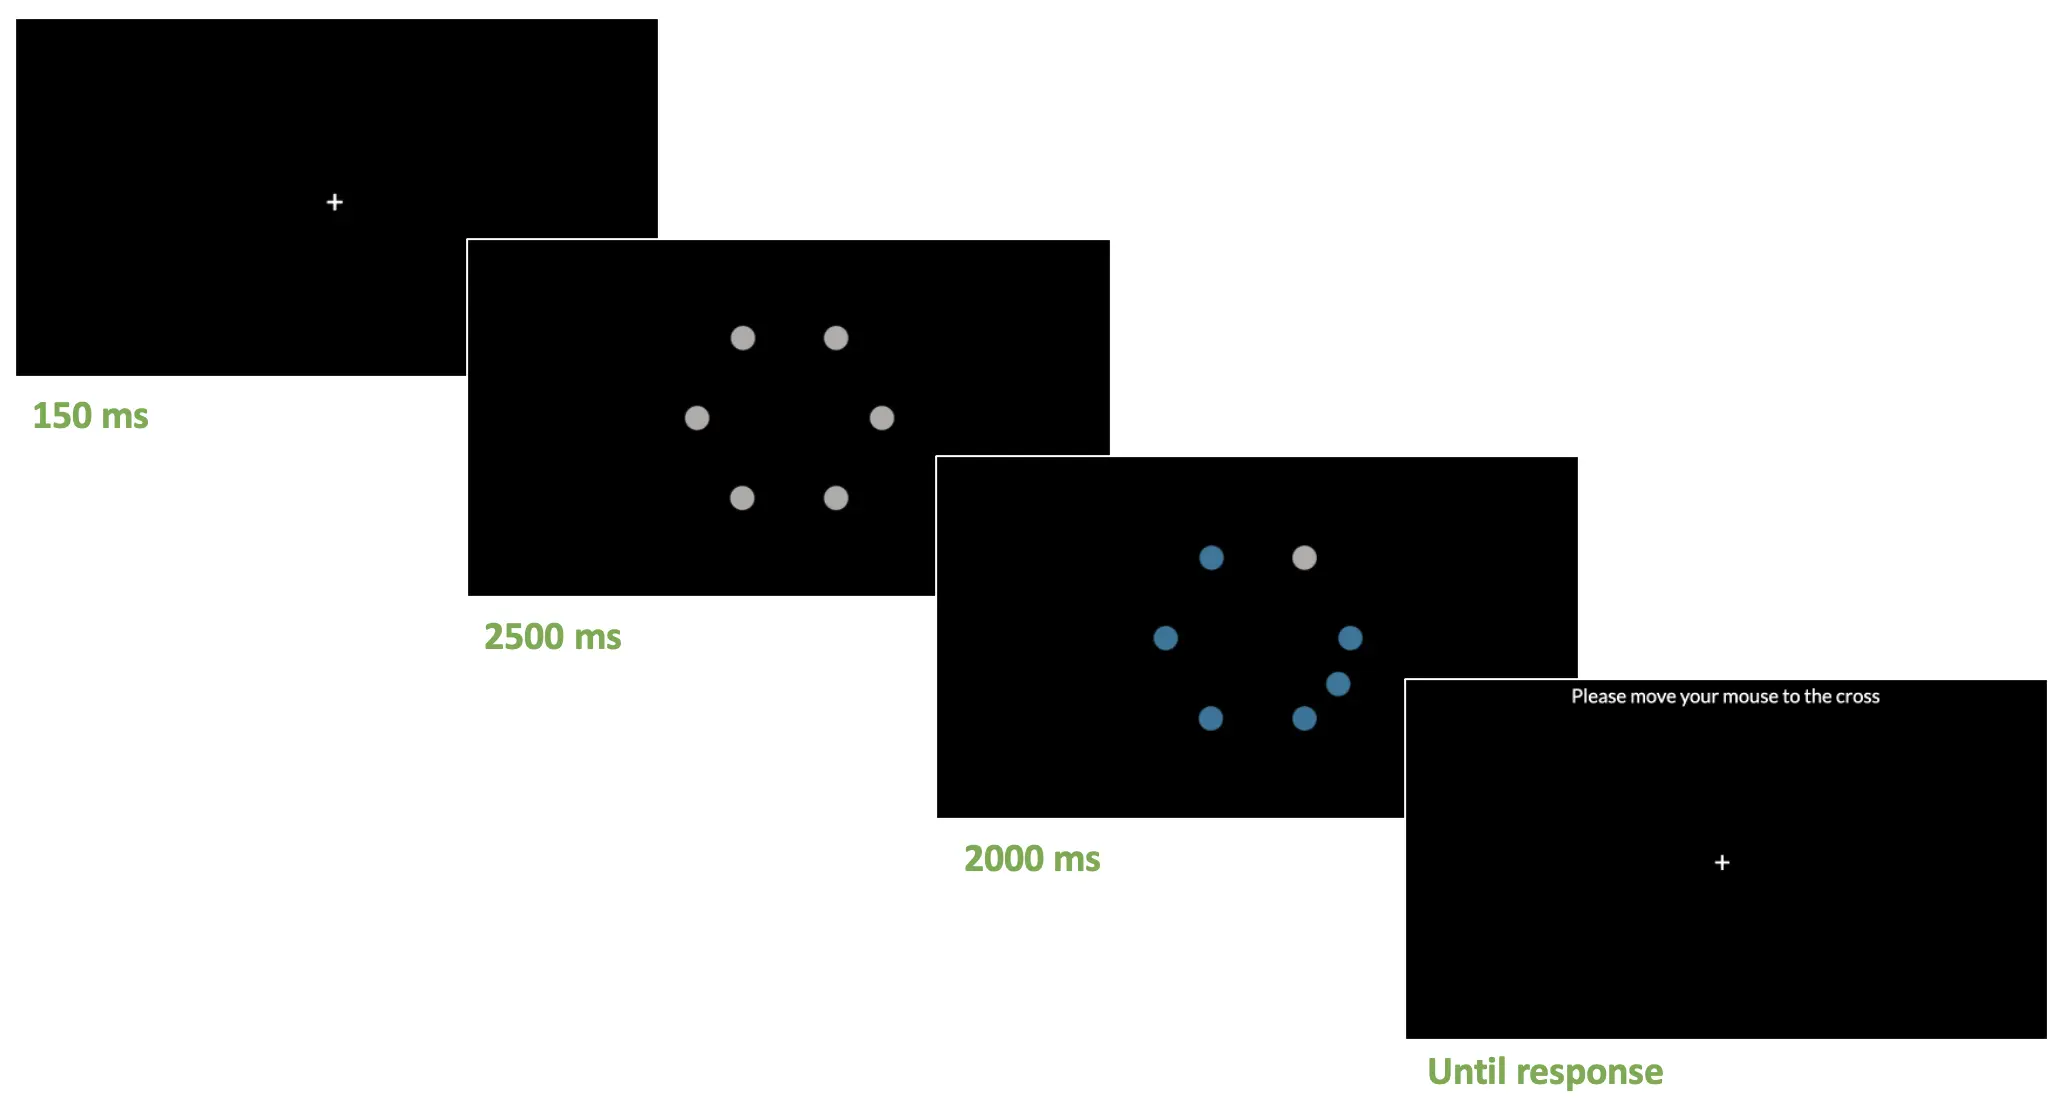 Figure 2. Display of a distractor trial sequence. The participant is required to move the mouse cursor at the central fixation to jump to the following trial sequence.
Beyond this step-by-step walkthrough, the complete study template is also available using this link. With that context and introduction, let’s dive into creating the first task by determining the critical variables for this study.
Part I: Variable Determination with Lavanced Factor Tree
Consistent with the other study walkthroughs, determining the variables and their levels (or categories) would be the first step in planning the conditions and subsequent trial setup. First, refer to the Factor Tree located on the left side of the Labvanced display to determine the factors (or independent variables) and their associated levels. For the current walkthrough, the factors and their levels will be as follows:
Trial Group → Main trials
- Factor 1 - Distractor
- a. Level 1 - No distractor
- b. Level 2 - 90 degrees (extra blue circle will appear 90 degrees on either side from the gray target
- c. Level 3 - 150 degrees (extra blue circle will appear 150 degrees on either side from the gray target
- Factor 2 - Target position
- a. Level 1 - 1 (position 1: northeast position)
- b. Level 2 - 2 (position 2: east)
- c. Level 3 - 3 (postiion 3: southeast)
- d. Level 5 - 4 (position 4: south)
- e. Level 5 - 5 (position 5: southwest)
- f. Level 6 - 6 (position 6: northwest)
It is noteworthy that Factor 1 is the primary independent variable for the research investigation, and Factors 2 is specified to account for all possible target locations (i.e., the gray target is present at an equal rate). Later, a researcher could collapse Factor 2 during the data compilation process to assess the distractor effect through reaction times analysis and the mouse track assessment.
The full display of this setup in the Factor Tree is also depicted below (see Figure 3A). With this 3 X 6 orthogonal setup, Labvanced will create 18 different conditions (see Figure 3B) in the Trials & Conditions with each factor combination. As depicted, this leads to all possible combinations of Distractor X Target position. Also, we can determine the number of trials per condition, and we will set 4 trials per each no distractor conditions, but we will set 2 trials for every 90 degrees and 150 degrees conditions.
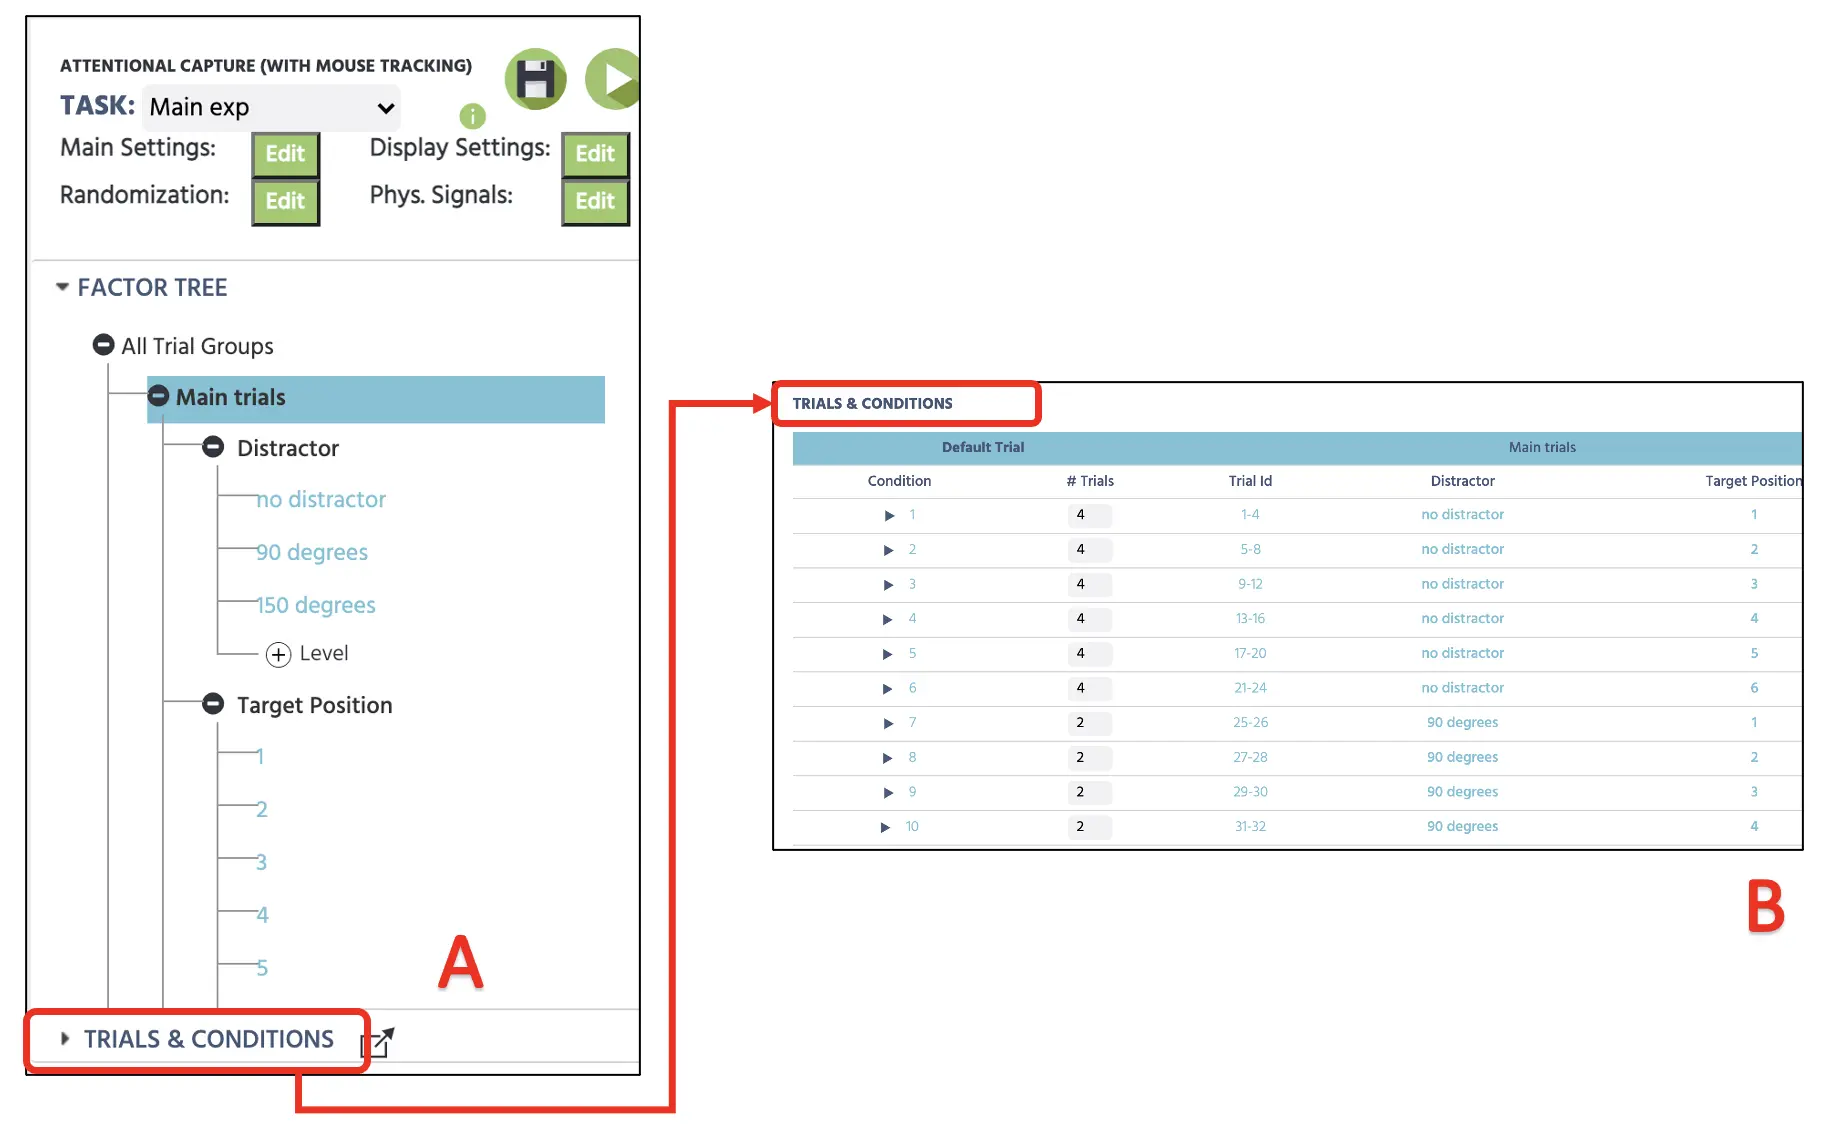 Figure 3. Initial canvas setup depicting determining factors with levels in the Factor Tree (A) and subsequent combinations with four trials in no distraction and two trials in every (90 and 150 degrees) distraction condition.
The Labvanced will automatically vary the trial presentation depending on the Randomization Setting (see Figure 4). The default setting will remain as the first Random option to generate a random trial sequence, but this could be pre-determined with different possibilities (Fixed by Design or Hand). The current study will proceed with Random without any constraints, and this will randomly vary the trial presentation among the main and catch trials. For more information about the Randomization setting, please use this link for more details.
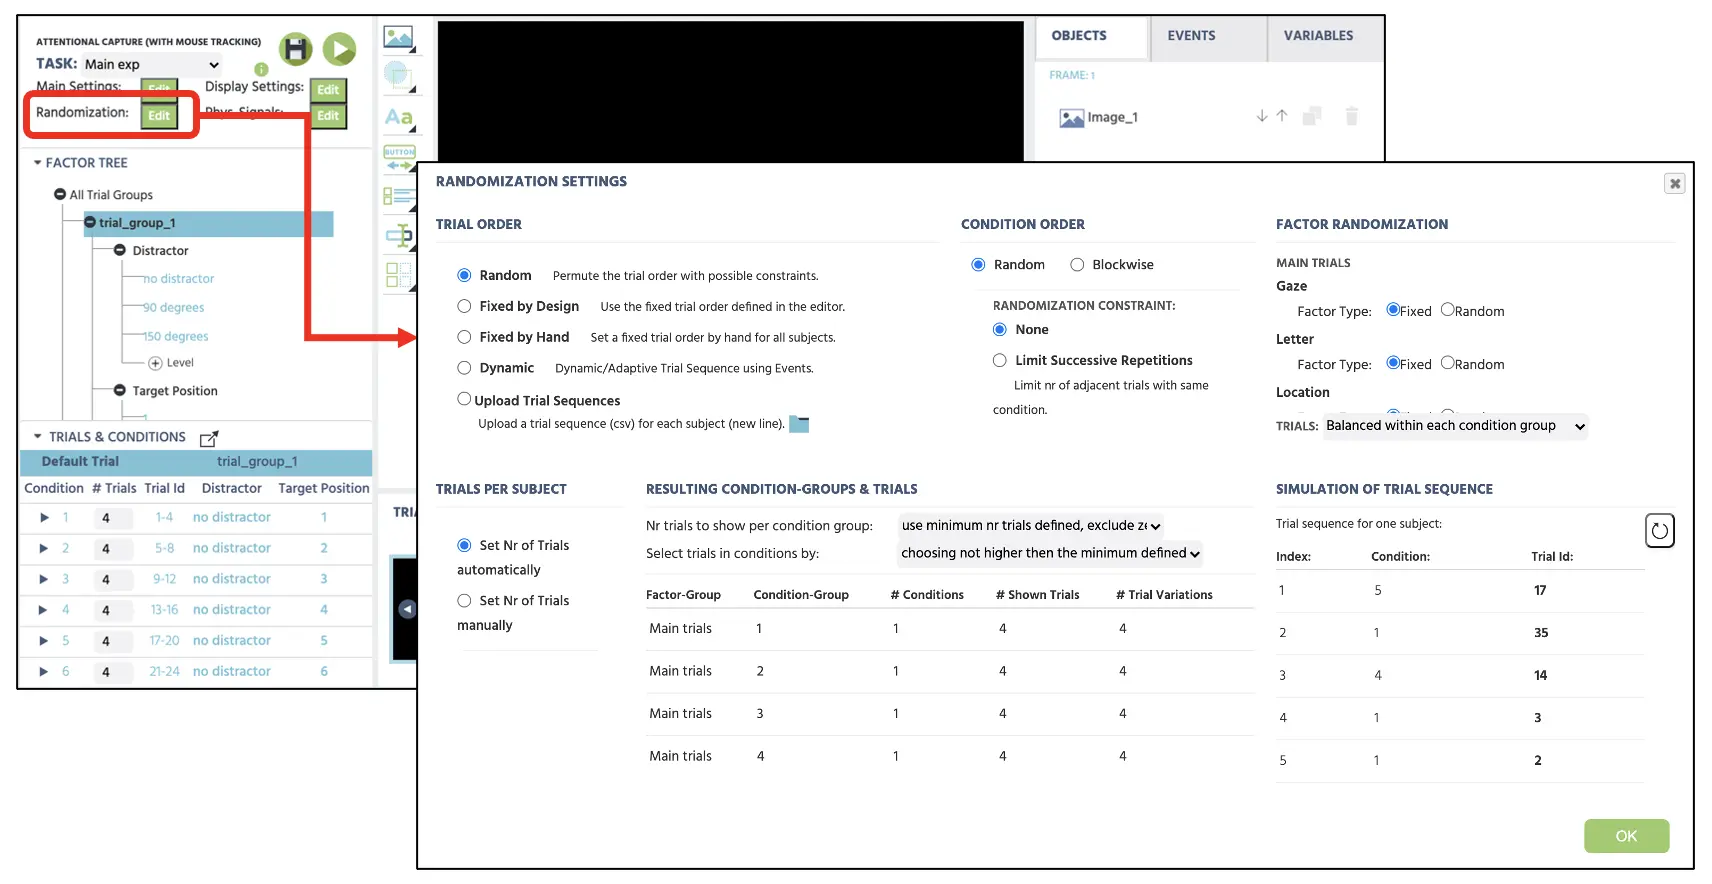 Figure 4. Display of Randomization setting with selected Random option to randomly present the trials without any constraints.
Part II: Frames setup
The second part of this walkthrough will create frames (stimuli presentation) that the participants will see during their participation. Again, the current task will follow the general procedure mentioned above (see Figure 2). As depicted, a trial will begin with a fixation cross (frame 1) for 150 ms, followed by the presentation of the six gray circles (frame 2) for 2500 ms. This will then proceed to the target and distractor presentation until the mouse click response (frame 3). After the target detection, the message screen will display instructing the observer to move the mouse cursor to the central location, which will prompt the subsequent trial.
To create these frames, we will click on the Canvas button at the bottom of the Labvanced display (see Figure 5A). Clicking this four times will display four new frames, and it would be ideal to name each frame immediately (e.g., fixation, pre, target, message) to maintain the study organization (see Figure 5B). Afterward, we will change the background color to black by clicking the color option (Figure 5D) under the same Frame setting. Before proceeding, it would be essential to click on the Default trial to highlight this row (see Figure 5C). This part serves as the default template for all the conditions below. While highlighted, any changes in the four frames will apply to all conditions (i.e., adding a fixation cross in the 1st frame will apply to all 48 trials), so this would be convenient to avoid unnecessary and repetitive setups. With this, we now have all the necessary frames to present the trial sequence. In the next part, we will add all the stimuli in each canvas that the participants will view during their participation.
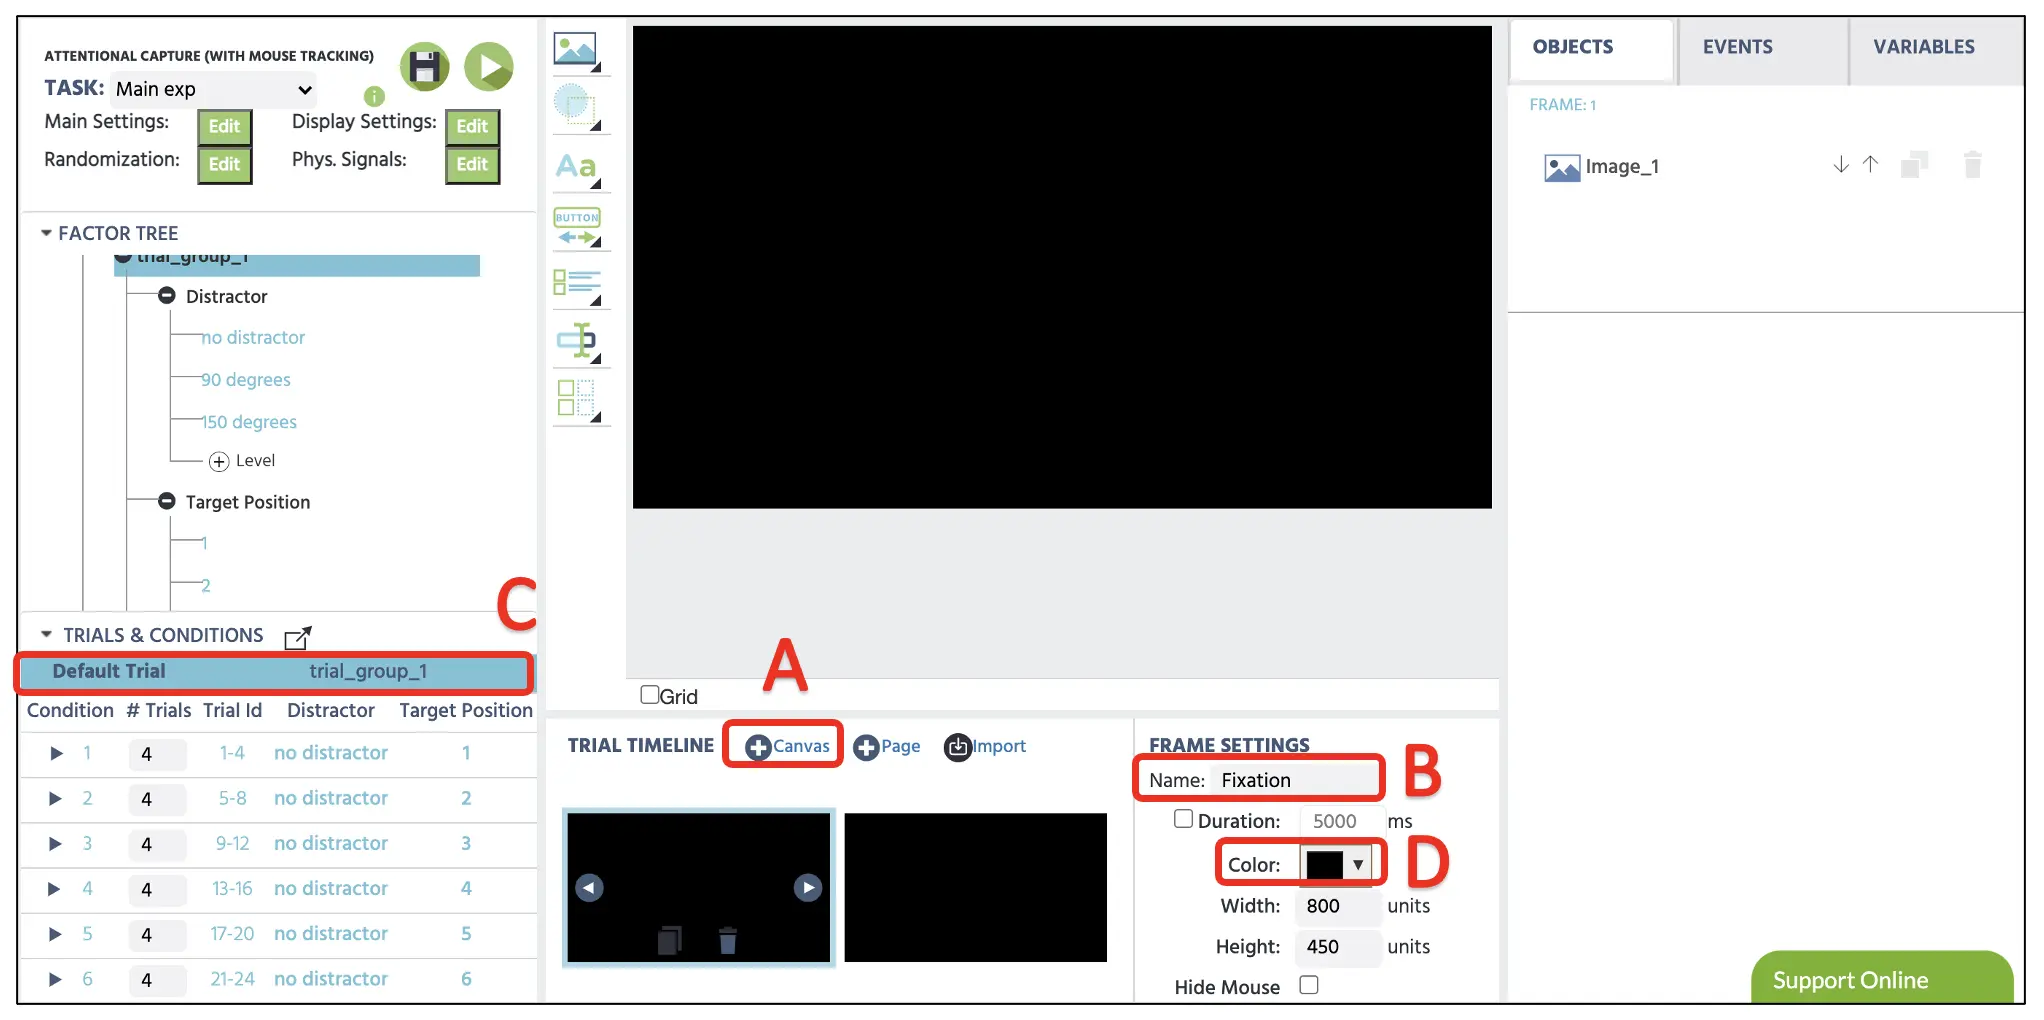 Figure 5. Display of sample trial with Canvas frame creation (A), frame name (B), Default Trial (C), and frame color option (D).
Part III: Stimuli setup (fixation cross, target images, and message display)
Frame 1
With the four frames we have prepared in the last part, we will now set the individual stimulus in each frame, starting with the fixation cross in the 1st frame. Again, make sure that the Default Trial is highlighted (See Figure 5C above). To create a fixation cross, we can start by clicking on the Display Text (see Figure 6A) to implement the textbox in the canvas. Here, we can type in the + in the box with a white-colored font size 36 and position it in the center of the display. We could also type in the specific X & Y frame coordinates at the Object Properties on the right side for the precise center position. If we want to upload the image containing the fixation cross or different stimuli, the Media option (see Figure 6B) can present images, videos, audios, etc. We will simply type in the display text for the current walkthrough, but we will eventually use the Media option to present the target pictures.
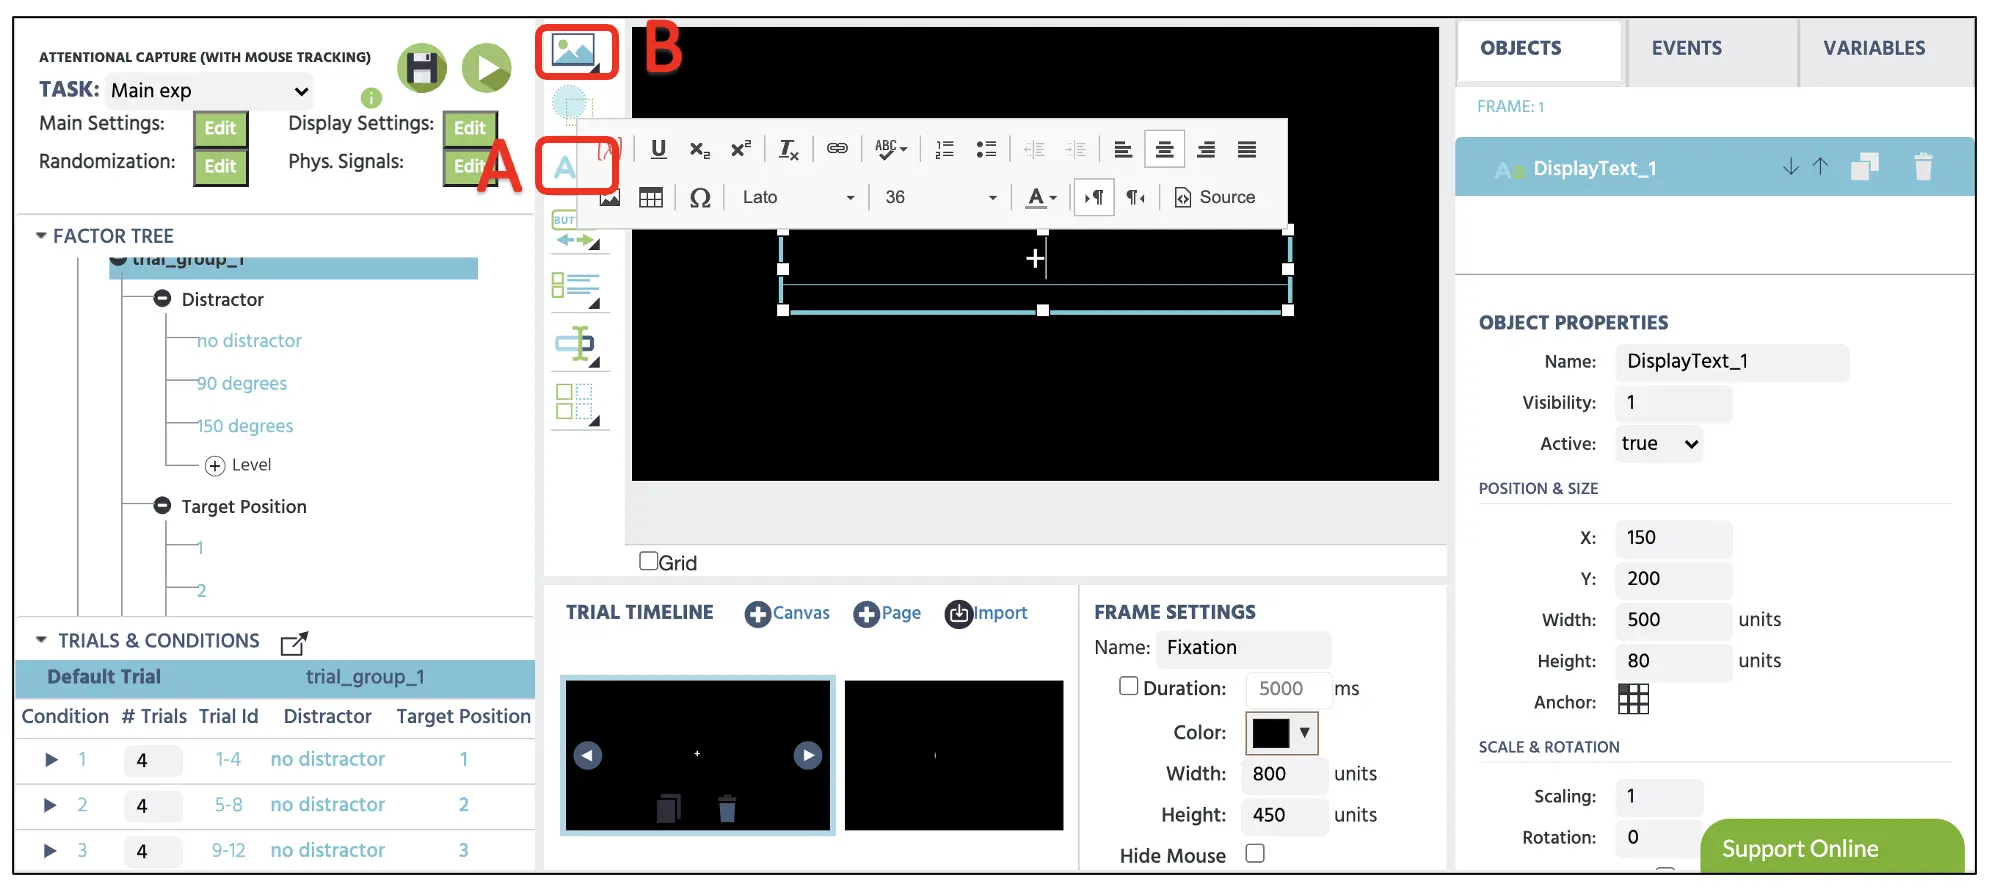 Figure 6. Display of fixation frame creation with the Display Text option(A). Images, videos, and audios could be presented via Media option (B).
Frame 2
Before proceeding, ensure we have the Default trial selected (see Figure 5 above) so that the pre(target) presentation will be implemented throughout the 48 trials. To add the pre-image to the 2nd frame, click on the Media option (see Figure 5 above) and select Image. This will prompt the Image Property in the canvas display, which we could use the Object Properties on the right side to adjust the position, size, and image we want to display from the Labvanced file storage. Let’s access the file storage to import all the gaze images by clicking on the File icon (see Figure 7). This will open the file storage window to upload and select the stimuli that we will display. All the images should already be available in the file storage within the completed template, but the separate images are also downloadable using the link below. For the file coding, refer to the table below for its interpretation.
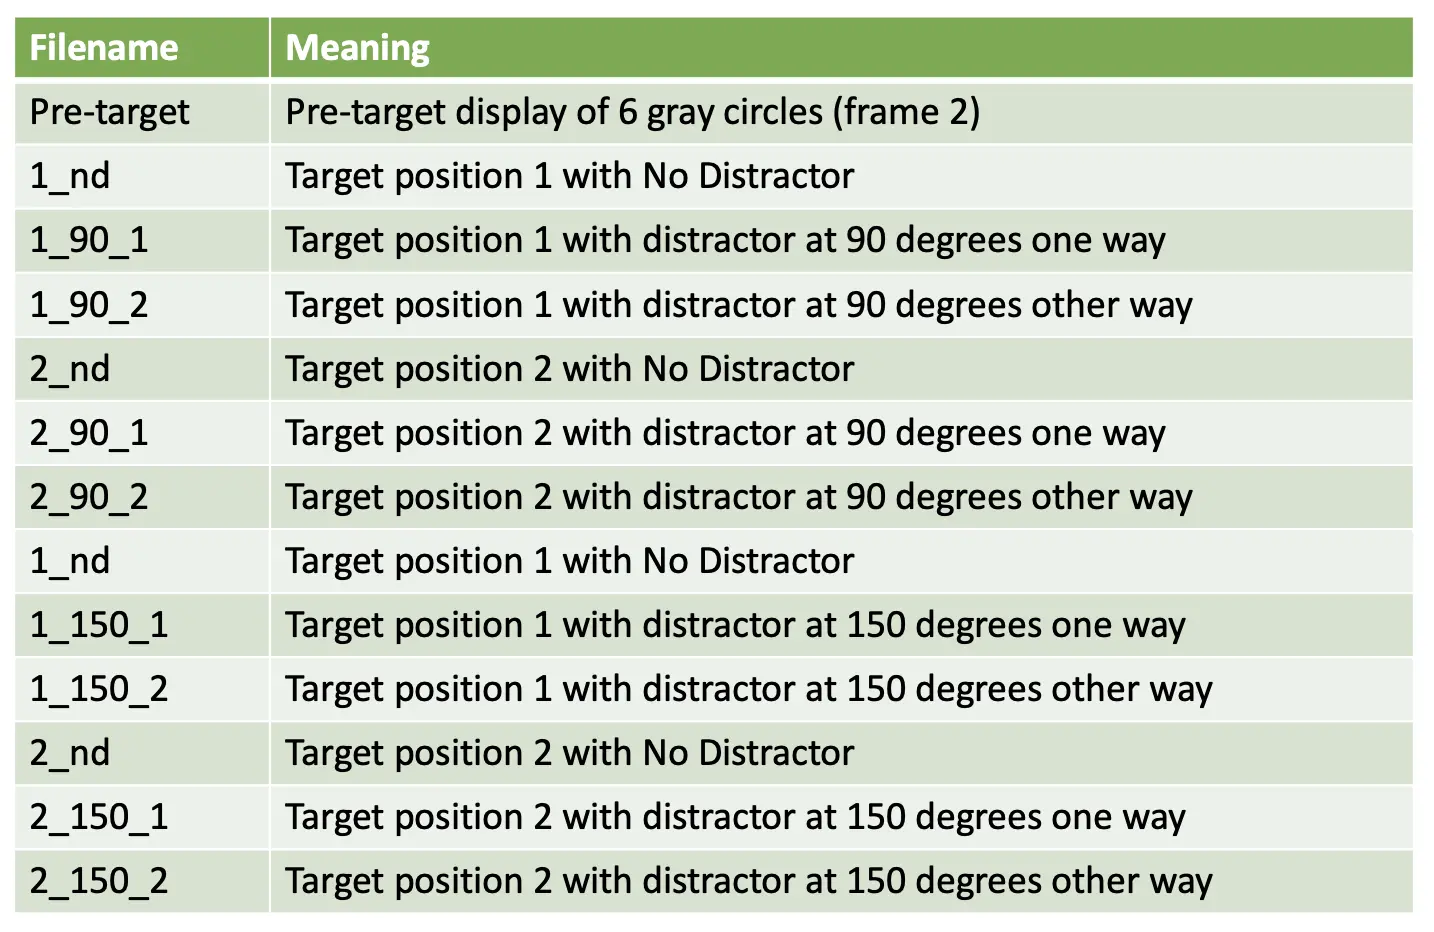 Table 1. A brief overview of the file coding and its interpretation for each stimulus.
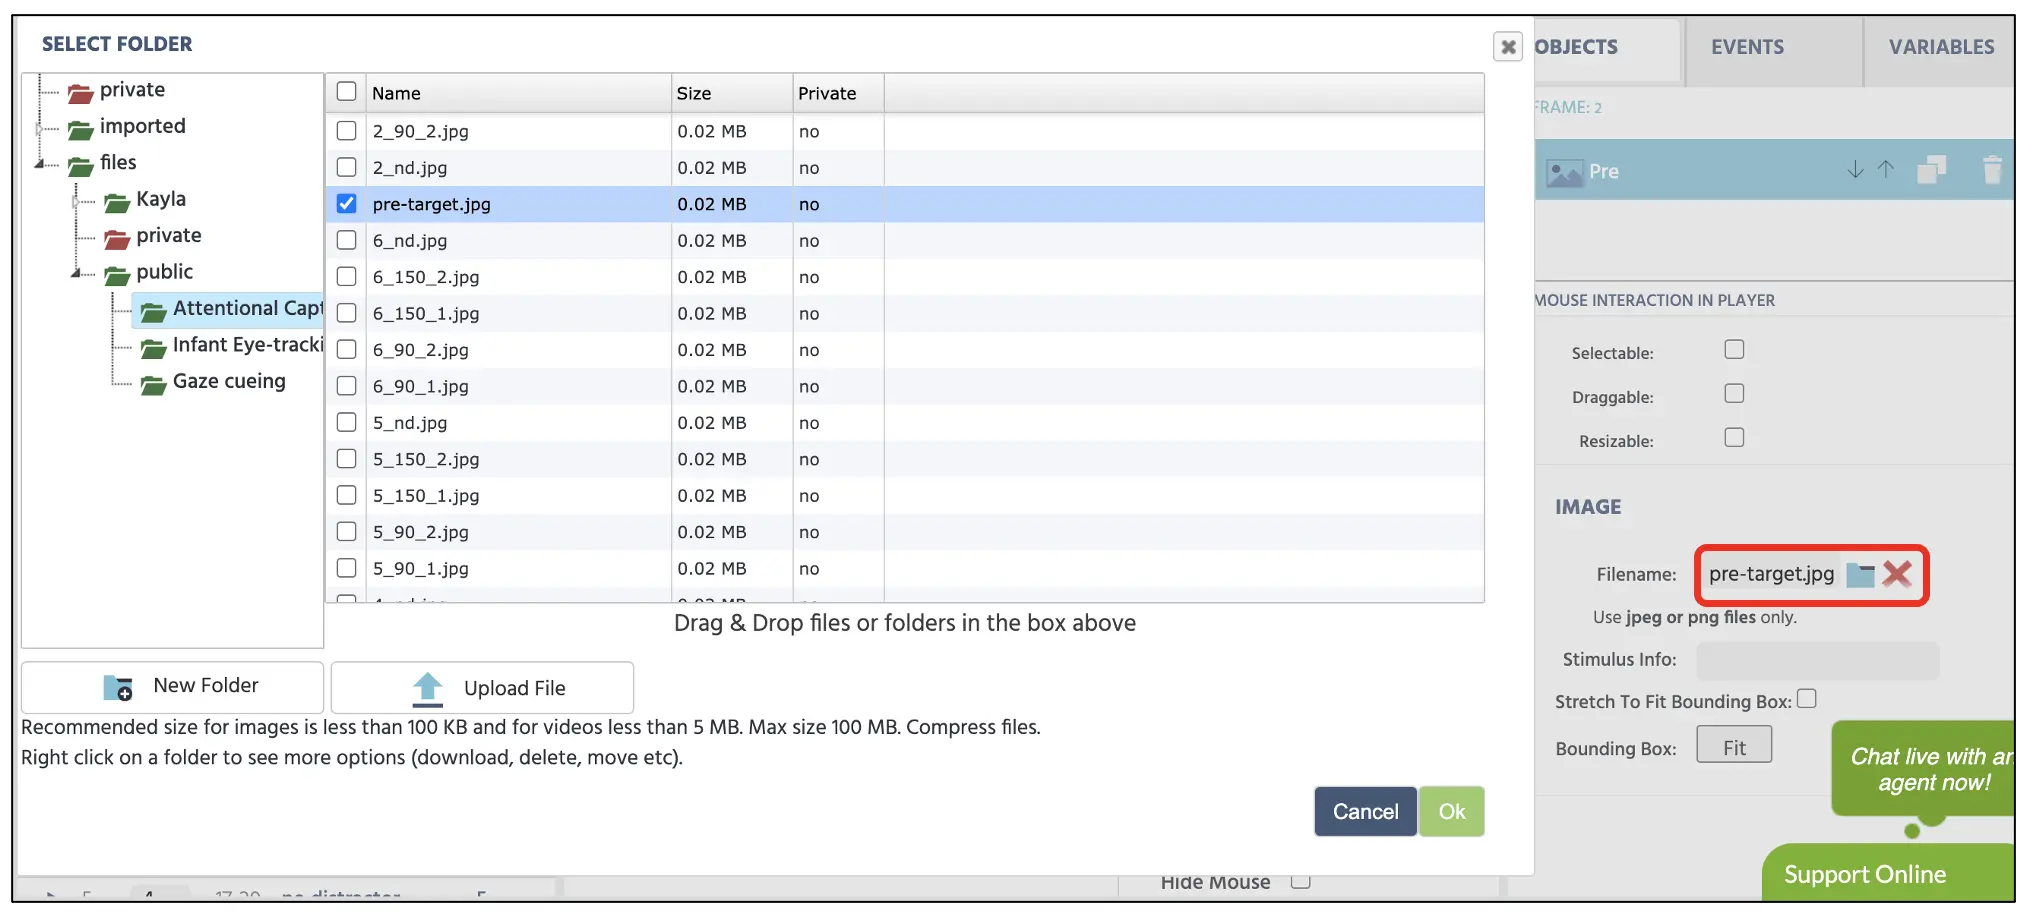 Figure 7. Display of file storage accessed by the file icon in the red box.
Following the pre-target selection from the storage, the canvas will display the image according to the orientation and size determined by the Object Properties set up at the right side of the display (see Figure 8 below).
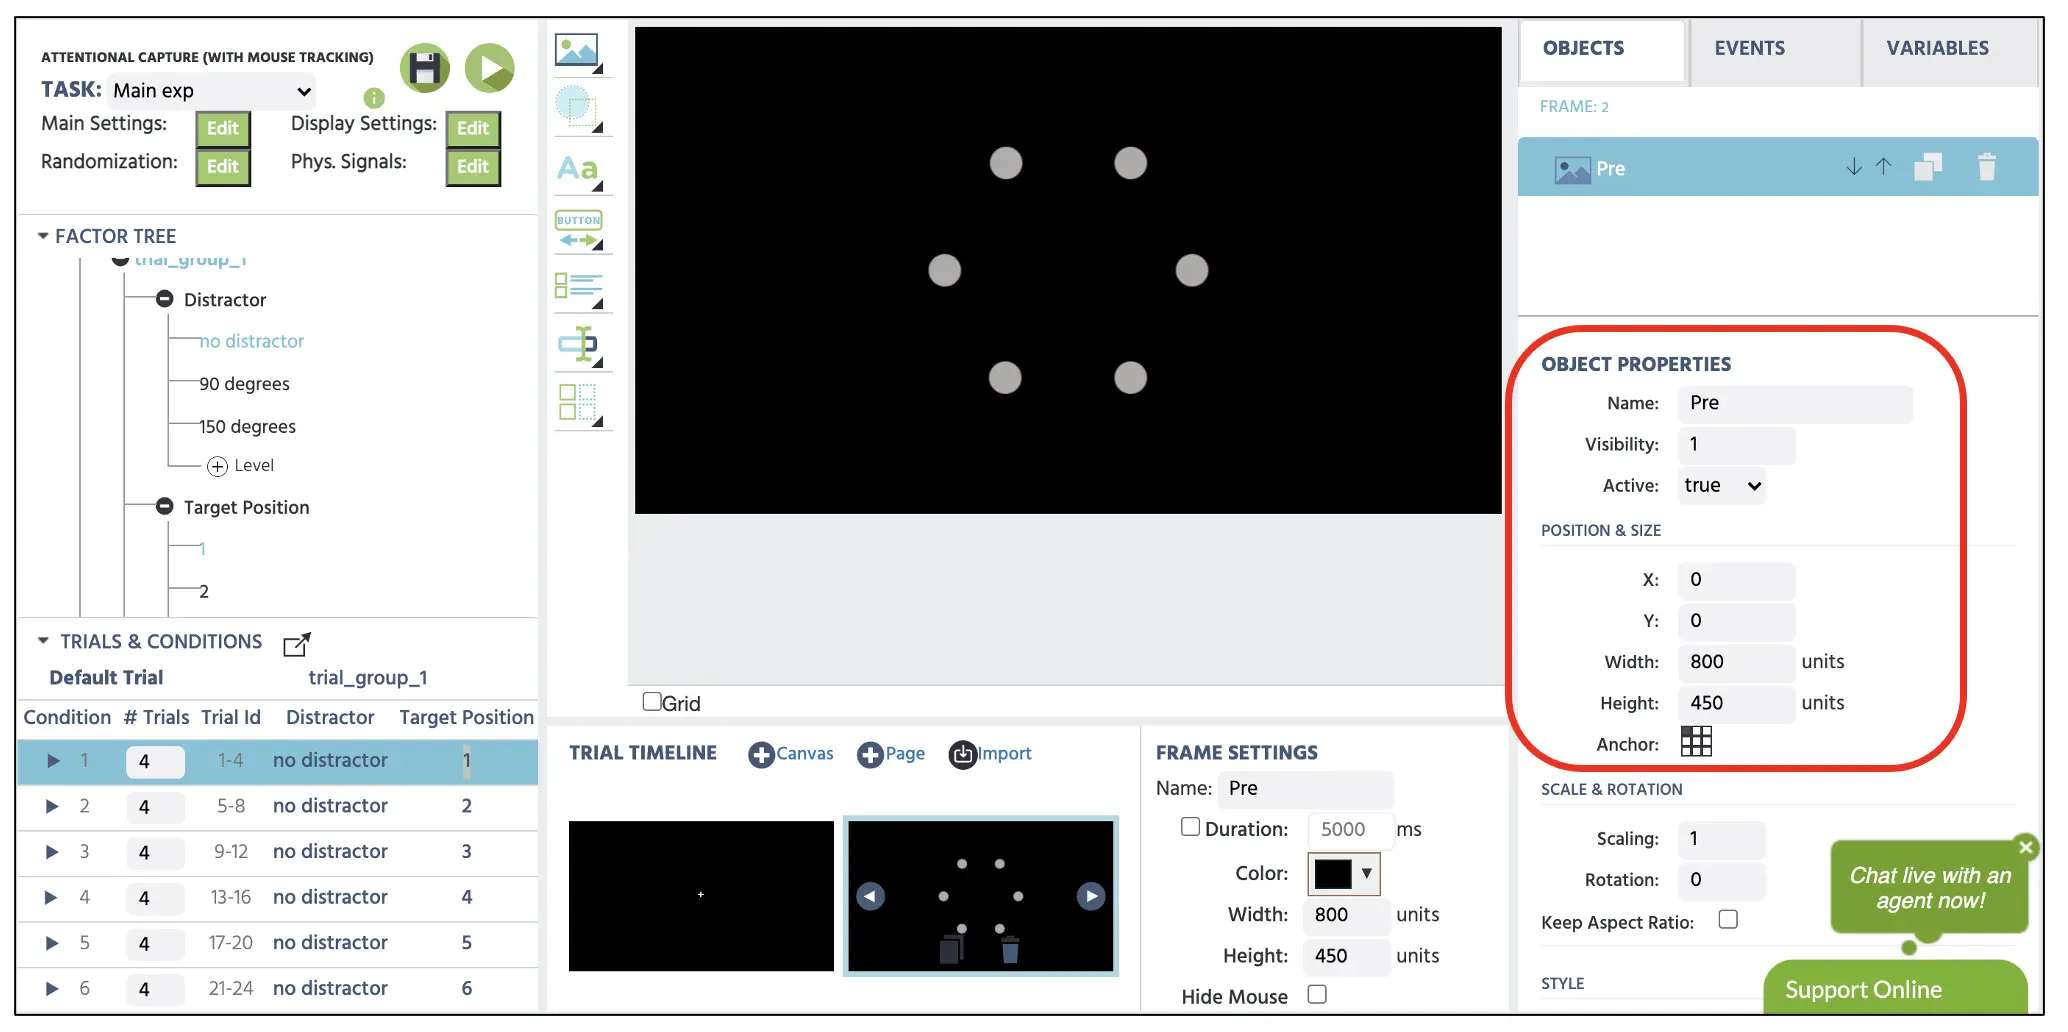 Figure 8. Display of pre-target image with object properties option in the red box.
Frame 3
The 3rd frame setup will follow the same procedure as the 2nd frame above. However, we will not select the Default Trial and select each condition below as the guideline to display a specific image depending on the distraction and target position factors. Looking at condition 1 (make sure condition 1 is selected), we present four no distraction trials where the target position appears at position 1 (northeast). After using the same Media option and opening the file storage, make sure to select the correct image for this condition (1_nd.webp) to display on canvas (see Figure 9) below. This will then apply to all four trials in this first condition. Make sure that the image has the exact dimensions as the pre-target image in the 2nd frame. For condition 2, we present four no distraction trials (2_nd.webp) where the target position appears at position 2 (east). Like so, we will refer to the Trials & Conditions as our guide to present the appropriate stimuli throughout the rest of the conditions.
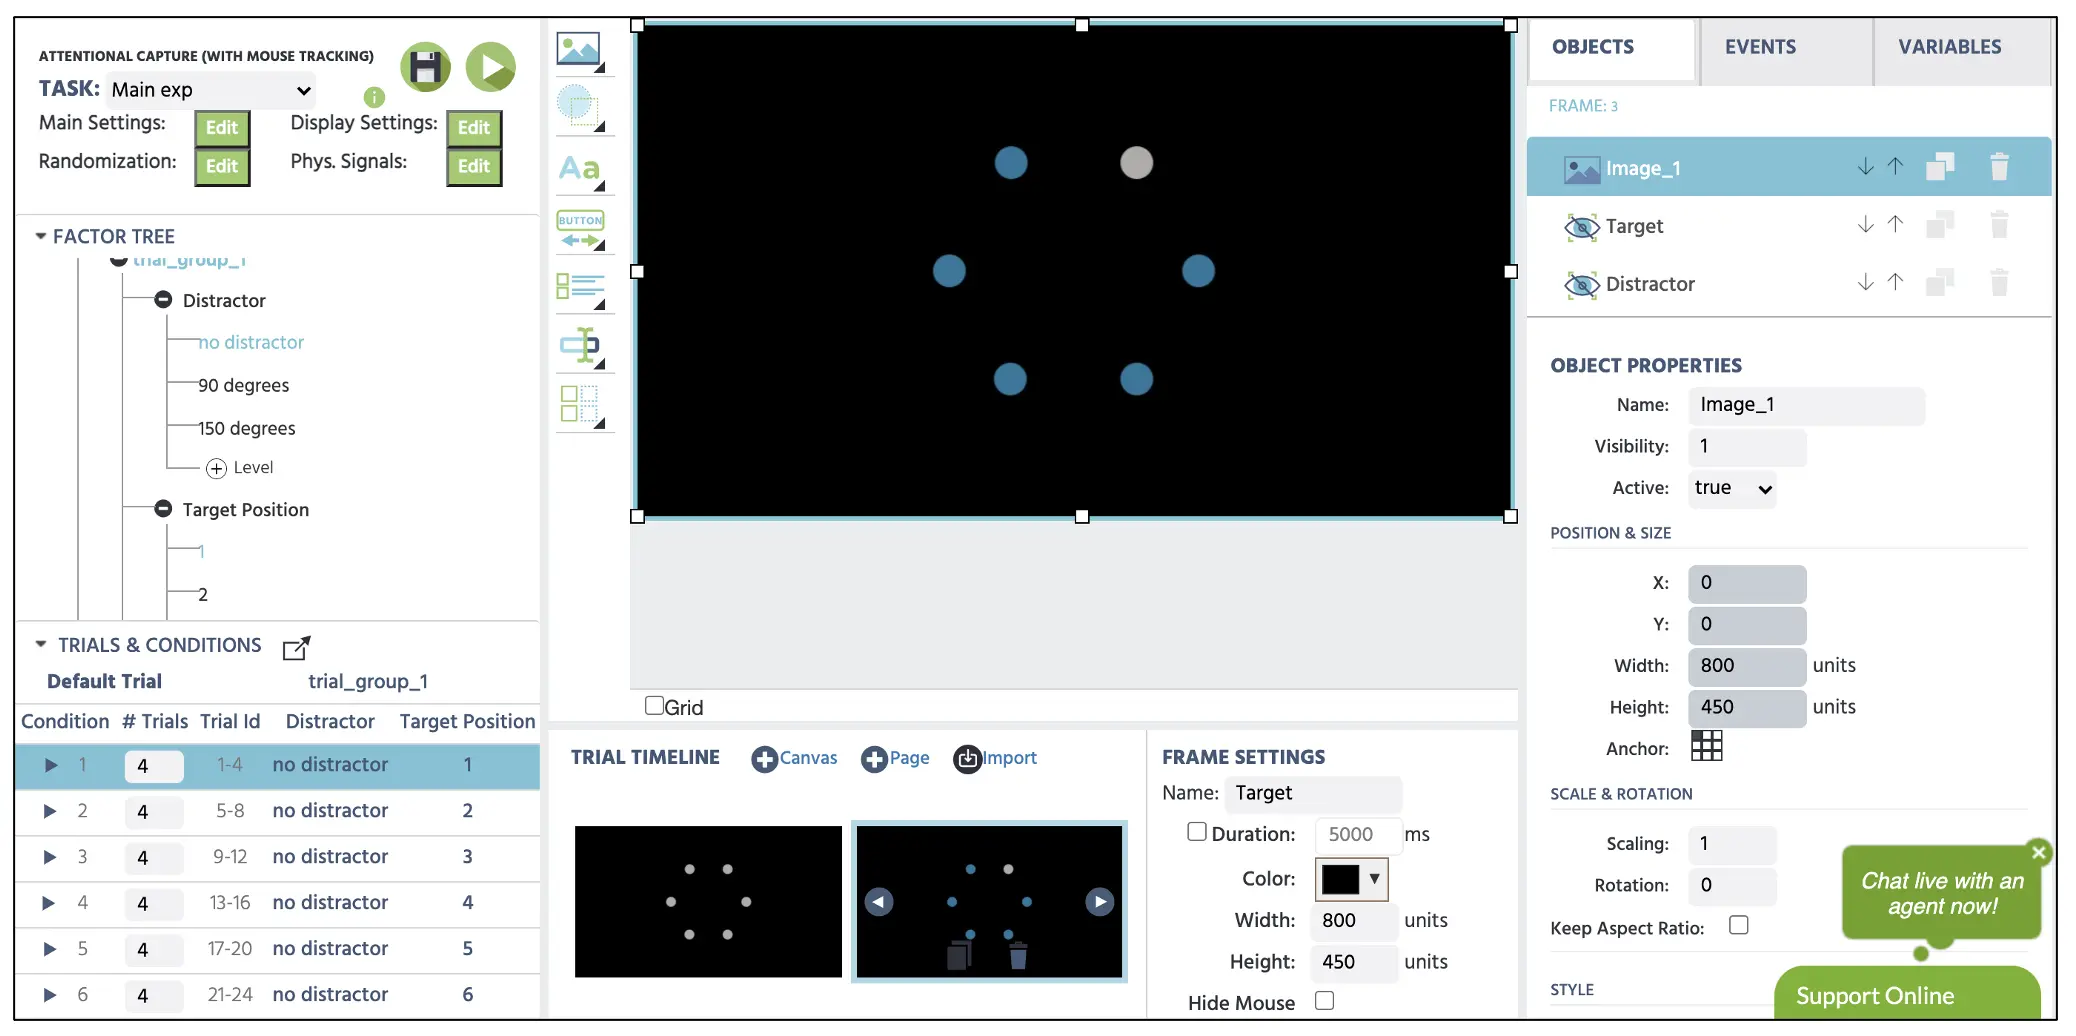 Figure 9. Display of 3rd frame presenting target at position 1 with no additional (distracting) blue circle following the 1st condition.
Next, we will also set up a vital object known as the Invisible Element in every condition. This is important because we specify the Labvanced program where the target and the extra blue circle are (in distractor conditions) located with the invisible element. This object is not visible to the observers and serves as a crucial purpose to program the areas of interest for our mouse tracking and, if necessary, eye-tracking setup. To specify the location of the target and the distractor, we will set up two invisible elements per every condition. This is accessed by Shapes → Invisible Element (see Figure 10A), and we will need to precisely position this element (named Target) on top of the target location (Figure 10B). We will also set the second Invisible Element (named Distractor) on top of the distractor (see Figure 10C). However, for no distractor conditions, we will place them at the bottom right corner of the canvas (see Figure 10D).
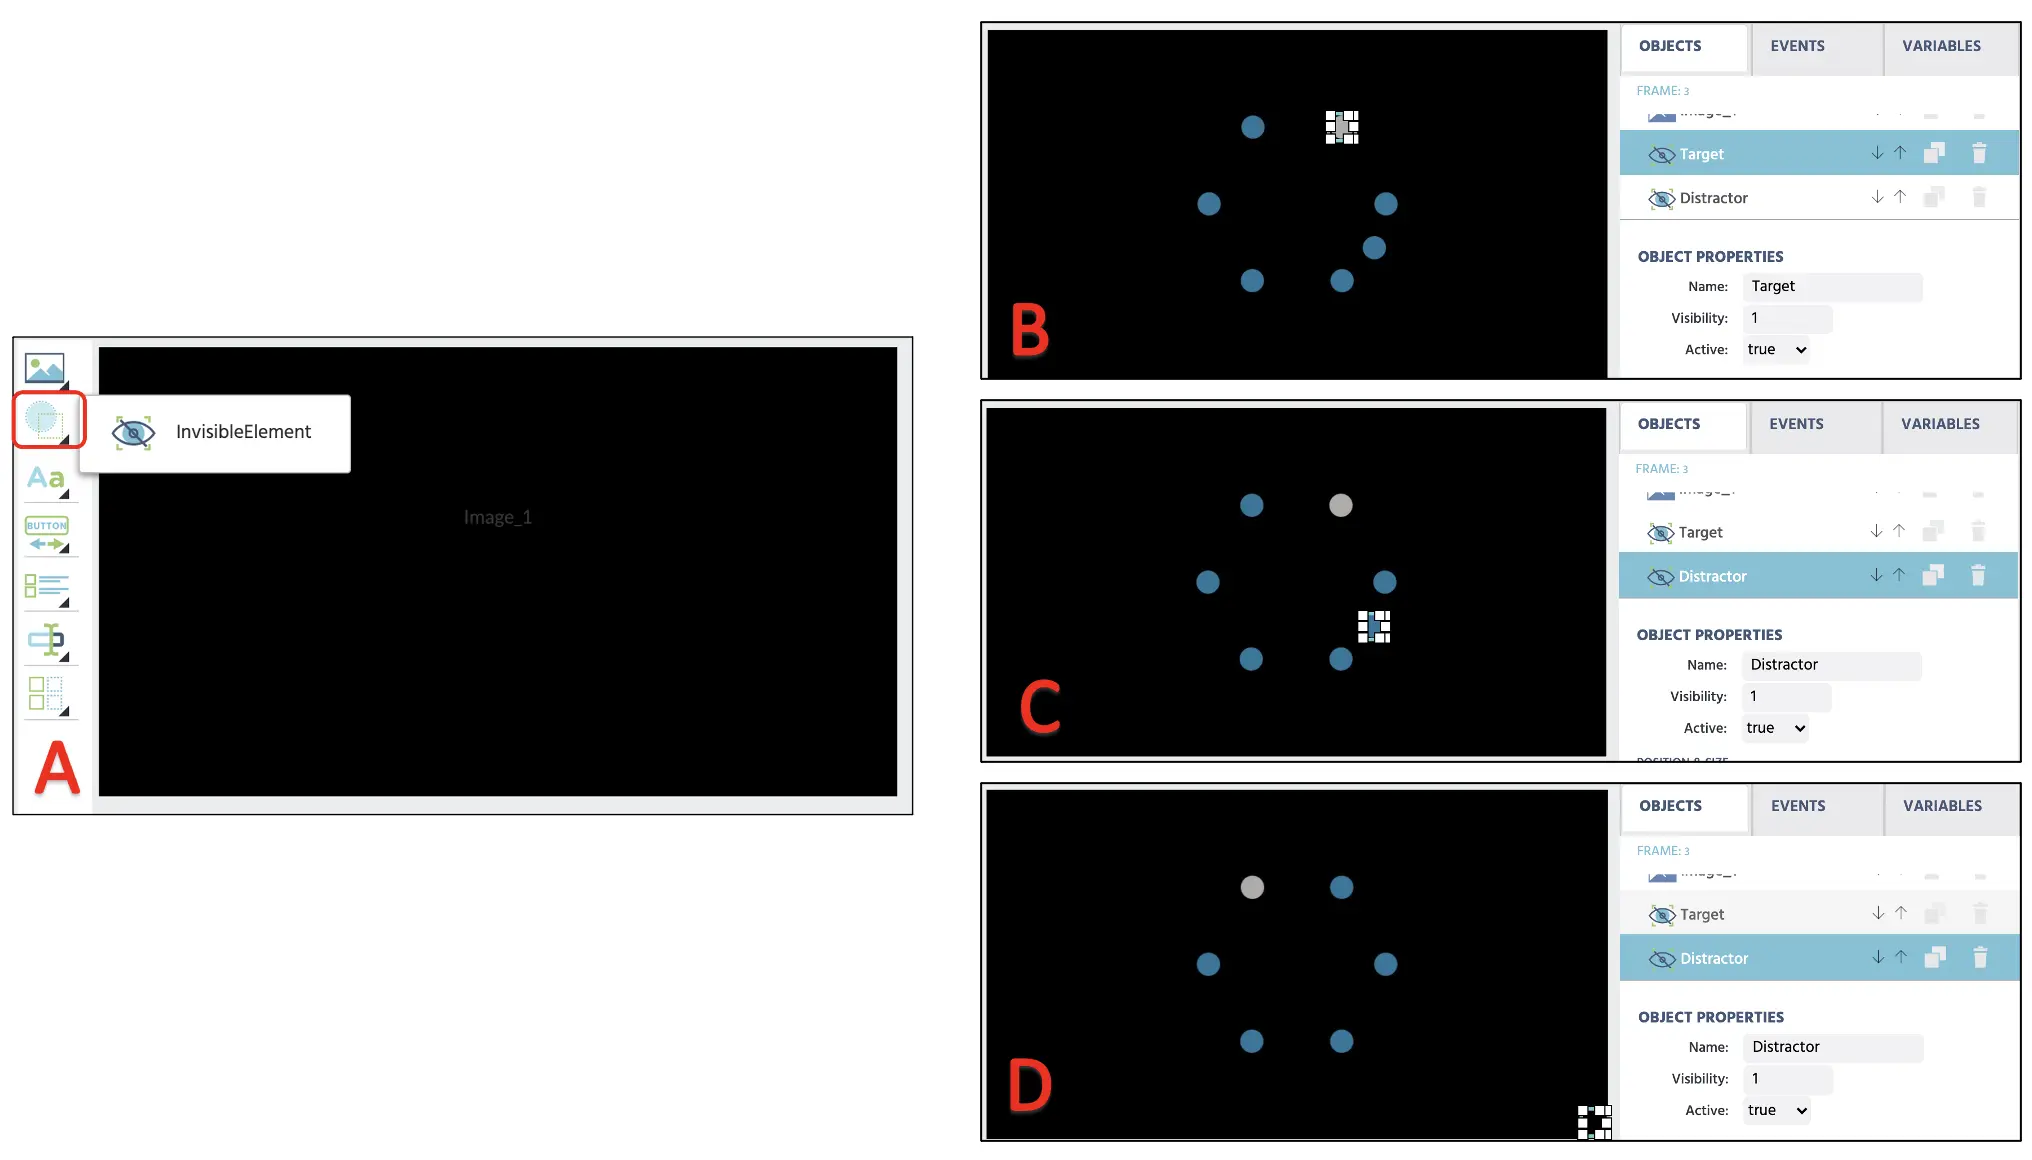 Figure 10. Display of invisible element creation (A). Note that the first invisible element - the target is placed above the target location (B) and distractor location (C). The invisible element is positioned at the bottom right corner (D) for the condition with no additional blue distractor.
Frame 4
We will create a fixation cross in the center frame in this final frame, prompting the observer to move the mouse cursor to the fixation. This is an essential control for the current task involving the visual search. The mouse position could bias the target detection if the following depends on target location appearing around the recently presented area. With this control, each unique trial will proceed with the central location of the mouse cursor.
To set the fixation and the instruction message, we can start by clicking on the Display Text to implement the textbox in the canvas. Here, we can type in the + in the box with a font size 36 and position it in the display center. We will create one more Display Text and include the message depicted below (see Figure 11). We will also implement the invisible element (Center) and position it above the central fixation, similar to the previous canvas. The basic idea is that later, we will program the mouse trigger to move to the subsequent trial when the cursor is hovering above this invisible element. For now, this concludes all the stimuli set up, and we will now program the events to program the stimuli duration and variable recording.
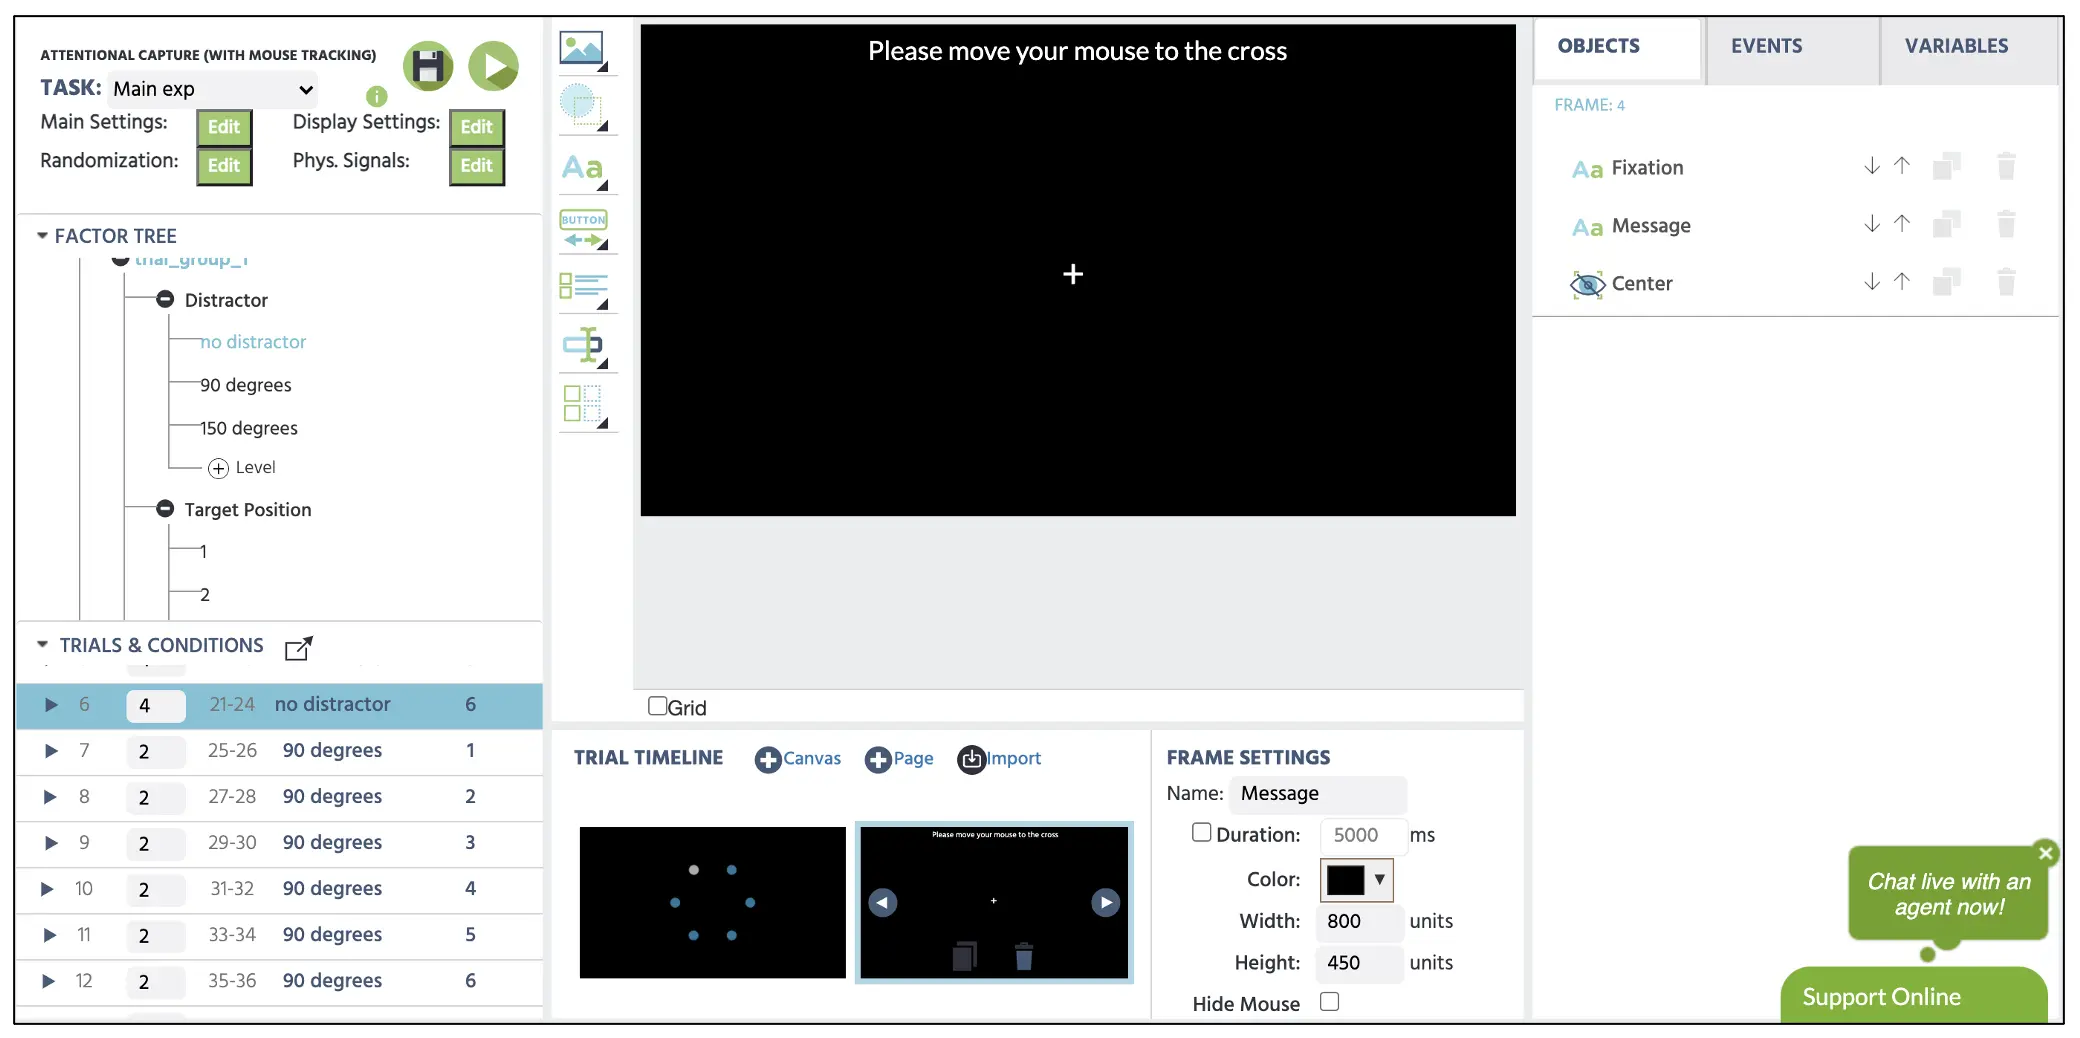 *Figure 11. Display of the 4th frame instruction screen with the invisible element above the fixation cross.
Part IV: Events setup (programming display duration, response evaluation, and variable recording)
In this part, we are establishing a logical sequence to the Labvanced to execute specific actions in each frame (e.g., frame duration and response assessment). Creating this sequence of actions is known as Events in the Labvanced platform, and we will establish each Event per frame starting with the 1st fixation presentation. Thus, this part will be split into five subsections detailing every step per frame and finish with the mouse tracking program.
Before proceeding to the 1st frame Event, we will need to create some new variables of:
- Reaction time - target detection measurement in millisecond
- MouseXY - to store X & Y mouse positions
- Counter - to count a number of events that the mouse movement occurred. We will display this in the target frame and also record this in the data output
We will click on the Variables on the top-right display and select Add Variable to create new variables. From the new variable window, we will proceed with the following steps for the names and types indicated below in bullet points (also in Figure 12 below). The Reaction time variable will store important behavioral measurements of how quickly the participant discriminated the target while ignoring the irrelevant blue circles. Note that the MouseXY variable has a set of extra options to indicate in the figure. Firstly, it is crucial is indicate the format as the Arrary as we are going to record an array of multiple X&Y positions in a trial. Next, we denote the starting positions as zeroes for both coordinates and set the recording type as the time series to record a series of mouse positions in any given trial.
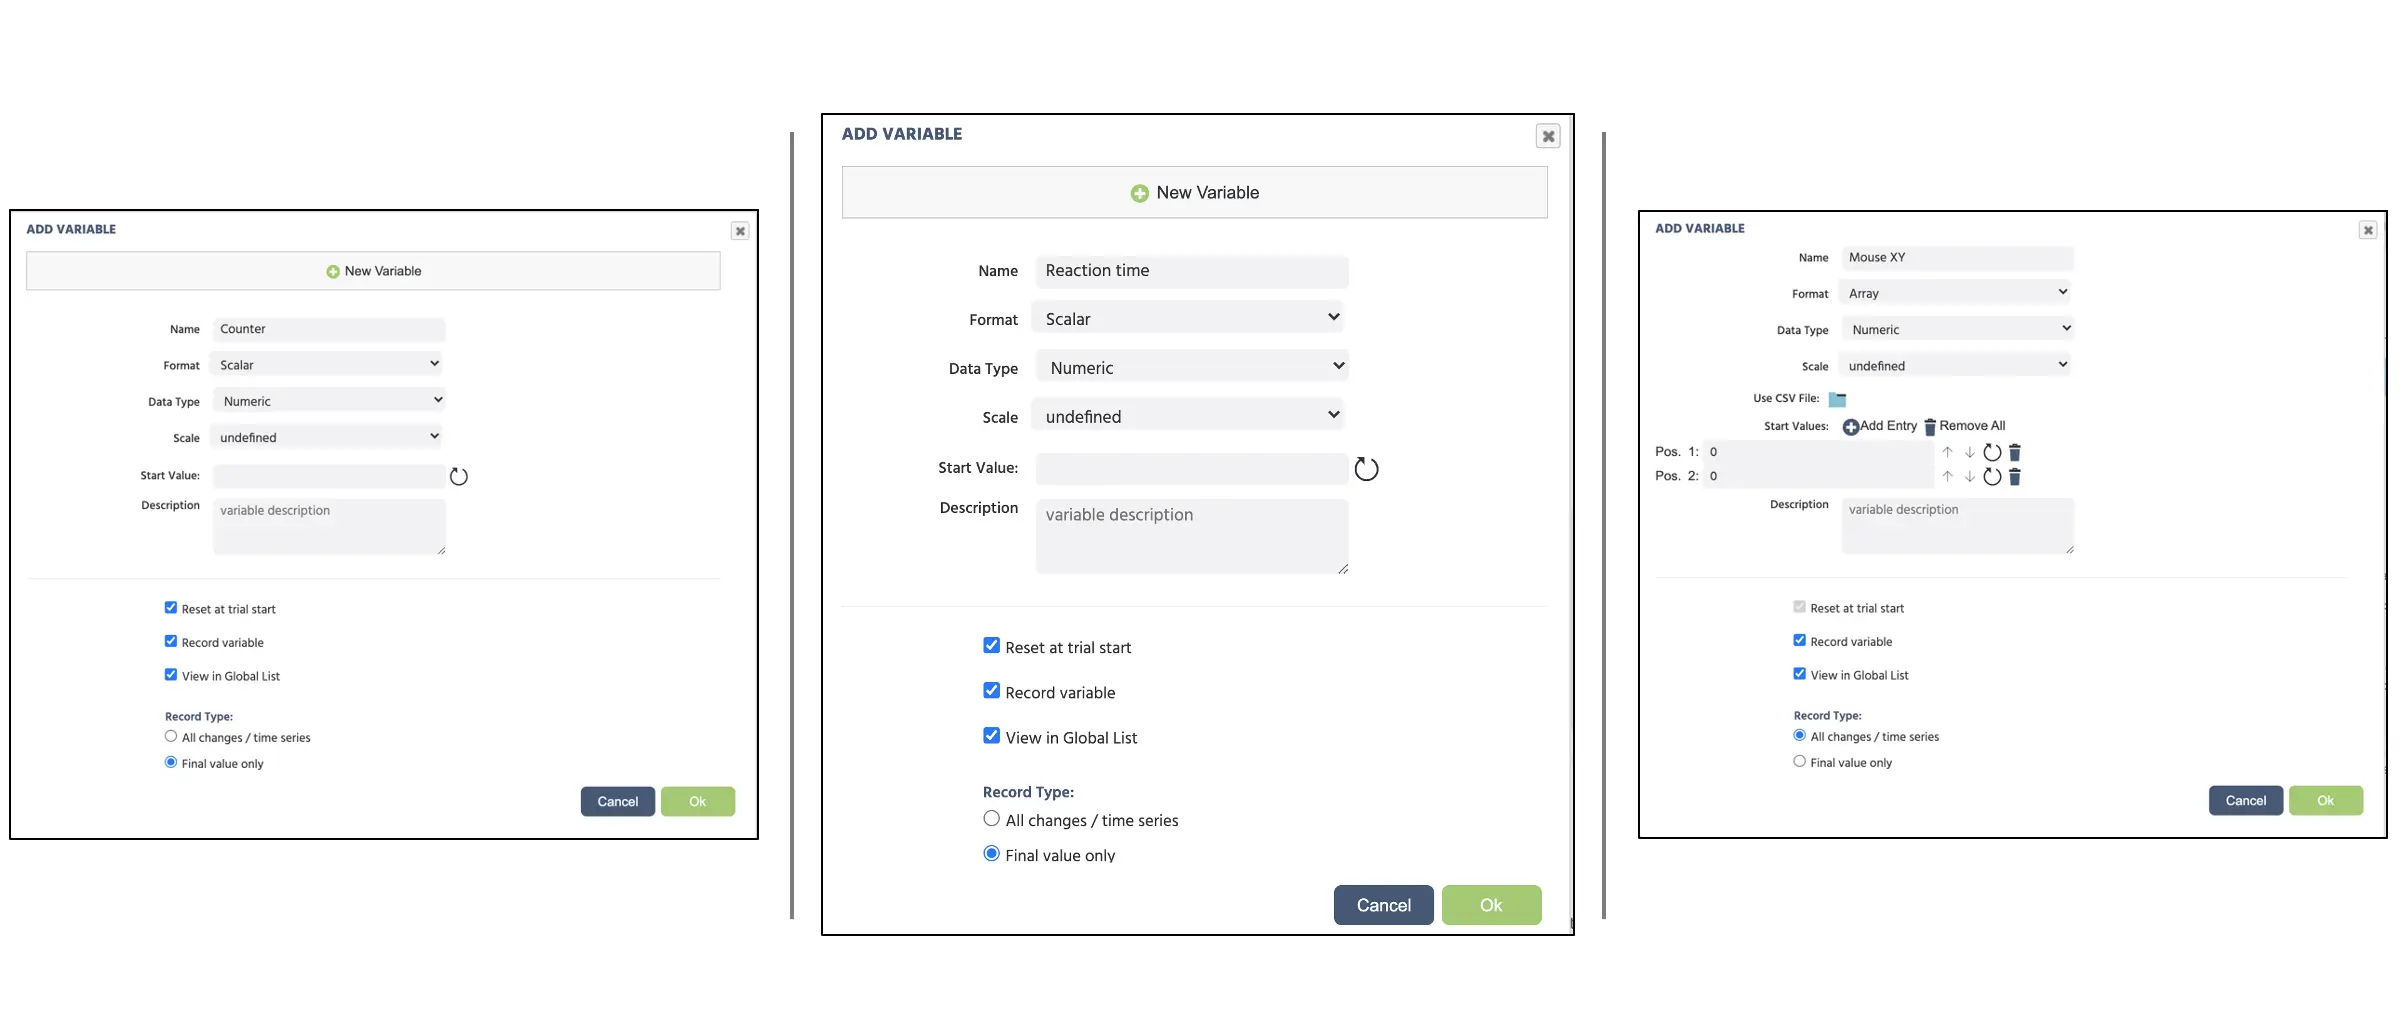 Figure 12. Display of new variables creation. Note that the last variable (MouseXY) is set with different options than the other two variables.
Following the general frame sequence mentioned in the introduction (see also Figure 2), we will create the Event structure separately per frame, starting with programming the fixation cross display for 150ms.
Frame 1 Event: Fixation cross display
In this frame, we want to present the fixation cross at the center of the display for 150 ms. Therefore, the logical sequence in this frame is:
- As soon as the frame starts
- Wait 150 ms
- And then jump to the next frame
To create this Event, click on the Events on the top right next to the Variables and select Frame Event (on this frame only). In the first window dialogue, we can name the Events as “Start” (Figure 13A) and click next to proceed to the Trigger option. Here, the trigger type is Trial and Frame Trigger → Frame Start (following the 1st logical sequence above; see Figure 13B). With this trigger, we want to initiate the 150 ms frame delay action (2nd logical sequence); therefore, this can be set with Add Action → Delayed Action (Time callback) and specify 150 in the delay box (see Figure 13C). Finally, click on Add Action in the Action Sequence box for the last logical sequence and proceed with Jump Action → Jump to → select the Next Frame (see Figure 13D). The Labvanced will always follow this logical sequence for the fixation cross-presentation for all the trials with this setup.
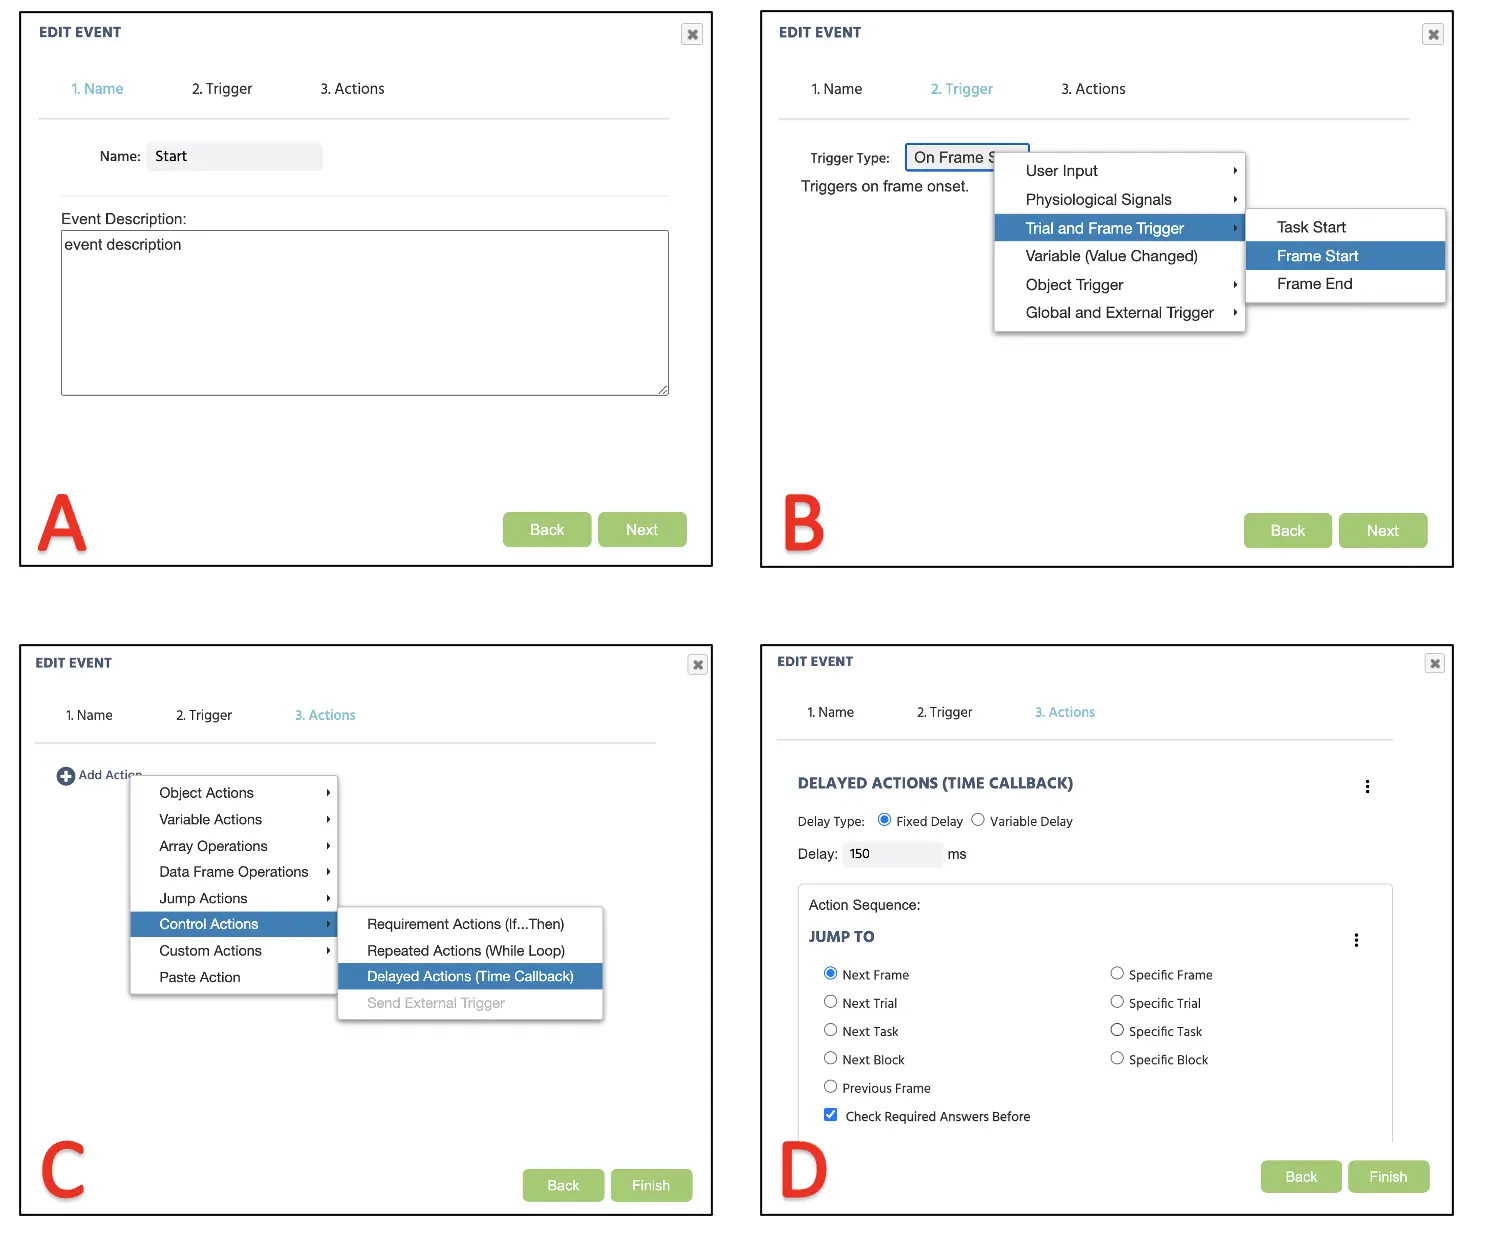 Figure 13. Display of Event creation for fixation cross (frame 1) presentation following Event naming (A), Trigger (B), Action determination (C), and Action execution (D).
Frame 2 Event: Pre-target (six gray circles) display
In this frame, we want to present the pre-target image for 2500 ms. The setup will mirror the fixation cross above with the following logical sequence:
- As soon as the frame starts containing the neutral gaze
- Wait 2500 ms
- And then jump to the next frame
The procedure will be the same as displayed in Figure 13 above with different frame duration.
Frame 3 Event: Target presentation (with or without the distractor) and record response
In this last frame, we want to present the target and have the program evaluate the participant’s mouse click response. Therefore, the logical sequence we will approach is:
- As soon as the frame starts containing the target and distractor
- Wait for the mouse click input (triggered by left mouse click) to the Invisible (Target) Element.
- Record the reaction time (ms) it took from the frame onset
- And then jump to the next frame
We will begin by clicking the Events and select Frame Event (on this frame only) to create this Event. Here we can name the Event as the “Response.” Since this event is indicative of a participant's mouse press, the trigger would be the User Input → Mouse Trigger. Here we can establish a clicking response to the Invisible “Target” Element (see Figure 14 below). After clicking next, we will set the recording action to measure the millisecond target detection.
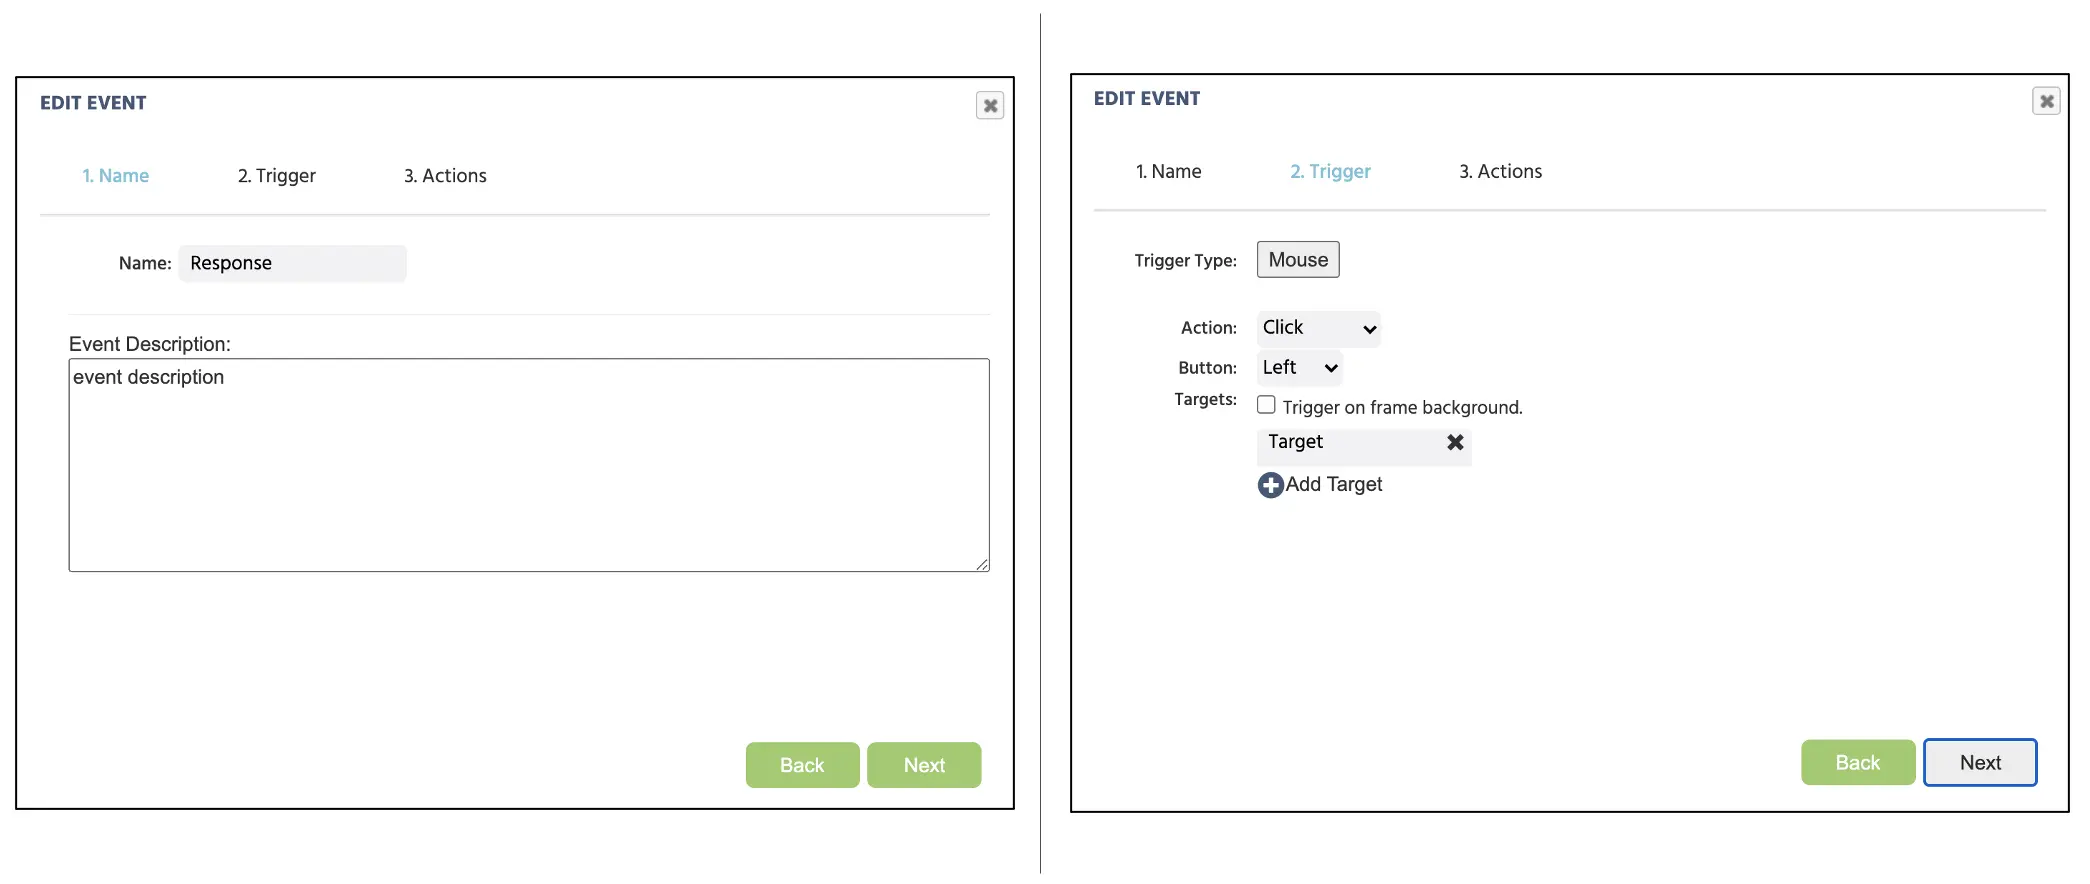 Figure 14. Display of Event creation for mouse click assignment following Event naming (left), Trigger type assignment with the assigned target to the invisible “Target” element (right).
Here, proceed with Add Action → Variable Actions → Set/Record variable and select Reaction time variable on the left side. On the right, proceed with Trigger (Mouse) → Time From Frame Onset (see Figure 15A below). With this, we are asking the program to record the mouse click reaction to the target measured in milliseconds from the frame onset. Finally, we would need the frame to proceed to the next display, selecting Add Action → Jump Actions and selecting Next Frame (see Figure 15B below). Click Finish at the bottom of the window to complete the Events setup for this study.
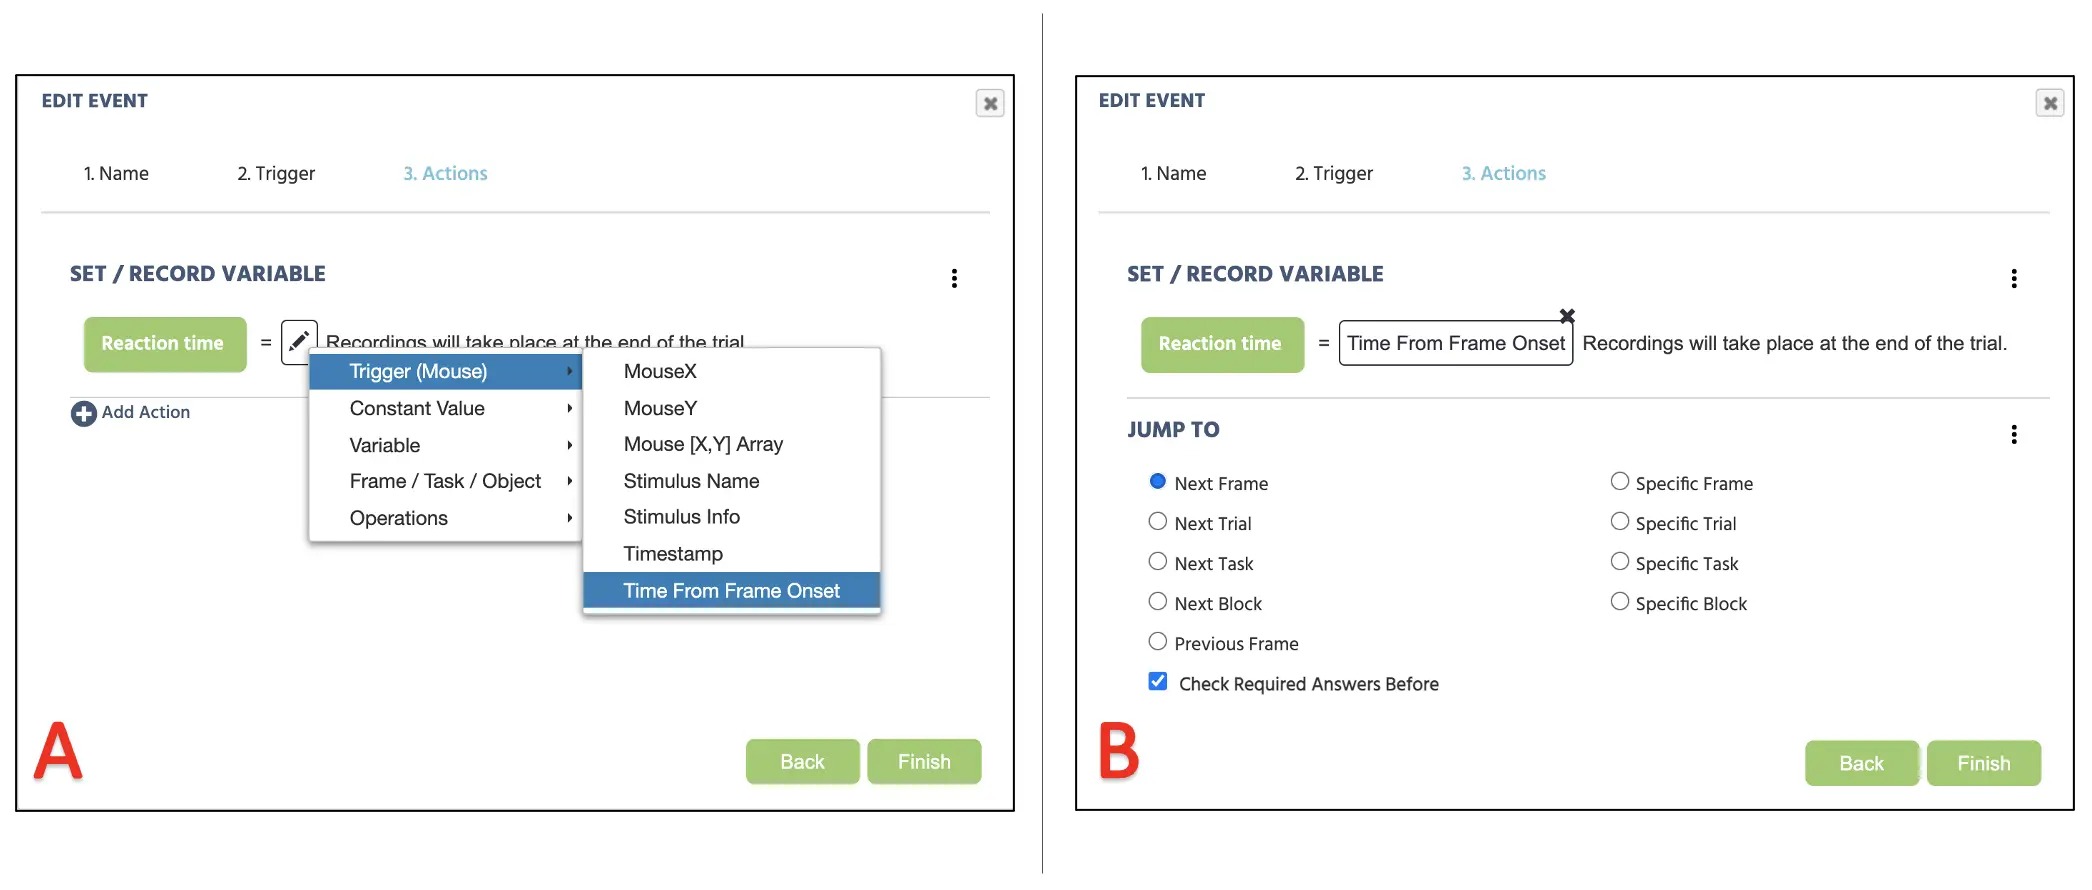 Figure 15. Display of continuing Event creation from Figure 15 for reaction time recording (A) and jump action to subsequent frame (B).
Frame 4 Event: Instruction to move the mouse cursor to the central fixation
In this last frame, we present the instruction to move the mouse cursor to the displayed central fixation cross. Once the mouse cursor hovers over the fixation, we will have the program jump to the next trial immediately. Therefore, the logical sequence we will approach is:
- As soon as the frame starts and the mouse cursor is hovering over the fixation cross
- Jump to the next trial.
To create this Event, we will begin by clicking the Events and select Frame Event (on this frame only). Here we can name the Event as the “Center.” Since this event is indicative of a participant's mouse location, the trigger would be the User Input → Mouse Trigger. Here we can establish a clicking response to the Invisible “Center” Element with the action “Hover” (see Figure 16A below). After clicking next, select Add Action → Jump Actions and select Next Trial (see Figure 16B below). Click Finish at the bottom of the window to complete the Events setup for this study.
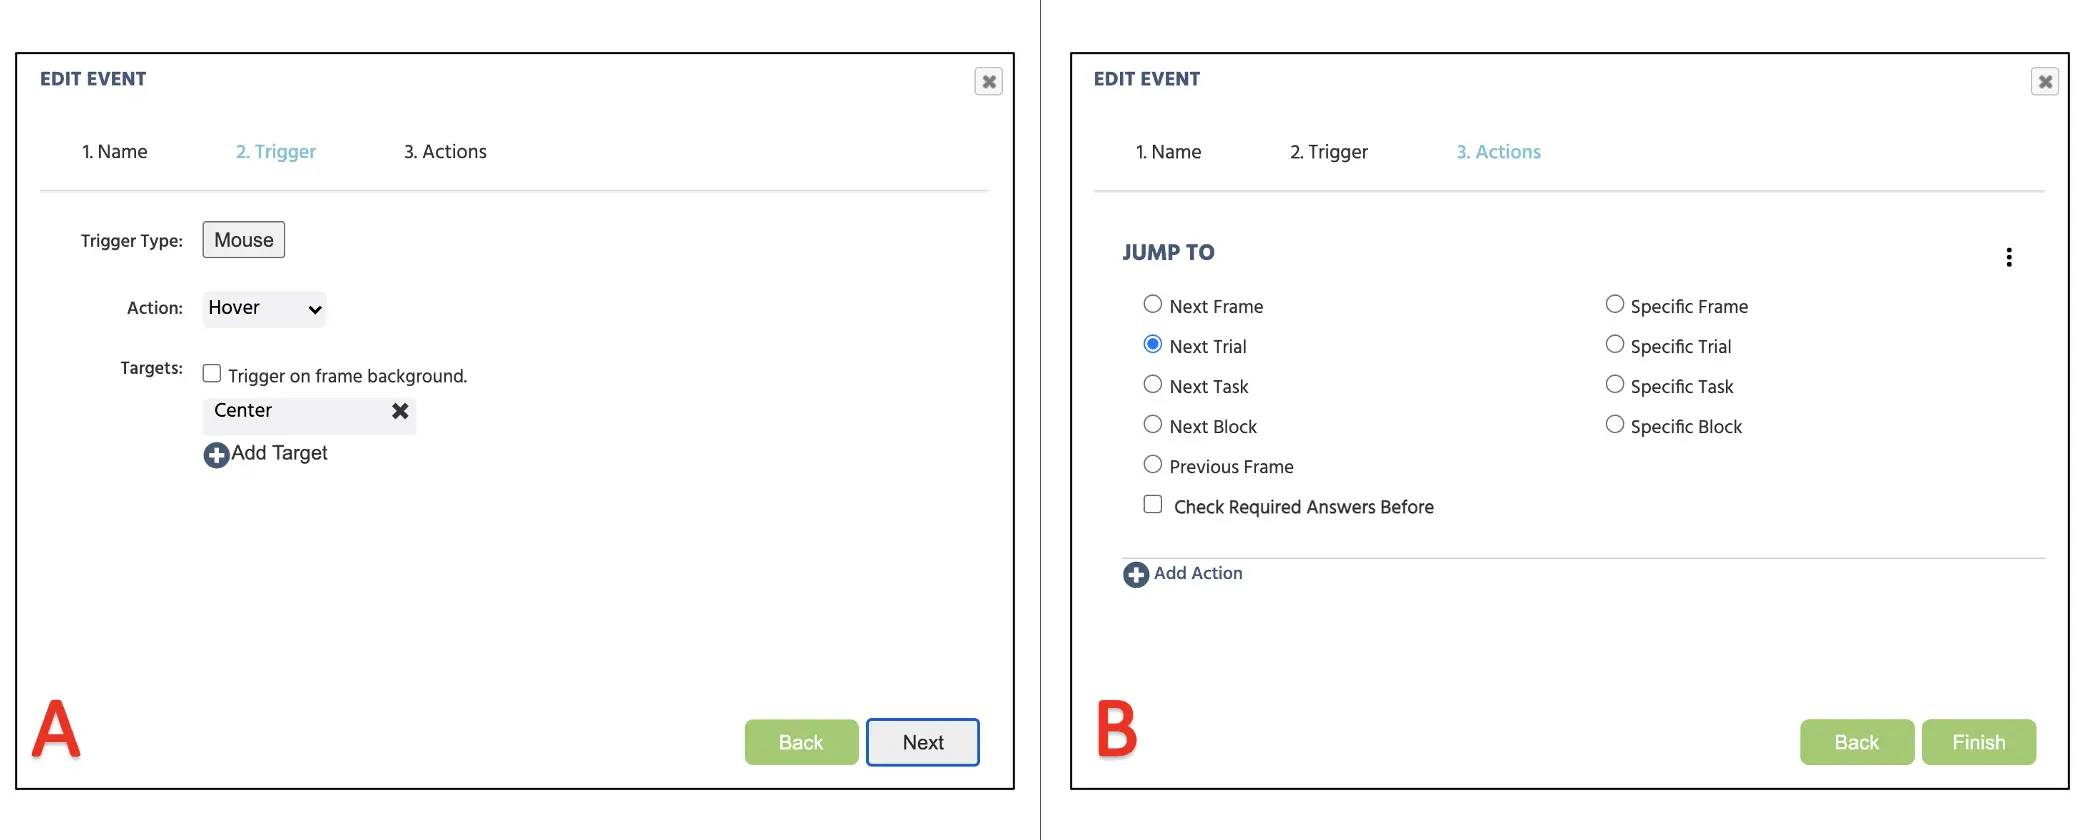 Figure 16. Display of Event creation for mouse hover trigger (A) and subsequent jump action to the next trial (B).
Mouse Tracking Event: Only in Frame 3 (target)
Here we will set the last Event parameter in our study, tracking the mouse movements in the third target frame. Furthermore, we will add a new text display in this frame, presenting a number of moves it occurred during the mouse movement. The logical sequence of this event will be:
- As soon as the mouse is moved from the frame onset
- Record both X&Y position with every movement and store in the MouseXY variable
- And also, count the number of mouse movements and store to the Counter variable with the arithmetic sequence of Counter = Counter + 1.
To create this Event, we will begin by clicking the Events and select Frame Event (on this frame only). Here we can name the Event as the “Mouse tracking.” Since this event is indicative of the mouse movement, the trigger would be the User Input → Mouse Trigger with the action “move” (see Figure 17A below). After clicking next, select Add Action → Variable Actions → Set/Record variable and select MouseXY variable on the left side. On the right, proceed Trigger (Mouse) → Mouse [X, Y] Array (see Figure 17B below). Afterward, we repeat the Add Action → Variable Actions → Set/Record variable and select Counter variable on the left side (see Figure 17C). On the right, proceed with Operations → Arithmetic. Inside the box, we will insert the Counter variable on the left and set summation one (make sure this is a numeric input, not a string value) on the right as indicated below (see Figure 17D below).
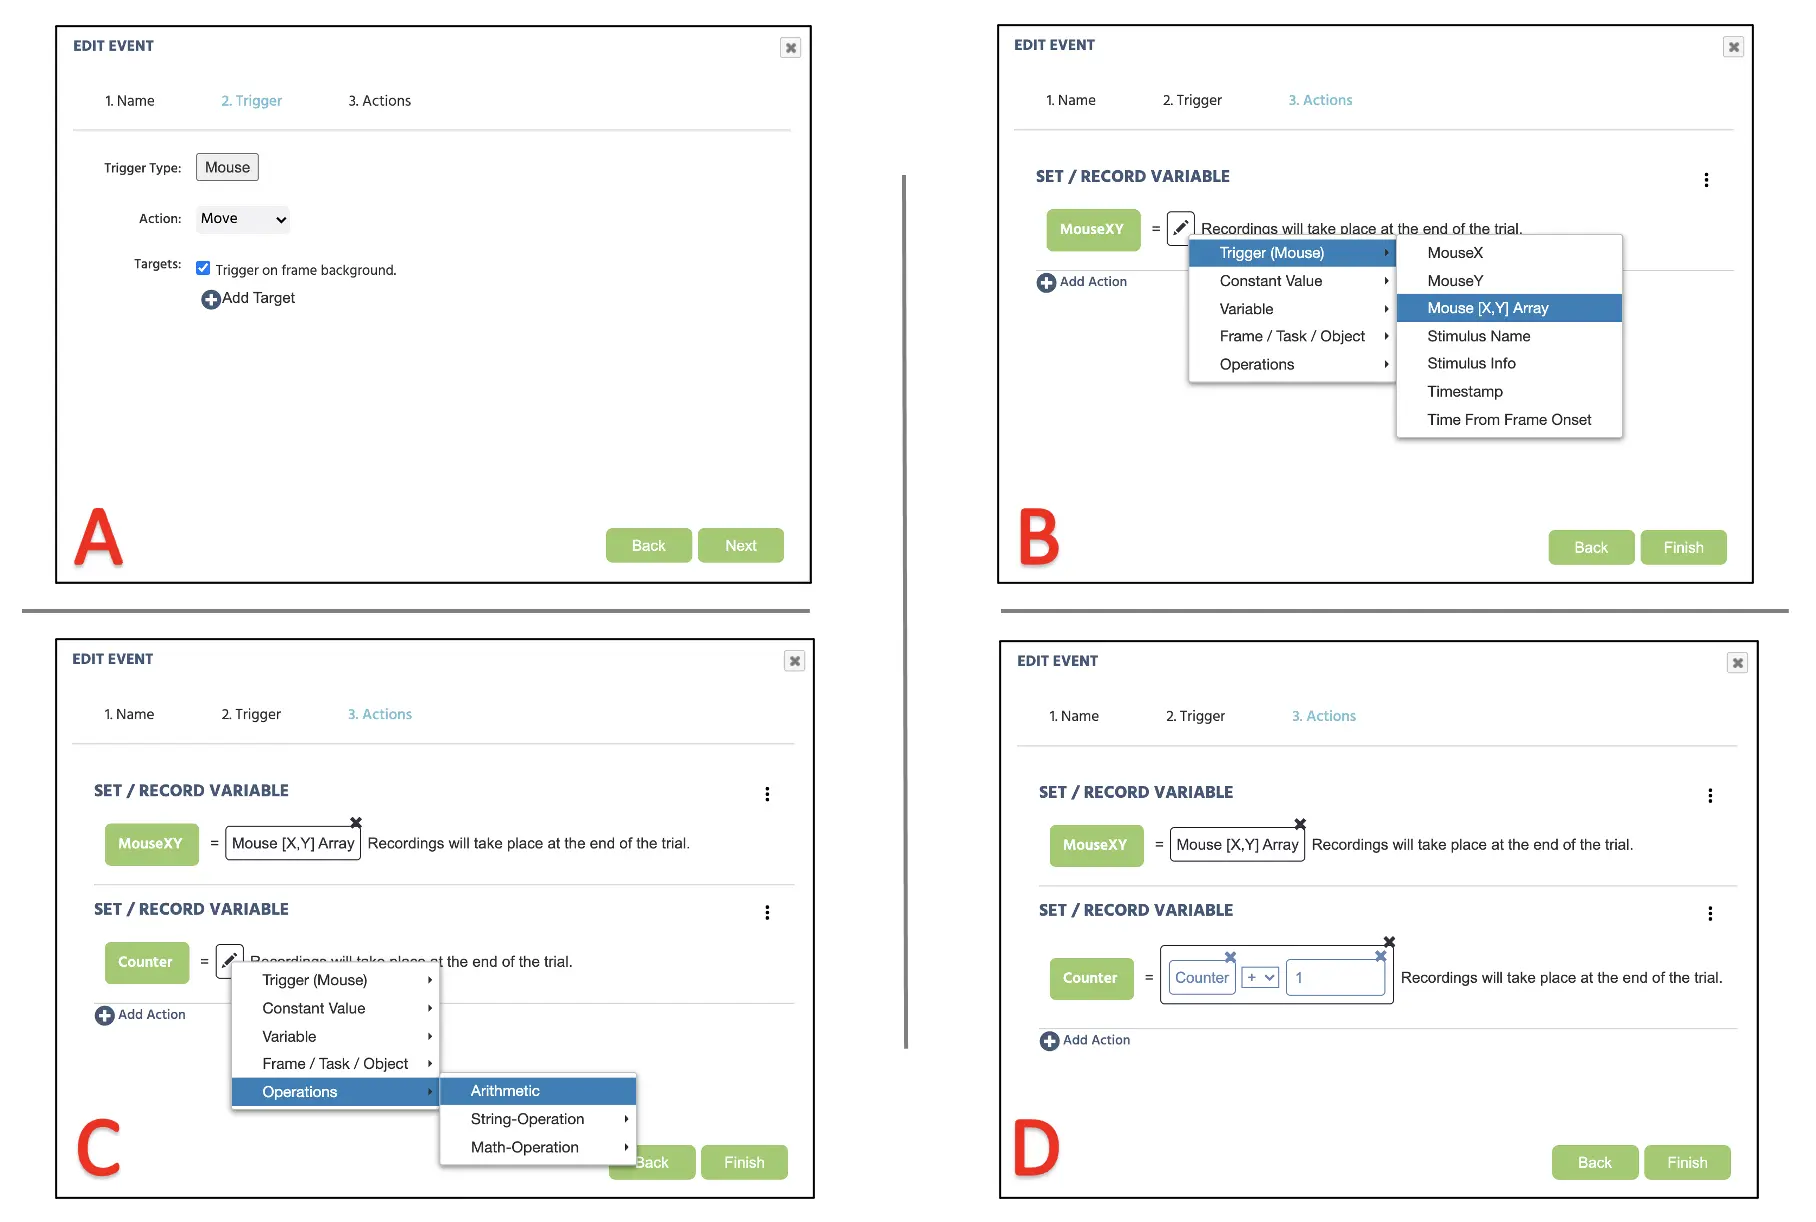 Figure 17. Display of Event creation for mouse tracking in the target frame presentation following Event trigger (A), mouse position recording (B), and counter recording setup (C&D).
Afterward, we use the Display Text procedure to create the following message: “Number of mouse events recorded:” After the colon, we will click on the Link Variable in the Text options (see Figure 18A below) and select the Counter variable. This will initially present the word: Counter in the Display Text, but during the experimental run, we could observe increasing values per every mouse movement as indicated in figure 19 below.
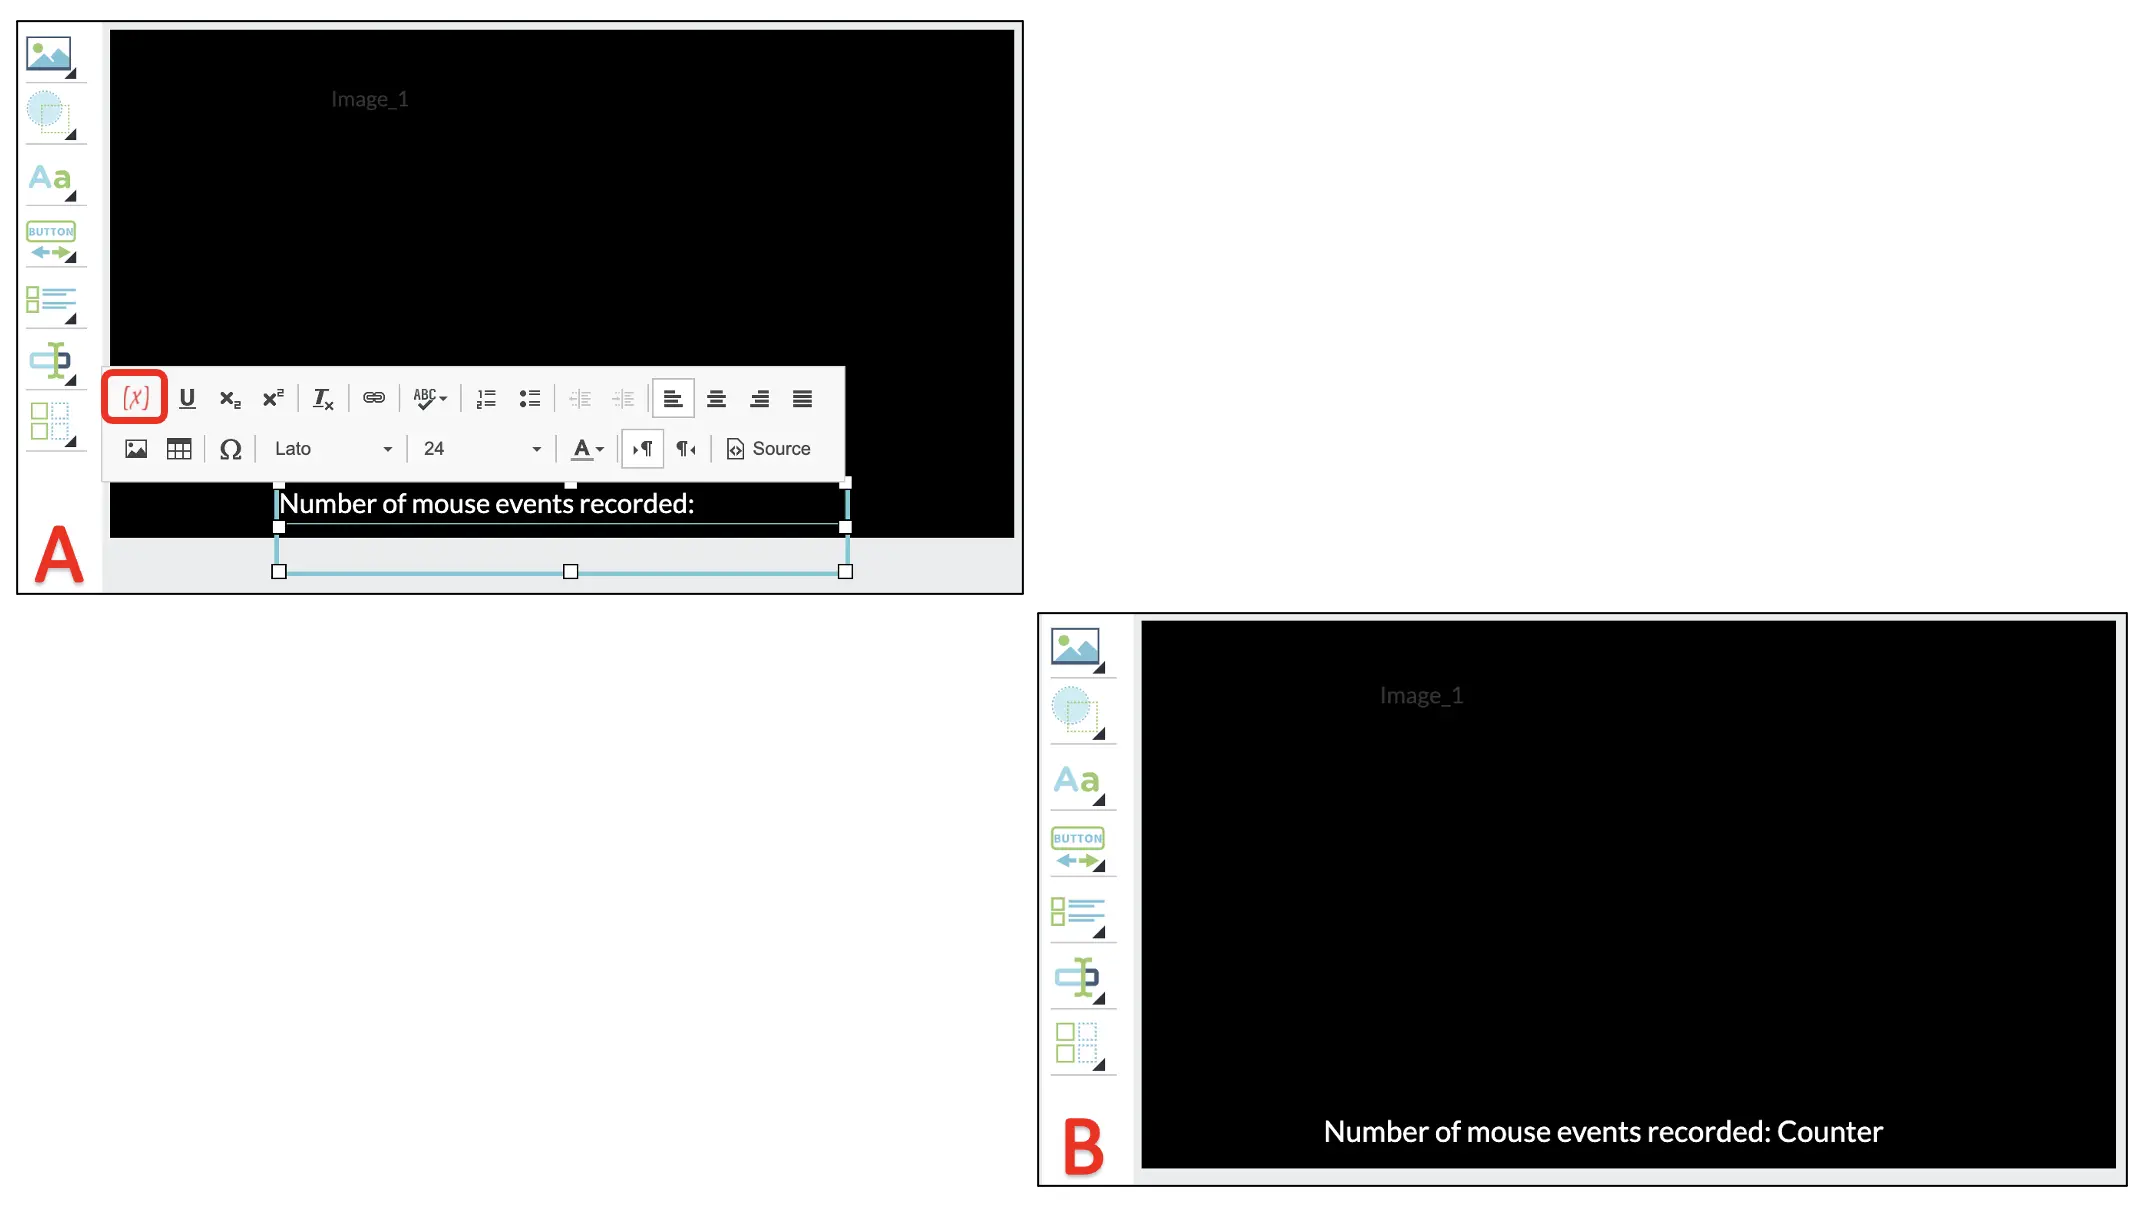 Figure 18. Display of text creation with variable linking option indicated in the red box.
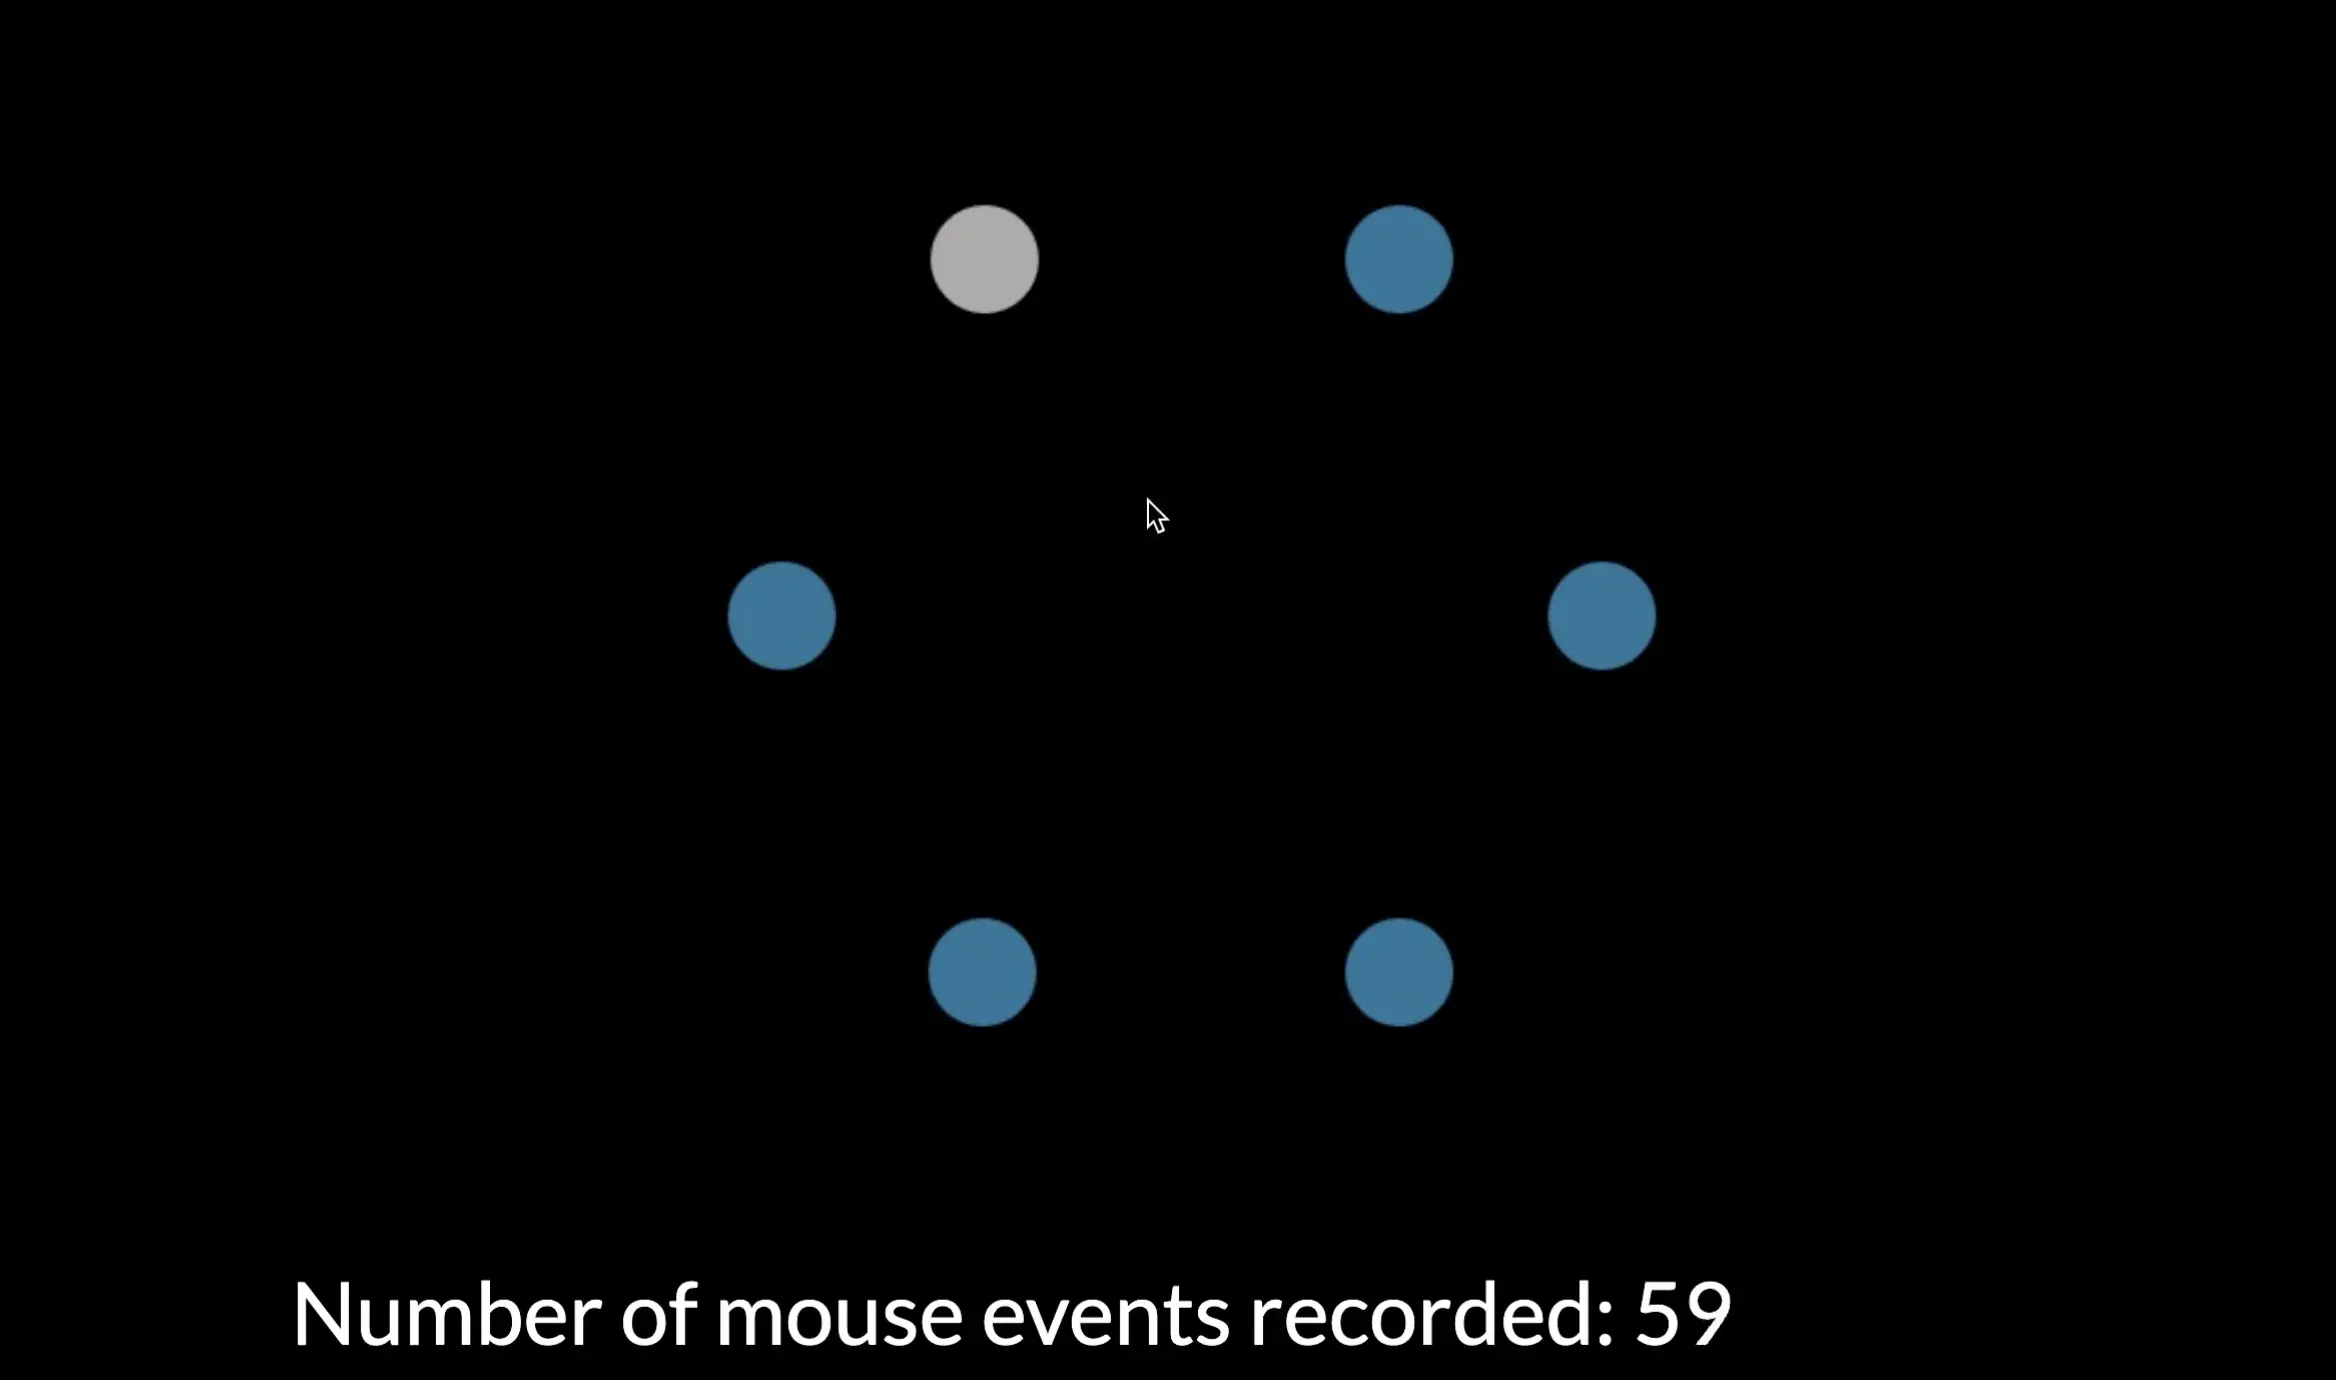 Figure 19. Display of target clip with the the mouse movement counter per every move.
Part V: Block setup
With this final setup, we now have a working Posner’s gaze cueing paradigm comprised of 48 trials with mouse track measurement in this block. Depending on the study, researchers may need to present multiple blocks of 48 trials to the participants depending on their investigation. Fortunately, Labvanced allows organizing the study in the Study Design page to organize different blocks (see Figure 20). Furthermore, we can also implement the Randomization Separator as seen in the Sessions column (see Figure 20). This separator allows counterbalance the blocks within the two horizontal dividers that could aid researchers with their particular manipulation and theoretical investigation.
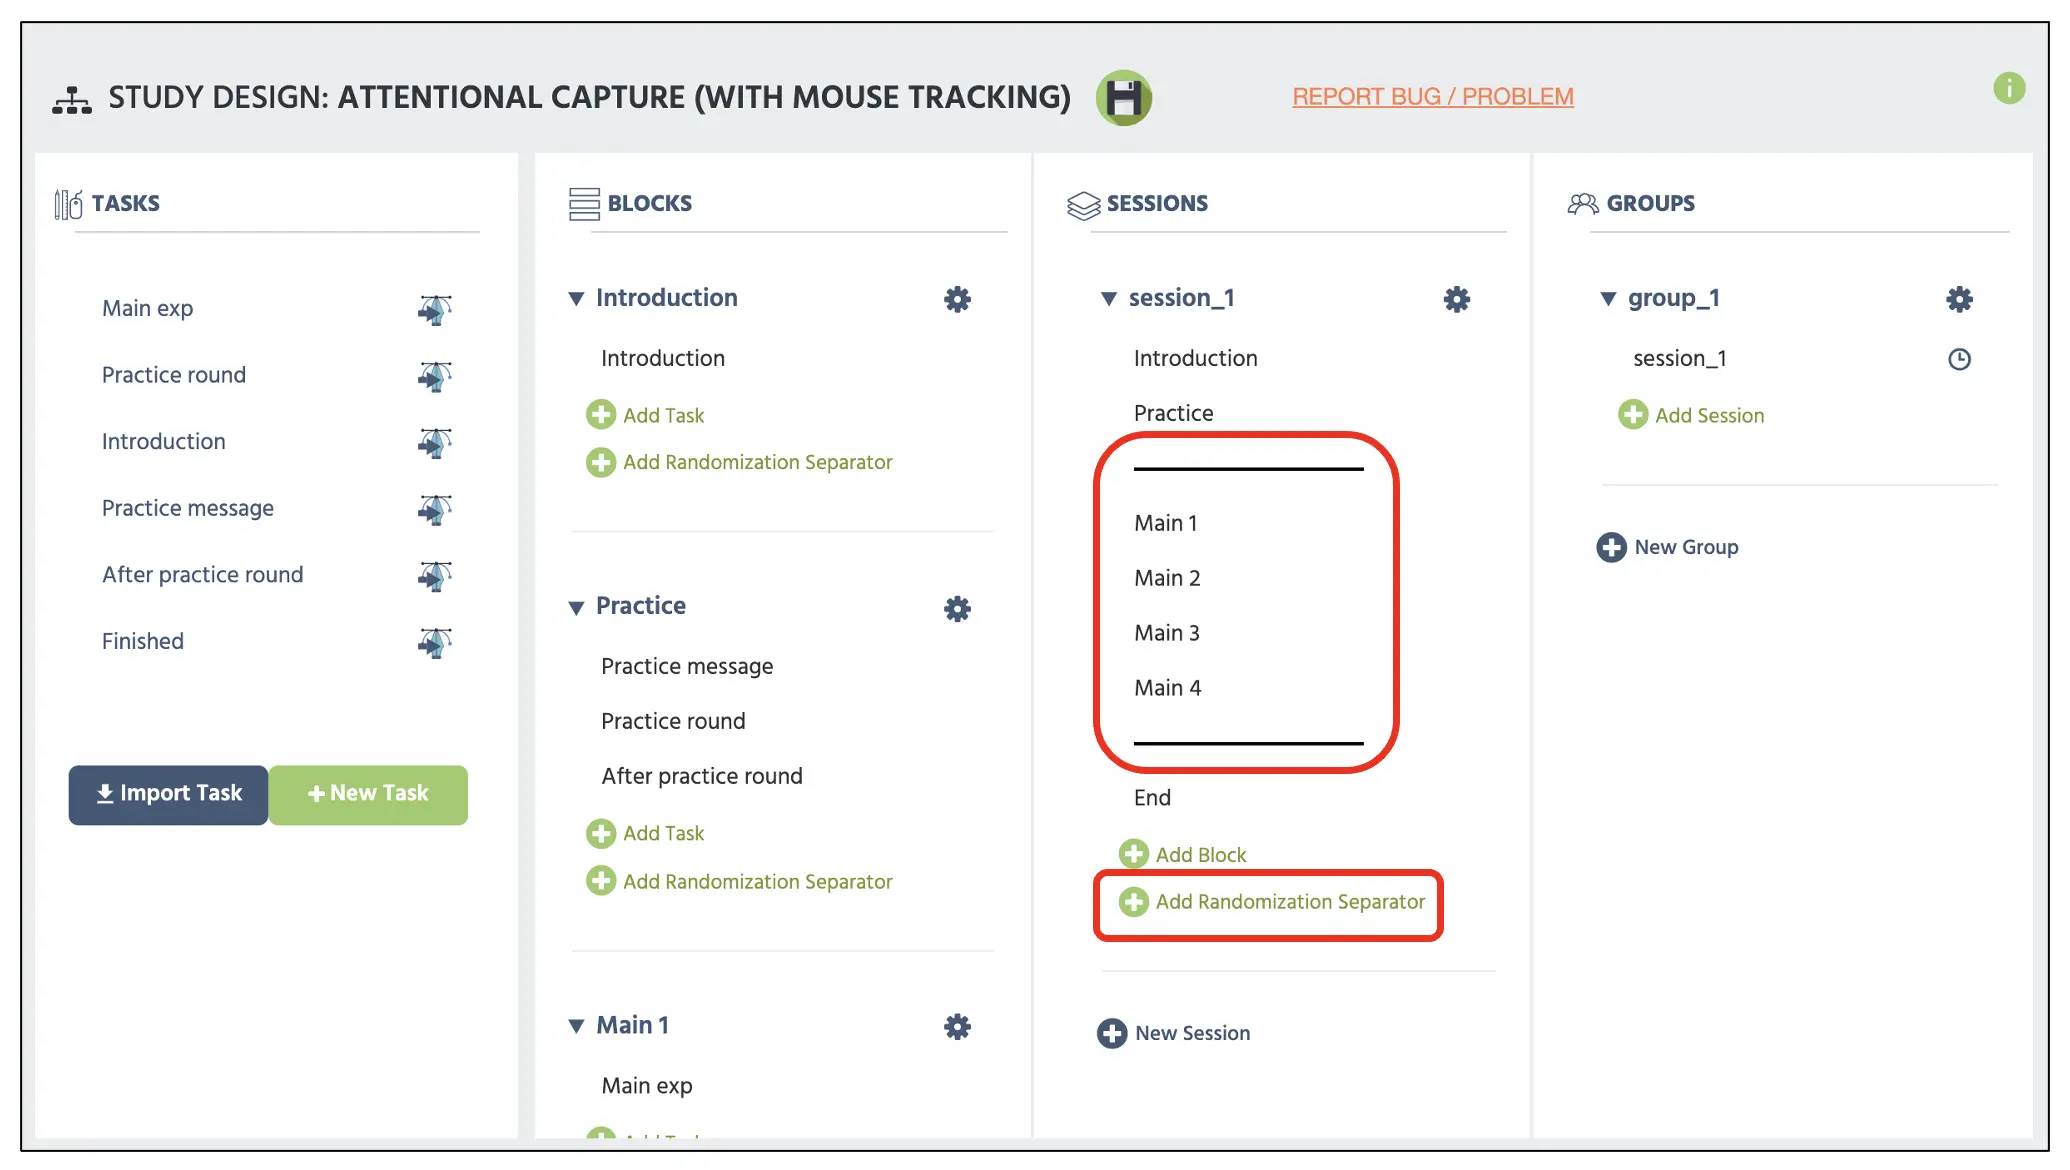 Figure 20. Display of main Study Design page with the top red box displaying two parallel bars serving as the Randomization separator added by the Add Randomization Separator below.
The only thing that remains in this walkthrough is the instruction/consent document, practice block, demographic questions, and other protocols, but that varies based on the researcher and institution to halt this walkthrough. For more information on text creation, please view our resources link for additional information. Furthermore, the constructed study is also available as the template in our Library using this link along with other experimental paradigms. With that said, on behalf of the Labvanced team, I hope for the best in all your scientific endeavors and pray that this walkthrough serves as an important cornerstone for your study construction.