labvanced logoLabVanced
  • Research
    • Publications
    • Researcher Interviews
    • Use Cases
      • Behavioral Psychology
      • Personality & Social Psychology
      • Cognitive & Neuro Psychology
      • Developmental & Educational Psychology
      • Clinical & Health Psychology
      • Sports & Movement Psychology
      • Marketing & Consumer Psychology
    • Labvanced Blog
  • Technology
    • Feature Overview
    • Desktop App
    • Phone App
    • Precise Timing
    • Experimental Control
    • Eye Tracking
    • Multi User Studies
    • More ...
      • Questionnaires
      • Artificial Intelligence (AI) Integration
      • Mouse Tracking
      • Data Privacy & Security
  • Learn
    • Guide
    • Videos
    • Walkthroughs
    • FAQ
    • Release Notes
    • Documents
    • Classroom
  • Experiments
    • Public Experiment Library
    • Labvanced Sample Studies
  • Pricing
    • Pricing Overview
    • License Configurator
    • Single License
    • Research Group
    • Departments & Consortia
  • About
    • About Us
    • Contact
    • Downloads
    • Careers
    • Impressum
    • Disclaimer
    • Privacy & Security
    • Terms & Conditions
  • Appgo to app icon
  • Logingo to app icon
Learn
Guide
Videos
Walkthroughs
FAQ
Release Notes
Classroom
  • 中國人
  • Deutsch
  • Français
  • Español
  • English
Guide
Videos
Walkthroughs
FAQ
Release Notes
Classroom
  • 中國人
  • Deutsch
  • Français
  • Español
  • English
  • Guide
    • GETTING STARTED

      • Objects
      • Events
      • Variables
      • Task Wizard
      • Trial System
      • Study Design
        • Tasks
        • Blocks
        • Sessions
        • Groups
    • FEATURED TOPICS

      • Randomization & Balance
      • Eye Tracking
      • Desktop App
      • Sample Studies
      • Participant Recruitment
      • API Access
        • REST API
        • Webhook API
        • WebSocket API
      • Other Topics

        • Precise Stimulus Timings
        • Multi User Studies
        • Head Tracking in Labvanced | Guide
    • MAIN APP TABS

      • Overview: Main Tabs
      • Dashboard
      • My Studies
      • Shared Studies
      • My Files
      • Experiment Library
      • My Account
      • My License
    • STUDY TABS

      • Overview: Study-Specific Tabs
      • Study Design
        • Tasks
        • Blocks
        • Sessions
        • Groups
      • Task Editor
        • Main Functions and Settings
        • The Trial System
        • Canvas and Page Frames
        • Objects
        • Object Property Tables
        • Variables
        • System Variables Tables
        • The Event System
        • Trial Randomization
        • Text Editor Functions
        • Eyetracking in a Task
        • Head Tracking in a Task
        • Multi-User Studies
      • Study Settings
        • Start Up and Main Settings
        • Browsers & Devices Settings
        • Experiment Features Settings
      • Description
        • More Details about Description Information
        • Images, Links, and References in Descriptions
      • Variables
      • Media
      • Translate
      • Run
      • Publish and Record
        • Requirements for Publishing a Study in Labvanced
        • Recruiting Participants and Crowdsourcing
        • License Selection and Confirmation
        • After Publishing Your Labvanced Study
      • Sharing
      • Participants
      • Dataview and Export
        • Dataview and Variable & Task Selection (OLD Version)
        • Accessing Recordings (OLD Version)
  • Videos
    • Video Overview
    • Getting Started in Labvanced
    • Creating Tasks
    • Element Videos
    • Events & Variables
    • Advanced Topics
  • Walkthroughs
    • Introduction
    • Stroop Task
    • Lexical Decision Task
    • Posner Gaze Cueing Task
    • Change Blindness Flicker Paradigm
    • Eye-tracking Sample Study
    • Infant Eye-tracking Study
    • Attentional Capture Study with Mouse Tracking
    • Rapid Serial Visual Presentation
    • ChatGPT Study
    • Eye Tracking Demo: SVGs as AOIs
    • Multi-User Demo: Show Subjects' Cursors
    • Gamepad / Joystick Controller- Basic Set Up
    • Desktop App Study with EEG Integration
  • FAQ
    • Features
    • Security & Data Privacy
    • Licensing
    • Precision of Labvanced
    • Programmatic Use & API
    • Using Labvanced Offline
    • Troubleshooting
    • Study Creation Questions
  • Release Notes
  • Classroom

Gamepad / Joystick Controller- Basic Set Up

Overview

In this walkthrough, we take a closer look at how a study can be built around the Gamepad / Joystick Trigger. Essentially a game controller or joystick is connected with Labvanced, the relevant events are set up to specify what will occur upon certain usage of the controller.

Here is an example of this feature in action:

In the example above, the participant is changing the image location and rotation using their gamepad device. The image moves up and down using the keys and rotates using the axes (sticks). These input options are specified using the event trigger menu in Labvanced. For demonstration purposes, the data values are shown on the right side of the image. When a key is pressed, its numeric ID value is shown and when the axes sticks are used, the values automatically update. In a typical study, these values are not displayed but they are here to illustrate how this data looks like and what the subsequent effect is on the image.

You can import the demo shown above and customize it using your own controller: https://www.labvanced.com/page/library/64055

Setup - Connecting Your Gamepad / Joystick

Upon connecting your gamepad / joystick to your device, Labvanced will detect it. Once you press a key, the section with live data feed will appear. Here, you can see how pressing, holding, and releasing keys are registered. Also the axes values of using the sticks are shown.

Note: We recommend directly connecting your controller to your device. Since Bluetooth support is limited in a browser-based environment, something called Bluetooth Low Energy (BLE) and is not standardized, we suggest avoiding connecting via Bluetooth to avoid experiencing any issues.

Moving the Image by Pressing the Controller’s Keys

Upon connecting your gamepad, you can specify what specific keys should be used as triggers. Upon pressing the particular key, the system will display its ID.

Trigger

In the example below, the 2 refers to the ◎ key and 3 refers to the ▵ key for the particular game controller being used.

example of the game pad trigger menu options in Labvnaced

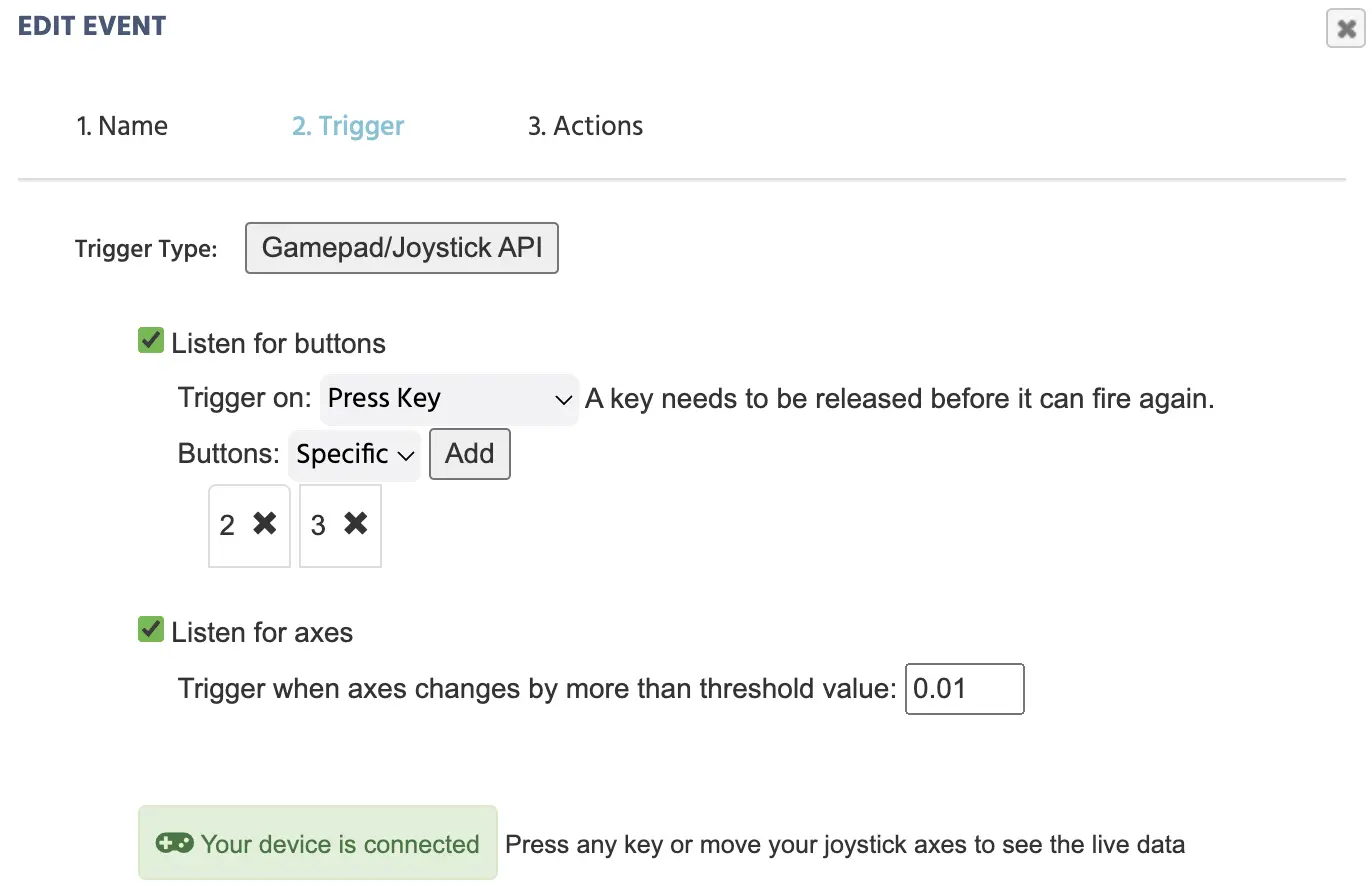
Note: There is variation between game controllers with how key ID assignment works; so for one brand, the gamepad's ◎ key may have an ID of 1 while for a different controller it will have an ID of 2.

Action

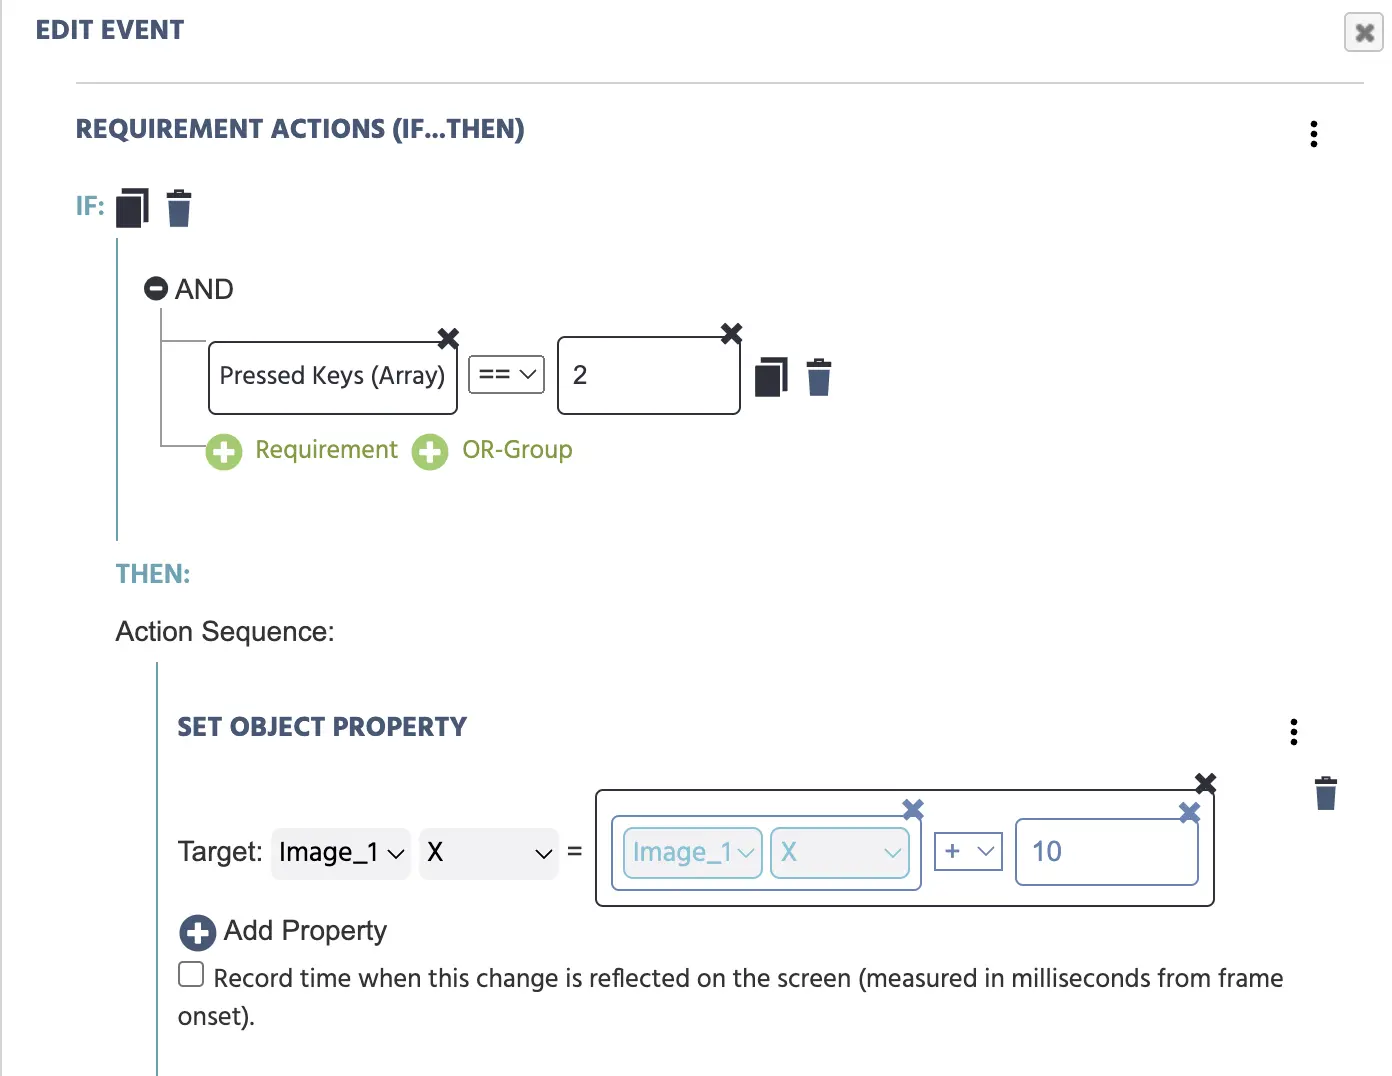
Upon the trigger being executed, we need to specify what will happen next via actions. First, we indicate that the Pressed Keys (Array) should be recorded and scored in an array variable we created and named pressedkeyarray.

Variable recording the key values being pressed

Now we need to set the following specifications (ie. the rules of what will happen when a specific key is pressed) using the Requirement Action (If…Then) action. In the action below,

  • IF the ◎ key is pressed (which, using the live data feed described above, we identified as having an ID of 2)
  • THEN the X object property of Image_1 will increase by a value of `+10’. This moved the image to the right by increasing its X-coordinate by 10 and is accomplished via Operations.

If/ then condition to assign specific actions to game pad keys

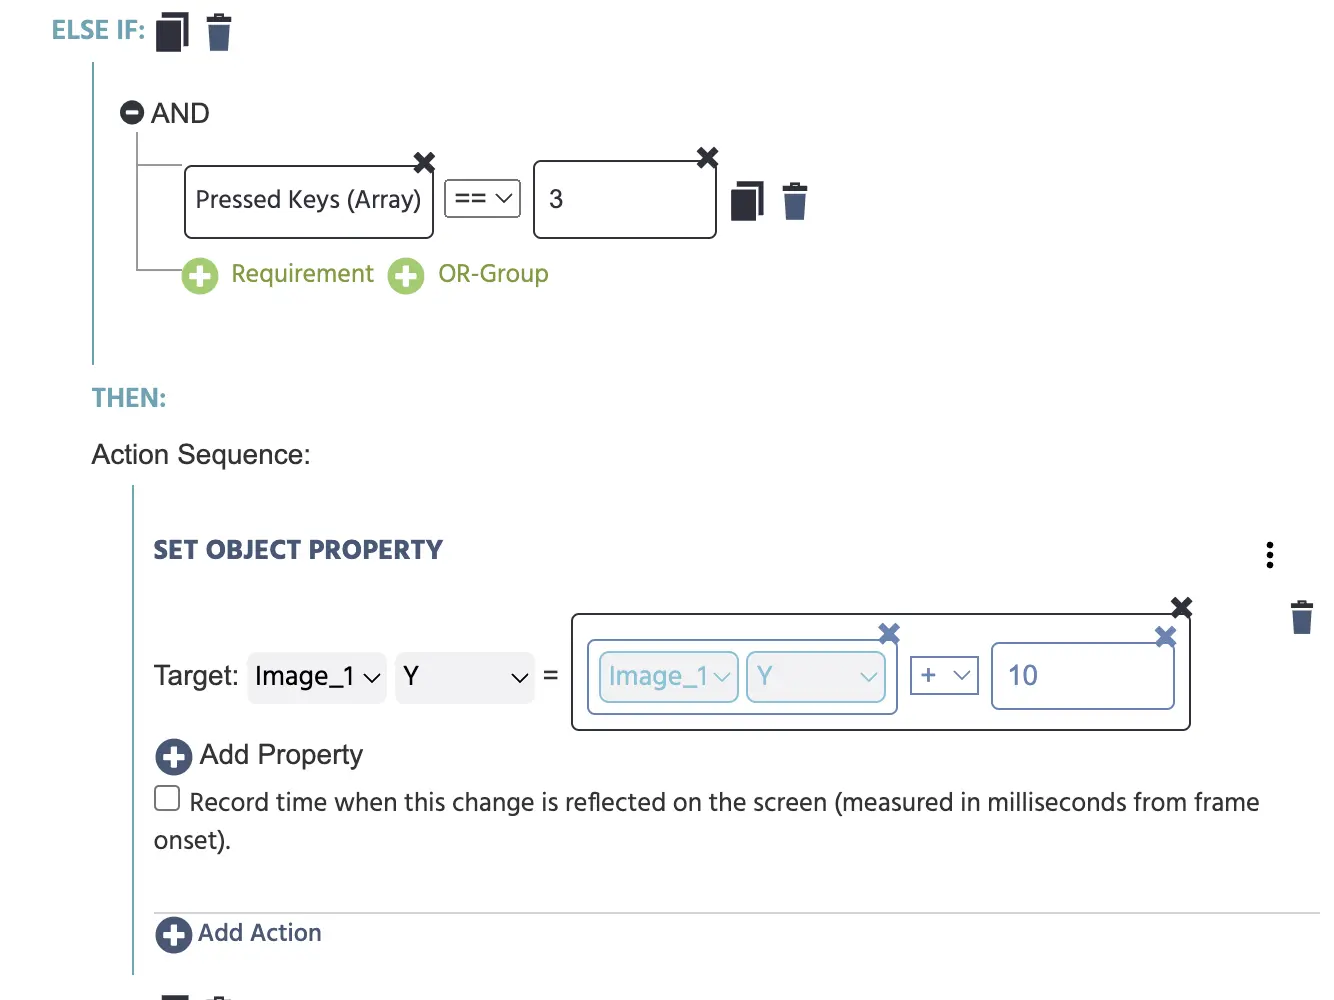
  • IF the ▵ key is pressed (which, using the live data feed described above, we identified as having an ID of 3)
  • THEN the Y object property of Image_1 will increase by a value of +10. This moves the image down by 10. Note: Yes, the value is +10 and the image moves downwards. This is because how the experiment is rendered in the browser, the Y value begins in the upper-left corner, so an addition of 10 will move the image ‘down’ as a result.

Another example of how to assign specific actions to gamepad keys

Note: Since the ‘Listen for Axes’ option is selected in the Trigger menu, at this point we can also create the action to record the Axes arrays. The data recorded will is shown below.

Creating a variable to record axes values

Data Recorded

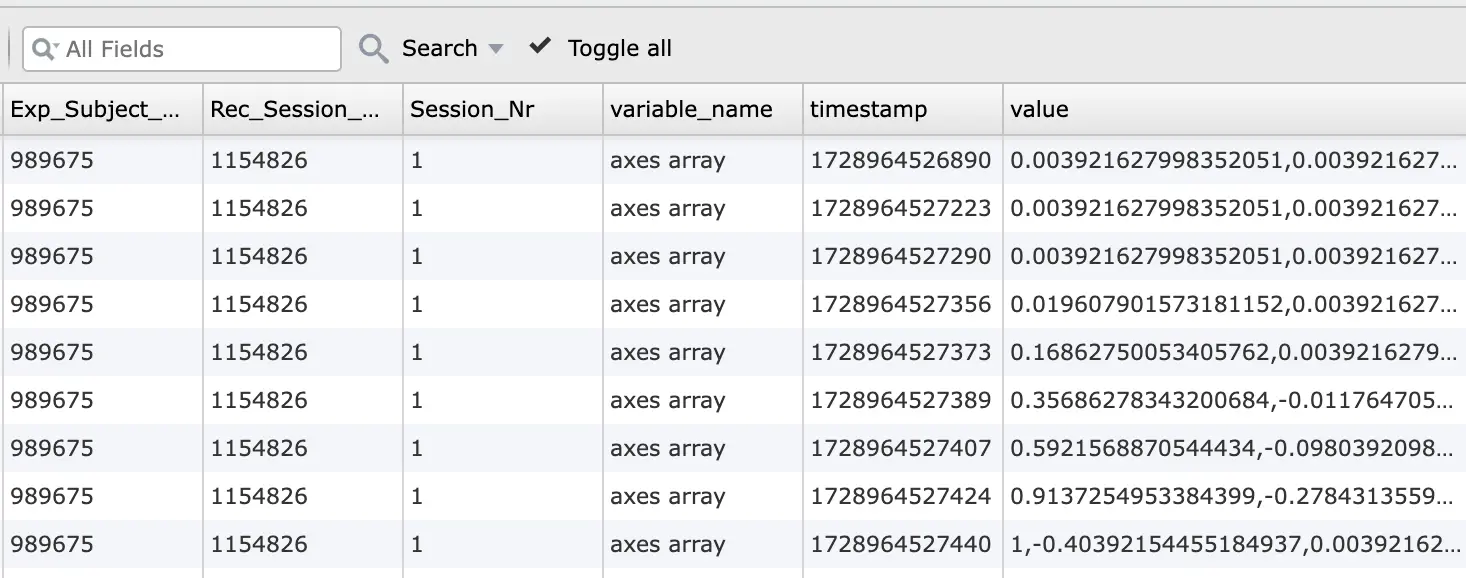
Below are a few examples of what data recorded using this experimental setup looks like.

The third column from the right points to the axes array variable and the last column, titled value shows the contents of this particular variable.

Data recorded for axes array values

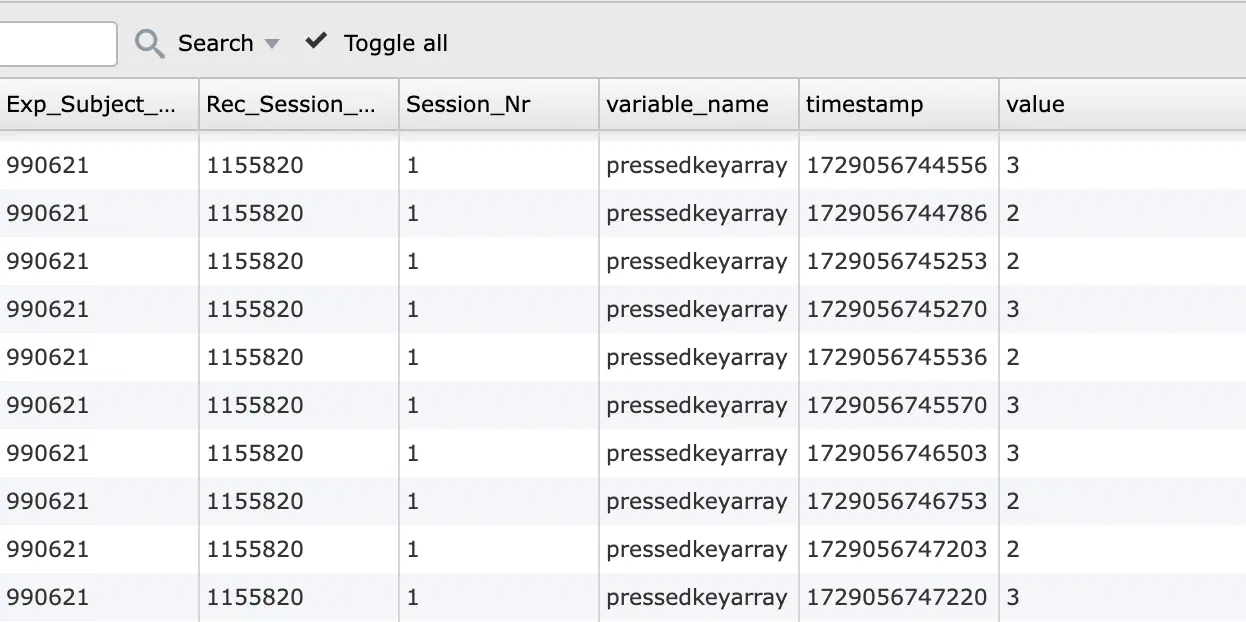
Here, the third column from the right points to the pressedkeyarray variable and the last column, titled value shows the contents of this particular variable, ie. the keys that were pressed.

Data recorded for pressed keys

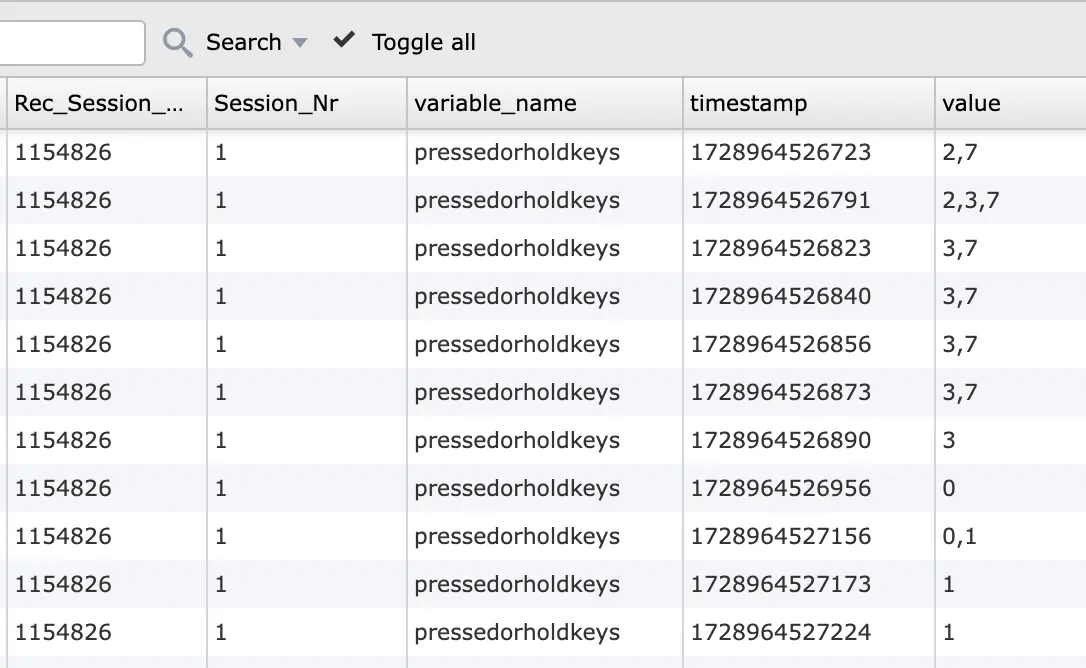
If, in your study, you utilize the Gamepad / Joystick’s Press OR Hold Key trigger option, then you can also measure combinations of key presses as shown below:

Data recorded for pressing or holding keys

If you are interested in implementing this in your study or have any questions, please contact us. We are just a chat message or email away!

Prev
Multi-User Demo: Show Subjects' Cursors
Next
Desktop App Study with EEG Integration