Event System
Description
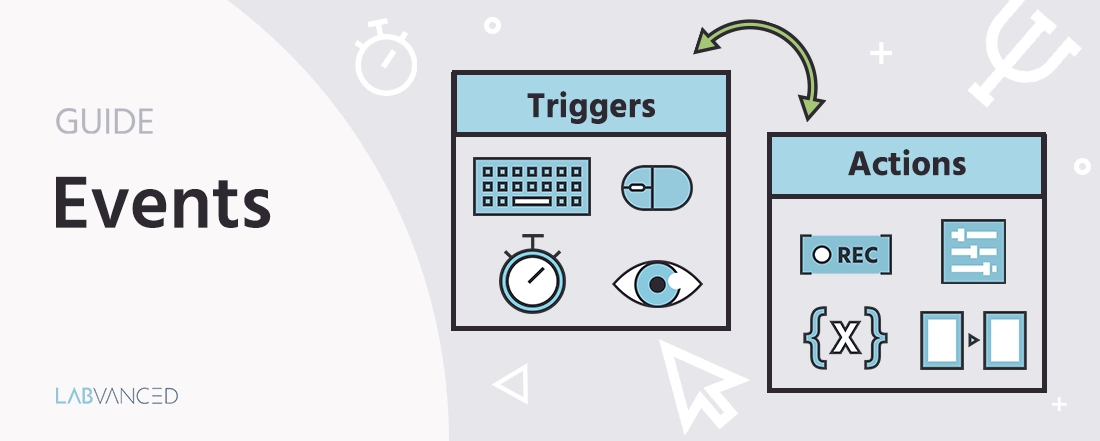
The Event System is essential for any study. It’s how you set up values to be recorded, make the experiment progress, and create tasks. Users can create an event system to execute all of the functionality, logic, and interactions in a task. An event often acts as a mediator between objects and variables.
- For a full list of triggers
- For the full list of actions
- For more information on the Value-Select menu for setting values under events
The event system is composed of triggers and actions. Here you set up rules, like ‘when this happens’ (trigger)’ then ‘do this’ (action). For example: if a participant clicks a specific image (trigger) then show a different, random image (action).
For an introduction of how events work in Labvanced, please refer to this quick video:
Creating Events - Overview
Events are managed in the Task Editor under the "Events" tab in the top right corner. New events can be created via a click on + Frame Event for events that should occur on that frame or by clicking + Trial Event which applies the event to all frames. All existing events are displayed in a list view on the right side panel. Events are defined on a frame level and can be separate/specific for each frame or duplicated/the same on each frame across a trial.

Either way, an event is always defined for all trials within a trial group for the specified frame(s). However, custom logic allows users to execute events only in certain trials, conditions, or in other circumstances.
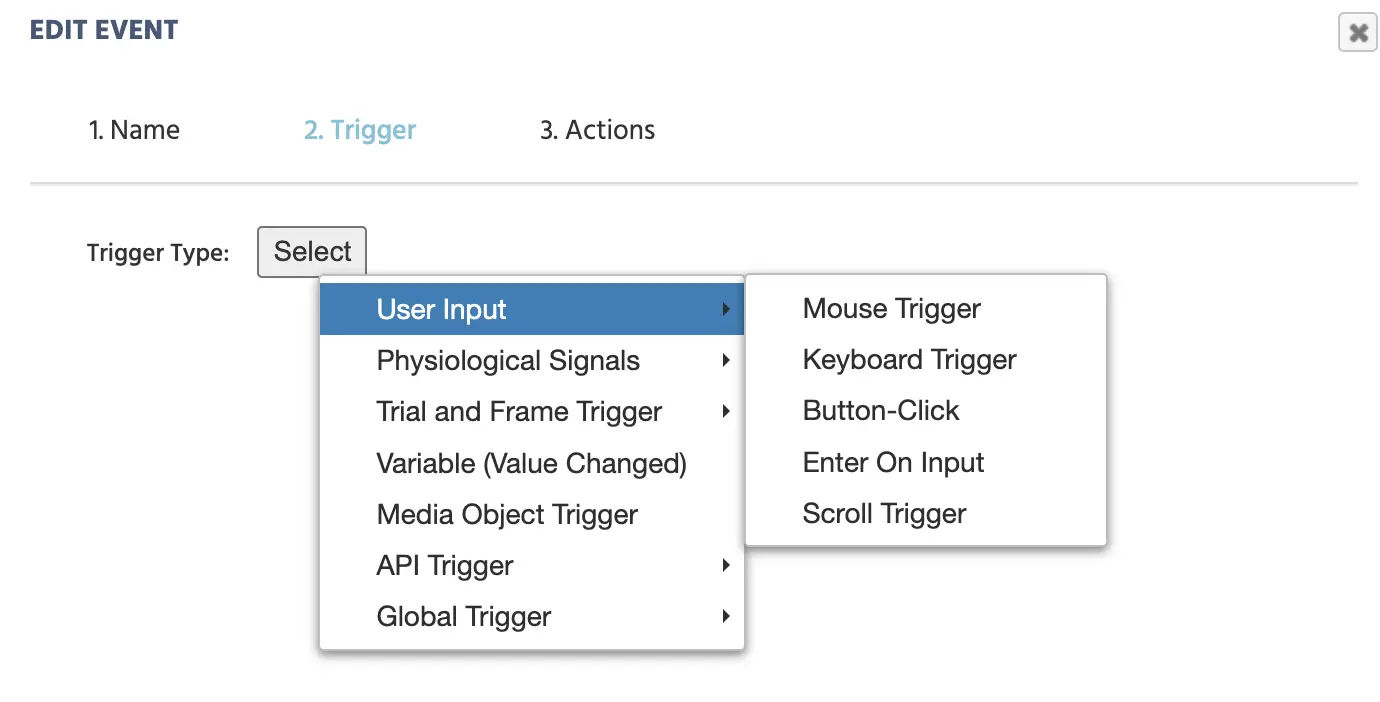
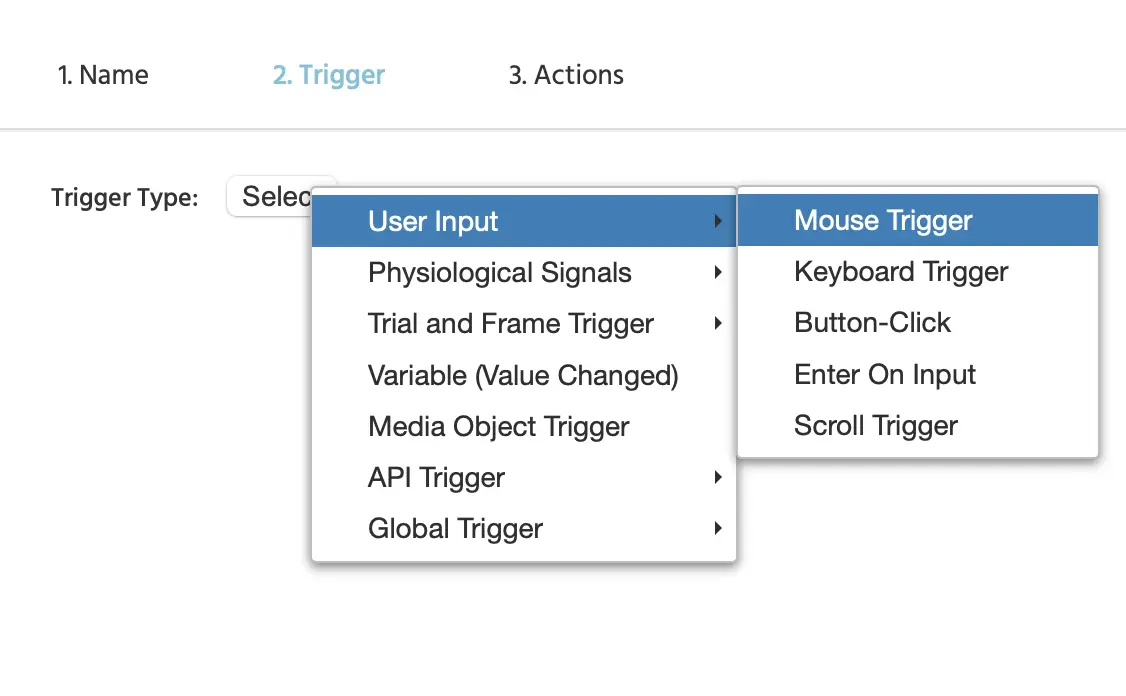
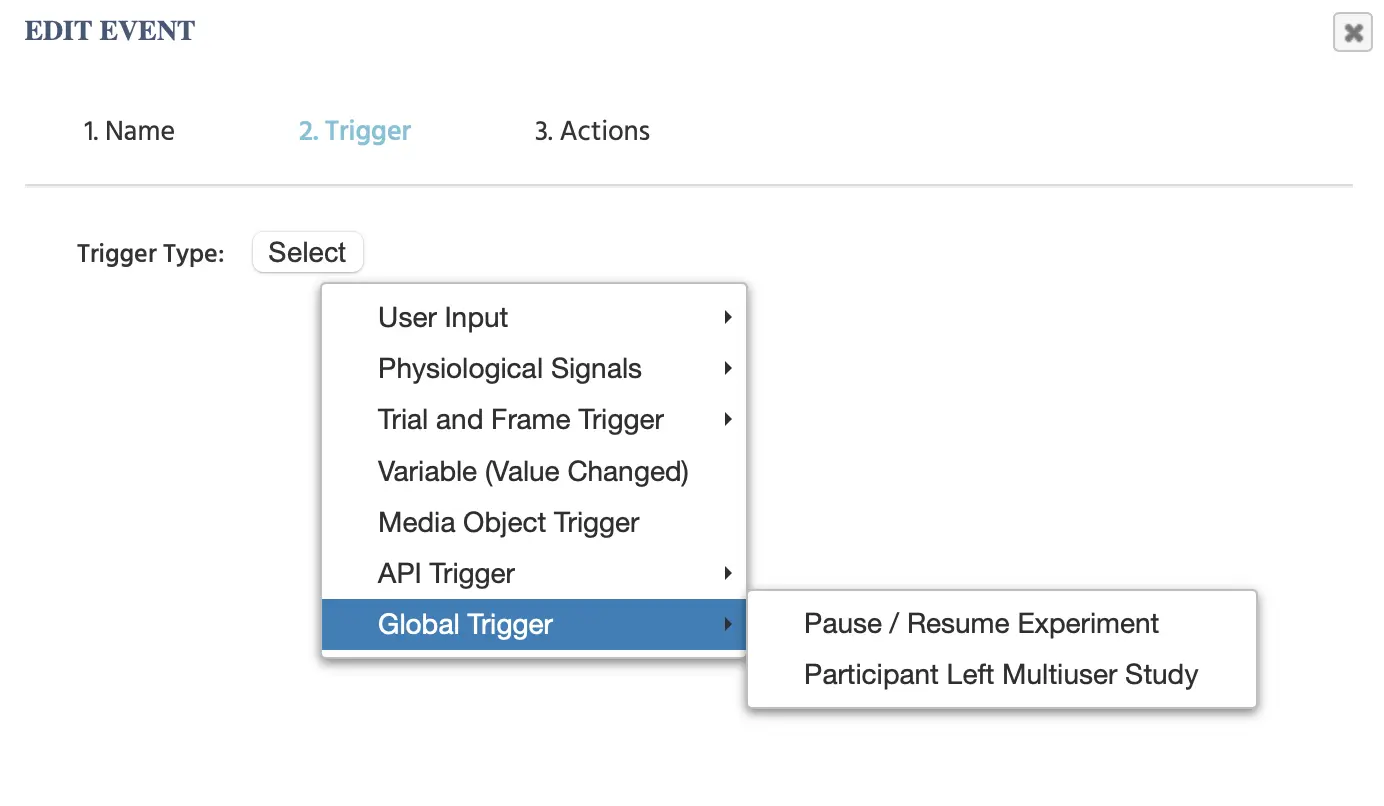
Selecting a Trigger
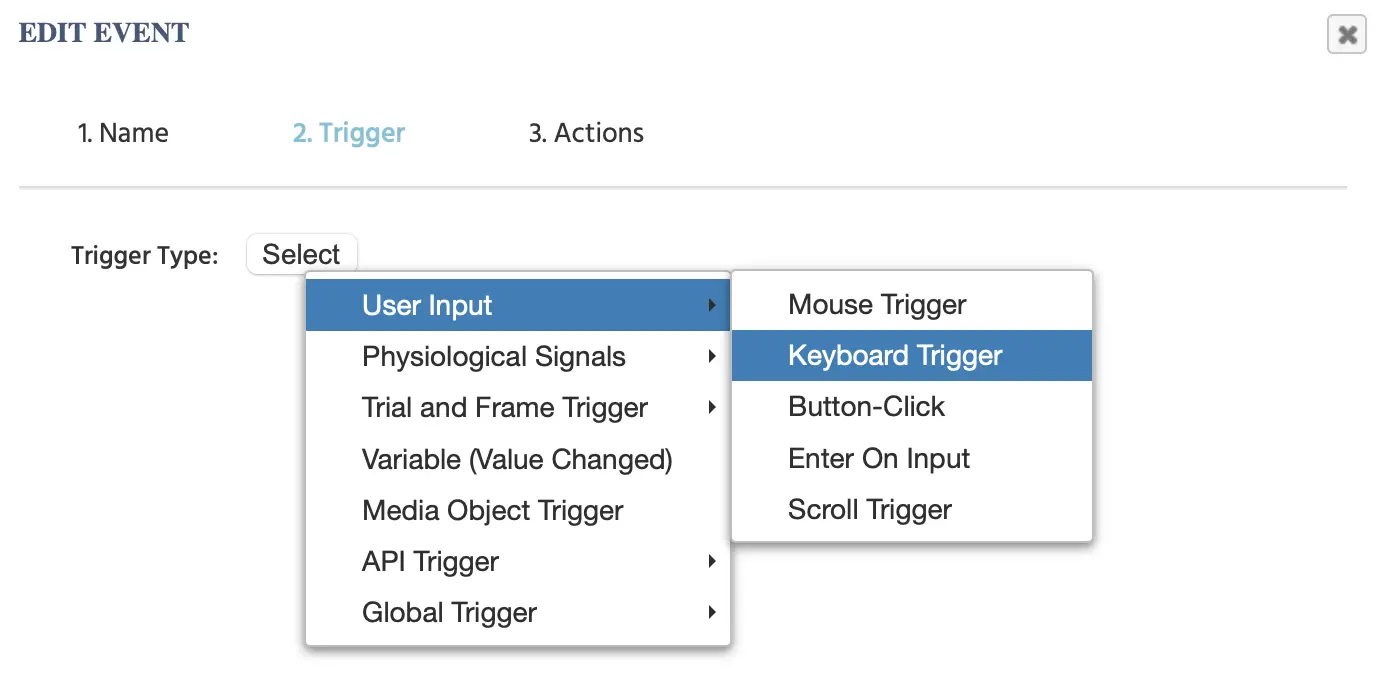
When you create a new event, the trigger selection opens as a tile grid. Trigger types are organized by category (User Input, Physiological Signal, Trial and Frame, Variable, Media Object, API, and Global). A search box at the top lets you filter trigger types by name. Click any tile to set it as the event's trigger.
Once a trigger is selected, the event shows a compact bar with the current trigger name and icon. To switch to a different trigger, click the Change trigger button (pencil icon) to reopen the tile grid.
The video below gives an overview of the triggers and actions available in Labvanced:
The execution order of events can be adjusted. By default, events with the same trigger are further up on the list and will be executed first. Events can also be copied and deleted. When selecting an existing event, the specifics are shown in the lower right (Event Properties) panel. For a better overview, existing events can also be re-opened (icon next to the name field).
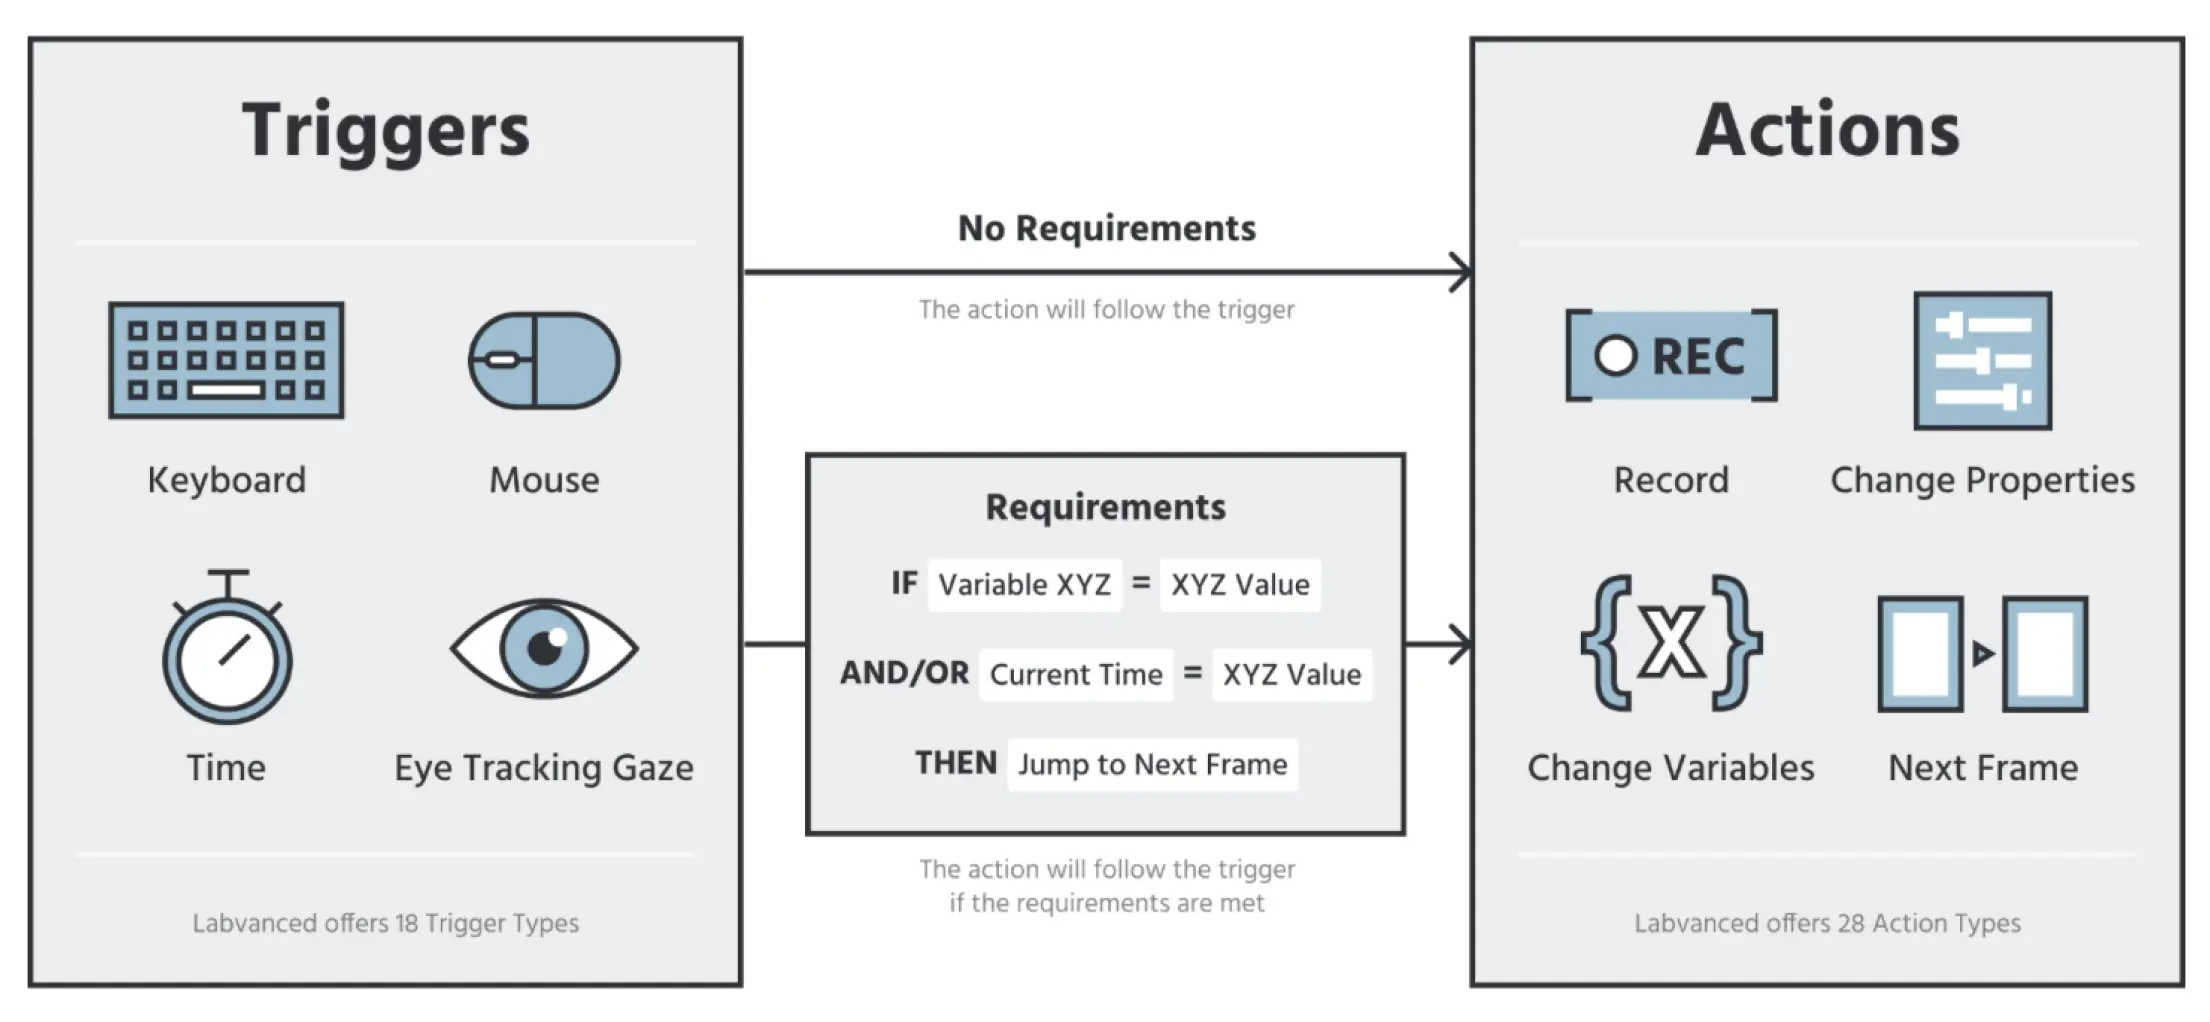
Triggers
The trigger defines when the event will be executed. This could be a mouse click on a particular object, a certain keyboard input, a change of a variable, the start of a video file, or many other things. All triggers and their settings / parameters are explained in the following list:
| Trigger Category | Trigger Options | Description |
|---|---|---|
User Input Triggers | User input triggers refer to any trigger that can be manually activated by the user/participant doing something like moving their mouse, clicking on a keyboard element, scrolling, etc. | |
Physiological Signal Triggers | Physiological signal triggers occur when there is a specified physiological input, like gazing at a specific element or changes in head movements. | |
Trial and Frame Triggers | These triggers occur with regards to the experimental trials and frames, such as when a frame starts or ends. | |
Variable Value Changed Trigger | Variable (Value Changed) | A trigger for the event occurs when there is a change in a specific variable value. |
Media Object Trigger | Media Object Trigger | This trigger occurs with regards to media objects, such as there being a pause in a video/audio file, a recording being completed, etc. |
API Triggers | These are triggers that occur when there is incoming data from an API. | |
Global Triggers | Global triggers refer to any major changes to an experiment, such as it being paused or a participant in a multiuser study leaving. |
User Input Triggers
User input triggers refer to any trigger that can be manually activated by the user/participant.
The table below provides an introductory overview of all the User Input Triggers available in Labvanced. Each of them is described in greater detail in the upcoming sections.
| User Input Trigger Option | Overview |
|---|---|
Mouse Trigger | Any mouse movement can be used as a trigger to initiate an event, such as: scrolling, clicking, hovering, etc. You can also associate specific elements or targets with a trigger. For example, a mouse click will be used as a trigger only if a specific image is clicked. |
Keyboard Trigger | Any keyboard press can be used as a trigger to initiate an event. You can specify specific keyboard letters or numbers as triggers. |
Button-Clicks | Button objects that are created in Labvanced can be used as triggers to initiate events. |
Enter on Input | This trigger is commonly used when a participant presses 'Enter' during an experiment, as a means of submitting their written response or input in text field areas. |
Scroll Trigger | This trigger occurs when the participant scrolls. You can specify x- or y-scroll directions, as well as over what elements the scroll occurs to be used as event triggers. |
Gamepad/ Joystick Trigger | This trigger allows you to make use of gamepad and joystick controllers in your experimental design as an input device for recording data. |
Mouse Trigger
The ‘Mouse Trigger’ option is a very popular event trigger as it initiates an event based on any mouse interaction, such as: moving the mouse up / down, clicking, hovering on a specific object, leaving a specific object, or any move at all!
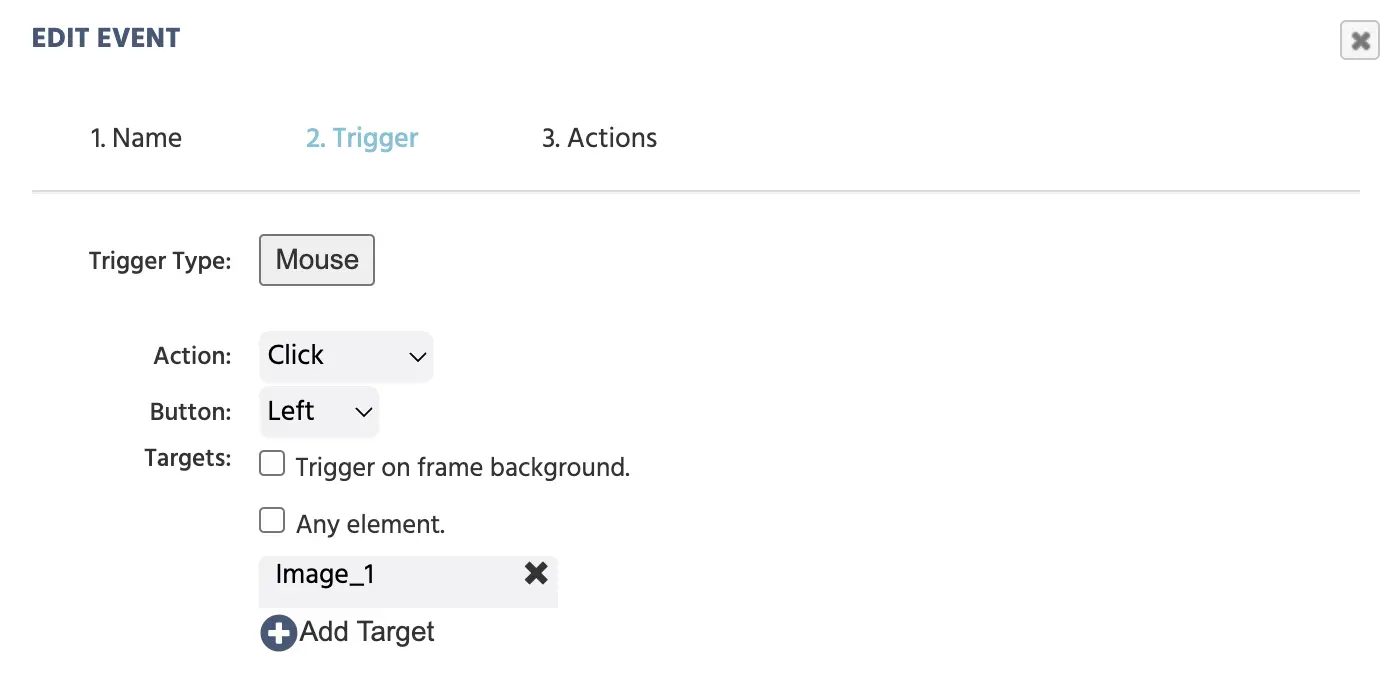
The example below shows a ‘Mouse Trigger’ that will occur when a ‘Click’ is performed by the ‘Left’ mouse click on the ‘Target’ object called ‘Image_1’:
Below is a full overview of options you have when working with mouse triggers:
| Menu Item | Menu Area | Mouse Trigger Options and Specifications |
|---|---|---|
Action drop-down list: | 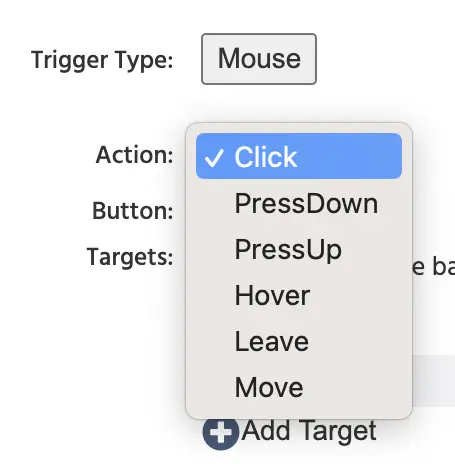 | The following mouse trigger options are available from the drop-down list:
|
Button drop-down list: | 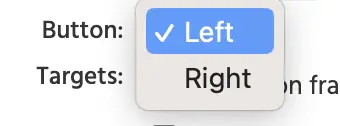 |
|
Targets options: | 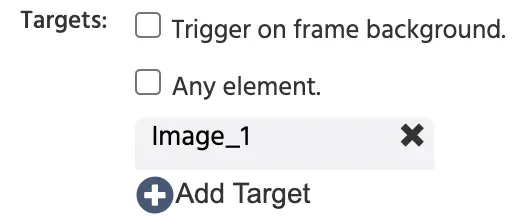 In the example above, ‘Image_1’ is the target of the button click that will trigger the event. Multiple targets can be added by clicking the ‘+Add Target’ option at the bottom. |
|
- Note: After selecting the mouse trigger in the event system, you have the option of utilizing and referencing trigger-specific mouse values across various actions with the value-select menu.
Keyboard Triggers
The ‘Keyboard trigger’ option is another popular way to have an event trigger. Essentially, any input from the keyboard can be used as a trigger. This includes: pressing, holding, or releasing a key.
In the example below, the trigger is set to be a keyboard press that occurs when the specified target numerical values (0, 2, or 6) are pressed:
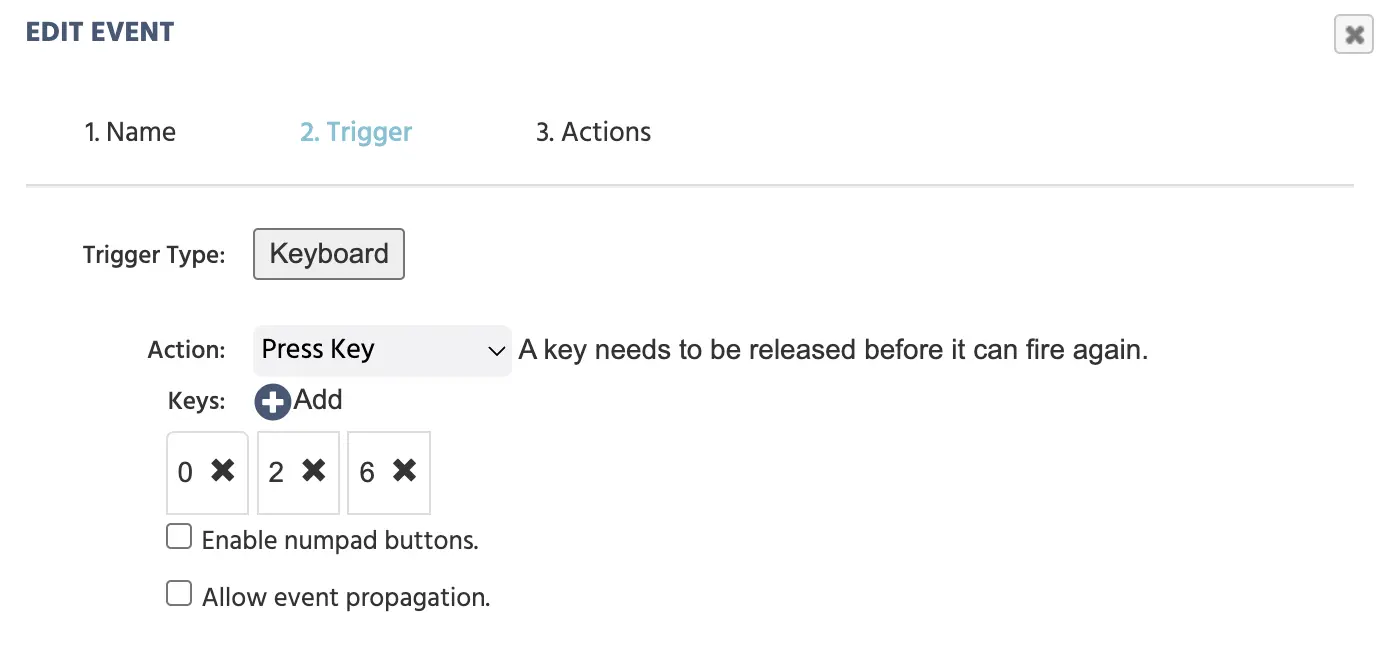
Below is a full overview of keys and options you have when working with keyboard triggers:
| Menu Item | Menu Area | Keyboard Trigger Options |
|---|---|---|
Action drop-down list: | 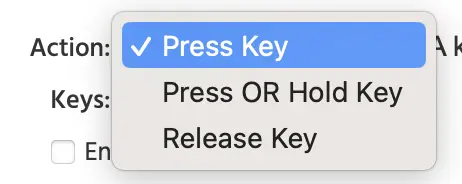 |
|
Keys which key triggers the event | 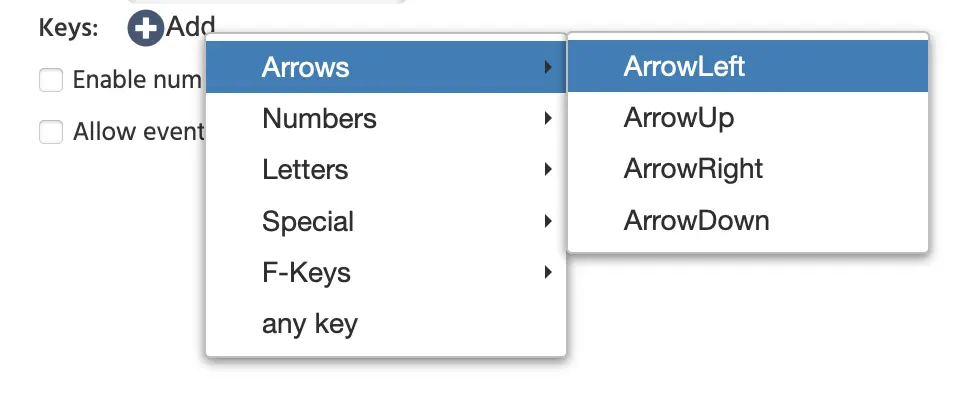 | Which key is used as a trigger is specified by selecting the options here by clicking +Add:
+Add: button again |
| Additional Options | 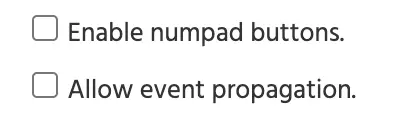 | The enable numpad buttons option allows for numpad keys to be used as triggers within the experiment. For the allows event propagation option, if multiple events have the same keyboard trigger then all fire/trigger without it. Only the first one will fire and the event execution will stop after the first event is done. |
- Note: After selecting the keyboard trigger in the event system, you have the option of utilizing and referencing trigger-specific keyboard values across various actions with the value-select menu.
Button Click Trigger
If you have a button or navigation object placed in the editor, you can utilize them as a part of an event where clicking on the button acts as a trigger for an action.
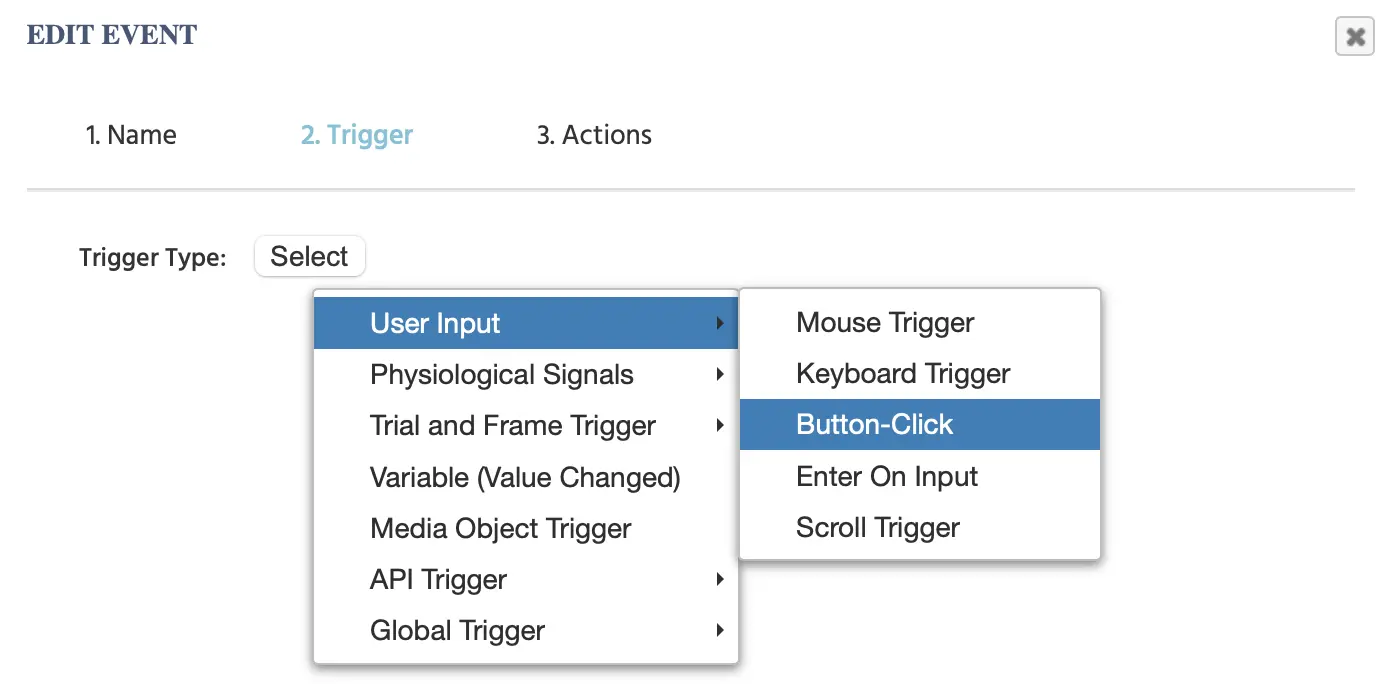
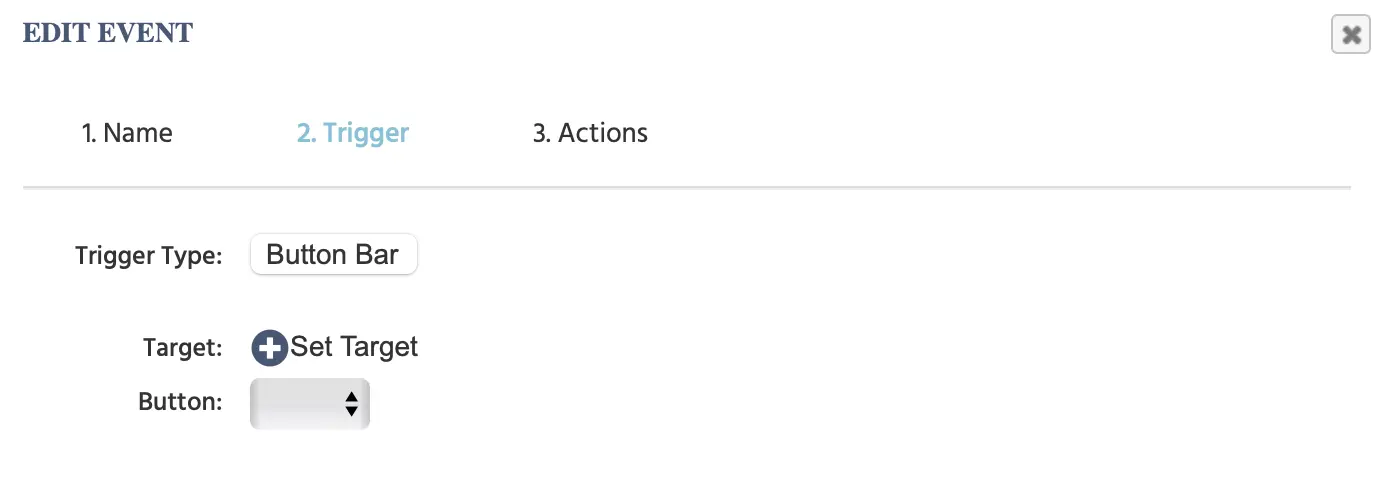
Clicking this trigger shows the following menu where you can specify which specific button will act as the trigger:
Here is a closer look at the items featured:
| Menu Item | Menu Area | Button-Click Trigger Options |
|---|---|---|
Target: +Set Target |  | |
Button: option | 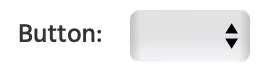 | Specify which specific button on the frame |
- Note: After selecting the Button Click trigger in the event system, you have the option of utilizing and referencing trigger-specific button-click values across various actions with the value-select menu.
Enter on Input Trigger
Triggers on: The Enter/Return key is pressed on the keyboard while a specific element is active.
Parameters:
Add Targets: Add a input element to the Event.
Note: After selecting the Enter on Input trigger in the event system, you have the option of utilizing and referencing trigger-specific Enter on Input values across various actions with the value-select menu.
Scroll Trigger
Triggers on: The scroll bar, scroll on track pad, or scroll wheel on the mouse is used on a specific element.
Parameters:
- Choose whether the scroll is on the Y axis or the X axis (vertical scroll or horizontal scroll).
Target: Set the target element that the scroll trigger will apply to.
Note: For long text, in the 'Object Properties' panel under the 'Style' section, the Overflow-Xand/or the Overflow-Y options need to have scroll as the option selected.
- Note: After selecting the Scroll trigger in the event system, you have the option of utilizing and referencing trigger-specific scroll values across various actions with the value-select menu.
Gamepad/ Joystick Trigger
The Gamepad/ Joystick Trigger allows you to make use of gamepad and joystick controllers in your experimental design as an input device for recording data. Note: remember to enable this option under the Settings tab.
Physiological Signal Triggers
These triggers will only apply if eyetracking and/or headtracking has been enabled for the task.
Eyetracking Gaze Trigger
Triggers on:
- Overall, this trigger will apply when eyetracking has been enabled.
- Only trigger when looking at specific elements
Parameters:
If you have selected to only trigger on specific elements, add those elements as targets.
Note: After selecting the Eyetracking Gaze trigger in the event system, you have the option of utilizing and referencing trigger-specific gaze values across various actions with the value-select menu.
Eyetracking Fixation Trigger
This trigger is still in its BETA phase.
- Note: After selecting the keyboard trigger in the event system, you have the option of utilizing and referencing trigger-specific fixation values across various actions with the value-select menu.
Headtracking Trigger
Triggers on:
Changes in head orientation or head movement.
Note: After selecting the Headtracking trigger in the event system, you have the option of utilizing and referencing trigger-specific Headtracking values across various actions with the value-select menu.
Trial and Frame Triggers
Task Init Trigger
Triggers on:
- The first frame of the first trial of a task. Will only be executed once per task, despite being shown in the Events tab for all instances of that frame.
This Trigger pairs well with the Shuffle and Read From actions. With these combinations, you can shuffle array entries or data frames as the task starts and assign subjects to sets of stimuli without having to create multiple events to read out stimuli or data.
Parameters: None
- Note: After selecting the Task Init trigger in the event system, you have the option of utilizing and referencing trigger-specific Task Init values across various actions with the value-select menu.
Frame Init Trigger
Triggers on:
- The initialization of the frame, before it becomes visible to the participant.
This trigger pairs well with the Shuffle, Read From, and Draw Random Number actions. With these combinations, these actions can be completed before the frame appears, leaving a clear pathway for other actions to begin as the frame starts.
Note: Do not use the Frame Init trigger with events that record a variable or that involve system variables such as Trial Number or Condition Number. This is because the Frame Init trigger occurs in between trials, so there is not a fully accurate count of the trial or condition about to be displayed.
Parameters: None
- Note: After selecting the Frame Init trigger in the event system, you have the option of utilizing and referencing trigger-specific Frame Init values across various actions with the value-select menu.
Note on Task and Frame Init Triggers: Because the Task and Frame Init triggers occur before the task or frame begins, variables created during this time will reset when the task/frame actually starts. A warning will appear when using this event:

Remember to uncheck the "Reset at Trial Start" box in the variable properties window if you do not want the variable values to be reset.
Frame Start Trigger
Triggers On:
- Start of the frame
Parameters: None
- Note: After selecting the Frame Start trigger in the event system, you have the option of utilizing and referencing trigger-specific Frame Start values across various actions with the value-select menu.
Frame End Trigger
Triggers On:
- End of the frame (after frame is no longer visible)
Parameters: None
- Note: After selecting the Frame End trigger in the event system, you have the option of utilizing and referencing trigger-specific Frame End values across various actions with the value-select menu.
Variable Value Changed Trigger
Variable Value Changed
Triggers On:
- The value of a variable changes from its starting value
Parameters:
Variables: Select one or more variables where you want to "listen" to changes. Any change in the value of these variables will trigger the corresponding Action immediately.
Note: After selecting the Variable Value Changed trigger in the event system, you have the option of utilizing and referencing trigger-specific Variable Value Changed values across various actions with the value-select menu.
Media Object Triggers
Media Object Trigger
Formerly known as the separate "Control Audio/Video Trigger" and "Control Object" triggers.
Triggers On:
- Start, pause, or stop of a video or audio file
- File Upload Finished, File Selected, Recording Done of a recording object
- Snapshot Finished or Upload Complete of a camera snapshot object
Parameters:
Target: Select an object element that exists on the frame
Execute On: Select sub type of trigger
- Audio or Video Object options:
- Playback Started: Triggers when the element starts playing
- Playback Stopped: Triggers when the element pauses
- Playback Ended: Triggers when the element stops playing
- Video, Audio, or Screen Recording Object options:
- Recording Finished: Triggers when the audio recording has stopped
- Upload Complete: Triggers when the file upload is complete
- File Upload Object options:
- File Selected: Triggers when a file is selected
- Upload Complete: Triggers when the file upload is complete
- Camera Snapshot Object options:
- Snapshot Finished: Triggers when the camera has successfully taken a snapshot
- Upload Complete: Triggers when the snapshot is finished uploading
- Audio or Video Object options:
Note: After selecting the Media Object trigger in the event system, you have the option of utilizing and referencing trigger-specific Media Object values across various actions with the value-select menu.
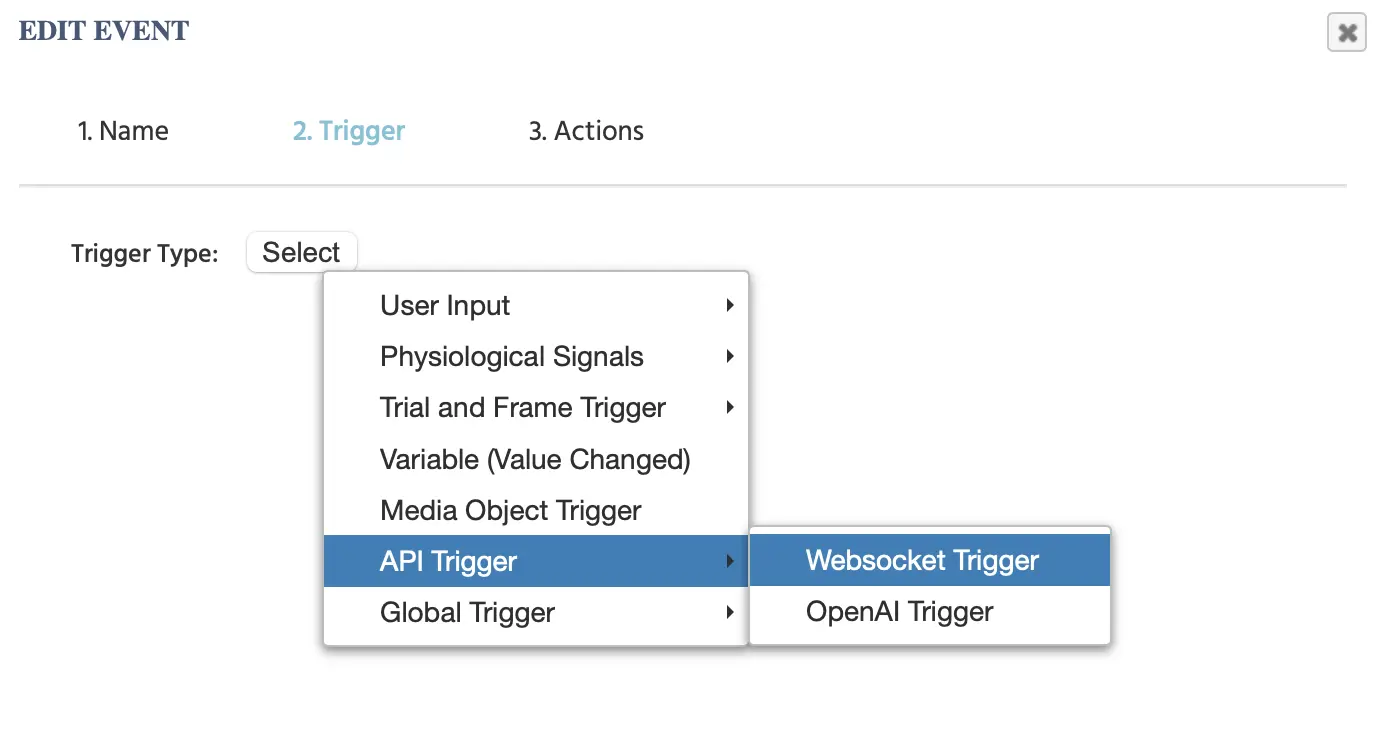
API Triggers
If you need to send or communicate data from an external server into Labvanced, then ‘API Triggers’ and ‘API Actions’ can be used. The following can be used as triggers:
- Websocket Trigger
- OpenAI Trigger
- PostMessage Received
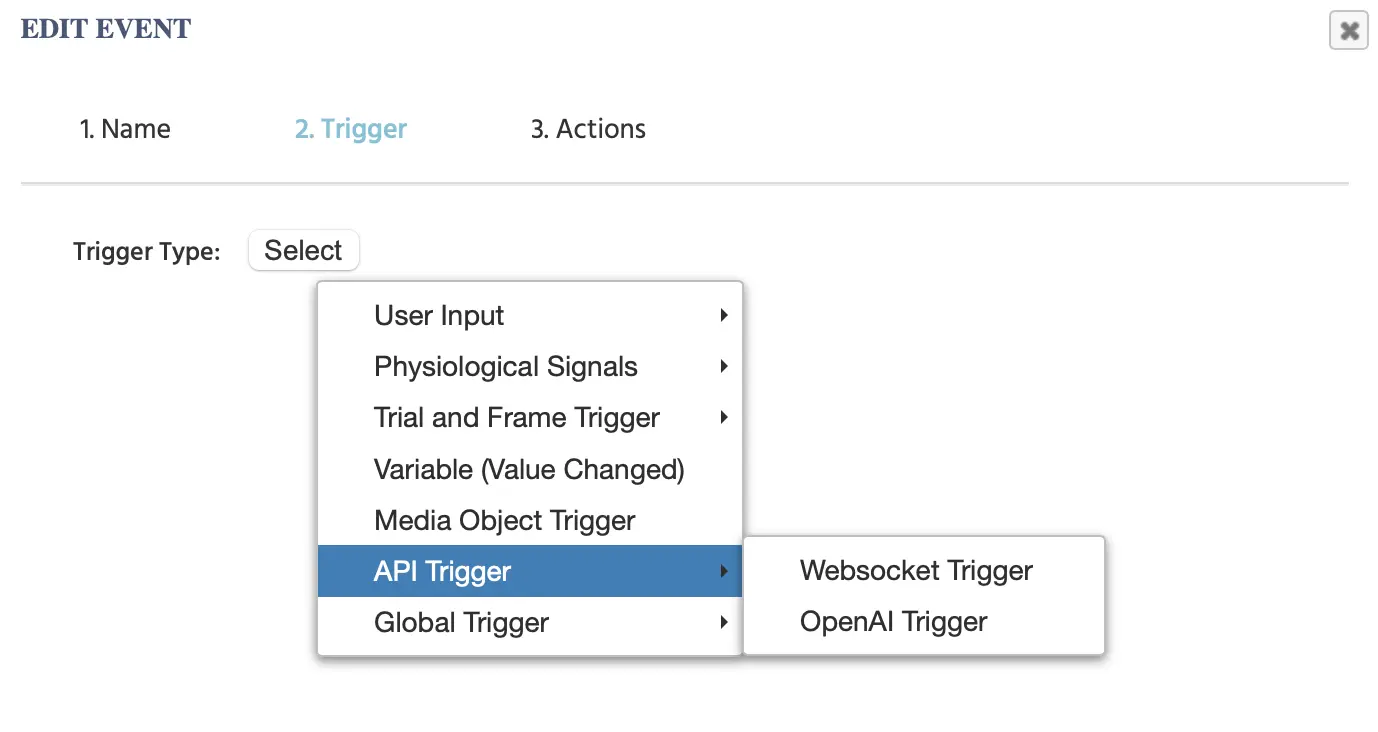
Websocket Trigger
The Websocket Trigger is used when a message from the websocket/API that will be received and processed as the trigger for the Action.
Upon clicking this option, the following items appear.
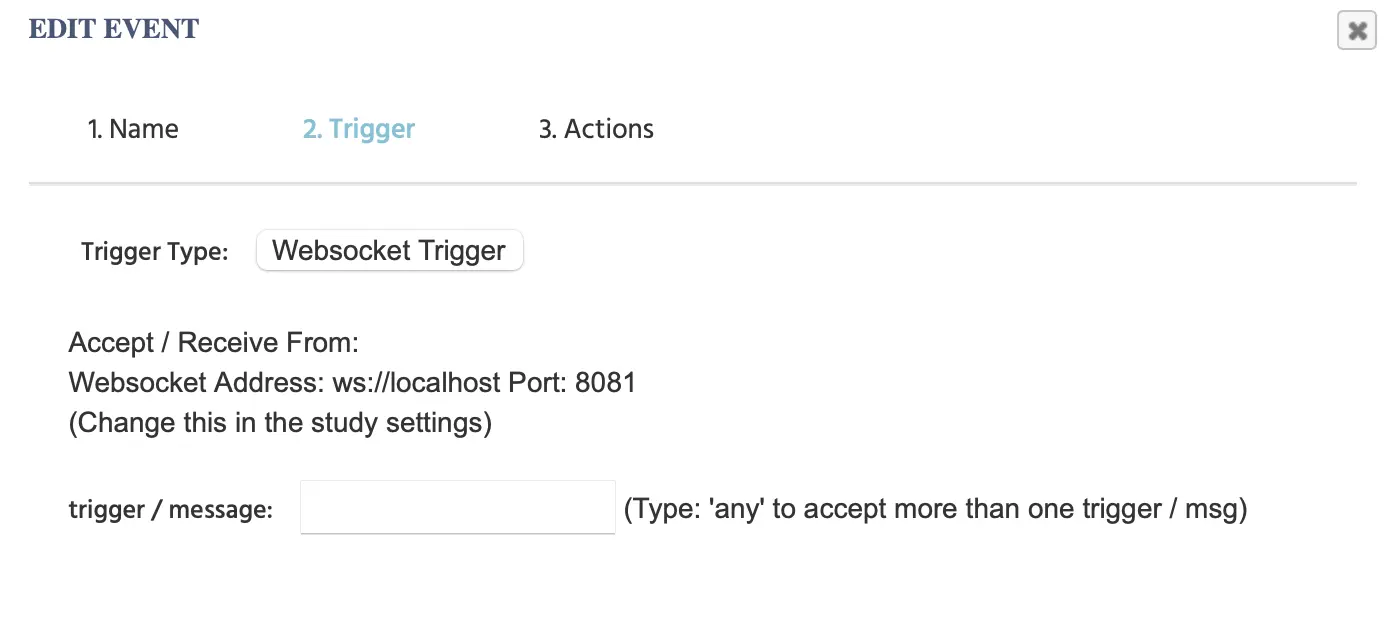
- Accept/Receive from: Auto-detects the IP address of the local host. Can be changed manually in the
Settingstab underSpecial Features. - Trigger/message: input the message that will serve as the trigger. Type 'any' to accept more than one message as a trigger.
For an example of how API Triggers / Actions are used, please check this demo https://www.labvanced.com/page/library/51053 by clicking the ‘Inspect’ option in the dialog box.
For more information about API Access, please visit this page.
- Note: After selecting WebSocket trigger in the event system, you have the option of utilizing and referencing trigger-specific WebSocket values across various actions with the value-select menu.
OpenAI Trigger
The ‘OpenAI Trigger’ can be used to initiate an action based on incoming information from OpenAI.
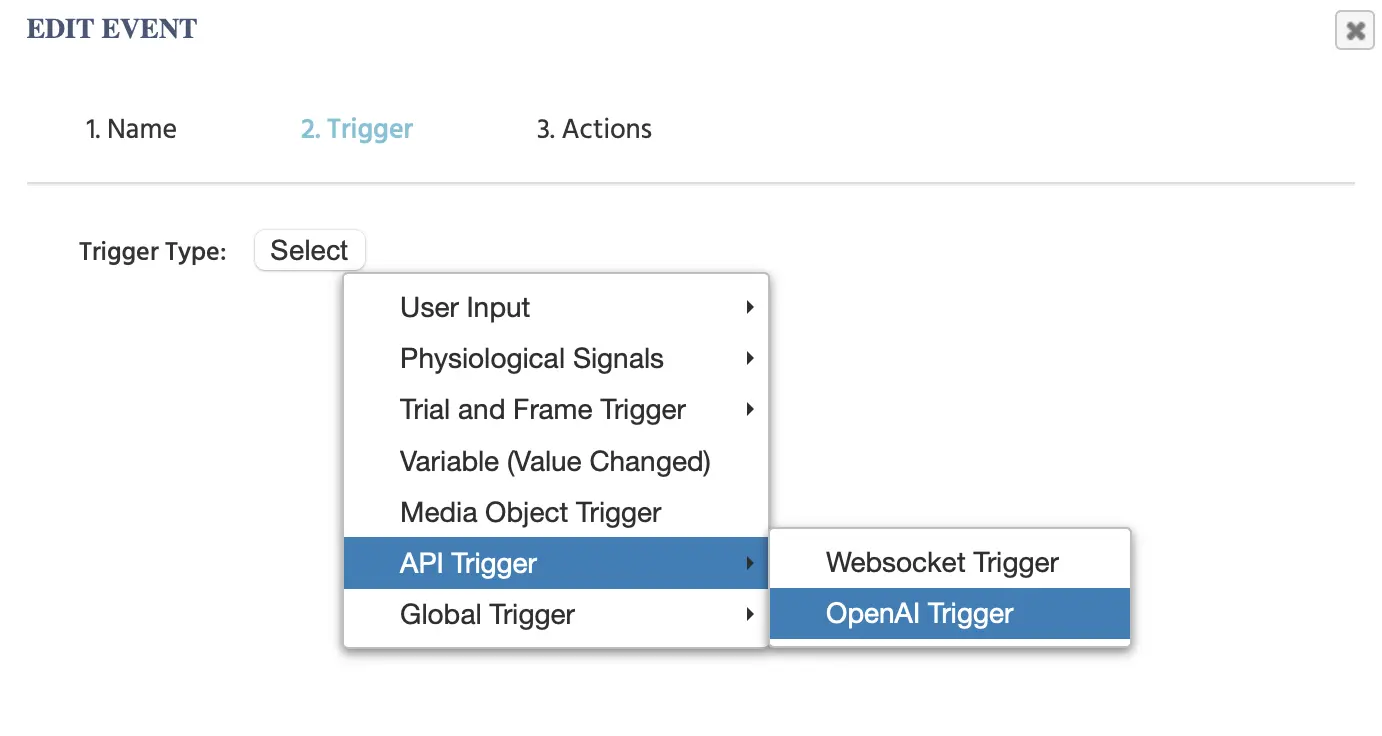
Selecting this option will lead to the following parameters being displayed:
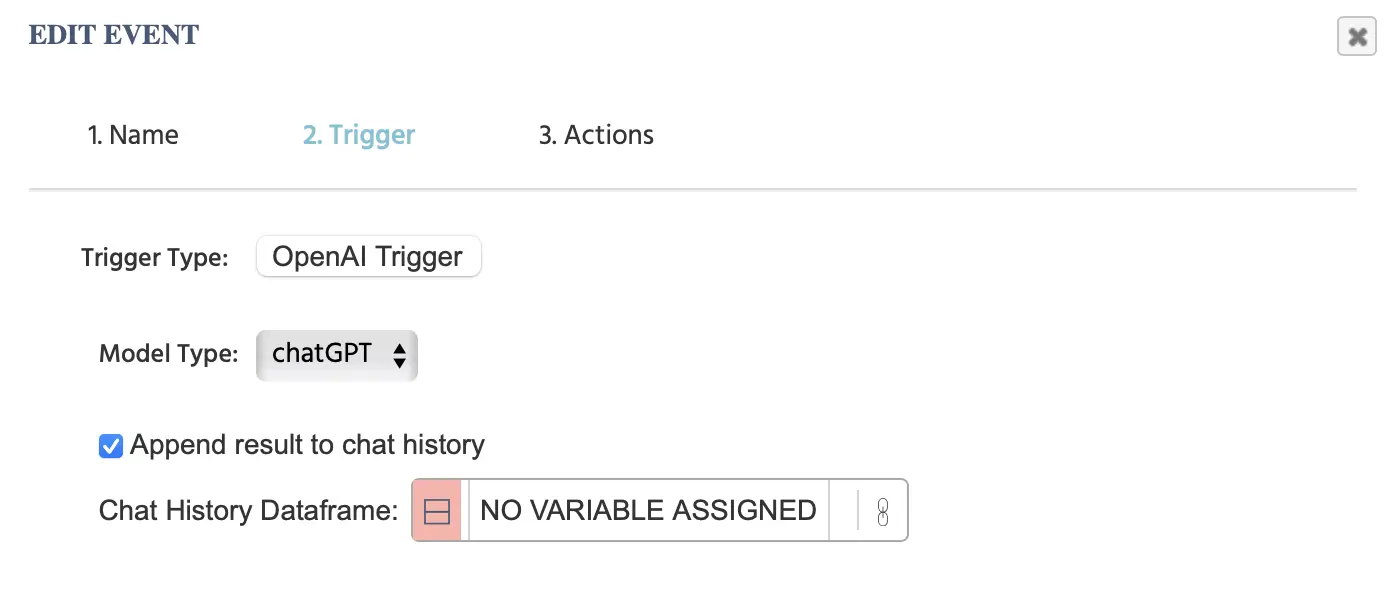
NOTE: Also refer to this walkthrough where we build a study step-by-step, integrating ChatGPT in a study and utilizing this trigger.
In the example below, the data frame that was assigned is called ‘df’ and the result from the ‘OpenAI Trigger’ will be appended to this data frame. This data frame needs to have two columns. The first column will denote the ‘role’ and the second column the ‘chat message.’ The values from the action will be automatically appended to the data frame that is linked here.
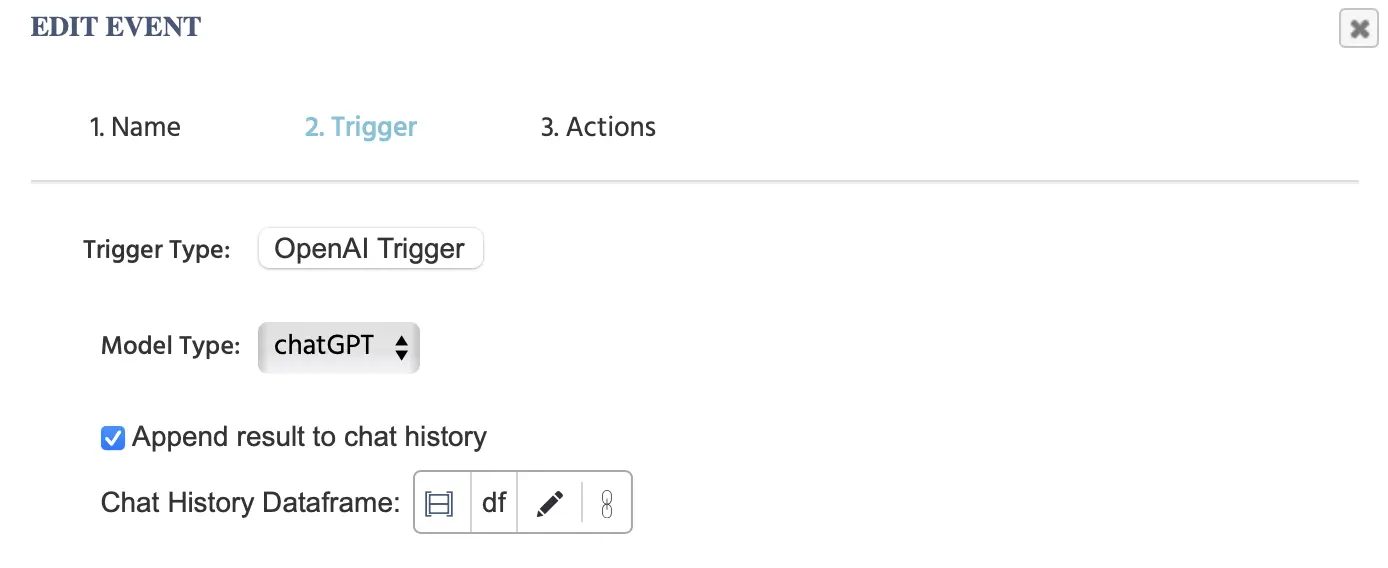
If you are also using the ‘Send to OpenAI’ action, then you need to utilize the same data frame there as you have indicated here.
- Note: After selecting the OpenAI trigger in the event system, you have the option of utilizing and referencing trigger-specific OpenAI values across various actions with the value-select menu.
PostMessage Received Trigger
The PostMessage Received trigger fires when the running experiment receives an incoming message from an external source via the browser's postMessage API. It is useful for connecting an experiment to a parent page, a custom application, or an embedded external website that sends data into the study.
- Note: After selecting the PostMessage Received trigger in the event system, you have the option of utilizing and referencing trigger-specific PostMessage Received values across various actions with the value-select menu.
Global Triggers
Global Triggers occur whenever a major change occurs within the experiment, ie. something that is ‘Global’ such as pausing the experiment or a participant leaving a multi user study! The following options are listed as Global Triggers:
- Pause / Resume Experiment
- Participant Left Multiuser Study
Pause/Resume Experiment
The ‘Pause / Resume Experiment’ trigger is an option that allows you to execute an event based on the experiment pausing or resuming.
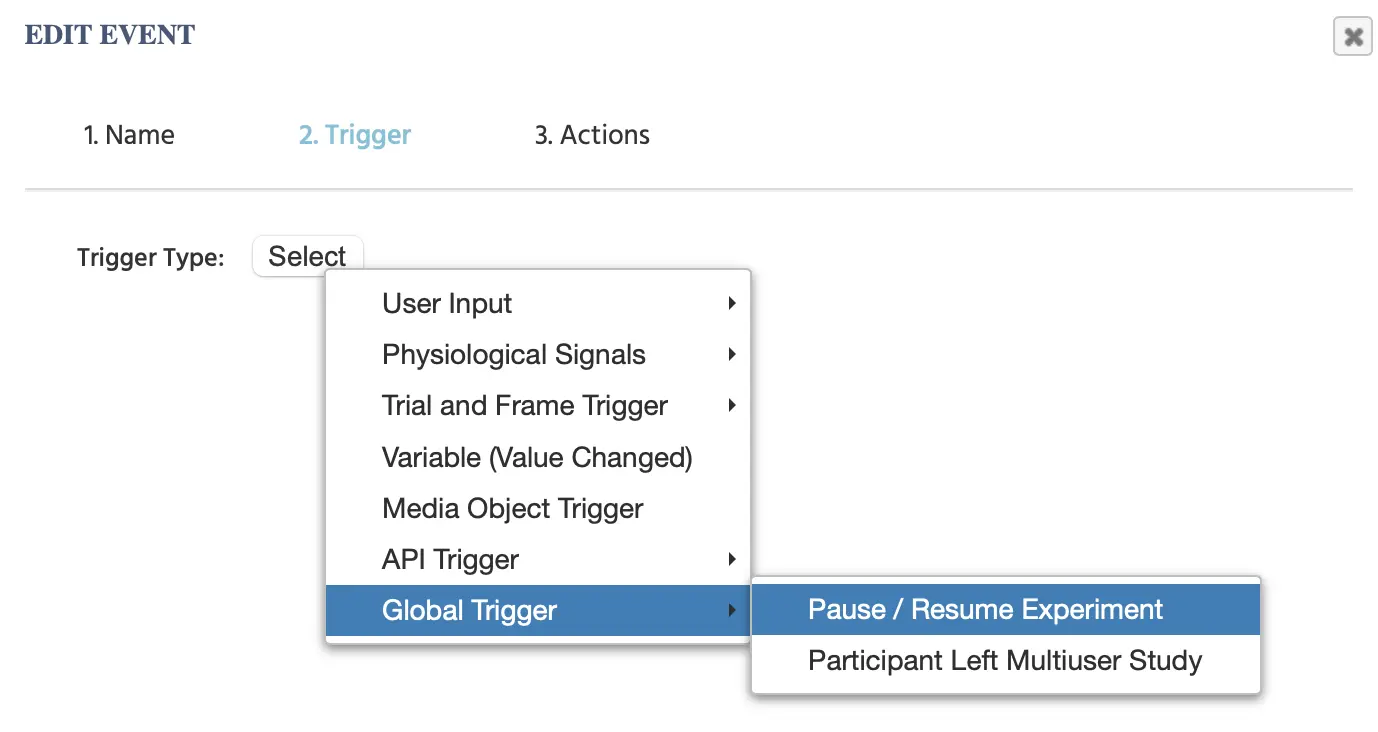
Upon selecting this trigger, the following view appears where you can further specify the nature of the trigger, whether is should be executed on the experiment being paused or continued / resumed:
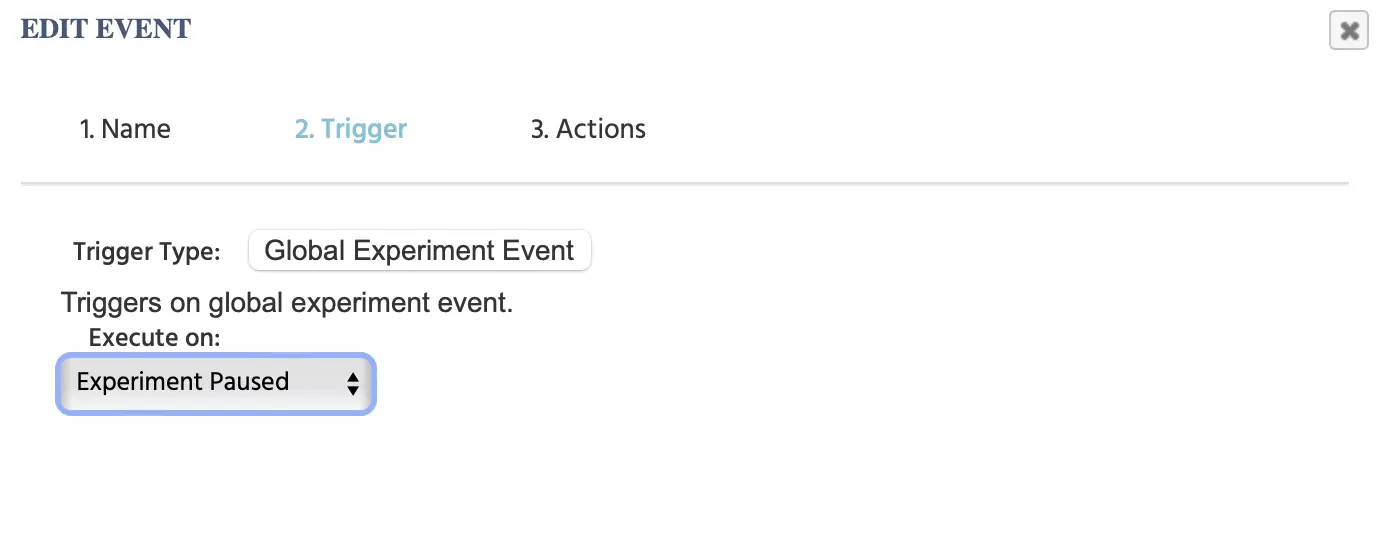
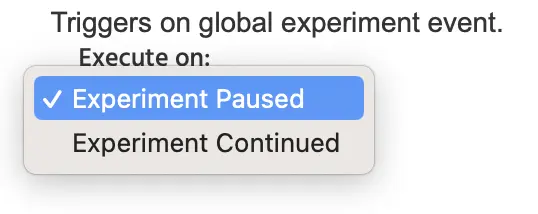
Experiment Paused: Participant pauses (exits fullscreen) the study.
Experiment Continued: Participant resumes the study. This trigger works well for eye tracking studies. It can be used to send the participant back to a previous trial or frame if they have left their Virtual Chinrest.
Note: After selecting the Pause/Resume Experiment trigger in the event system, you have the option of utilizing and referencing trigger-specific values across various actions with the value-select menu.
Participant Left Multiuser Study
If a participant leaves a multi user study, that can also be used as a trigger for an event. If a participant leaves a multiuser study, this affects the experiment on a global level because it prevents other participants from continuing the study.
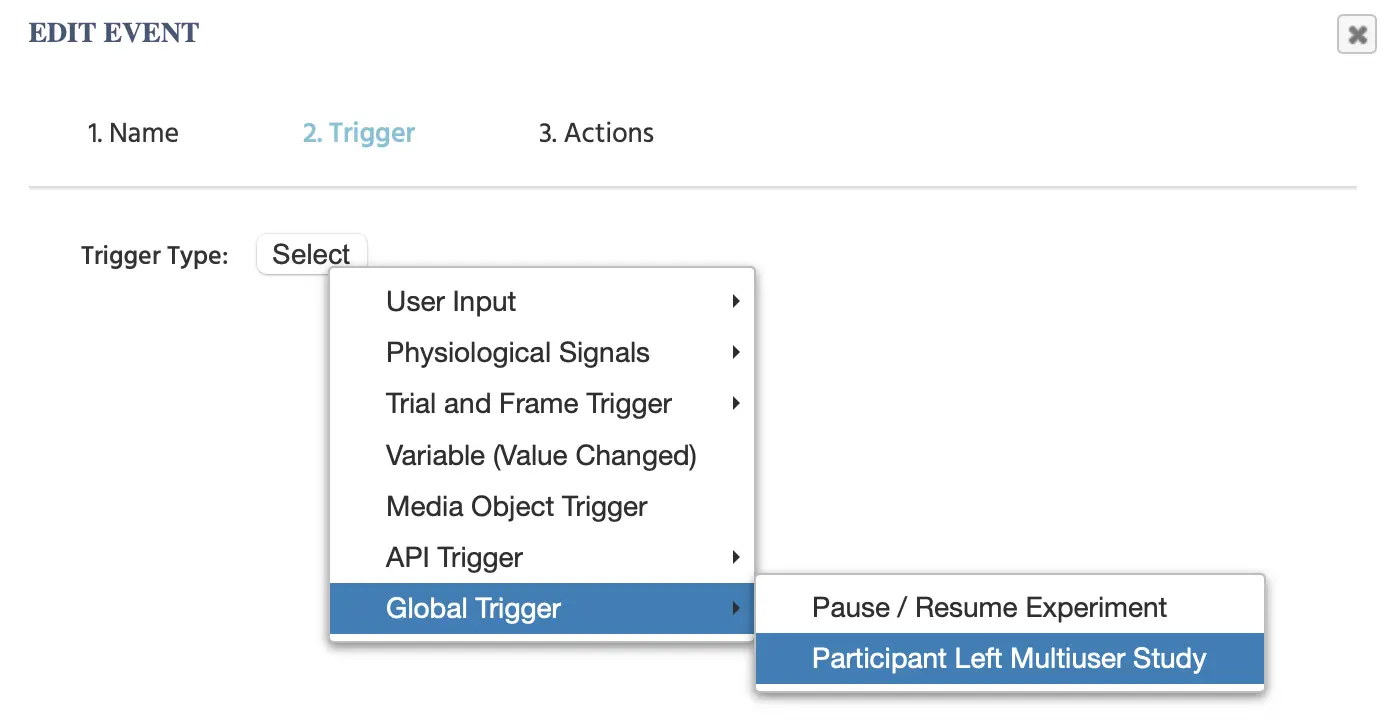
By selecting this trigger, you can specify what kind of action will happen if a participant leaves a multi user study.
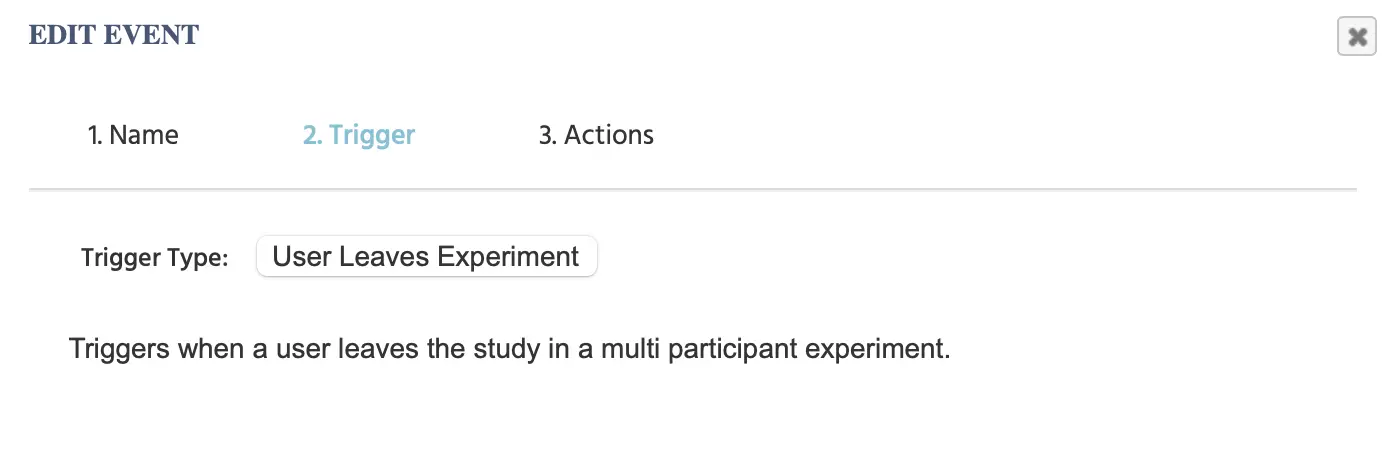
- Note: After selecting the Participant Left Multiuser Study trigger in the event system, you have the option of utilizing and referencing trigger-specific values across various actions with the value-select menu.
Actions
Actions define what should happen when the event is executed. They can be used to change variables and object properties, record data, read and write data to / from arrays, or jump to the next trial or task. Often there are several actions per event. Using "ControlActions," one can use logical operations (If-Else statements), Loops, callback functions, as well as nesting actions within each other (e.g a while-loop within an if-statement). Hence, the event system can be seen as a graphical programming environment. In this view, triggers act as the function invocations, while actions describe the functional logic. This approach guarantees that almost any experimental logic can be implemented without the use of certain programmatic / syntactical structures.
The table below provides an introductory overview of the actions that are available in Labvanced:
| Action Category | Action Options | Description |
|---|---|---|
Object Actions | Object actions refer to any manipulation that will occur on an object that exists within the task. | |
Variable Actions | Any action that reads from or records a variable value. | |
Array Actions | Array operations involve selecting, adding, removing, changing and shuffling arrays and their entries. | |
Data Frame Operations | These actions are relevant if you are working with .csv files (data frames) in your experiment. | |
Jump Actions | Allows you to navigate the experiment by jumping to a specific section, as well as accept and reject participant sections. | |
Control Actions | Control actions are used for executing specific sequences of events, like if/then logic, looping (like playing a repeated sound or flashing an image), as well as setting up a delay to when an action occurs. | |
API Actions | Refers to API-specific actions for sending data to an API. | |
Code Actions | Code actions allow you to work with JavaScript or CSS. | |
Paste Action | Paste Action | Allows you to paste an action you previously copied. |
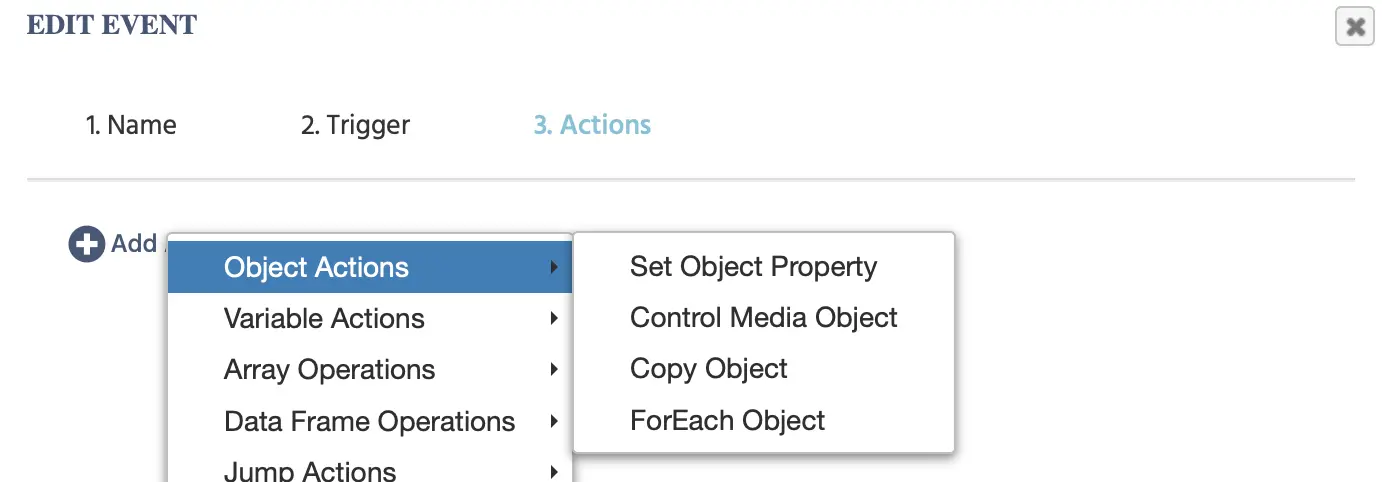
Object Actions
Object actions refer to any manipulation that will occur on an object that exists within the task. There are several Object Action options:
- Set Object Property
- Control Media Object
- Copy Object
- ForEach Object
Set Object Property Action
With the ‘Set Object Property’ action you can change the appearance of an object however you want by specifying the object in question, the property to be changed, and the new value.
Control Media Object Action
Formerly the separate "Control Audio/Video" and "Control Object" actions.
Effect: Changes the playback of video/audio elements or changes the state of upload/recording elements.
Parameters:
- Target: Select one media object
- Effect: Select a sub action
- Audio or Video Object options:
- Start Playback: Starts playing the video / audio file
- Stop Playback: Stops the video / audio file
- Pause Playback: Pauses the video / audio file
- JumpToTime: allows you to specify a time in milliseconds to jump to in the audio/video file
- Mute: turns off the sound of the object
- Unmute: restores the sound of the object
- Audio, Video, or Screen Recording Object options:
- Start Recording: Starts a new (audio) recording
- Stop Recording: Stops the (audio) recording
- Start Upload: Starts uploading of the file
- Clear Recording: Deletes the (audio) recording data.
- Start Playback: Starts playing the recorded file
- Stop Playback: Stops playing the recorded file
- Pause Recording: pauses the recording of the object
- Resume Recording: resumes the recording of the object
- File Upload Object options:
- Start Upload: starts the uploading process for the selected file
- Clear File: Deletes the selected file
- Choose File: allows the participant to choose the desired file
- Camera Snapshot Object options:
- Start Camera: turns on the participant's camera
- Stop Camera: turns off the participant's camera
- Start Upload: begins to upload the snapshot to the experiment
- Take Snapshot: takes a picture using the participant's camera
- Audio or Video Object options:
Copy Object Action
Effect: Copies an object, replacing the need for several separate objects and duplicate events.
Parameters:
- Source: Choose the object on the frame to copy.
- No of copies: Input the number of copies to make of the source object.
- Set new element name: Choose from several parameters to determine the names of the copies.
- Assign name with incrementing postfix: Adds a numeric tag to the end of the new element name to differentiate the copies.
- Action Sequence: Allows you to choose (from the usual list of actions) what will happen to the copies. Select "CurrentObject" as the target to apply the action to all of the copies.
ForEach Object Action
Effect: Applies an action to several objects of the same type.
Parameters:
- Filter: Choose the type of element to target.
- Allow Additional Name Filter: Type the name of the object(s) to target. For several objects on a frame where some have identical names, this works well.
- Action Sequence: Allows you to choose (from the usual list fo actions) what will happen to the selected elements. Select "CurrentObject" as the target to apply the action to all of the elements meeting the above specified criteria.
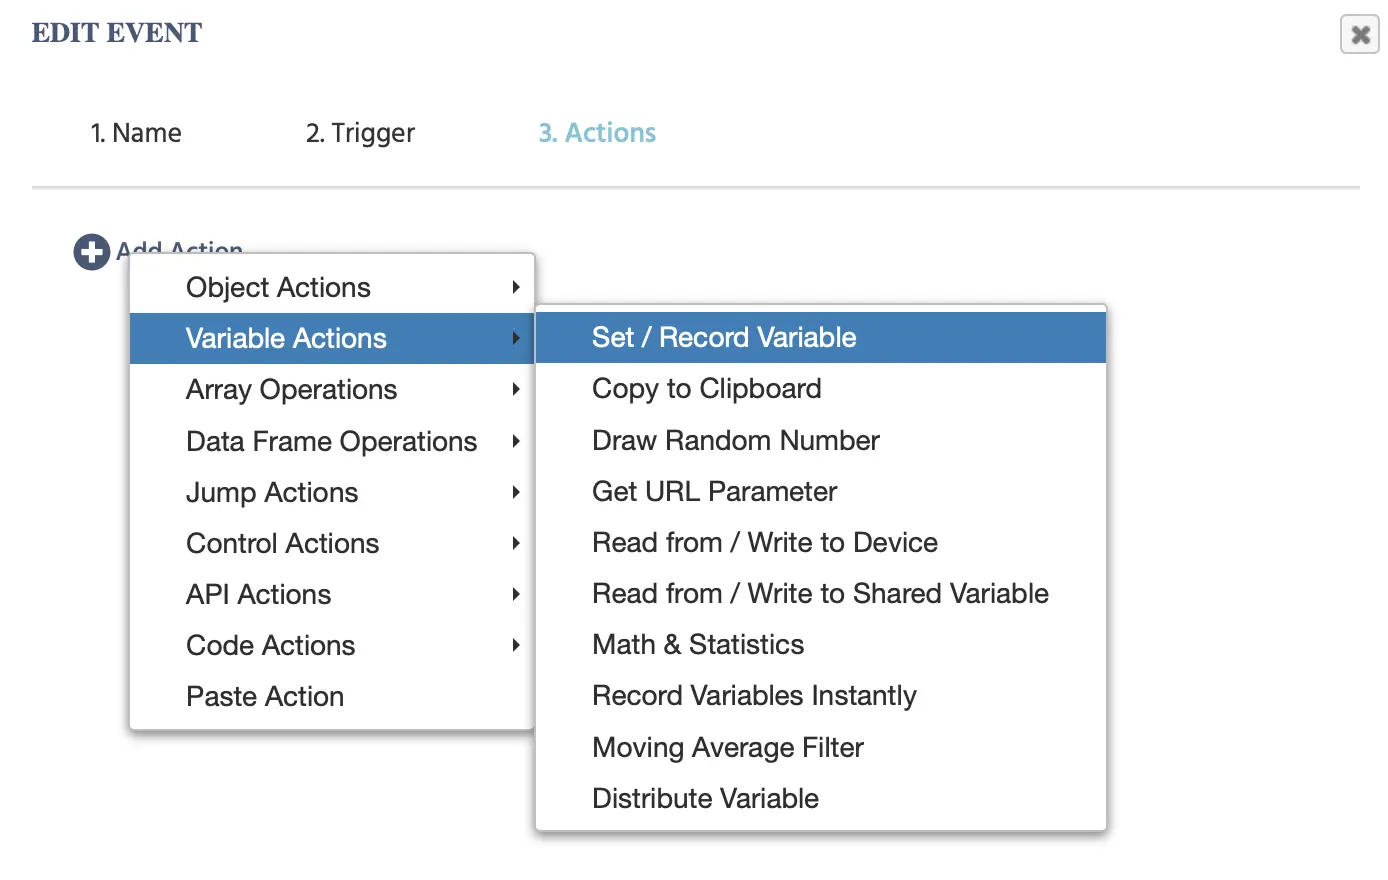
Variable Actions
Variable actions are used to set or create variables values, record and define values, including values across sessions.
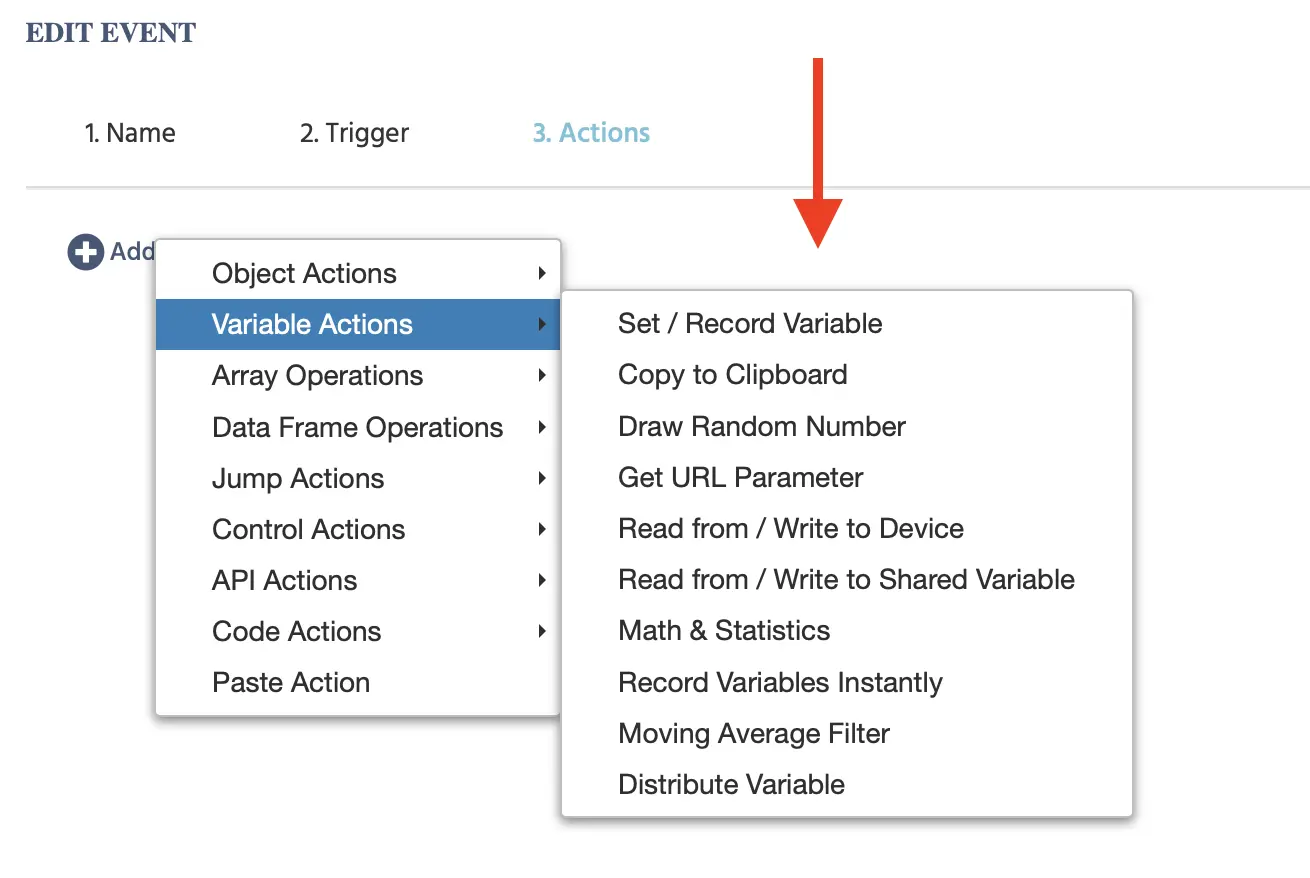
The table below provides an introductory overview of all the Variable Action options available in Labvanced. Each of them is described in greater detail in the upcoming sections.
| Variable Action Option | Description |
|---|---|
Set / Record Variable | Write or set a variable value |
Copy to Clipboard | Copy a variable value to the computer’s internal clipboard. |
Draw Random Number | Draws one or multiple random number(s) and saves them in a variable |
Get URL Parameter | Save a value from the unique URL of the participant |
Read from / Write to Device | Reads or writes a variable to/from the local device's storage. This Action saves data to the participant's device instead of sending the data to the Labvanced servers. |
Read from / Write to Shared Variable | Reads from or writes to a variable that is shared across sessions of a study. The variable can be shared with all participants or private to each individual. |
Math & Statistics | Performs a mathematical operation of some input variable (array) and saves the result in an output variable. |
Record Variables Instantly | Creates a snapshot of all variables values and sends this to the Labvanced server. |
Moving Average Filter | Calculates a moving average (a constantly updating average of the data) of some input and stores the result in a new variable. |
Distribute Variable | Will send a value to other participants. The value is stored in a variable. |
Set / Record Variable Action
The ‘Set / Record Variable’ Action is bound to be used in every experiment in Labvanced as it is how values and behavioral measures are stored and recorded.
Upon clicking on this action, the following dialog menu will appear where you can specify which variable should be recorded and the value of interest:
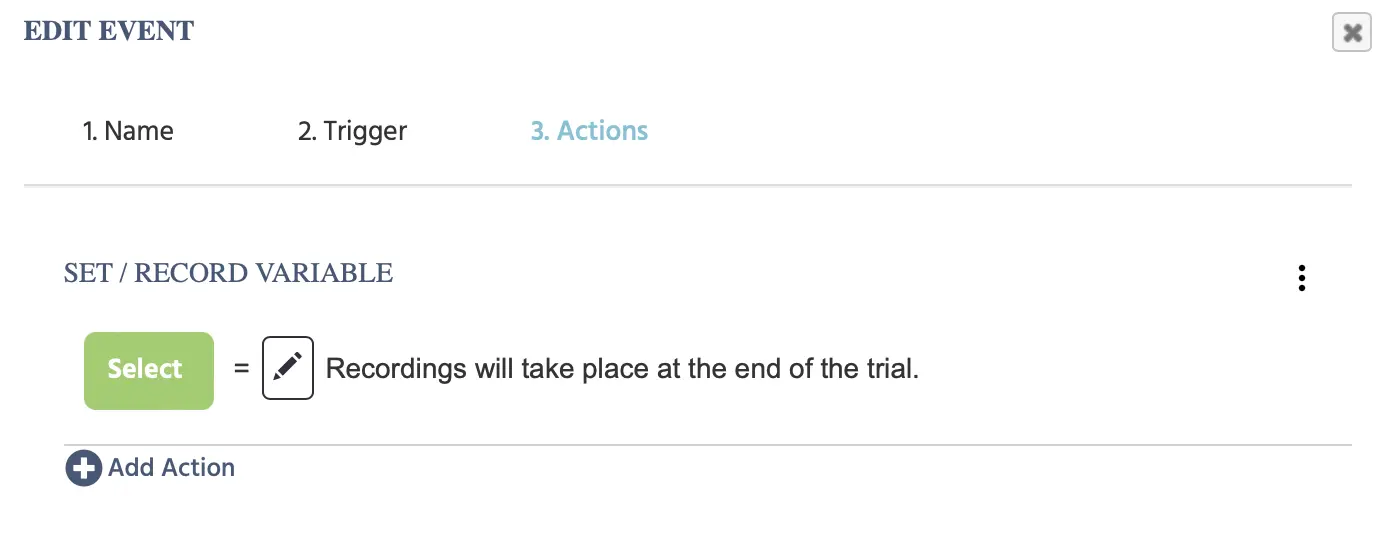
| Menu Item | Menu Area | Description |
|---|---|---|
Select |  | Upon clicking select, you indicate which variable should store the value. From here, you can also create a new variable. |
| Pen Icon | The pen icon symbolizes the value select menu which is used to define and specify the exact values that should be assigned to the selected variable (as specified in the green button to the left of the equals (=) sign). |
In the example below, we created a new variable called counter and used an arithmetic option from the value select menu to make the variable value increase by 1 (based on the trigger defined in the previous step).

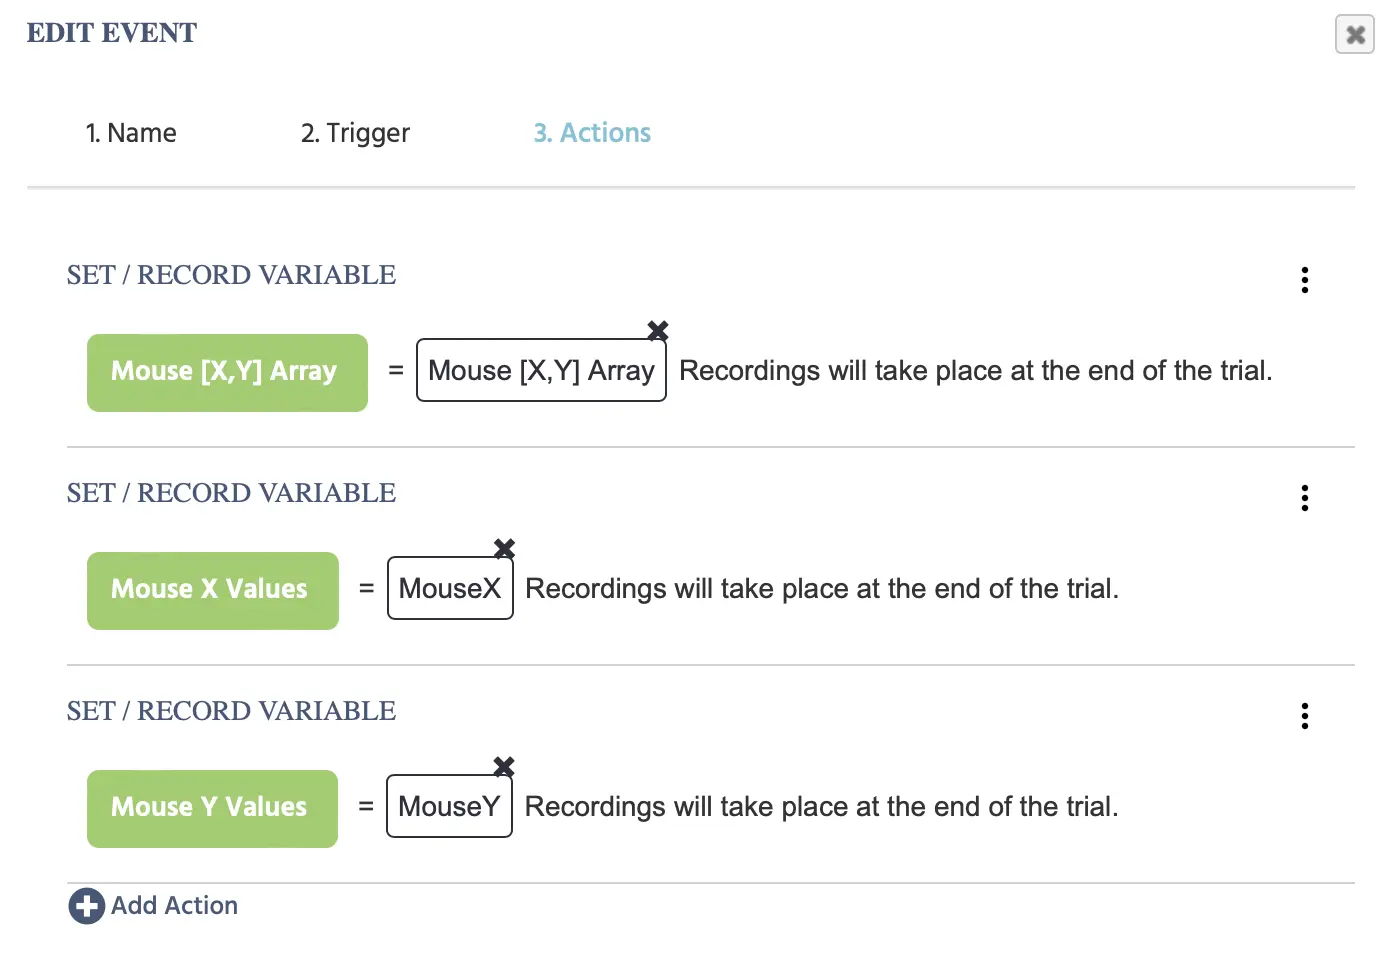
The image below records mouse X,Y coordinates in order to capture mouse tracking during a study. The image below shows how three actions are being used to make variable value recording possible. The variable (on the left) is created manually while the value on the right side of the equals (=) sign is a mouse trigger-specific value that the system provides and you can refer to when recording values.
Note: The Set / Record VariableAction is also commonly used in the context of Control Actions where you can specify conditions using ‘if / then’ and ‘while loops’ based on variable values.
Copy to Clipboard Action
Effect: Copy a variable value to the computer’s internal clipboard.
Draw Random Number Action
Effect: Draws one or multiple random number(s) and saves them in a variable
Parameters:
- Type: Choose Between continous and discrete values
- Distribution: Choose between gaussian and uniform distribution
- Multiple Draws (boolean true/false): Choose to draw once or multiple times.
- Nr of Draws: Select the number of draws
- Min: Define the minimum value for the uniform distribution
- Max: Define the maximum value for the uniform distribution
- Mean: Define the mean value for the gaussian distribution
- Standard Deviation: Define the standard deviation for the gaussian distribution
- Save in Variable: Select a variable where the value(s) are stored.
Get URL Parameter Action
Effect: saves a value from the unique URL of the participant
Parameters:
- Parameter name: input the name of the desired parameter
- Save in Variable: select the variable in which to save the parameter value
This Action could be combined with other Actions to construct unique URLs for participants or extract information necessary for data analysis.
Read from/Write to Device Action
Effect: Reads or writes a variable to/from the local device's storage. This Action saves data to the participant's device instead of sending the data to the Labvanced servers.
Parameters:
- Choose read from or write to the local device.
- Choose the variable to read or write.
Use Case: Longitudinal/Multi-Session Studies
- With this action, device-specific data can be carried over from session to session, provided the same participant is using the same device for every session.
- For example, you can use this action to record which images were presented to each participant in Session 1 and ensure that different images are presented to them in Session 2.
- Create an array of images and randomly select a few to present in each session.
- Write to Device: the index number of the images presented in Session 1.
- Read from Device: in Session 2, read out the indexes of the images from Session 1 and include a JavaScript action that prevents those indexes from being selected for the second session.
Read from/Write to Shared Variable Action
Effect: Reads from or writes to a variable that is shared across sessions of a study. The variable can be shared with all participants or private to each individual.
Parameters:
- Choose the variable to sync. Must be either scalar or an array.
- Advanced Options
- Storage key: choose the name of a variable to serve as the key to access the synced variable.
- Read or Write Method:
- Read, modify, then write shared variable: reads the variable, makes a change, then sends the variable to the study.
- Only read shared value from server: calls the variable that is shared within the study, but does not make any changes.
- Only write variable to server: makes changes to the shared variable, but does not show it to participants.
- Share values between different participants (not only between sessions): allows participants to see each other's synced variable values across sessions. This option is selected by default, but can be deselected by clicking the checkbox.
- Action Sequence:
- Choose what happens to the shared/synced variable from the list of all available Actions.
Use Case: Longitudinal/Multi-Session Studies
- With this action, participant-specific data can be carried over from session to session and can be shared among participants across sessions.
- For example, you can use this action to record a score on a test and then allow the participant to compare their score to the mean score of the other participants who have completed the test.
- Another example (similar to the Read from/Write to Device Action) is to have participants pick 5 images they like from an array, perform a task, and then present those 5 images again in a later session. The difference is that this Action can be used to show other participants the images that were picked, or to exclude those images from another participant's available options.
Math & Statistics Action
Effect: Performs a mathematical operation of some input variable (array) and saves the result in an output variable.
Parameters:
- Type: Choose between Array Operations, Linear Algebra, and Statistical Tests
- Operation: Choose a math operation (e.g. sum, min, stdev, etc.)
- Input Array: Choose an input variable (Array) on which the operation is executed
- Parameters: Some operations have additional parameters.
- Output: Select an output variable where the result will be stored.
Record Variables Instantly Action
Effect: Creates a snapshot of all variables values and send this to the Labvanced server.
Parameters: None
Moving Average Filter Action
Effect: Calculates a moving average (a constantly updating average of the data) of some input and stores the result in a new variable.
Parameters:
- Filter Shape: Select the filter type
- Simple Moving Average: Calculates a simple moving average, where all samples have the same weight.
- Linear Weighted Moving Average: Weighs the samples such that the weights of the samples decrease linearly.
- Exponential Moving Average: Weights the samples such that the weights of the samples decrease exponentially.
- Number of Samples: Determines how many samples are used per step.
- Input: Choose an input variable (Array) on which the moving average is calculated
- Output: Select an output variable where the result will be stored.
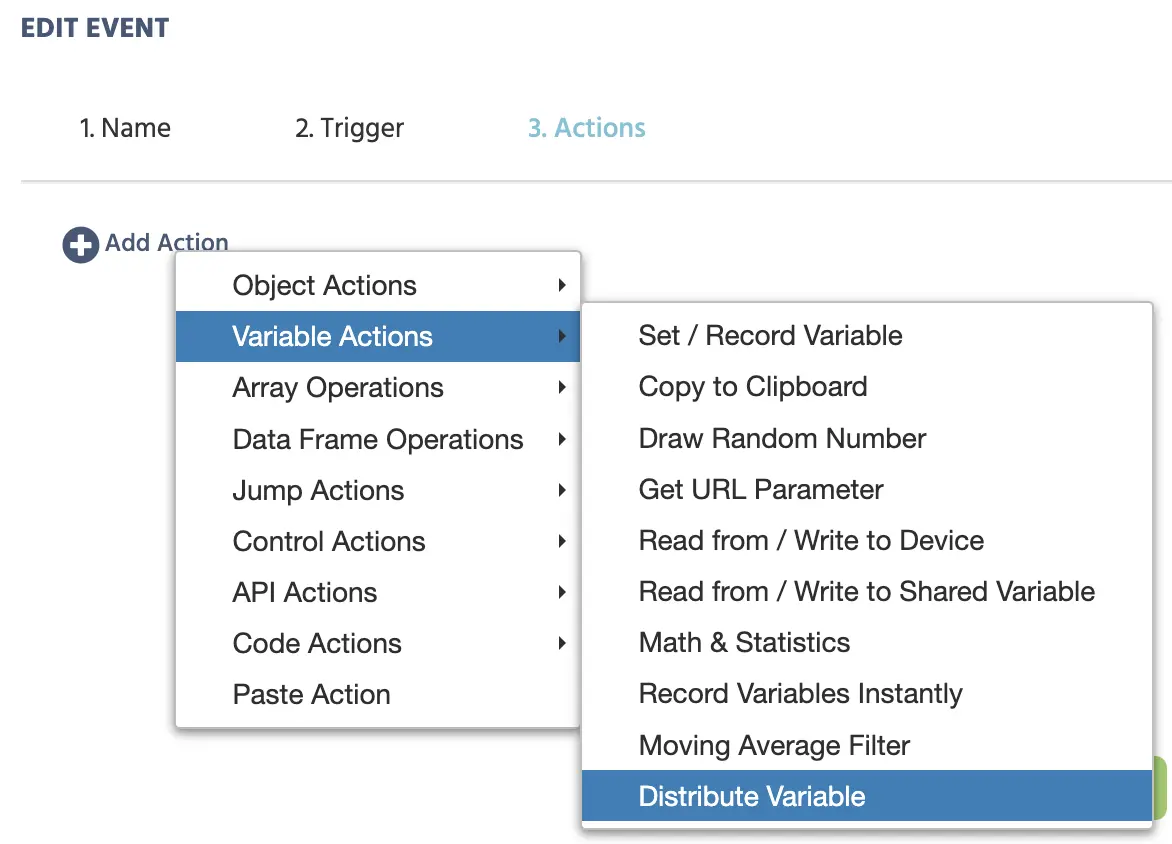
Distribute Variable Action
The Distribute Variable action is essential for multi user studies in Labvanced. With this action, a variable value can be shared between participants, essentially allowing for information (including stimuli locations and any changes) to be reflected on the participants’ screens.
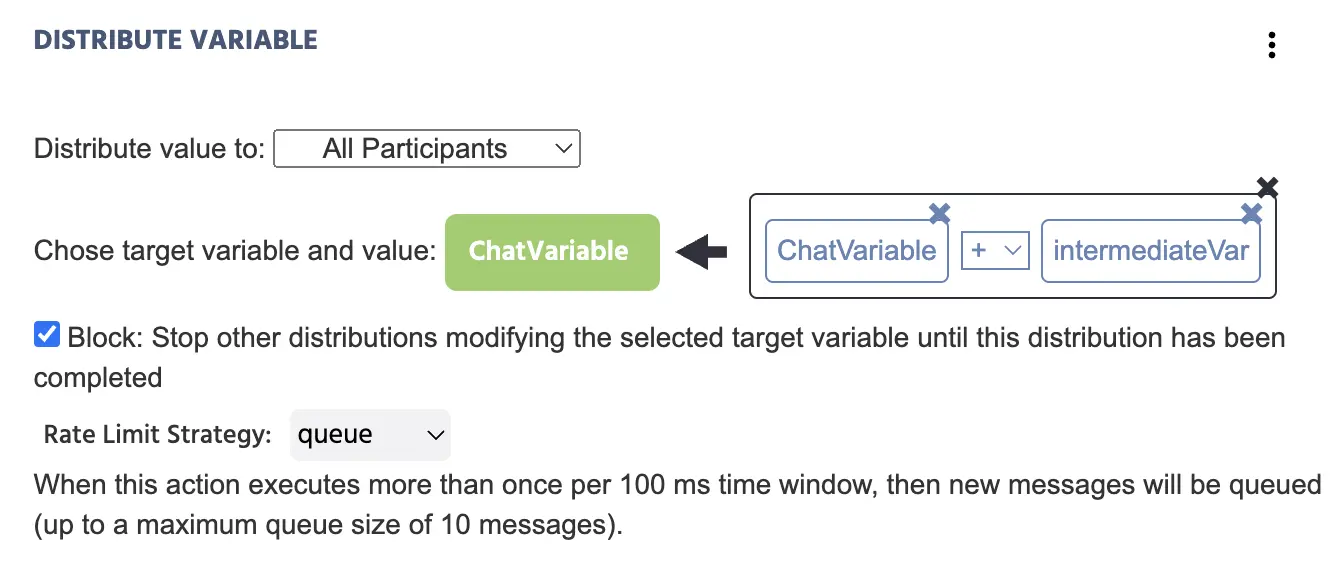
Upon selecting this action, the following dialog box will appear where you can specify which variable value is being distributed between participants.
The image below is what functional Distribute Variable Action dialog box looks like when all the menu items are filled. In this example, the distribute variable is an action that is being used as a way to create a chat between two participants by distributing the value of a variable from an input field object.
Check out this demo that incorporates the distribute variable and chatbox feature here: Image Description Task with Chat Add-On.
A full explanation of the dialog menu items can be found below:
| Menu Item | Menu Area | Distribute Variable Action Options and Description |
|---|---|---|
Distribute value to | 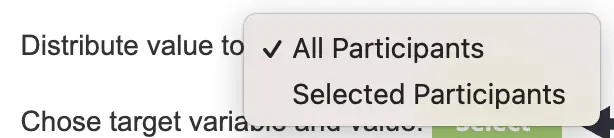 | Choose to which other participants the value should be sent to.
|
Choose target variable and value |  |
|
Block |  | If enabled, the Target Variable cannot be changed until the current value distribution has been completed. |
Rate Limit Strategy | 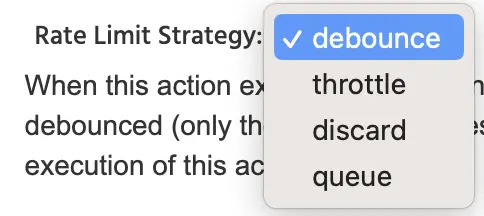 | The Rate Limit Strategy is a way to safeguard your experiment from overflowing the server and acts as a precautionary strategy for controlling the rate of which requests (ie. updates via the distribute variable) are being sent to the server. The following strategy options are available:
|
Array Actions
Select (Read) from Array Action
Effect: Will read out one variable from an array and store this value in a scalar variable.
Parameters:
- Array Variable: Input Array for reading out the value.
- Index Type: Determines what kind of index is used.
- Fixed: Use a fixed index for the read operation. In this case, type in the position from where the information should be read out (1 based).
- Variable: Use a numeric variable as an index for the read operation. In this case, select a scalar numeric variable to determine the position of the readout.
- End of Array: Read from the end of the array.
- Output variable: Select a scalar variable where the read out value will be stored.
Add / Remove Array Entries Action
Effect: Will add and/or remove entries from /to an array.
Parameters:
- Array Variable: Array variable where the add or remove operation should be executed.
- Index Type: Determines what kind of index is used.
- Fixed: Use a fixed index for the insert / delete operation. In this case, type in the array position where the entries should be inserted / deleted. (1 based).
- Variable: Use a numeric variable as an index for the insert / delete operation. In this case, select a scalar numeric variable to determine the where the entries should be inserted / deleted.
- End of Array: Insert / delete from the end of the array.
- Nr or entries to delete: Will remove the array entries (before inserting new entries) starting at the defined index position. 0 indicates that no values will be removed.
- Variable(s) to Insert: Select one or more scalar variable(s), which will be added to the array variable at the defined index position.
Change (Replace) Array Entry Action
Effect: Will replace / change one value within an array.
Parameters:
- Array Variable: Array variable in which one value should be modified
- Index Type: Determines what kind of index is used.
- Fixed: Use a fixed index for the replace operation. In this case, type in the array position which should be changed (1 based).
- Variable: Use a numeric variable as an index for the replace operation. In this case, select a scalar numeric variable to determine the position of the replace operation.
- End of Array: Replace the last entry in the array.
- Input variable: Select a (scalar) variable which holds the new value.
Shuffle Array Entries Action
Effect: Will re-shuffle the entries /order within an array.
Parameters: None
Data Frame Operations
Read from / Write to Data Frame Action
Effect: Reads out values from or writes values into a data frame and saves them in a new array variable.
Parameters:
- Data frame variable: select the variable of the data frame to read.
- Read or Write: Choose to read from the selected data frame or write to the selected data frame.
- By row or column: Choose how the data should be read.
- Index type: Choose the type of index variable that will be used to read the data frame. Can be fixed, variable, or the last row.
- Index variable: Choose the variable that will be used as the index to read the data frame.
- Output variable: Choose the variable where the read/written data will be stored as an output. Must be an array variable.
Shuffle Data Frame Entries Action
Effect: Shuffles the order of entries in the data frame.
Parameters:
- Select the data frame to shuffle.
- Select if the data frame should be shuffled by rows or columns.
Jump Actions
Jump To Action
Effect: "Jumps" the participant to a different step in the experiment. This action can change the order of trials and tasks in an experiment and can be used to create individualized experimental logic for each participant.
Parameters:
- Jump To: Determines where to jump to in the experiment.
- Next Frame: Jumps to the next frame. If there are no more frames defined in a trial, it will jump to the first frame of the next trial.
- Next Trial: Jumps to the next trial. If there are no more trials defined, it will jump to the first trial of the next task.
- Next Task: Jumps to the next task. If there are no more tasks defined, it will jump to the first task of the next block.
- Next Block: Jumps to the next block. If there are no more blocks defined, the session will end.
- Previous Frame: Jumps to the previous frame. If there are no previous frames, the action will not be executed.
- Specific Frame: Jumps to a specific frame. Users directly select the frame to jump to.
- Specific Trial: Jumps to a specific trial. Users directly select the trial number to jump to.
- Specific Task: Jumps to the first instance of the specified task in the current block. Users directly select the task to jump to.
- Specific Block: Jumps to the first instance of the specified block. Users directly select the block to jump to.
- Check Required Answers Before: If enabled, the experiment will check whether all required answers have already been answered. If not, the jump to action is not executed.
Accept/End Session Action
Effect: Will accept the participant's data, end the recording session, and show the crowdsourcing code.
Parameters:
- Record trial data before finish session: If enabled, the most recent trial data will be stored (sent to the server) before exiting the study.
- Show default ending page: If enabled, the default Labvanced end-screen will appear. If this is a crowdsourcing session (crowdsourcing link was used), the compensation code will be shown to the participant. If disabled, the experiment will finish after showing the current frame and will not show the default end screen with compensation code.
Reject/End Session Action
Effect: Ends the recording session, does NOT mark the participant's data as complete, and does NOT show the default end screen with compensation code.
When using this action to reject a participant's data, users should display an appropriate message to participants that explains the reason they will not be rewarded for their time.
Parameters: None
Redirect to URL Action
Effect: Redirect the participant to a specific URL.
Note: The URL must include the https:// at the beginning in order for this action to work.
Control Actions
Requirement Actions (If... Then... Else If) Action
Effect: Evaluates an if-then statement and executes a series of actions dependently. Each If /Else-If statement consists of nested AND / OR comparisons to evaluate whether all requirements are met (statement is true) or not (statement is false). If the statement is true, the actions under "Then" are executed.
Parameters:
- Add Requirement: Add a new requirement to a statement. The "value-select" menu will appear on both sides to make a logical comparison. In the middle of the statement, you can choose how both sides should be compared (e.g. equal, smaller than, unequal, etc.).
- Add OR Group: Only one out of all requirements within an OR Group has to be true for the whole group to be true. Add an OR group if the sub-actions should be executed in several cases.
- Add AND Group: All requirements within an AND Group have to be true for the whole group to be true. Add an AND group if the sub-actions should be executed only when several requirements are met.
- Action Sequence: Each If / Else-If statement has a list of actions, which are defined under "Then". The action sequence lists all the actions for a certain If / Else-If statement. A new action can be added via the "Add Action" icon. The action sequence will be executed only if the requirement(s) of the associated If / Else-if statement are fulfilled.
- Add Else-If Case: The Requirement Action can consist of several separate If / Else-If --> Then statements. However, only one statement can be executed. If one If / Else-If statement is evaluated positively (returns true), the actions in the Then block are executed and the rest of the Requirement Action is skipped.
- Add Else Case (true / false): If enabled, a default / fallback option is added to the requirement action. If none of the If / Else-If statements are executed (returned true), the actions defined in the else case will be executed.
Repeated Actions (While Loop) Action
Effect: Repeatedly executes a series of actions, either immediately or within a defined interval. A stop condition can be specified so that the loop execution will be stopped.
Parameters:
- Execution Type: Choose between immediate execution or timed execution
- Execute complete loop: This will execute the loop continuously until the stop condition is fulfilled.
- Execute every ... ms: This will execute the loop with defined interval (e.g. the loop is executed every 50 ms).
- Define the number of loops: When "Execute every ... ms" is selected, users have the option of assigning a numeric integer value for the number of times the loop should be executed. This replaces the need to define a stop condition.
- Execution Interval: This determines the execution interval.
- Start immediately (true / false): If enabled, this will execute the loop right away. If disabled, the loop will be started on the next execution interval.
- Allow multiple starts (true / false): If enabled, several loop instances can be started in parallel. If disabled, only one loop instance can be executed at a time.
- Enable stop condition (true / false): If enabled, a stop condition for the loop can be specified.
- Stop Condition: The stop condition can be used to specify a logical expression for when the loop execution should be stopped. Similar to the If / Else-If statements, one can combine AND groups, OR groups, and Requirements for the logical comparison.
- Action Sequence: The action sequence lists all the actions which are executed at each iteration of the loop. A new action can be added via the "Add Action" icon.
Delayed Actions (Time Callback) Action
Effect: Executes a series of actions after a certain time delay
Parameters:
- Delay Type: Choose between a fixed delay or a variable delay
- Fixed Delay: The actions will be executed after a fixed delay.
- Variable Delay: The actions will be executed after a delay specified in a (numeric) variable.
- Delay: The length of the delay in milliseconds (ms).
- Action Sequence: The action sequence lists all the actions which are executed after the specified time delay. A new action can be added via the "Add Action" icon.
Action Group
Actions can also be organized into action groups. Action groups allow you to group certain actions together for easier visual structure, but also if you want to copy, duplicate, or delete several actions at once.
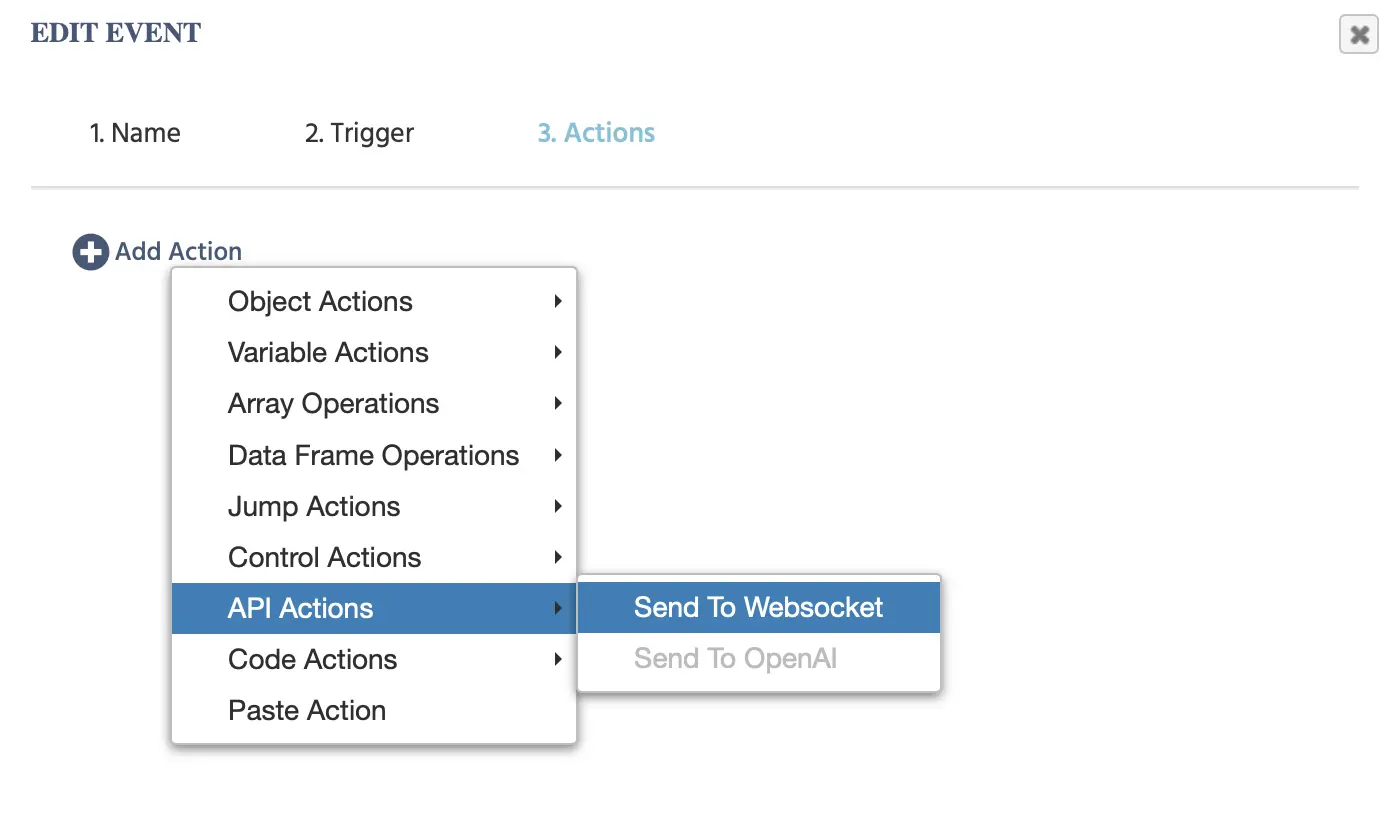
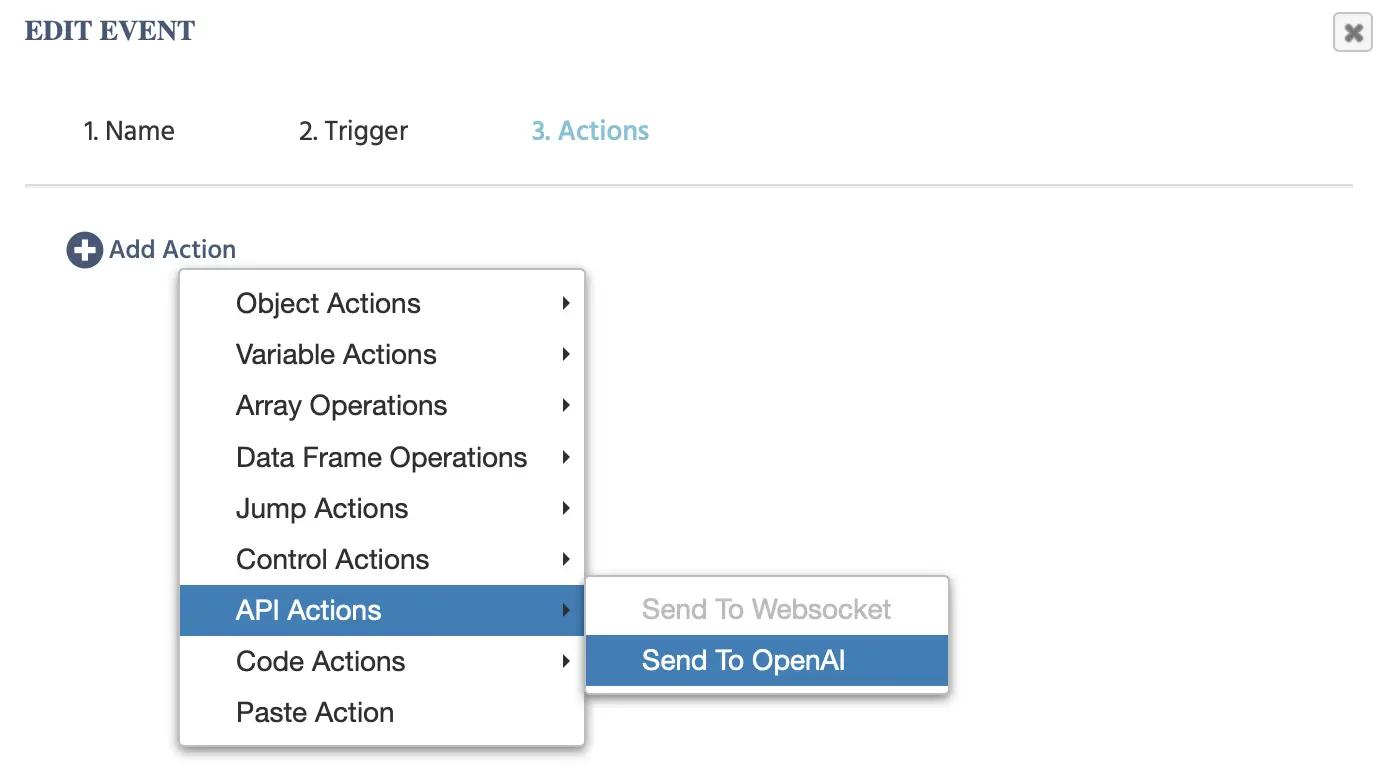
API Actions
If you need to send or communicate data from an external server into Labvanced, then ‘API Actions’ and ‘API Triggers’ can be used. You have the following actions available under this category:
- Send PostMessage
- Send To Websocket
- Send to OpenAI
In order for these actions to be ‘available’ or usable, you must input an API Key in the under the Settings tab.

Send PostMessage Action
The Send PostMessage action sends a message from a running Labvanced experiment to an external target, such as a parent webpage or embedded frame, using the browser's postMessage API.
Send to Websocket Action
When selecting this action, the following options appear:

The example above and the full event structure can be accessed here: https://www.labvanced.com/page/library/51053 by clicking ‘Inspect.’
| Menu Item | Description |
|---|---|
| Send To: | Specified the Websocket Address which is listed in the Settings tab under Special Features. |
| Trigger / message to send: | Specify the trigger or message you want to be sent. |
| Send Variable (optional): | Indicate the variable that can also be sent out as a part of the action. |
For more information about API Access, please visit this page.
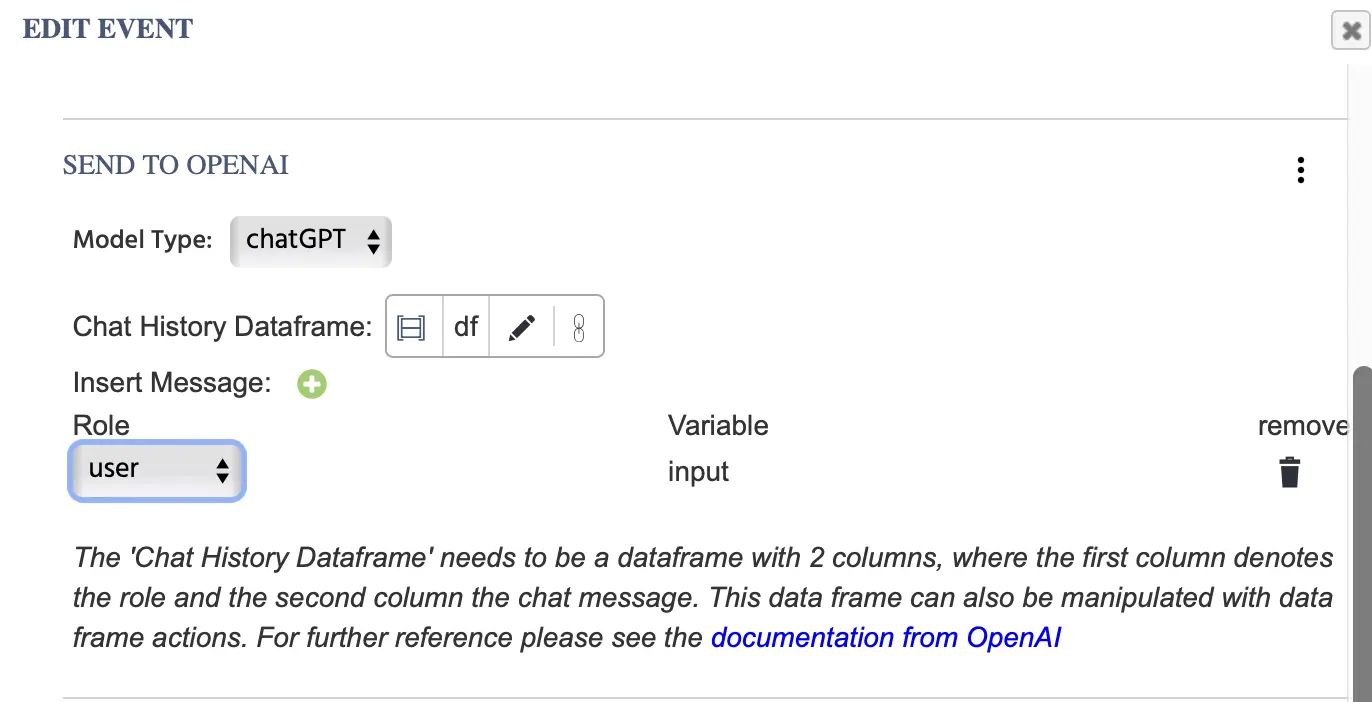
Send to OpenAI Action
The ‘Send to OpenAI’ action allows you to send information, such as a string input value, to OpenAI. Please note that for this option to be available, you have to list your API Key in the Settings tab under Special Features.
The following options will appear upon clicking this event:
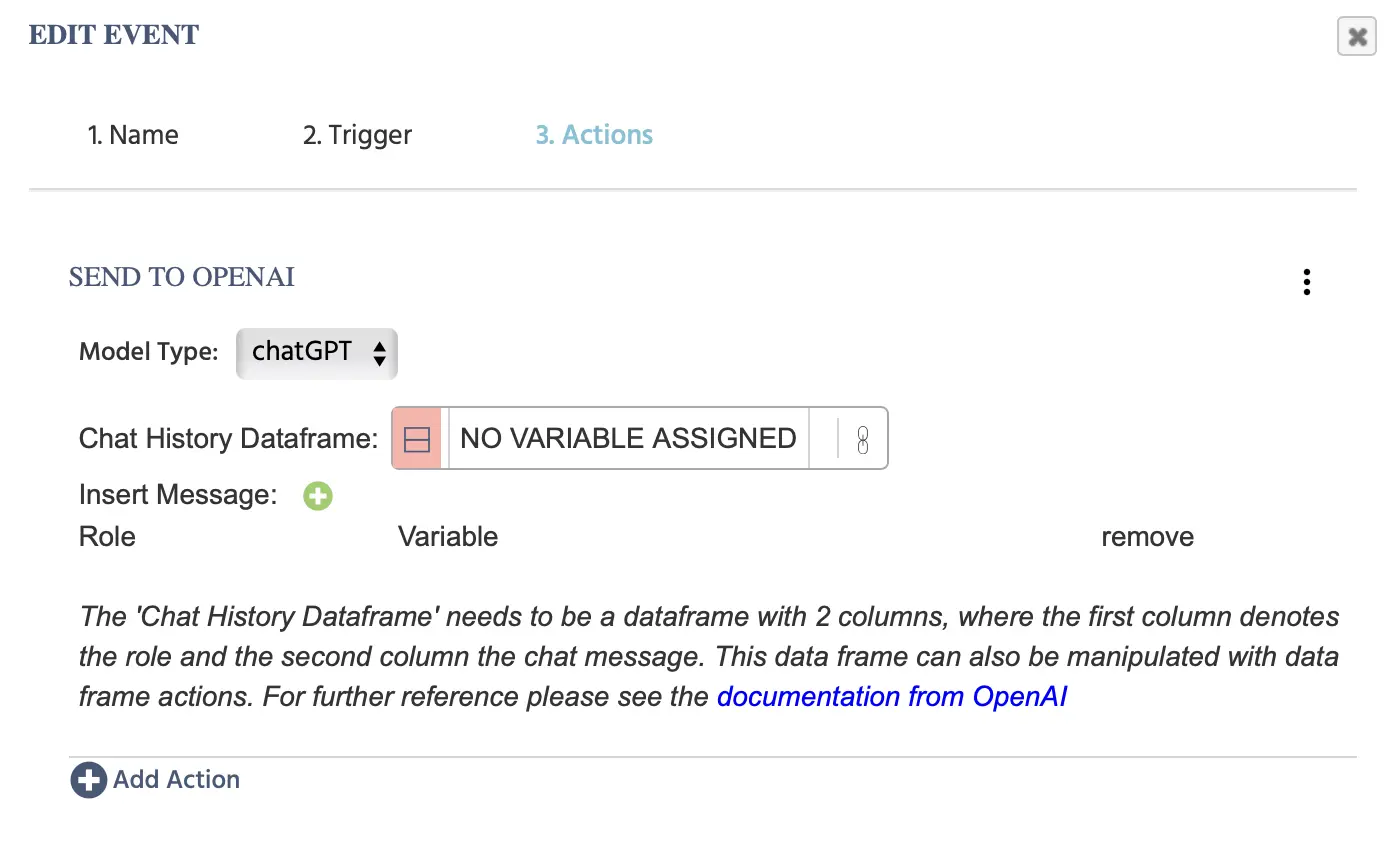
Here is a functional example of how this event looks like when all the necessary information is provided:
For a greater understanding of how you can utilize this feature and see it in action, please feel free to reach out to us for a demo by submitting this contact form.
NOTE: Also refer to this walkthrough where we build a study step-by-step, integrating ChatGPT in a study and utilizing this action.
Here is a deeper explanation of the fields included under the 'Send to OpenAI' action:
| Menu Item | Menu Area | 'Send to OpenAI' Action Options |
|---|---|---|
Model Type |  | |
Chat History Dataframe |  | Link to a data frame variable with two columns. The first column will denote the ‘role’ and the second column the ‘chat message.’ The values from the action will be automatically appended to the data frame that is linked here. The data frame can also be manipulated with data frame actions. For further reference, please check the docs from OpenAI. |
Insert Message ‘+’ | 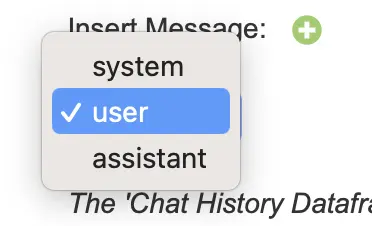 | By clicking on this, the variable dialog box will appear. You will need to indicate which ‘Variable’ value is being sent out to OpenAI as well as the ‘role’ of the associated message:
|
As OpenAI is evolving on a daily basis, please check the docs from OpenAI for further clarifications.
Code Actions
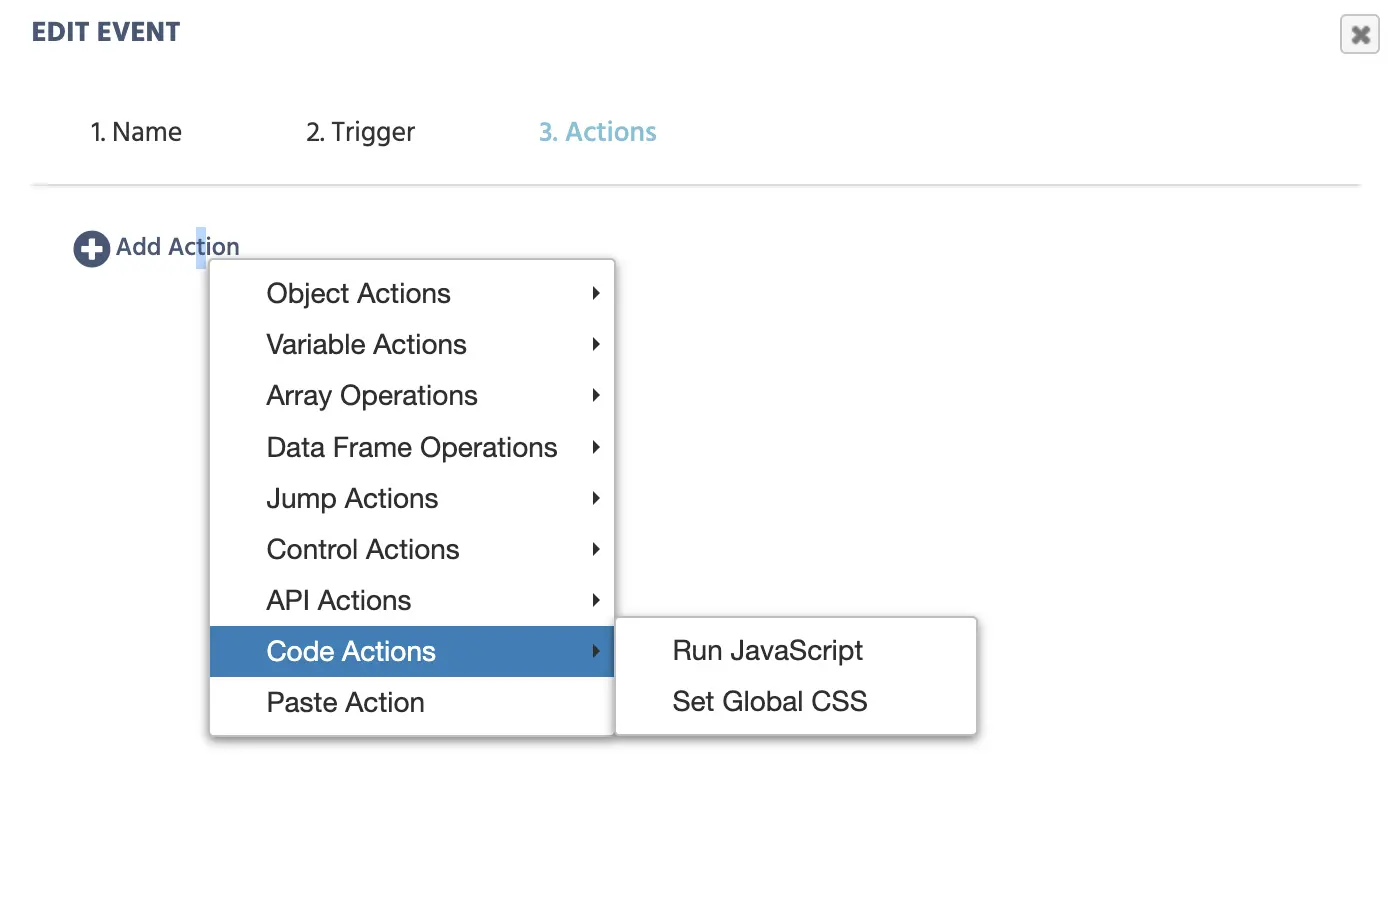
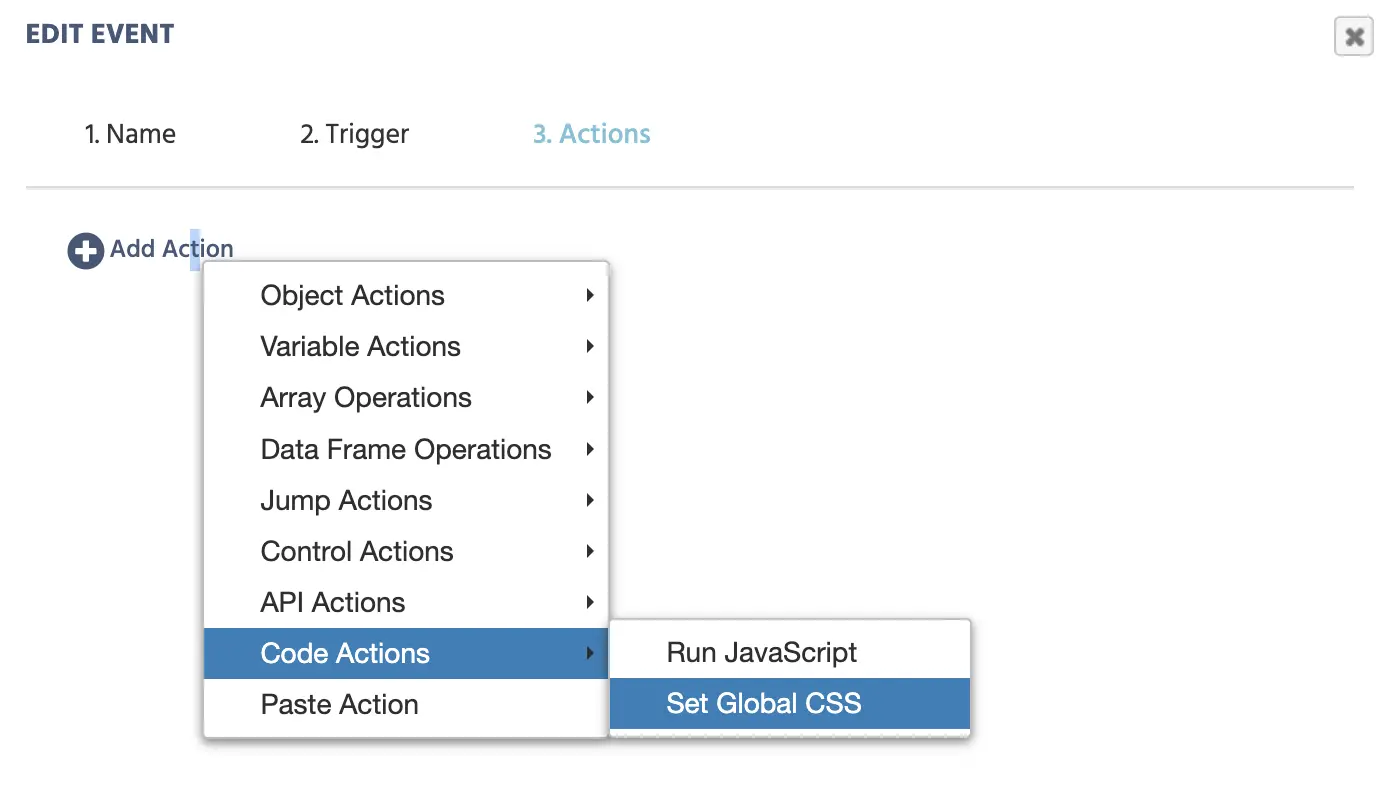
In some cases, your experiment may require you to use custom code. With these actions, you can do just that! The following options are available under the ‘Code Actions’ menu:
- Run JavaScript
- Set Global CSS
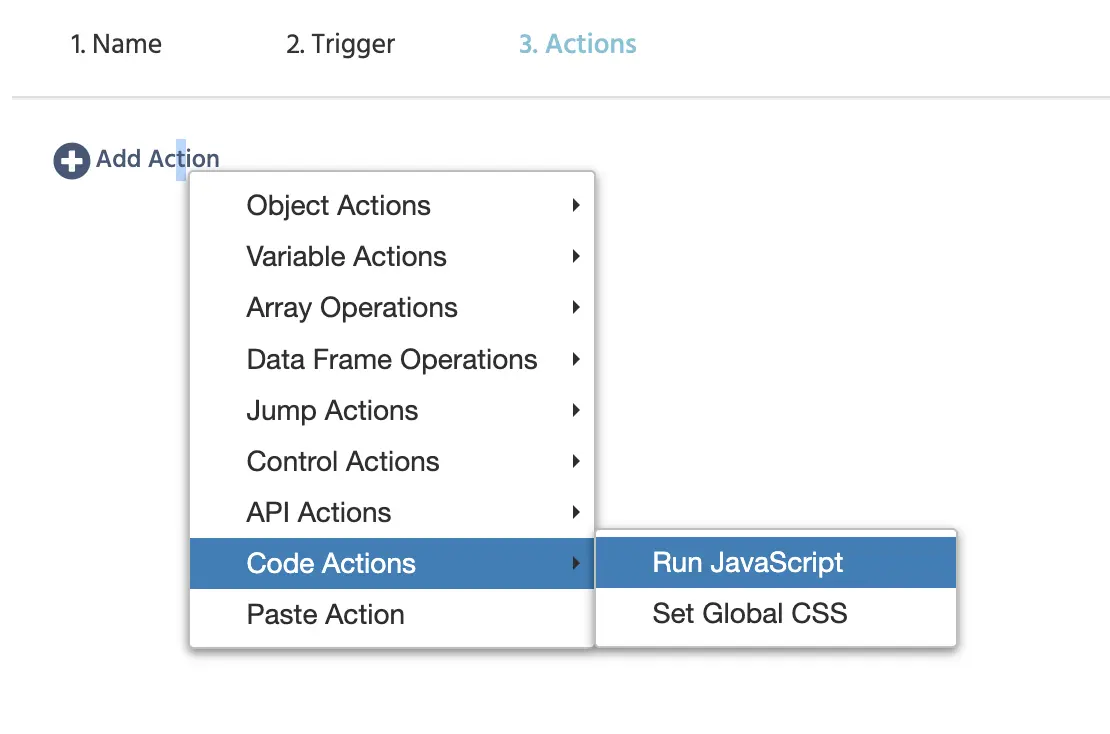
Run JavaScript Action
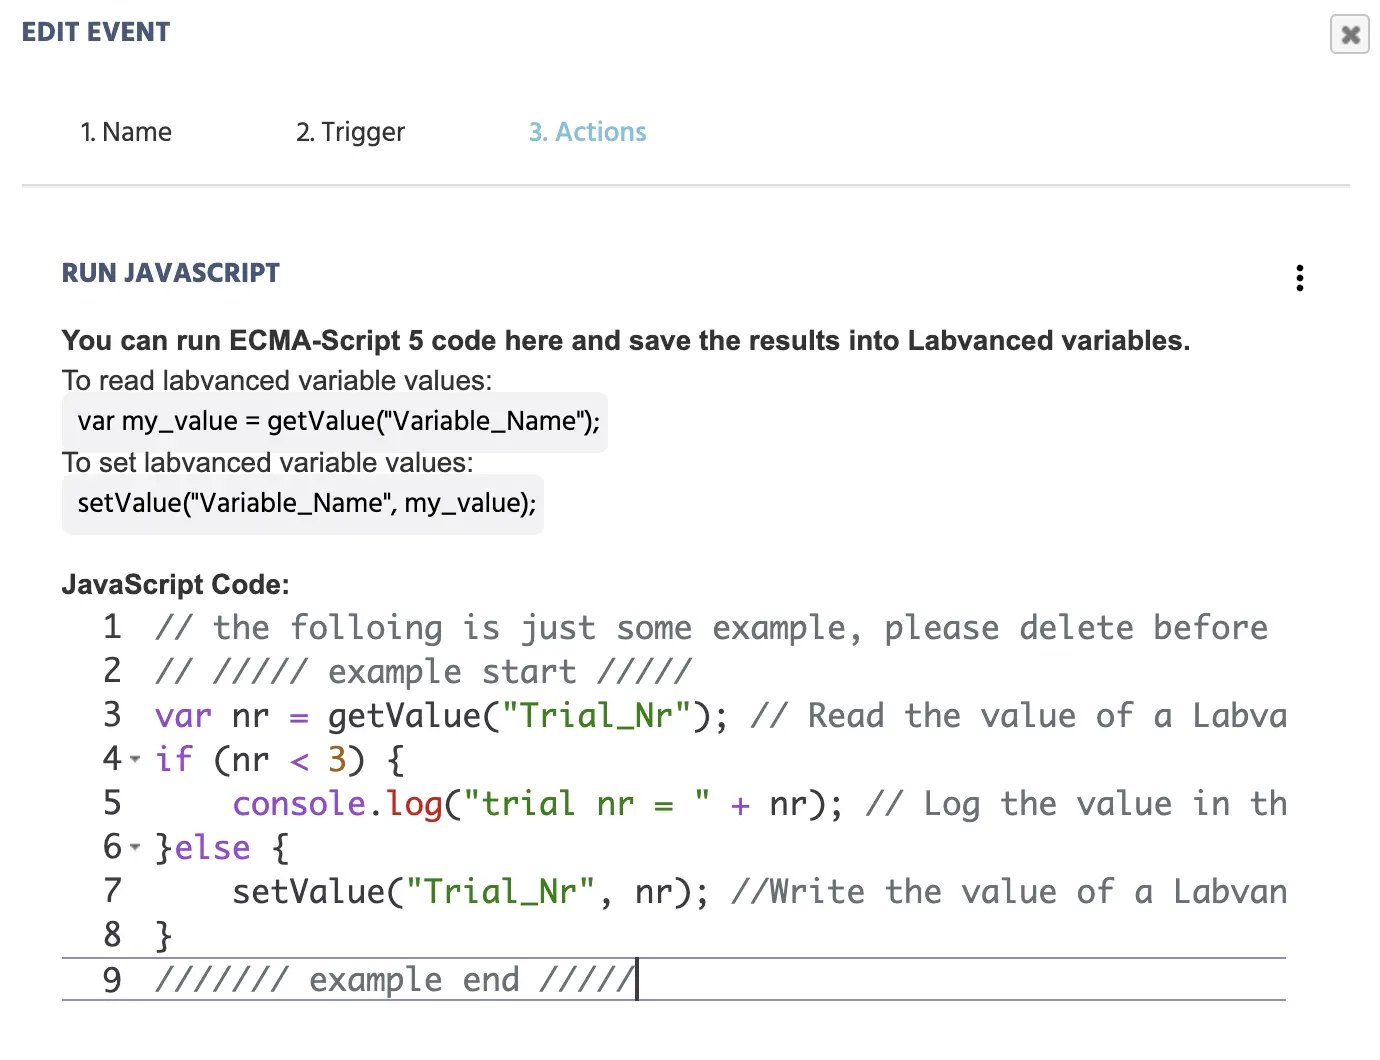
The ‘Run JavaScript’ action allows you to program specific events and to read/set Labvanced variables in your study by inputting custom JavaScript that will run as an action when triggered to occur.
When the above ‘Run JavaScript’ action is selected, you will see an area (a code editor) where the JavaScript code should be written, as well as instructions on how to use it:
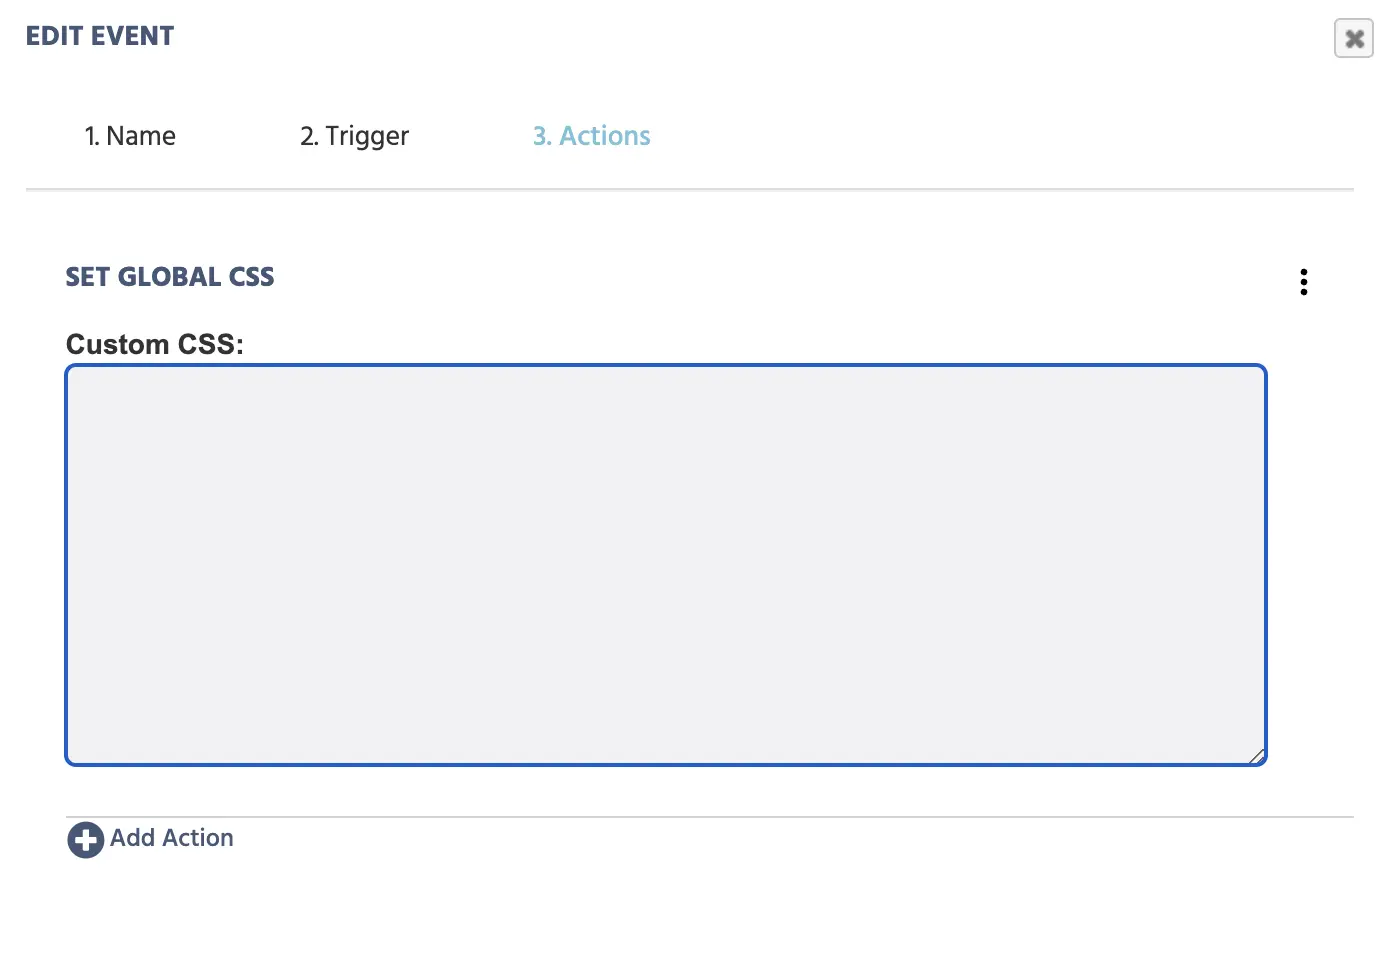
Set Global CSS Action
With the ‘Set Global CSS’ action, you can use custom CSS code to change an aspect of the study upon a trigger.
The following field opens upon clicking this action:
An example for using the ‘Set Global CSS’ action would be to change the background color of the study when a participant selects a specific color from a multiple choice question.
Paste Action
This option allows you to paste an Action that you have previously created and copied. It allows you to work faster when designing your experiment so that you don't have to keep selecting the same items over and over again. For example if you have an event that is similar to one that already exists, you can just copy it, paste it, and modify it, instead of building it from the beginning.
The Value Select Menu
![]() When working with certain events, you will notice a pen icon appear. This is called the Value Select Menu because it allows you to select and instruct what kind of values are to be recorded or should be tracked. It’s a very powerful and important option that you are bound to use for your experimental design and set up.
When working with certain events, you will notice a pen icon appear. This is called the Value Select Menu because it allows you to select and instruct what kind of values are to be recorded or should be tracked. It’s a very powerful and important option that you are bound to use for your experimental design and set up.
This pen icon / Value Select Menu appears in various locations for certain actions in the event system, such as the Set / Record Variable action , the Set Object Property action, and the Requirement (If... Then) action, as shown below.
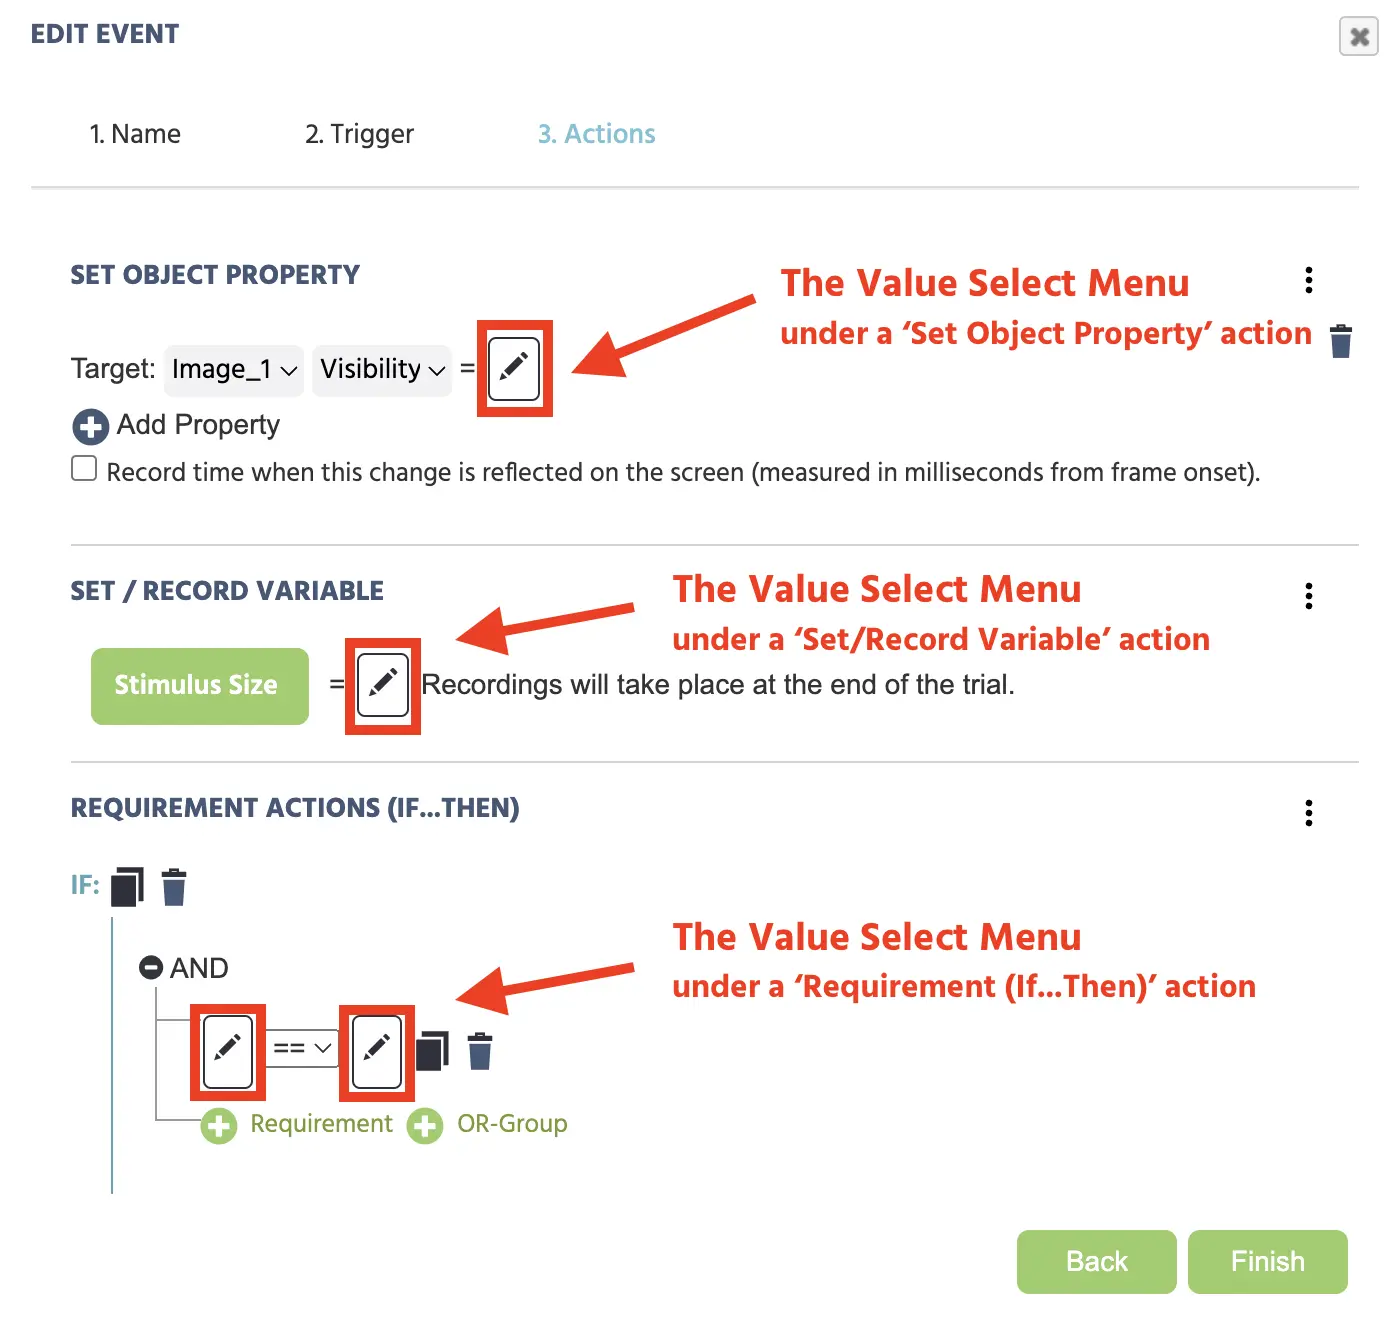
Clicking the pen icon leads to a drop down menu where you specify the value that is to be read out or written. The drop down menu will always start by listing a trigger-specific value option and then continue to the other 5 categories (Current Time, Constant Value, Variable, Frame / Task / Option, and Operations), all of which have their own options. These will be described futher below.
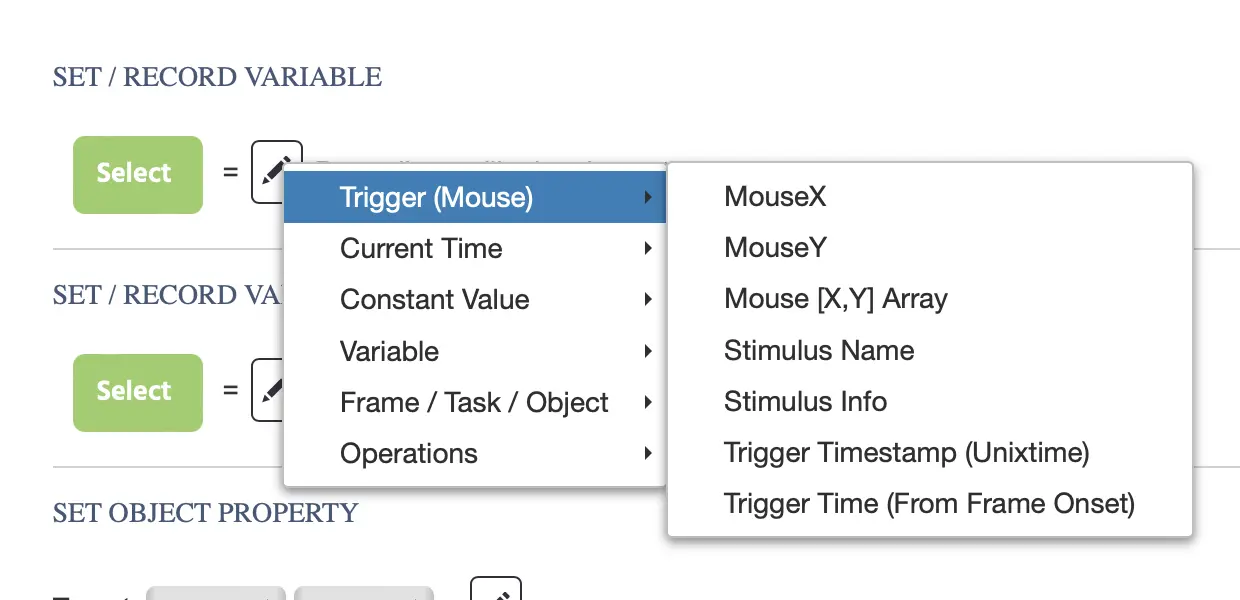
The image above shows what the Value Select Menu looks like when there is a Mouse Trigger being used. As you can see, the first menu item on the left begins with a trigger-specific category then moves on to the other 5 categories (Current Time, etc).
Menu Options
The table below further explains the categories and options:
| Category | Options | Description |
|---|---|---|
Trigger-specific | Depends on the trigger type you have previously selected for the event. | Based on the trigger you have selected for an event, you will have a specific list of options appear at the top of the value select menu to chose from. Please refer to the section on Trigger-specific values to see a full list of option and descriptions. |
Current Time | Measure and call on time values. | |
Constant Value |
| Assign constant values based on the type of variable you need, like string or numeric. These are sometimes used in combination with other options like Arithmetic to create counters. |
Variable |
| Specify or refer to a variable or select a value from an array or data frame. |
Frame / Task / Object |
| Allows you to fetch values associated with object properties, the frame, eye tracking (if it’s activated), and the device (screen refresh rate). |
Operations |
| Use operations to perform specified changes to your variables such as combining variable values, transforming strings so they are all lower case, or running mathematical operations. |
Current Time Values
With the ‘Current Time’ option you can record or refer to values with regards to time.
The following options are available:
Current Time: UNIX Timestamp
This value captures a timestamp in UNIX format in milliseconds.
Current Time: Time From Frame Onset
This value captures the amount of time that has elapsed from the frame onset. Most often, this is equivalent to the reaction time.
Constant Values
Assign constant values based on the type of variable you need, like string or numeric. These are sometimes used in combination with other options like Arithmetic to create counters.
The following options are available:
Constant: String
Assigns a string / text value.
Constant: Numeric
Assigns a numeric / number value.
Constant: Boolean
Assigns a value of true or false.
Constant: Categorical
Assigns a level value (mostly for factors).
Constant: Date
Assigns a date value.
Constant: Time
Assigns a time value.
Constant: Color
Assigns a color (hex-string) value.
Variable Values
Specify or refer to a variable or select a value from an array or data frame. The following options are available:
Select Variable
Allows you to select and point to a Variable.
Select Value from Array
Allows you to select a value from an array.
Select Value from Data Frame
Allows you to select a value from a data frame you have created.
Frame / Task / Object Values
Allows you to fetch values associated with object properties, the frame, eye tracking (if it’s activated), and the device (screen refresh rate).
Object Property
Reads out an object property.
Frame
| Frame Value Options | Description |
|---|---|
Last cached Mouse X Position | The last X coordinate value of the participant's mouse. |
Last cached Mouse Y Position | The last Y coordinate value of the participant's mouse. |
Last cached Mouse [X,Y] Array | The last [X,Y] coordinate value of the participant's mouse in an array format. |
Frame Name | The name of the frame. |
Eye Tracking
| Eye Tracking Value Options | Description |
|---|---|
Last cached Coordinate X | The last X coordinate value of the participant's gaze. |
Last cached Coordinate Y | The last Y coordinate value of the participant's gaze. |
Last cached Coordinate [X,Y] Array | The last [X,Y] coordinate value of the participant's gaze in an array format. |
Last cached Coordinate + Time [X,Y,T] Array | The last [X,Y] coordinate value of the participant's gaze, plus the Camera Capture T value in an array format. |
Device
- Refresh Rate: The refresh rate value of the participant's device.
Operations
Use operations to perform specified changes to your variables such as combining variable values, transforming strings so they are all lower case, or running mathematical operations.
The following options are available:
Arithmetic
Arithmetic operations are useful for many different purposes, including combining strings and even modifying object properties.
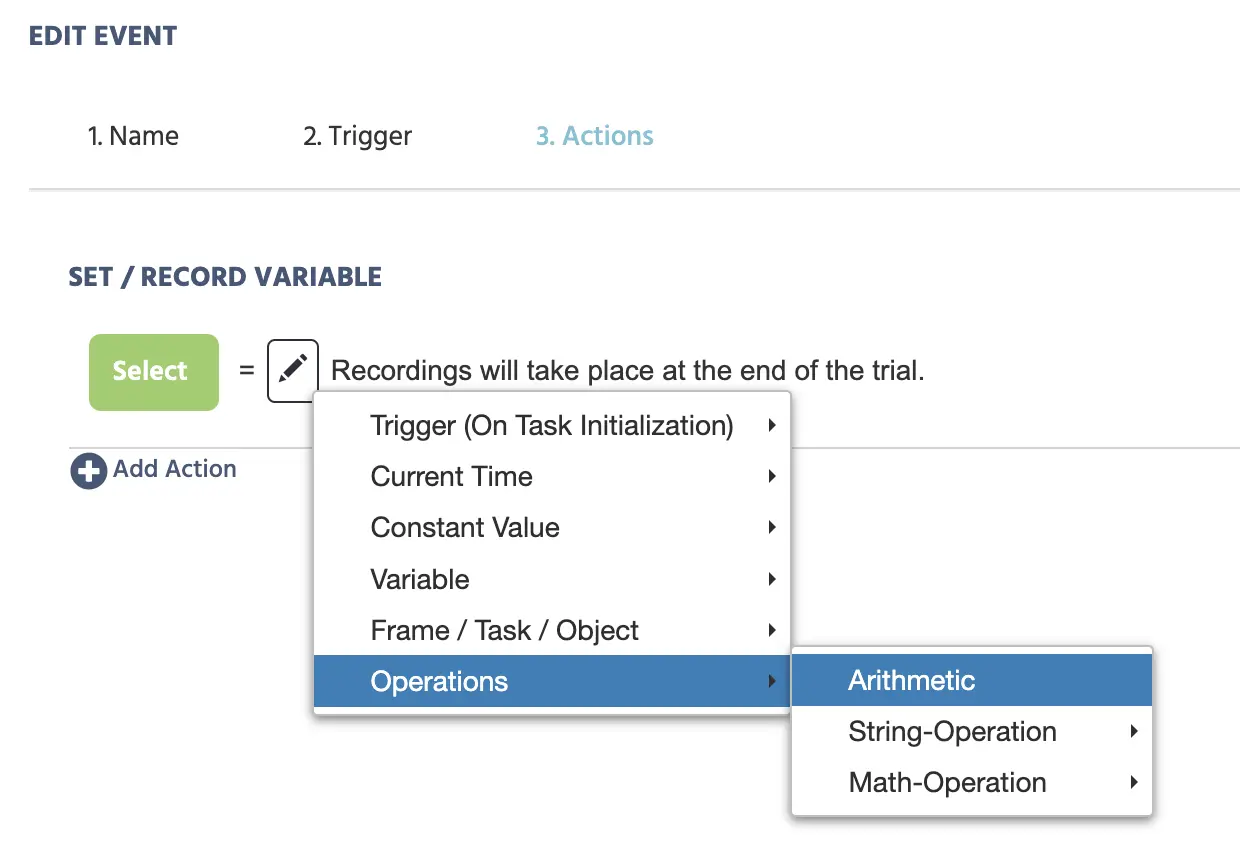
Essentially, the artithmetic operation allows you to perform operations on multiple values.
Upon selecting this option, the following an additional pen icon (ie. Value Select Menu) will appear, as well as a list of operations, such as addition.
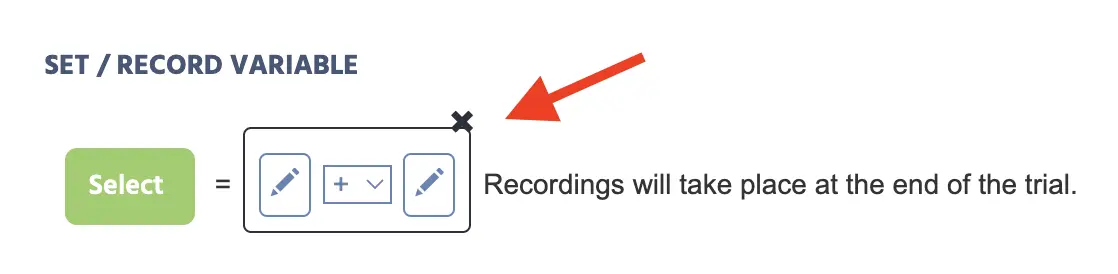
The values can be manipulated by using these 5 different operations:
- (+) addition
- (-) subtraction
- (/) division
- (*) multiplication
- (%) modulo
The example below shows how to utilize arithmetic operations in order to create a new string variable (in the green button), called 'intermediateVar'.
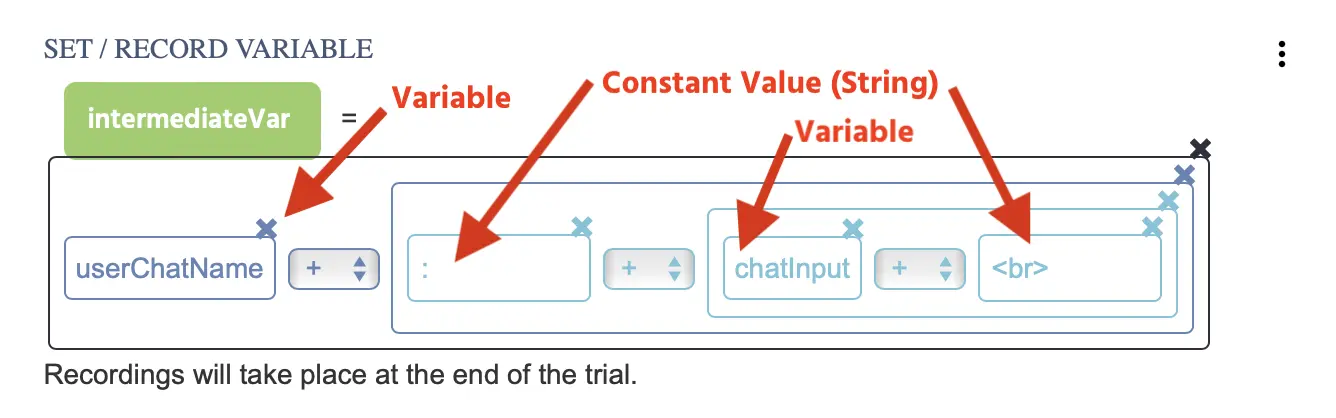
The new variable value (of 'intermediateVar') is defined by using several arithmetic operations together with a combination of previously created variables (ie. 'userChatName' and 'chatInput'), along with constant string values, ie. the semicolon : and the breaking space <br>. This action creates the effect of a user chat that can be used in a multi user study.
String-Operation
| String-Operation Options | Description |
|---|---|
To Lowercase | Changes all the letters in a string variable into small letters. → Ex: (AAABBB) transforms to (aaabbb) |
To Uppercase | Changes all the letters in string variable into capital letters. → Ex: (aaabbb) transforms to (AAABBB) |
To Link | Transforms the string in a variable into a URL that opens in another window |
Remove Whitespaces | Removes any spaces between the letters in a string variable. → Ex: (aaa bbbb cccc) transforms to (aaabbbbccc) |
Trim Whitespaces | Removes the spaces at the beginning of a string variable. → Ex: ( aaabbbcccc) transforms to (aaabbbcccc) |
Replace Substring Regexp | Replaces certain letters in a string value variable. → Ex: (aaabbbccc) replaces bbb with xxx which transforms the value to be (aaaxxxccc) |
Math-Operation
Performs a math operation on a scalar value.
| Math-Operation Options | Description |
|---|---|
abs | Returns the absolute number of a value. |
sqrt | Returns the Square-Root of a value. |
round | Returns the rounded value with 0 to 3 decimal places. |
floor | Returns the floored value. |
ceil | Returns the ceiled value. |
cos | Returns the cosine value. |
sin | Returns the sine value. |
tan | Returns the tangent value. |
Trigger-Specific Values
Trigger-specific values refer to values that are associated with the trigger defined within a particular event. For example, if your event uses a mouse trigger, then, under certain areas where the action is specified (such as while using a Set / Record Variable action or a Set Object Property action), you can reference mouse trigger-specific values in the value select menu.
In the example below, trigger-specific values for a mouse trigger are used to record x- and y-values and an [X,Y] array using a Set / Record Variable action.
Below is a table of all the types of trigger-specific values that can be found in Labvanced, followed by an in-depth explanation of each option.
| Name | Value Options - Overview |
|---|---|
Trigger (Mouse) |
|
Trigger (Keyboard) |
|
Trigger (Button Bar) |
|
Trigger (Enter On Input) |
|
Trigger (Scroll) |
|
Trigger (Gamepad/ Joystick) |
|
Trigger (Eyetracking Gaze) |
|
Trigger (Eyetracking Fixation) |
|
Trigger (Head Tracking) |
|
Trigger (On Task Initialization) |
|
Trigger (On Frame Init) |
|
Trigger (on Frame Start) |
|
Trigger (On Frame End) |
|
Trigger (Variable Value Changed) |
|
Trigger (Media Object Trigger) |
|
Trigger (Websocket Trigger) |
|
Trigger (OpenAI Trigger) |
|
Trigger (PostMessage Received) |
|
Trigger (Global Experiment Event) |
|
Trigger (User Leaves Experiment) |
|
Trigger (Mouse) Values
When a mouse trigger is used, the following trigger-specific values can be called on when working with certain actions:
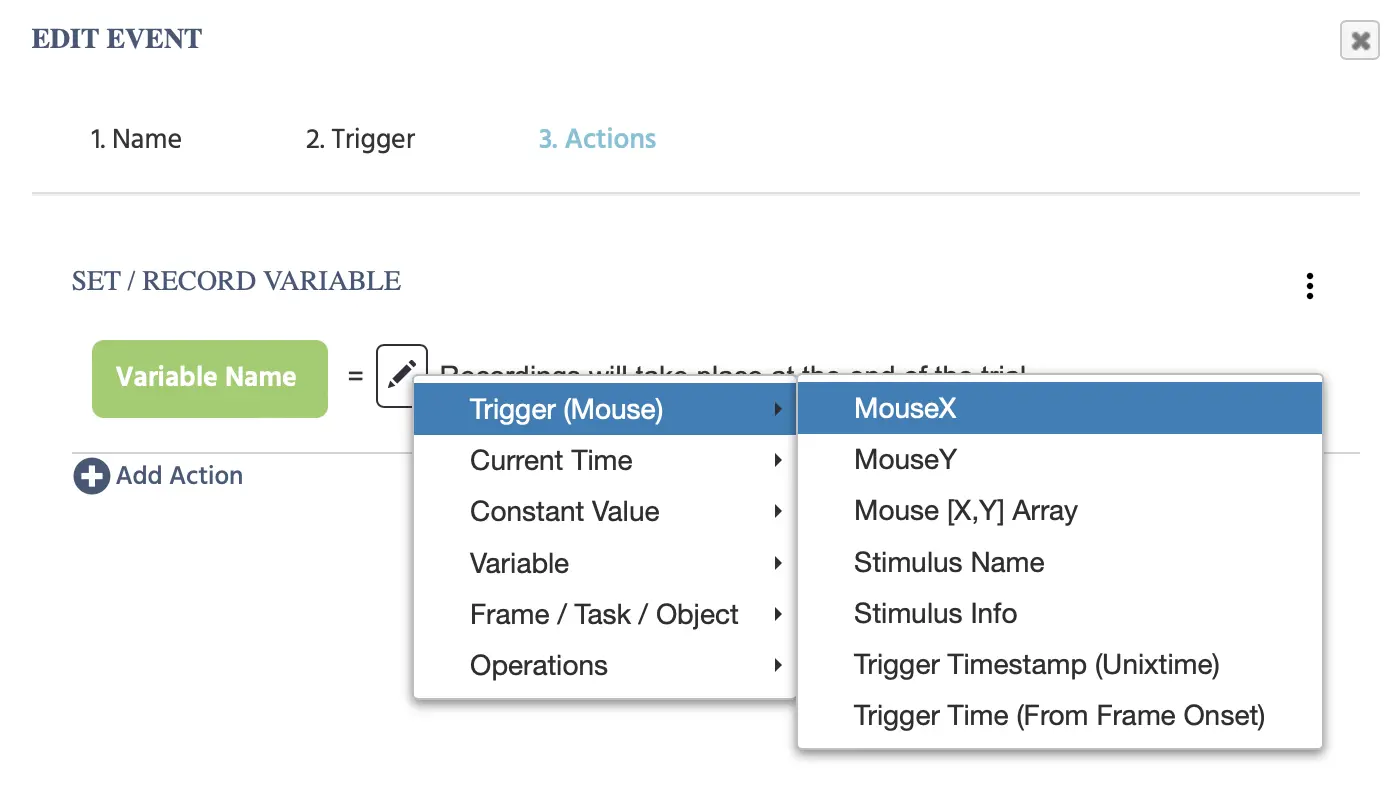
| Trigger (Mouse) Options | Description |
|---|---|
Mouse X | Returns the current Mouse X position in frame coordinates. |
Mouse Y | Returns the current Mouse Y position in frame coordinates. |
Mouse [X,Y] Array | The mouse [X,Y] coordinates in an array format. |
Stimulus Name | The name of the object which triggered the event (e.g which image was clicked). |
Stimulus Info | The stimulus info of the object which triggered the event. |
Trigger Timestamp (Unixtime) | The timestamp of when the trigger occurred in Unix Time format with milliseconds. |
Trigger Time (From Frame Onset) | The elapsed time in milliseconds as measured from the beginning of the frame onset to when the trigger occurred. |
Trigger (Keyboard) Values
When a keyboard trigger is used, the following trigger-specific values can be called on when working with certain actions:
| Trigger (Keyboard) Options | Description |
|---|---|
Id of Key | The ID value of the key that was pressed as the trigger. |
Trigger Timestamp (Unixtime) | The timestamp of when the trigger occurred in Unix Time format with milliseconds. |
Trigger Time (From Frame Onset) | The elapsed time in milliseconds as measured from the beginning of the frame onset to when the trigger occurred. |
Trigger (Button Bar) Values
When a button-click trigger is used, the following trigger-specific values can be called on when working with certain actions:
| Trigger (Button Bar) Options | Description |
|---|---|
Stimulus Name | The name of the button object which triggered the event. |
Stimulus Info | The stimulus info of the button object which triggered the event. |
Trigger Timestamp (Unixtime) | The timestamp of when the trigger occurred in Unix Time format with milliseconds. |
Trigger Time (From Frame Onset) | The elapsed time in milliseconds as measured from the beginning of the frame onset to when the trigger occurred. |
Trigger (Enter on Input) Values
When an Enter on Input trigger is used, the following trigger-specific values can be called on when working with certain actions:
| Trigger (Enter on Input) Options | Description |
|---|---|
Id of Key | The ID value of the key that was pressed as the trigger. |
Trigger Timestamp (Unixtime) | The timestamp of when the trigger occurred in Unix Time format with milliseconds. |
Trigger Time (From Frame Onset) | The elapsed time in milliseconds as measured from the beginning of the frame onset to when the trigger occurred. |
Trigger (Scroll) Values
When a Scroll trigger is used, the following trigger-specific values can be called on when working with certain actions:
| Trigger (Scroll) Options | Description |
|---|---|
Stimulus Name | The name of the button object which triggered the event. |
Stimulus Info | The stimulus info of the button object which triggered the event. |
Scroll Position X | The scroll position in X of the mouse when the event was triggered. |
Scroll Position Y | The scroll position in Y of the mouse when the event was triggered. |
Trigger Timestamp (Unixtime) | The timestamp of when the scroll trigger occurred in Unix Time format with milliseconds. |
Trigger Time (From Frame Onset) | The elapsed time in milliseconds as measured from the beginning of the frame onset to when the scroll trigger occurred. |
Trigger (Gamepad/ Joystick) Values
When a Gamepad/Joystick trigger is used, the following trigger-specific values can be called on when working with certain actions:
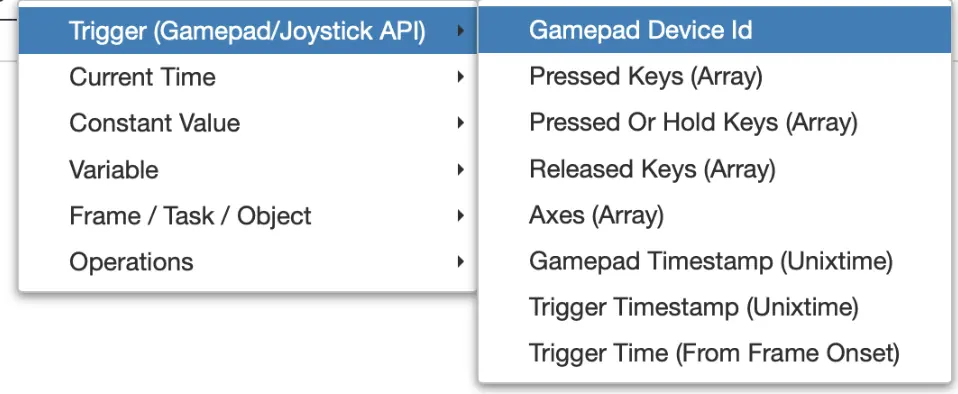
| Trigger (Gamepad/ Joystick) Options | Description |
|---|---|
Gamepad Device Id | The ID or name of the gamepad that was connected. |
Pressed Keys (Array) | The keys that were pressed. |
Pressed OR Hold Keys (Array) | The keys that were pressed or held. |
Released Keys (Array) | The keys that were released. |
Axes (Array) | The axes values. |
Gamepad Timestamp (Unixtime) | The gamepad timestamp in Unixtime. |
Trigger Timestamp (Unixtime) | Timestamp of when the trigger occurs in Unixtime. |
Trigger Time (From Frame Onset) | Timestamp in Unixtime of when the trigger occurs with relation to the onset of the frame. |
Trigger (Eyetracking Gaze) Values
When an Eye tracking gaze trigger is used, the following trigger-specific values can be called on when working with certain actions:
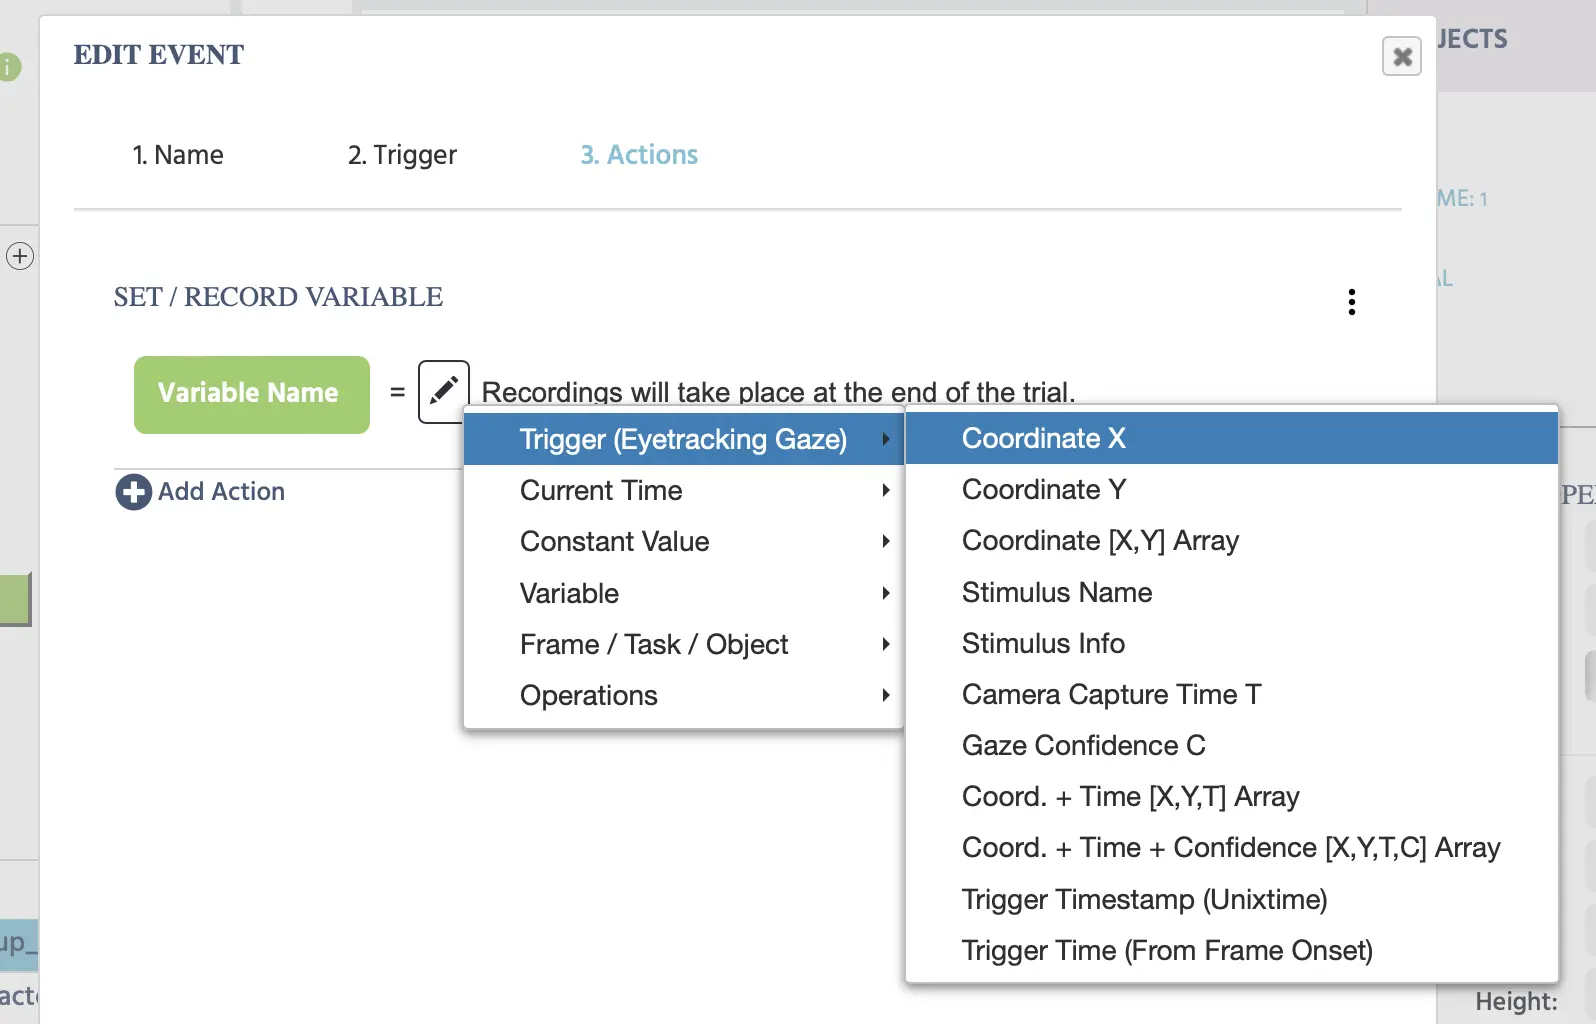
| Trigger (Eyetracking Gaze) Options | Description |
|---|---|
Coordinate X | The value of the gaze's X coordinate. |
Coordinate Y | The value of the gaze's Y coordinate. |
Coordinate [X,Y] Array | The gaze coordinates X,Y in an array format. |
Stimulus Name | The name of the stimulus that initiated the gaze trigger. |
Stimulus Info | The stimulus information behind the stimulus that initiated the gaze trigger. |
Camera Capture Time T | The exact time when the snapshot occurred. In the Labvanced eye tracking pipeline, a camera snapshot happens first before the algorithm and neural network perform gaze calculations. Thus, the Camera Capture Time T is a UNIX Timestamp of when the initial snapshot occurred. For more information regarding the technology behind our webcam-based eye tracking please refer to our ET technology page. |
Gaze Confidence C | This value ranges from 0 to 1 and refers to the confidence and probability that there is an open eye in the image snapshot and essentially serves as a ‘blink detector.’ Please refer to our published peer-reviewed paper for more details. |
Coord. + Time [X,Y,T] Array | An array containing the x/y coordinates of the gaze and the timestamp of the camera capture time (T) as described above. |
Coord. + Time + Confidence [X,Y, T,C] Array | An array containing the x/y coordinates of the gaze and the timestamp of the camera capture time (T) and gaze confidence (C) as described above. |
Trigger Timestamp (Unixtime) | The timestamp of when the gaze trigger occurred in Unix Time format with milliseconds. |
Trigger Time (From Frame Onset) | The elapsed time in milliseconds as measured from the beginning of the frame onset to when the gaze trigger occurred. |
Trigger(Eyetracking Fixation) Values
When an Eye Tracking Fixation trigger is used, the following trigger-specific values can be called on when working with certain actions:
| Trigger (Eyetracking Fixation) Options | Description |
|---|---|
Fixation Centroid X | The center point of the fixation as an X value. |
Fixation Centroid Y | The center point of the fixation as an Y value. |
Fixation Duration | The duration of the detected fixation. |
Fixation Start Time | The start time of the detected fixation. |
Fixation End Time | The end time of the detected fixation. |
Fixation Dispersion | Refers to how dispersed the gaze values are within a detected fixation. |
Stimulus Name | The name of the button object which triggered the event. |
Stimulus Info | The stimulus info of the button object which triggered the event. |
[X, Y, Dur, Start, End, Disp] | An array of the following: x- and y-values of the fixation's centroid, the duration of the fixation, the start time, the end time, and the dispersion value. |
Trigger Timestamp (Unixtime) | The timestamp of when the fixation trigger occurred in Unix Time format with milliseconds. |
Trigger Time (From Frame Onset) | The elapsed time in milliseconds as measured from the beginning of the frame onset to when the fixation trigger occurred. |
Trigger (Head Tracking) Values
When a Head Tracking trigger is used, the following trigger-specific values can be called on when working with certain actions:
| Trigger (Head Tracking) Options | Description |
|---|---|
Camera Capture Time T | When the camera captured the frame, ie. a unix timestamp of when the frame capture occurred. This is the time that the image / frame was captured before any processing occurs. |
Facemesh Dataframe | A data frame containing the 468 facial landmark keypoints detected by the face mesh model. Each row represents one keypoint with its x, y, and z coordinates in normalized frame space. Use this value to access detailed facial geometry per frame, such as lip, eye, or jaw landmarks. |
Head Turn | Head turning from left to right, this is referred to as the yaw in literature. |
Head Tilt | Head tilting from up to down, known as head pitch in the literature. |
Head Roll | Captures the movement of the head rolling from side to side. |
Head Position [X,Y, T] Array | This array captures the numerical values associated with head position, this includes the x- and y-coordinates for the center of the head along with the timestamp variable (T). |
Nose Position [X,Y, T] Array | This array captures the numerical values associated with the position of the nose specifically, this includes the x- and y-coordinates for the where the nose is located along with the timestamp variable (T) of when the measurement occurred. |
Nose Vector [X,Y, Z, T] Array | This measurement works by projecting a vector from the nose tip and is useful for testing whether the participant is attending to the screen ( this is especially important for studies where eye tracking is not enabled). Thus, if the nose points off screen (ie. the participant is not attending to the experiment) the Z value decreases from 1 and moves closer to 0. |
Trigger Timestamp (Unixtime) | Time point during the experiment when the trigger itself occurs where the head tracking was detected and accounts for when the trigger occurred in the system. Essentially, this is the time where processing the image / frame is processed and this value is largely affected by the participant’s graphics card. In theory, it should be as close as possible to the value T. |
Trigger Time from Frame Onset | This is the time value of when the trigger occurred with regards to when the frame onset happened. |
Trigger (On Task Initialization) Values
When a Task Init Trigger is used, the following trigger-specific values can be called on when working with certain actions:
| Trigger (On Task Initialization) Options | Description |
|---|---|
Trigger Timestamp (Unixtime) | The Unix Timestamp of the trigger in milliseconds. |
Trigger Time (From Frame Onset) | The time in milliseconds of when the trigger occurred from the frame onset. |
Trigger (On Frame Init) Values
When a Frame Init Trigger is used, the following trigger-specific values can be called on when working with certain actions:
| Trigger (On Frame Init) Options | Description |
|---|---|
TrialNr | The Trial Number of when the Frame Init Trigger occurred. |
Trigger Timestamp (Unixtime) | The Unix Timestamp of the trigger in milliseconds. |
Trigger Time (From Frame Onset) | The time in milliseconds of when the trigger occurred from the frame onset. |
Trigger (on Frame Start) Values
When a Frame Start Trigger is used, the following trigger-specific values can be called on when working with certain actions:
| Trigger (on Frame Start) Options | Description |
|---|---|
Trigger Timestamp (Unixtime) | The Unix Timestamp of the trigger in milliseconds. |
Trigger Time (From Frame Onset) | The time in milliseconds of when the trigger occurred from the frame onset. |
Trigger (On Frame End) Values
When a Frame End Trigger is used, the following trigger-specific values can be called on when working with certain actions:
| Trigger (On Frame End) Options | Description |
|---|---|
Total Frame Time | The total time in milliseconds that was spent on the frame. |
Trigger Timestamp (Unixtime) | The Unix Timestamp of the trigger in milliseconds. |
Trigger Time (From Frame Onset) | The time in milliseconds of when the trigger occurred from the frame onset. |
Trigger (Variable Value Changed) Values
When a Variable Value Changed Trigger is used, the following trigger-specific values can be called on when working with certain actions:
| Trigger (Variable Value Changed) Options | Description |
|---|---|
New Value in Variable | Refers to the new value of a variable. |
Trigger Timestamp (Unixtime) | The timestamp of when the variable change trigger occurred in Unix Time format with milliseconds. |
Trigger Time (From Frame Onset) | The elapsed time in milliseconds as measured from the beginning of the frame onset to when the variable value changed occurred. |
Trigger (Media Object Trigger) Values
When a Media Object Trigger is used, the following trigger-specific values can be called on when working with certain actions:
| Trigger (Media Object Trigger) Options | Description |
|---|---|
Trigger Timestamp (Unixtime) | The timestamp of when the media object trigger occurred in Unix Time format with milliseconds. |
Trigger Time (From Frame Onset) | The elapsed time in milliseconds as measured from the beginning of the frame onset to when the media object trigger occurred. |
Trigger (Websocket Trigger) Values
When a WebsSocket Trigger is used, the following trigger-specific values can be called on when working with certain actions:
| Trigger (Websocket Trigger) Options | Description |
|---|---|
Message | A message that can be used to describe and label which allows you (on the receiving-end) to filter between different types of data. |
Data | A value that can hold different types of data, such as participant’s choices, timestamps, mouse x/y coordinates, etc. |
Trigger Timestamp (Unixtime) | The timestamp of when the Websocket trigger occurred in Unix Time format with milliseconds. |
Trigger Time (From Frame Onset) | The elapsed time in milliseconds as measured from the beginning of the frame onset to when the WebSocket trigger occurred. |
Trigger (OpenAI Trigger) Values
When an OpenAI Trigger is used, the following trigger-specific values can be called on when working with certain actions:
| Trigger (OpenAI Trigger) Options | Description |
|---|---|
Chat GPT Answer | The value of the answer from ChatGPT. |
Trigger Timestamp (Unixtime) | The timestamp of when the OpenAI trigger occurred in Unix Time format with milliseconds. |
Trigger Time (From Frame Onset) | The elapsed time in milliseconds as measured from the beginning of the frame onset to when the OpenAI trigger occurred. |
Trigger (PostMessage Received) Values
When a PostMessage Received trigger is used, the following trigger-specific values can be called on when working with certain actions:
| Trigger (PostMessage Received) Options | Description |
|---|---|
Message Content | The data payload of the received postMessage, as sent by the external source. |
Trigger Timestamp (Unixtime) | The timestamp of when the PostMessage Received trigger occurred in Unix Time format with milliseconds. |
Trigger Time (From Frame Onset) | The elapsed time in milliseconds as measured from the beginning of the frame onset to when the trigger occurred. |
Trigger (Global Experiment Event) Values
When a Pause / Resume Experiment Trigger is used, the following trigger-specific values can be called on when working with certain actions:
| Trigger (Global Experiment Event) Options | Description |
|---|---|
Total Frame Time | Refers to the Total Frame Time that allotted prior to the Trigger. |
Reason for Global Event | A string value that states the reason of the trigger, such as participant leaving the study. |
Trigger Timestamp (Unixtime) | The timestamp of when the Global Event trigger occurred in Unix Time format with milliseconds. |
Trigger Time (From Frame Onset) | The elapsed time in milliseconds as measured from the beginning of the frame onset to when the Global Event trigger occurred. |
Trigger (User Leaves Experiment) Values
When a Participant Left Multiuser Study Trigger is used, the following trigger-specific values can be called on when working with certain actions:
| Trigger (User Leaves Experiment) Options | Description |
|---|---|
Remaining Number of Participants | The number of how many participants remain in the study. |
Trigger Timestamp (Unixtime) | The timestamp of when the User Leaves Experiment trigger occurred in Unix Time format with milliseconds. |
Trigger Time (From Frame Onset) | The elapsed time in milliseconds as measured from the beginning of the frame onset to when the User Leaves Experiment trigger occurred. |