Stroop Task Creation Walkthrough
Hi! Welcome to another walkthrough for the study creation walkthrough. This information will contain building one of the commonly used psychological experiments, the Stroop task. As a short explanation, the Stroop task presents a color word with congruent ink color (i.e., text “Red” with red ink) or incongruent ink color (i.e., text “Red” with green ink), and the participant is required to selectively pay attention and discriminate between the ink or the text (i.e., discriminating red or green text in certain trials and ink color in others). Commonly, the responder demonstrates a lower performance (e.g., slower discrimination and less accuracy via keypress) in the incongruent condition compared to the congruent word due to the information competition (i.e., mismatch of the text with the ink color). Critically, the delay in the incongruent response is operationalized as the attention (or cognitive) control to evaluate the different populations, such as people with avid video game experience, mono vs. multilingual, and attention-demanding occupations (e.g., air traffic control) to examine their interference control. For practical clinical application, the Stroop paradigm is utilized to assess the levels of attention deficit and cognitive abilities of various psychological disorders like schizophrenia, bipolar disorder, or major depression. Creating this paradigm in Labvanced is a relatively straightforward process compared to other complex experimental designs, but this current walkthrough will detail the walkthrough in 5-parts, comprising:
- Variable determination (IVs & DVs)
- Frames setup (fixation, target, feedback messages)
- Stimuli setup (visual & auditory)
- Events setup
- Block setup
To make the paradigm more interesting and showcase the audio stimuli setup, we will build the Stroop paradigm as a multimodal setup, presenting two different modalities of stimuli presentation, visual and audio presentation. Overall, the current walkthrough will build three different tasks of requiring participants to focus either:
- Text (e.g., discriminating the text - red or green while ignoring the presented text color and concurrent auditory word
- Color (e.g., discriminating the presented color - red or green ink while ignoring the text semantic and concurrent auditory word)
- Auditory (e.g., discriminating the projected sound - red or green while ignoring the text semantic and presented color)
Without further ado, let’s dive into creating the first task by determining the important variables for the study structure.
Part I: Variable determination
As with any study preparation, determining the variables would be important for the study structure. For this, we could use the Factor Tree to determine the factors (or independent variables) and their associated levels (or categories). For the purpose of the current multimodal Stroop, the factors and their levels are as follows:
- Factor 1 - text
- Level 1 - green
- Level 2 - red
- Factor 1 - text
- Factor 2 - color
- Level 1 - green-colored text (i.e., green or red)
- Level 2 - red-colored text (i.e., green or red)
- Factor 2 - color
- Factor 3 - audio
- Level 1 - audio sound with the word ‘green’ presentation
- Level 2 - audio sound with the word ‘red’ presentation
- Factor 3 - audio
The full display of this setup in the Factor Tree is also depicted below (see Figure 1A). With this 2 X 2 X 2 orthogonal setup, Labvanced will create 8 different conditions (see Figure 1B) in the Trials & Conditions with each factor combination. As depicted, this leads to all possible combinations of Text X Color X Audio. Also, we can determine the number of trials per condition, and we will determine 4 trials per condition - a total of 32 trials.
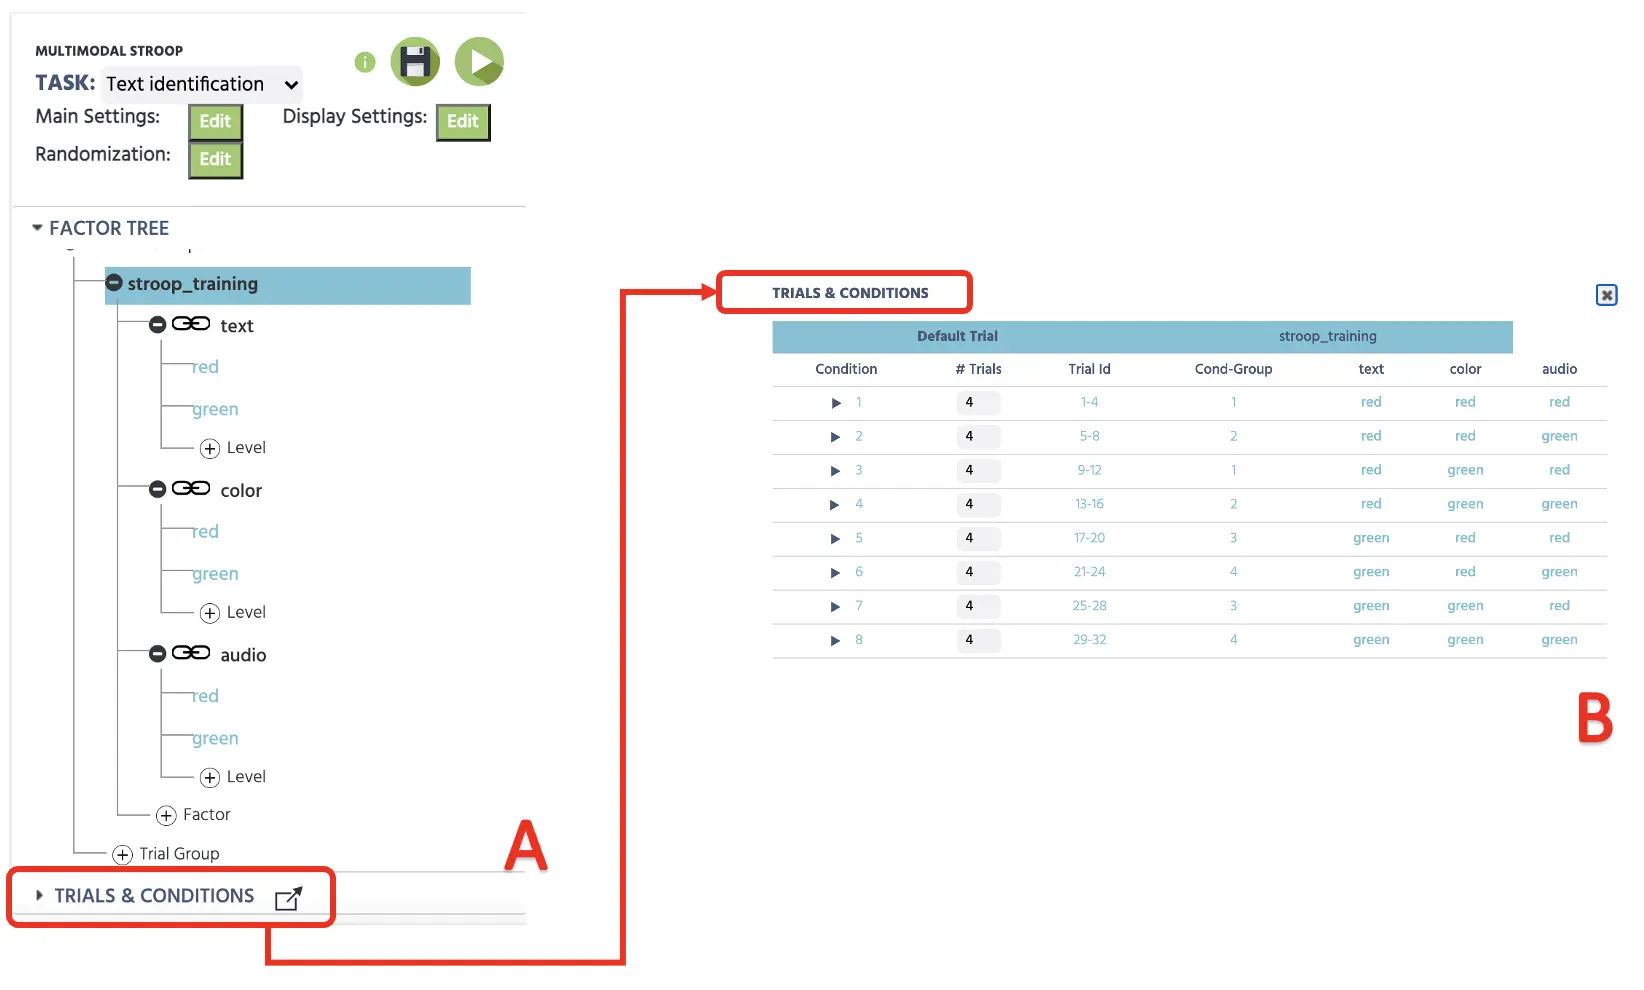 Figure 1. Initial canvas setup depicting determining factors with levels in the Factor Tree (A) and subsequent combinations with 4 trials in each condition (B).
For the trial randomization, the Labvanced will vary the trial presentation depending on the Randomization Setting (see Figure 2). The conventional approach is proceeding with the first Random option that will generate a random trial sequence, but this could be pre-determined with different options (Fixed by Design or Hand) in the same setting. For now, the current setup will proceed with Random without any constraints to randomly vary the trial sequence. For more information about the Randomization setting, please use this link for more information.
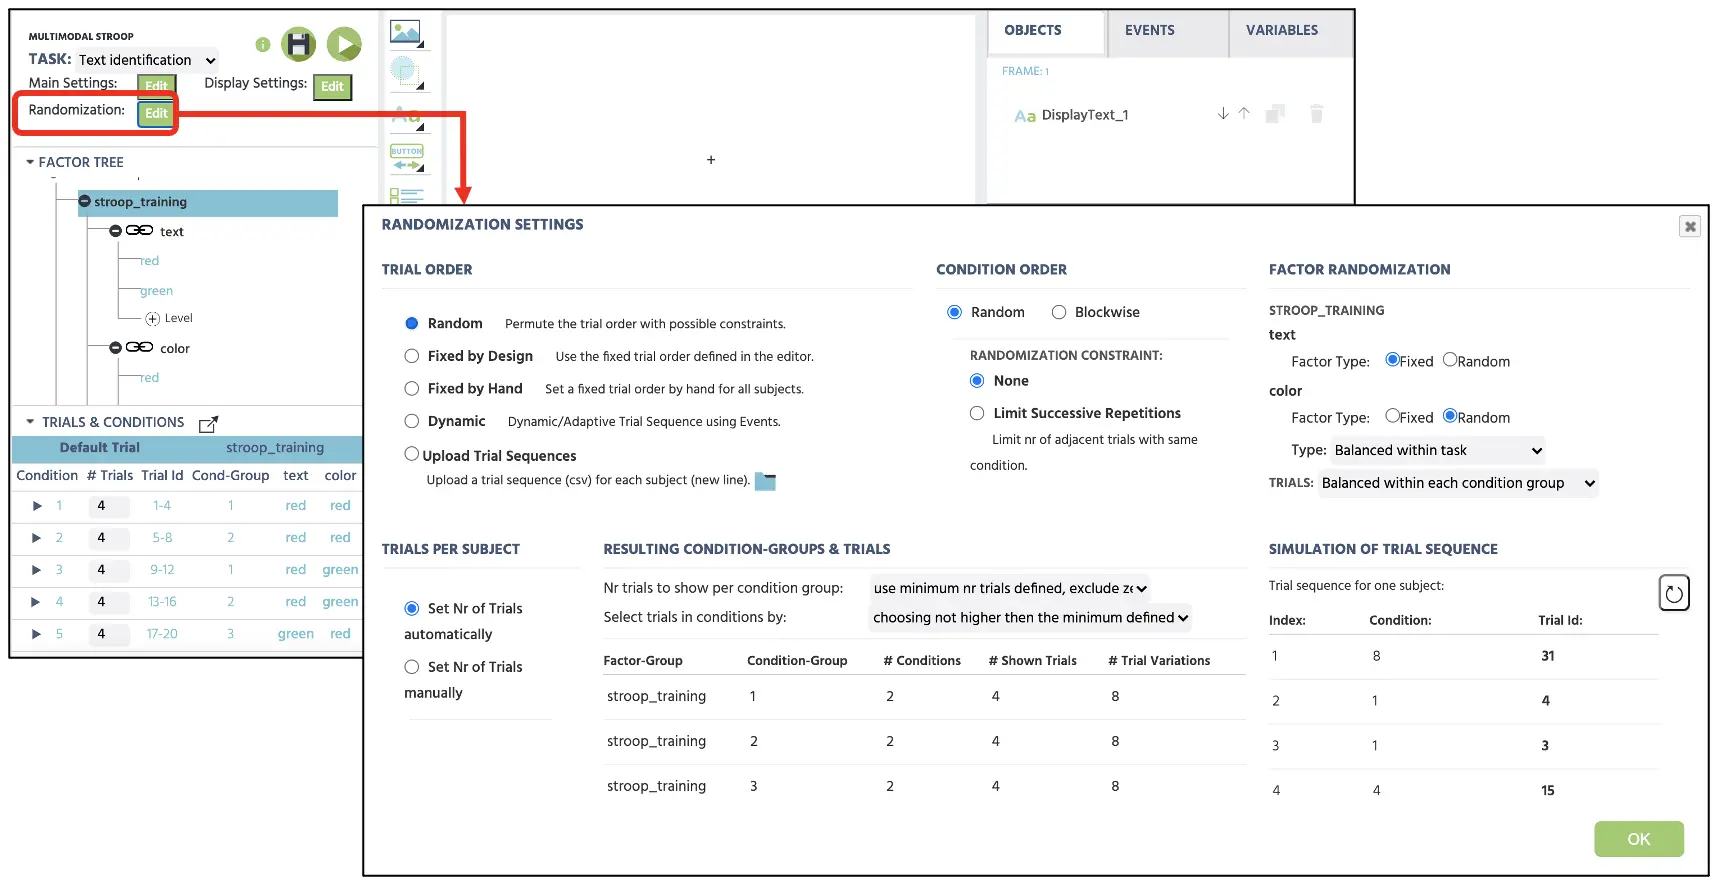 Figure 2. Display of Randomization setting with selected Random option to randomly present the trials without any constraints.
Part II: Frames setup
The second part of this walkthrough will create frames (stimuli presentation) that the participants will see during their study participation. Overall, the current Multimodal Stroop will follow the general procedure below (see Figure 3). As depicted, a trial will begin with a fixation cross (frame 1) for 500 ms followed by the simultaneous presentation of a colored text with sound (frame 2) with displayed keypress options. This will follow with feedback messages, Correct (frame 3) or Incorrect (frame 4) messages depending on the keypress accuracy. The feedback will display for 1000ms.
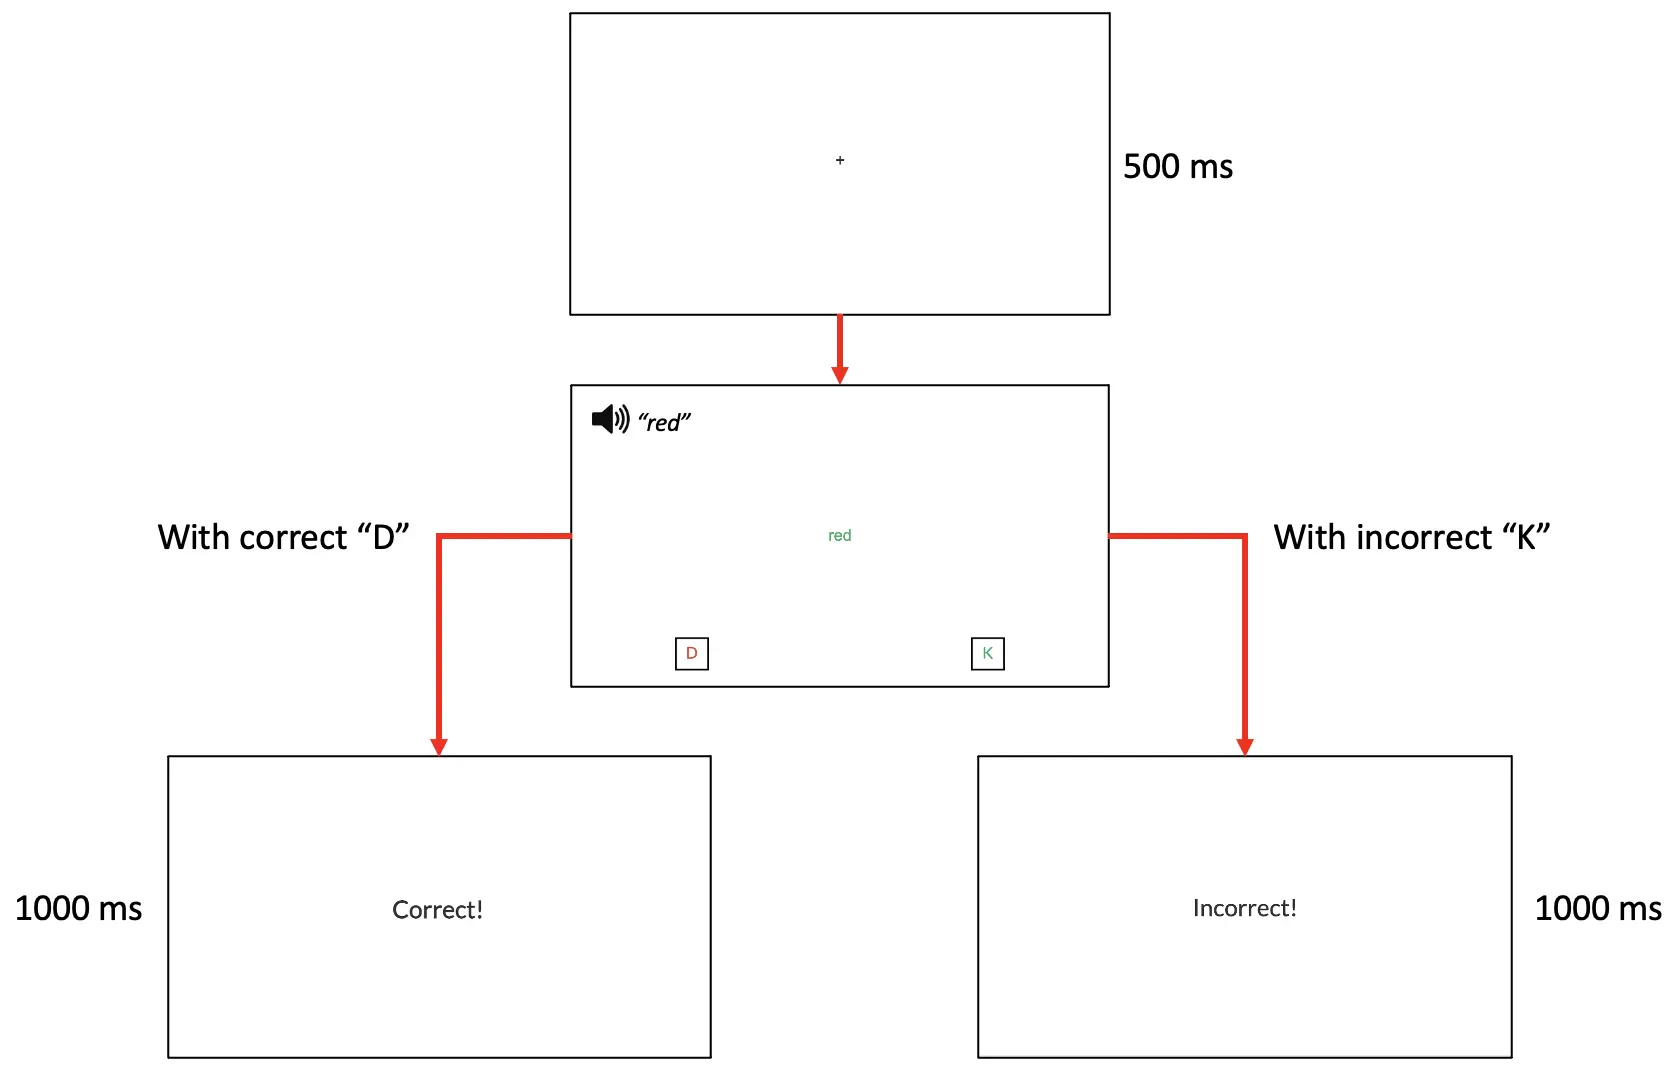 Figure 3. Display of sample trial. In this example that requires text discrimination while ignoring the color and sound, D-keypress is associated with the correct response indicating red-text, and K-keypress is associated with the incorrect response indicating green-text.
The construction of these frames will begin by clicking on the Canvas button at the bottom of the Labvanced display (see Figure 4A). Clicking this 4 times will display 4 new frames and lets immediately name each frame (e.g., fixation, target, correct, incorrect) to maintain the organization (see Figure 4B). Before proceeding, it would be important to click on the Default trial to make sure this row is highlighted (see Figure 4C). This part serves as the default template for all the conditions below. Any changes in the frame creation will subsequently follow for all the conditions, so this would be a convenient way to set all the trials that follow the same experimental sequence. For example, while highlighting the Default trial, adding the fixation cross display for a certain number of duration will apply the same presentation to all the 48 trials below in the Trials and Conditions.
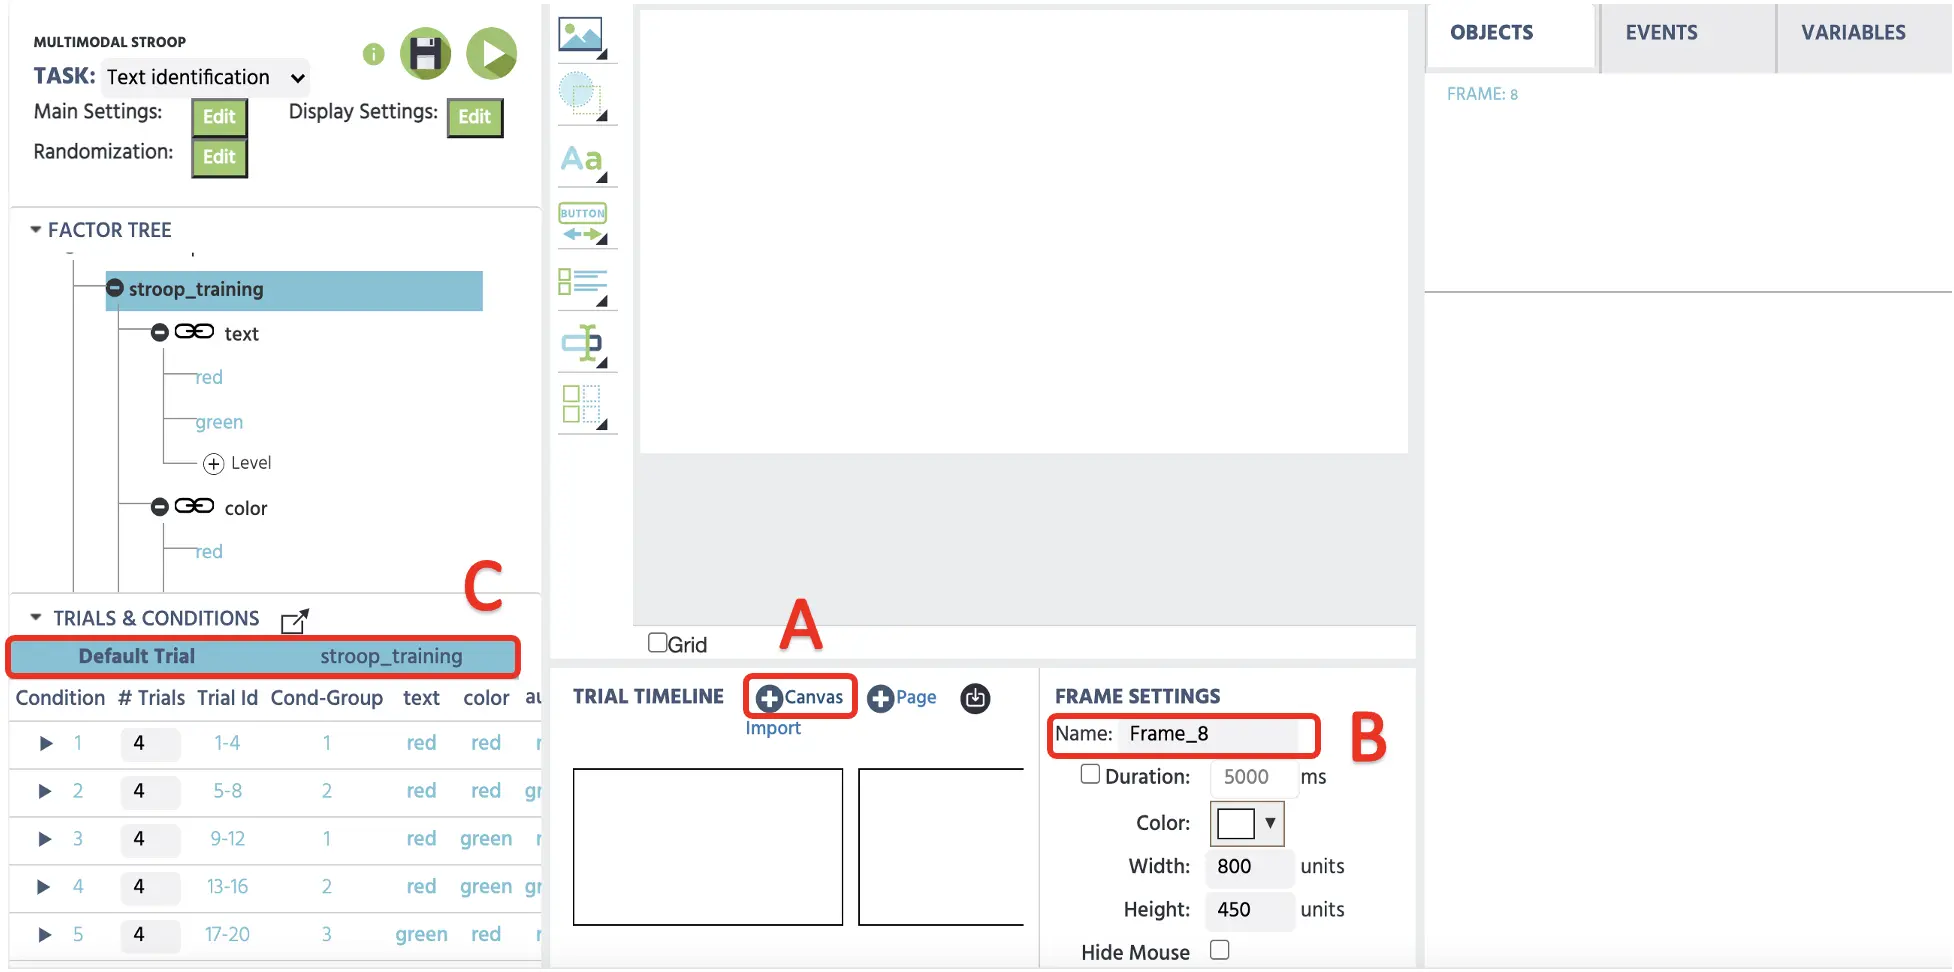 Figure 4. Display of sample trial with Canvas frame creation (A), frame name change option (B), and highlight Default Trial (C).
To create the fixation cross in the first frame, we can click on the Display Text (see Figure 5A) to implement the textbox in the canvas. Here, we can type in the + in the box with a font size 36 and position it in the center of the display. For the precise center position, we could also type in the specific X & Y frame coordinates at the Object Properties on right. If we want to upload the image containing the fixation cross or different stimuli, the Media option (see Figure 5B) can be used to present images, videos, audios, and etc.
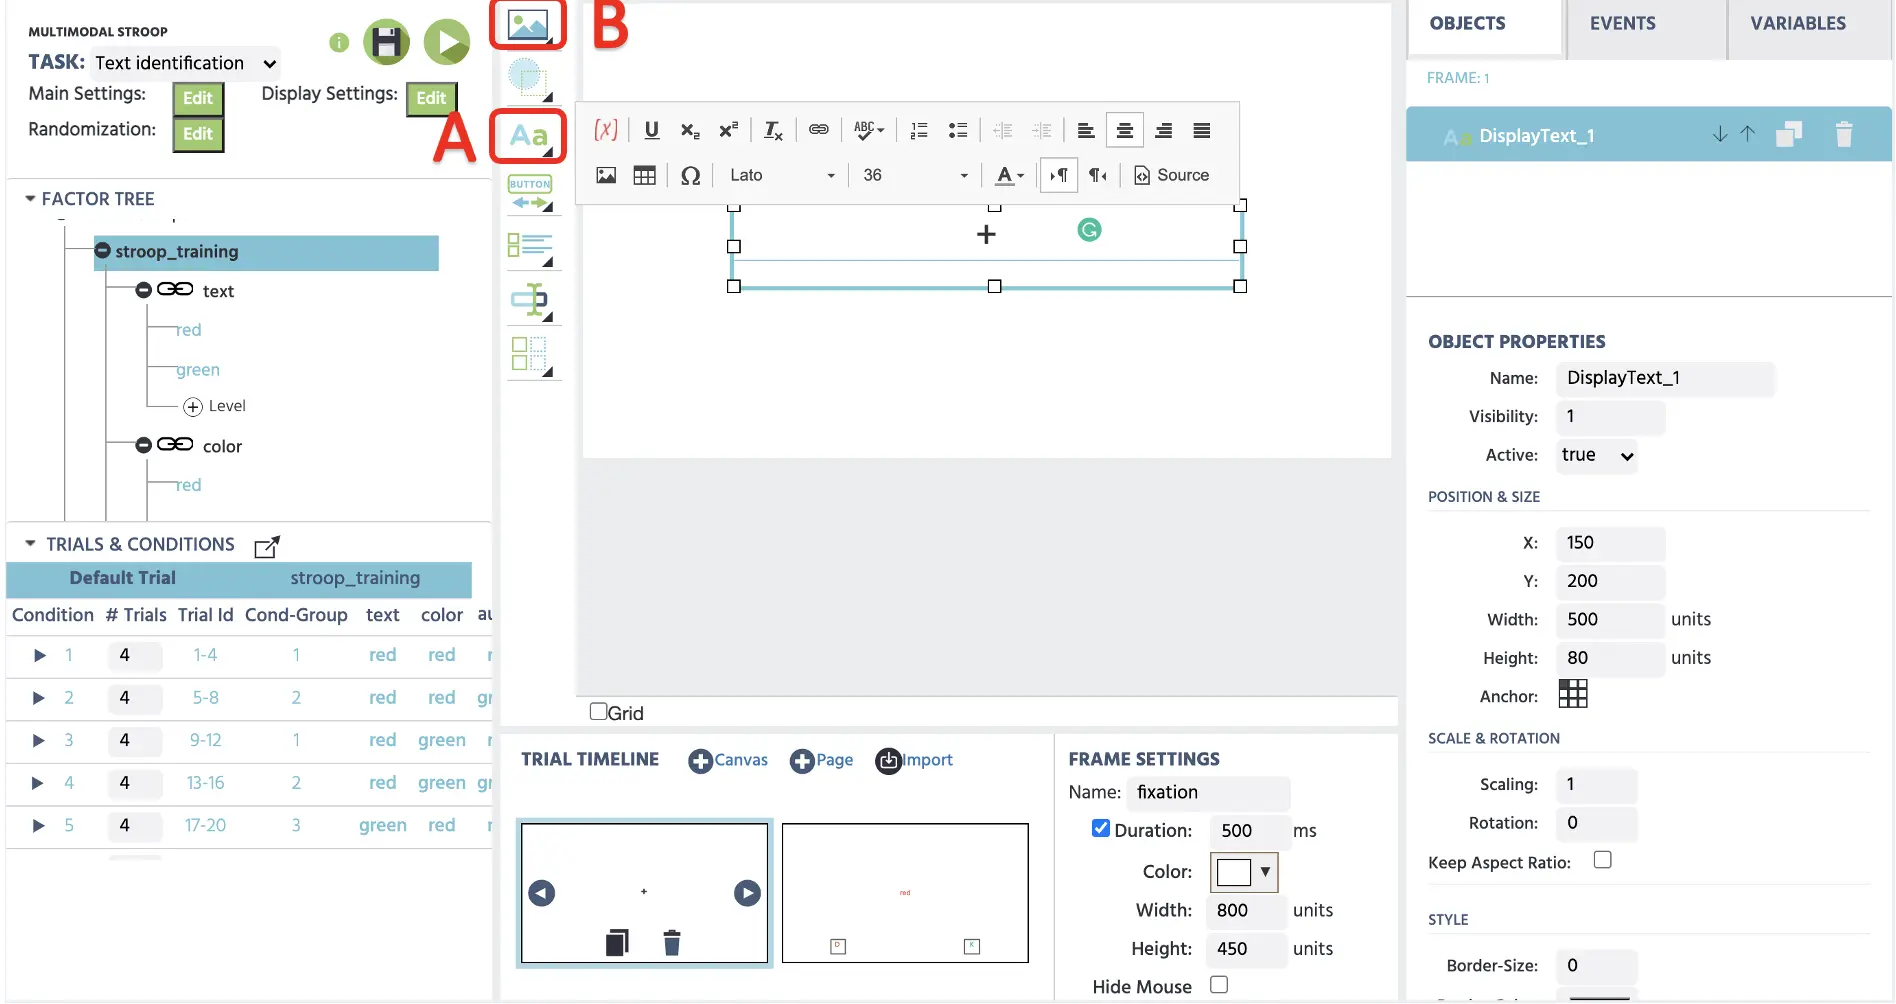 Figure 5. Display of fixation frame creation with the Display Text option(A). Images, videos, and audios could be presented via Media option (B).
Creating the feedback messages (frame 3: Correct; frame 4: Incorrect) involves the same process as the fixation cross, where the messages can be typed into the textbox with a repositioning option in the center of the display (see Figure 6). With frames 1, 3, 4 out of the way, the next part of the walkthrough will involve target creation in frame 2.
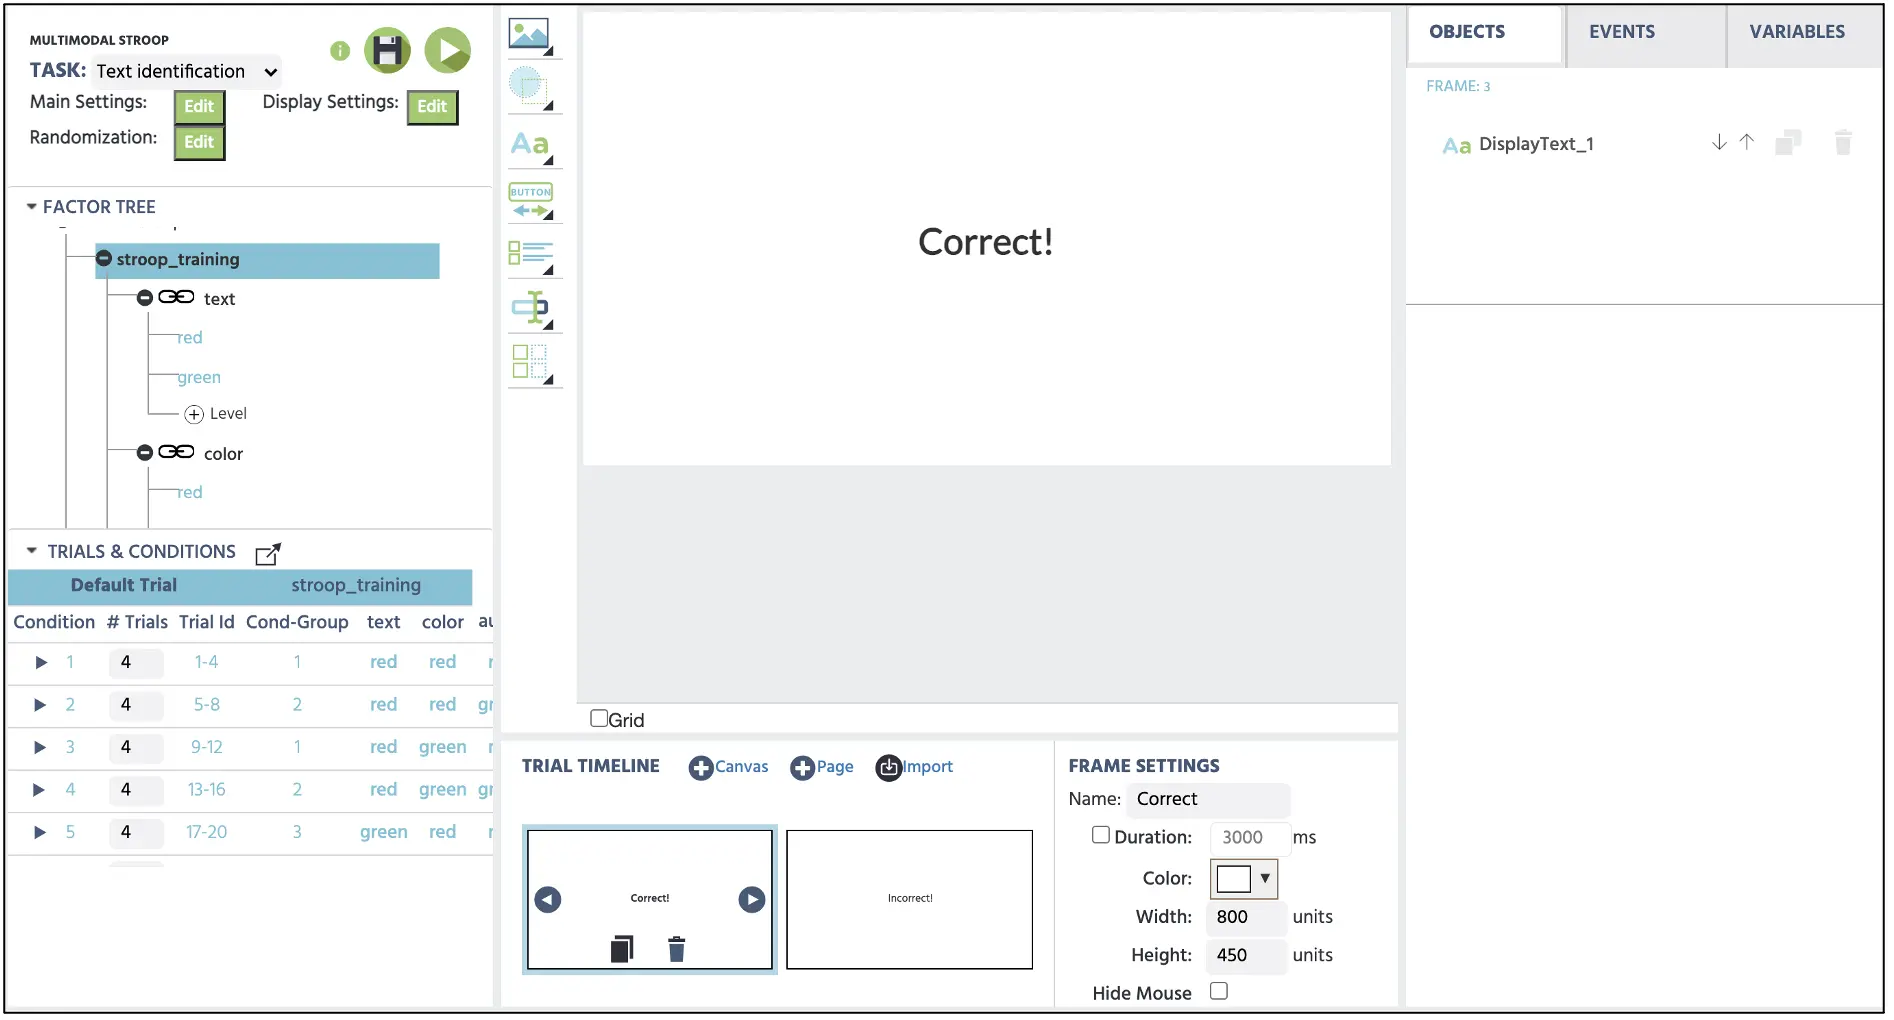 Figure 6. Sample display of the correct feedback in frame 3.
Part III: Stimuli setup
To create frame 2: target presentation for both visual (text and color) and auditory stimuli, it will begin with clicking the Media option (see Figure 5 above) and selecting Image. This will prompt the Image Property in the canvas display, which we could use the Object Properties on the right side to adjust the position, size, and most importantly, which image we would want to present from the Labvanced file storage. If the researcher has not imported all the experimental stimuli, clicking on the File icon (see Figure 7) will open the store window which they could upload and select the stimuli of interest.
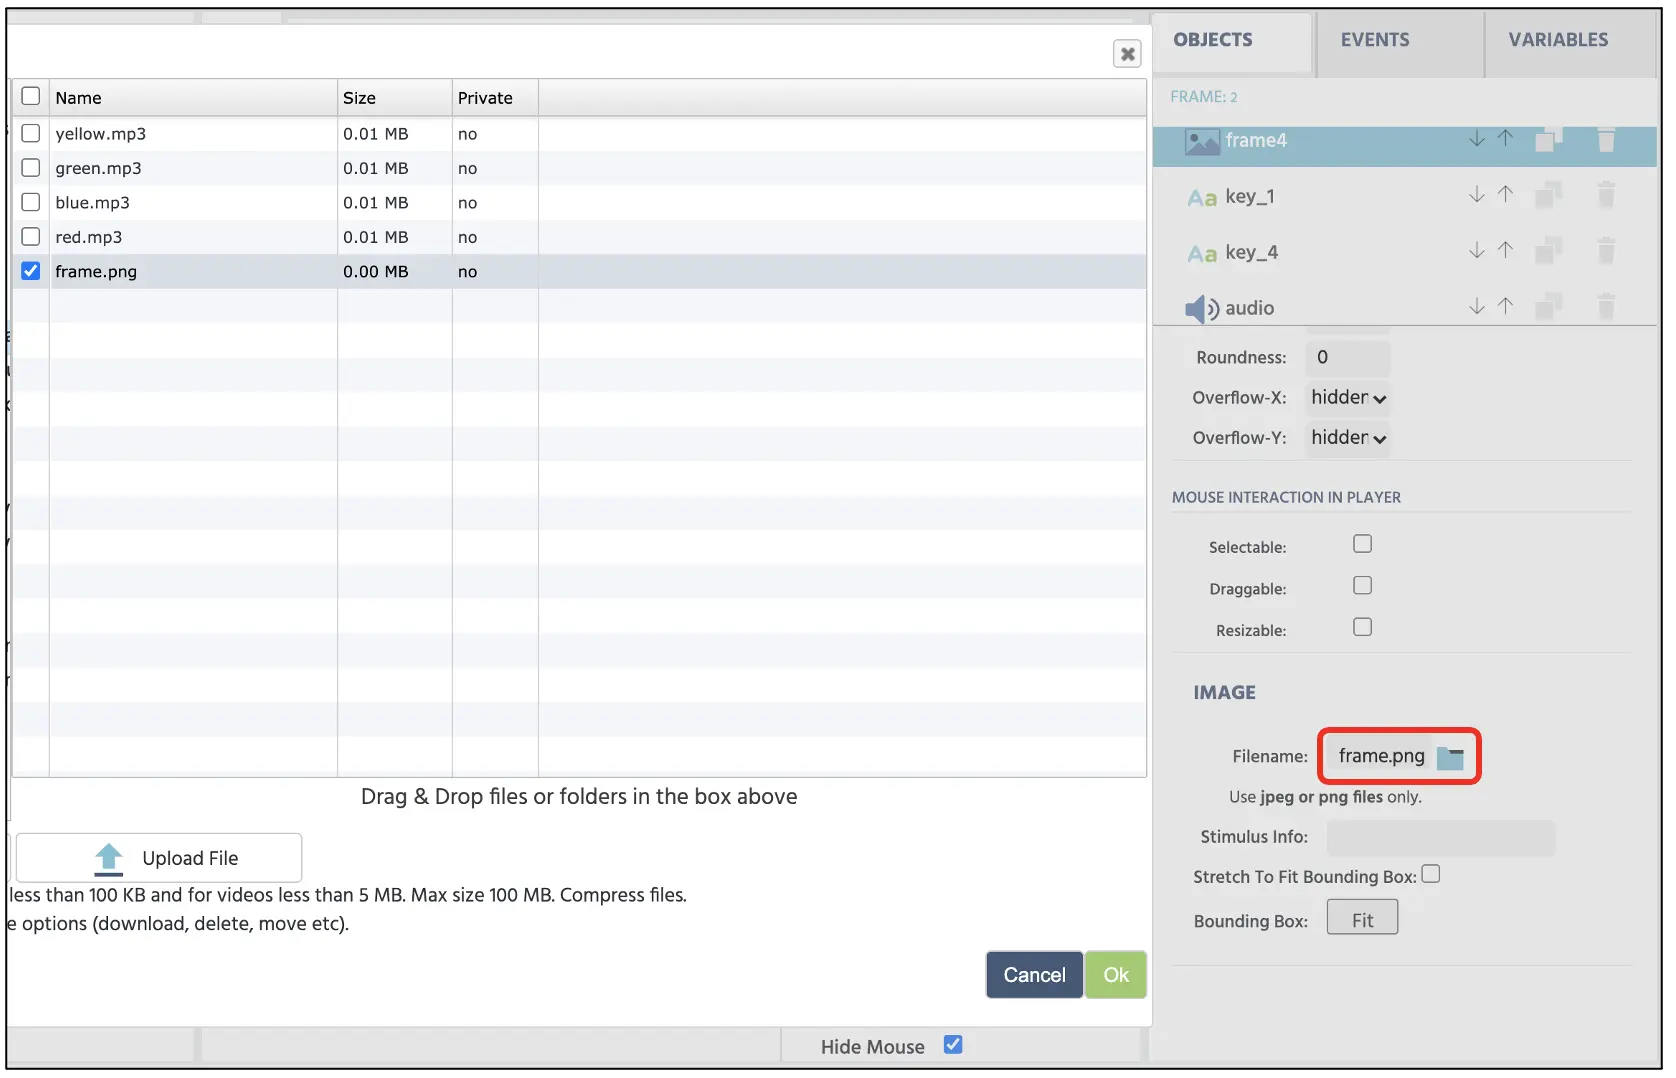 Figure 7. Display of file storage accessed by the file icon in the red box.
Afterward, the stimuli setup will comprise of the following presentations:
- 2 Images - frames (image from the file storage)
- 3 texts - 2 button responses (D & K) and the target colored text
- 1 audio - auditory presentation (sound files from the file storage)
Importantly, we want to ensure that the correct audio and images with a particular color areare displayed in each trial. This can be referenced using the Trials and Conditions that we already built from Part I. For example, in the first condition, we want to make sure that the text “red” is displayed in red color concurrently with the audio presentation of red vocal sound (see Figure 8). However, in the second condition, we want to maintain the same text and color but change the audio to a green vocal sound. By referring to this Trials & Conditions structure, a researcher can reference this guide the stimuli set up and ensure all possible conditions are accounted for in their study.
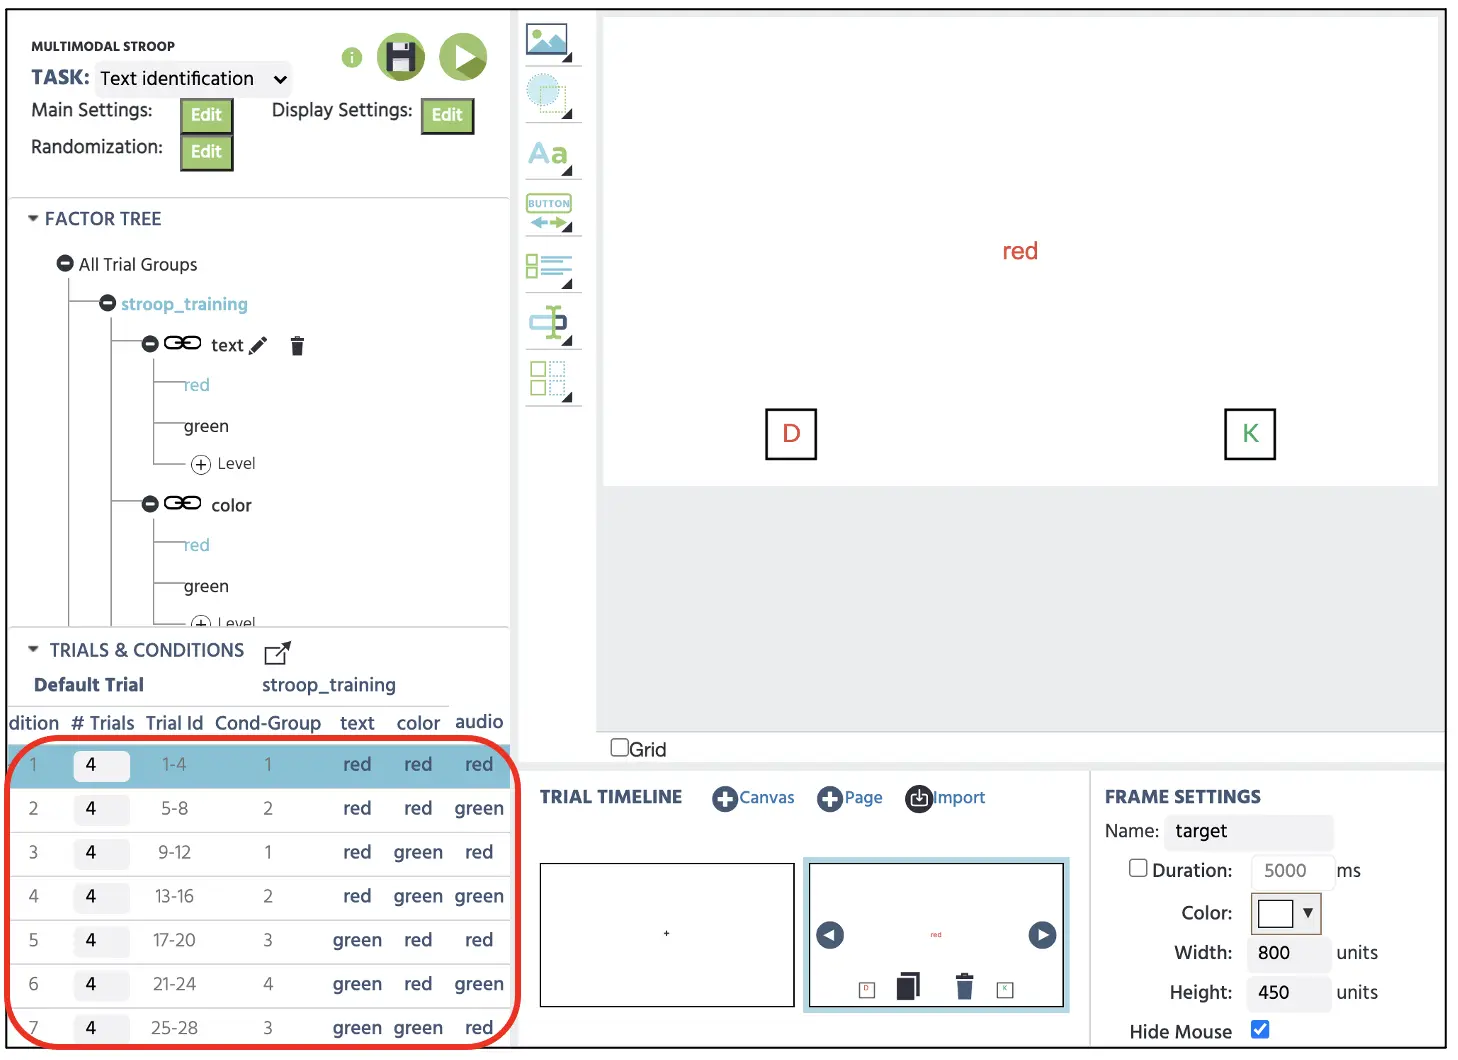 Figure 8. Display of canvas display of frame 2 stimuli presentation. Following the first condition in the red box, this trial presents storage accessed by the file icon in the red box.
The next part will involve setting the Events system with the frame setup completion with each stimuli presentation. Here, we will program to follow the logical sequence of how the frames should present with respective stimuli for a specific duration and record vital information such as reaction times (ms) and correct responses.
Part IV: Events setup
Before creating the Events system, let’s create two new variables (reaction time and correct response) that will serve as the dependent variable measurements. To create new variables, we can click on the Variables on the top-right display and select Add Variable (see Figure 9). From the new variable window, we will proceed with the following steps for the names and types. These variables will store important behavioral measurements of how quickly the participant discriminated the target and their respective accuracy performance. Thus, the two new variables will be:
- Reaction time - measured in milliseconds from the frame onset
- Correct - response accuracy (1=correct; 0=incorrect)
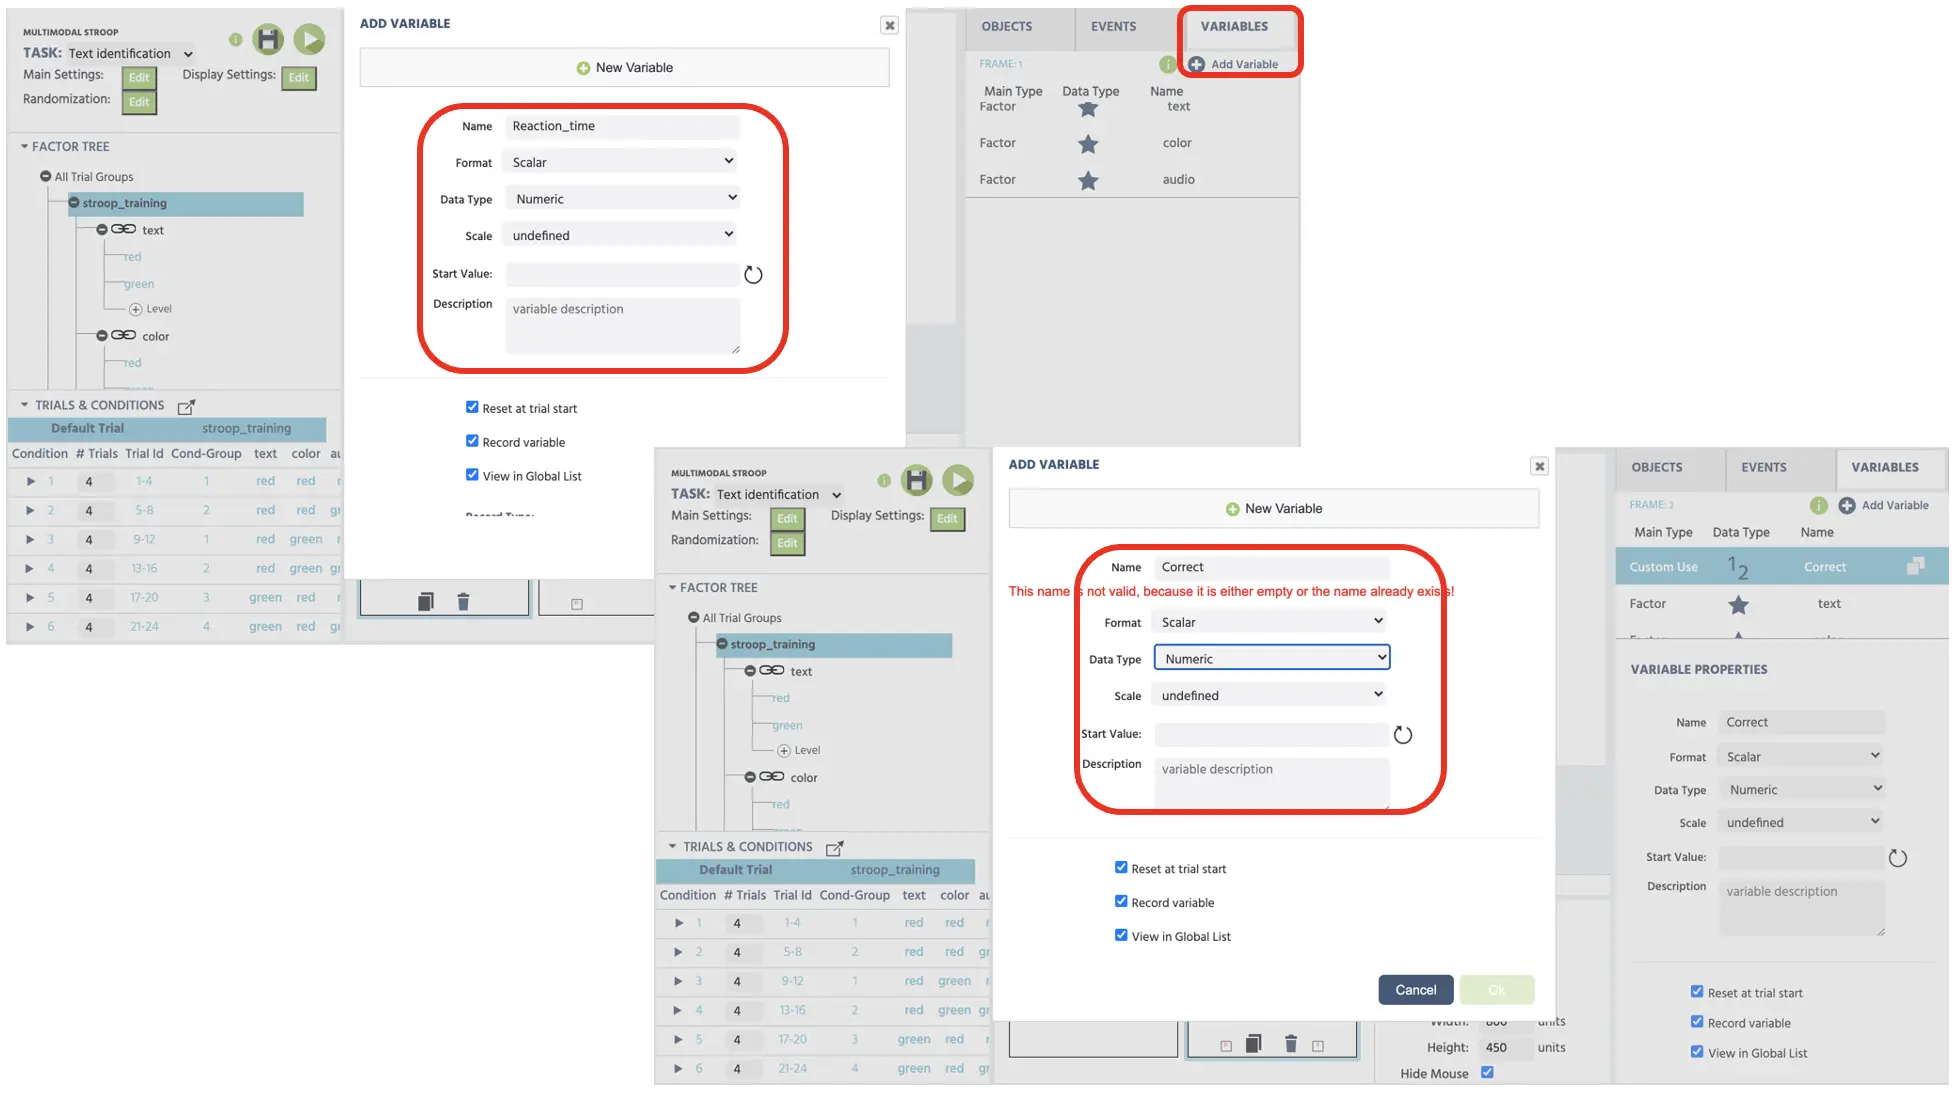 Figure 9. Display of new variables (response time & correct) creation. Both variables are set with the numeric data type.
Following the general frame sequence from Part II (see Figure 3 above), this section will be split into 4 subsections explaining Events creation for each frame.
Frame 1 Events: Fixation cross
In this frame, we want to present the fixation cross at the center of the display for 500 ms. Therefore, the logical sequence we will approach is:
- As soon as the frame starts
- Wait 500 ms
- And then jump to the next frame
To implement this in Events, click on the Events on the top right next to the Variables and select Frame Event (on this frame only). In the first window dialogue, we can name the Events as “Start” and click next to proceed to the Trigger option. Here, the trigger type is Trial and Frame Trigger → Frame Start (following the 1st logical sequence above). With this trigger, we want to initiate the 500 ms frame delay action (2nd logical sequence); therefore, this can be set with Add Action → Delayed Action (Time callback) and set 500ms in the delay box (see Figure 10). Finally, to execute the last logical sequence, click on Add Action in the Action Sequence box and proceed with Jump Action → Jump to → select the Next Frame (see Figure). The Labvanced will always follow this logical sequence for the fixation cross-presentation for all the trials with this setup.
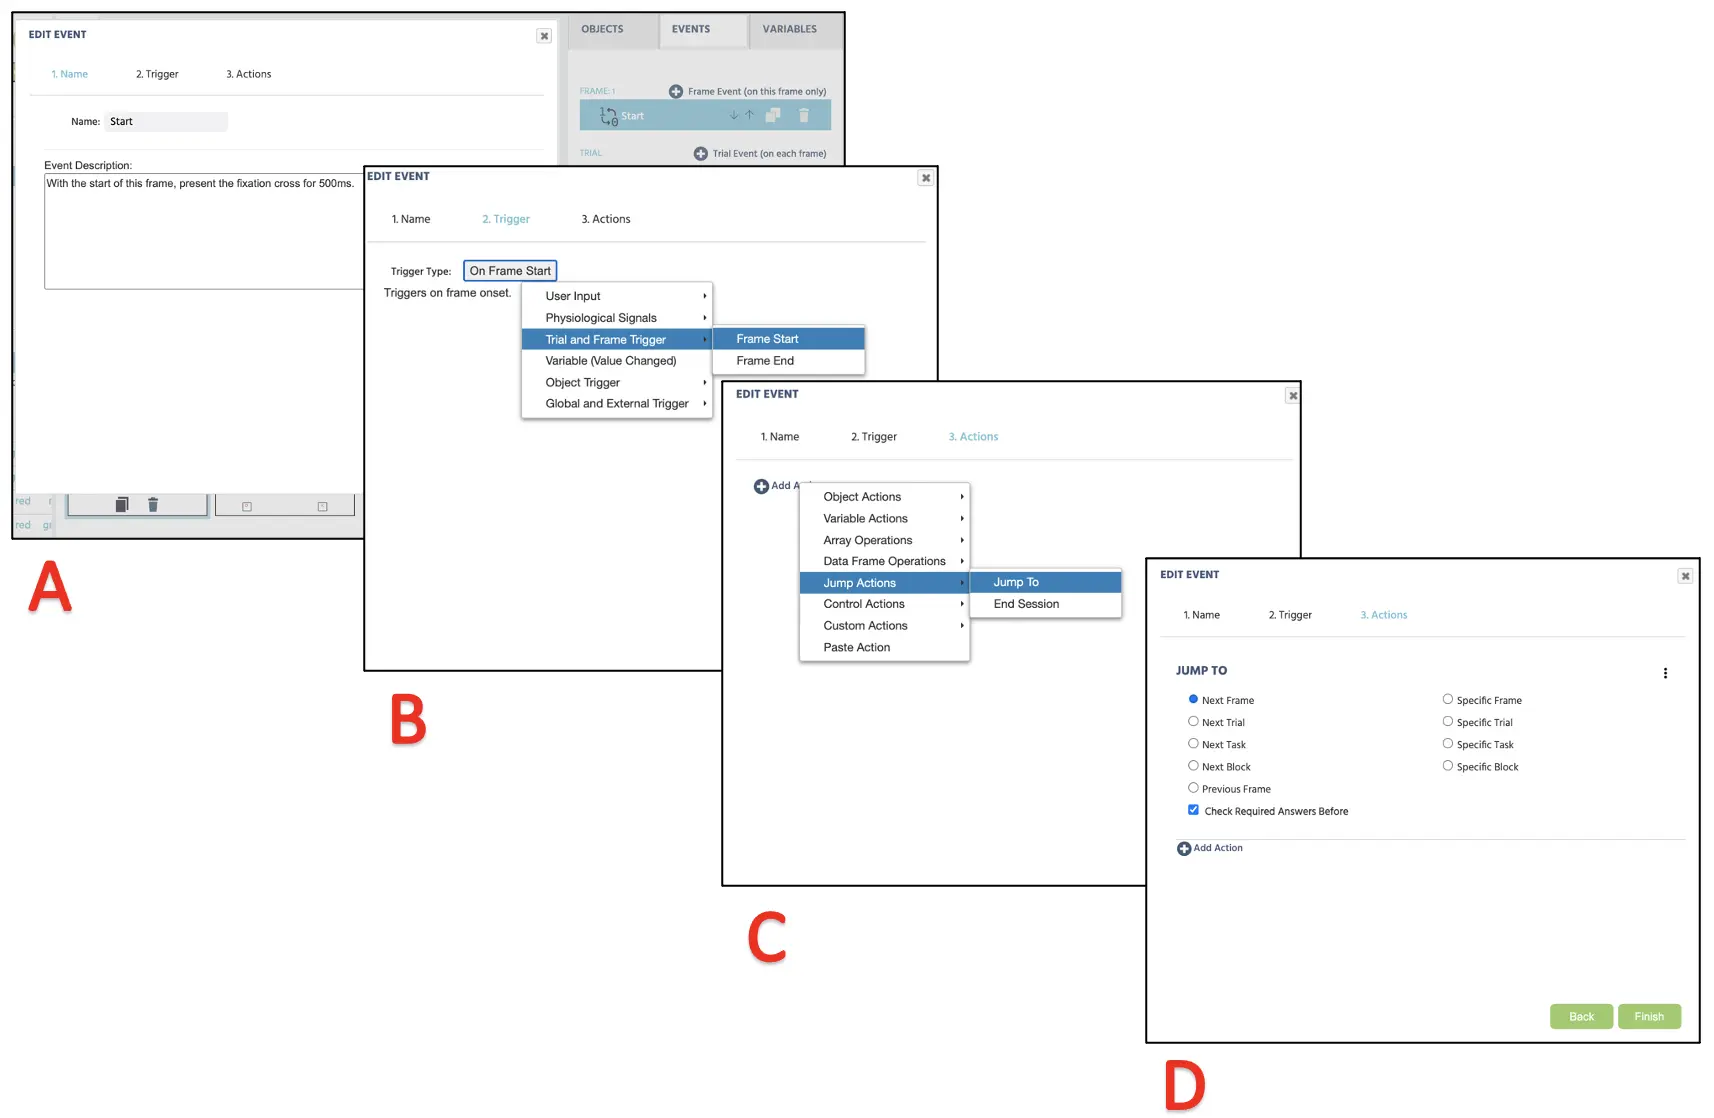 Figure 10. Display of Event creation for fixation cross (frame 1) presentation following Event naming (A), Trigger (B), Action determination (C), and desired Action execution.
Frame 2 Events: Target presentation and response recording
In this frame, we want to present the target word with an auditory sound at the start of the frame and remain until a keypress. Therefore, the logical sequence we will approach is:
- As soon as the frame starts
- Play the audio respective to that trial
- If the button response is correct → record Correct = 1 → Jump to the Correct feedback (frame 3)
- If the button response is incorrect → record Correct = 0 → Jump to the Incorrect feedback (frame 4)
Let’s begin with the audio play first, but ensure that the Default Trial is highlighted so these Events will be applied to every trial. This process will mirror the fixation cross above as the logic remains the same: as soon as the frame starts do X. We will begin by clicking on the Events and select Frame Event (on this frame only). In the first window dialogue, we can name the Events as “Audio play” and click next to proceed to the Trigger option. Here, the trigger type is Trial and Frame Tigger → Frame Start (Following the 1st logical sequence). Afterward, proceed to the Object Actions → Control Audio/Video Obj → select the existing Audio object in canvas to Start (see Figure 11). With this setup, the Labvanced will always follow the logical sequence for the audio presentation for every trial in Frame 2. Let’s now discuss the remaining parts of establishing keypress condition
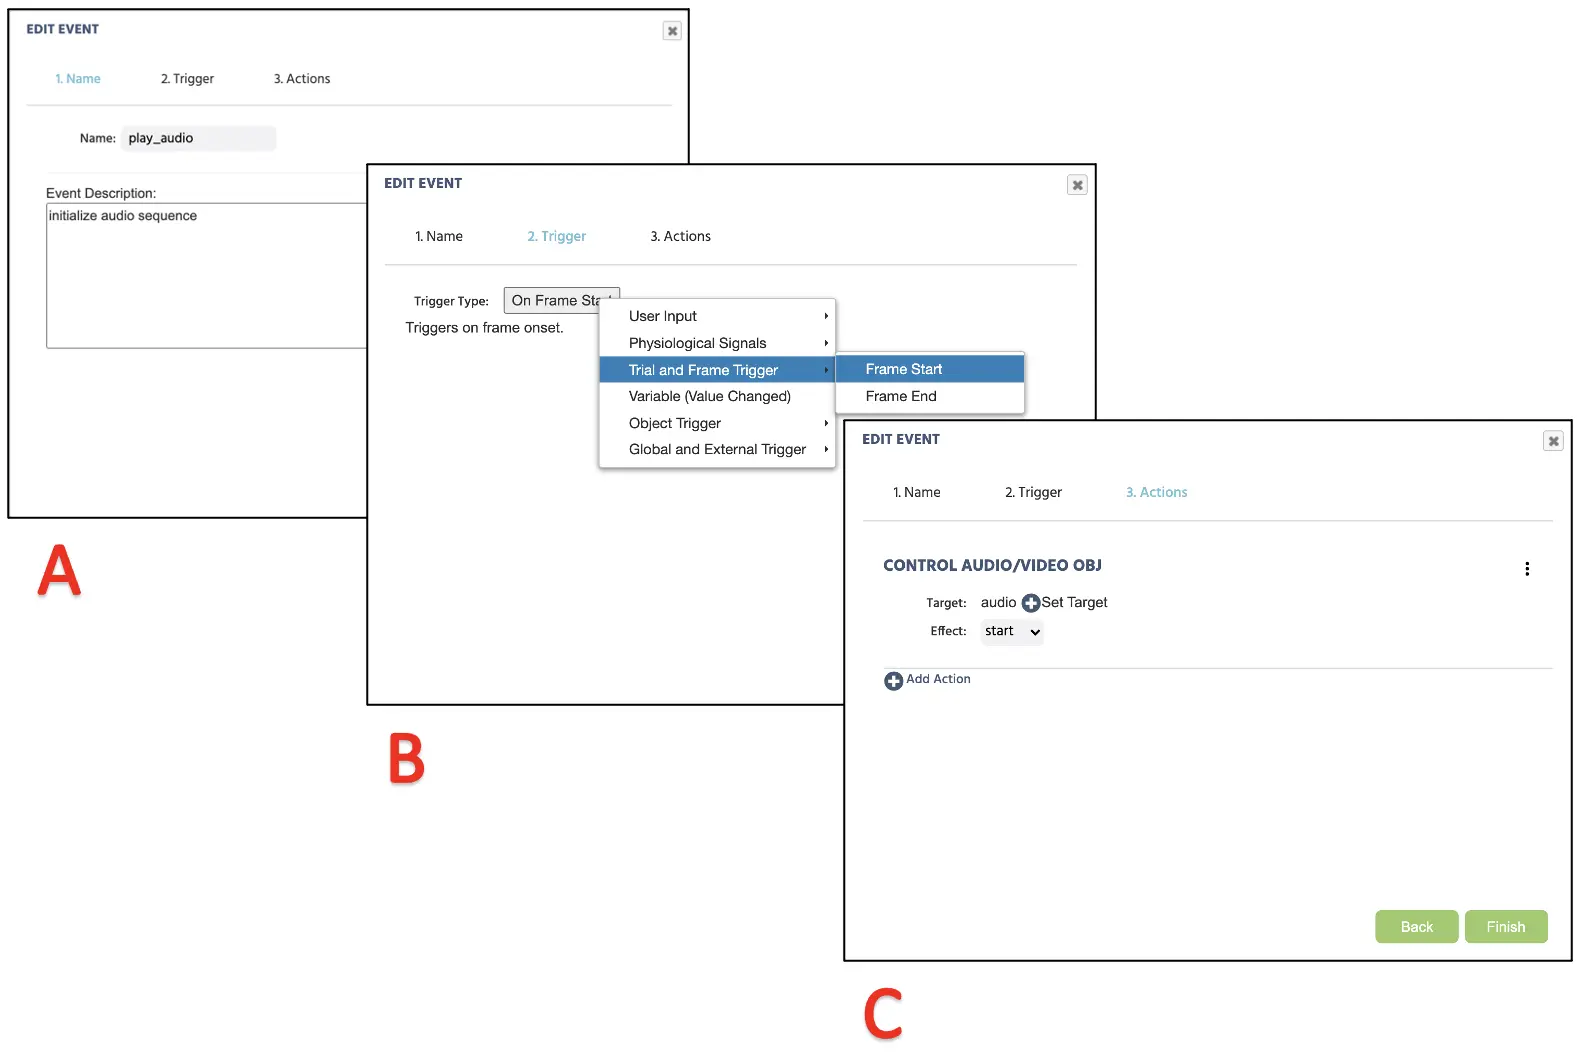 Figure 11. Display of Event creation for audio (frame 2) presentation following Event naming (A), Trigger (B), Action determination (C), and desired Action execution.
As previously mentioned, this block requires participants to pay attention to the text and discriminate using the associated keypress while ignoring the color and presented sound. Conveniently, we can use the Text column in the Trials & Conditions to determine whether the participant’s keypress matches the associated trial. This would allow for the conditional argument and record the Correct variable with either correct/incorrect measurement. To create this Event, we will again begin with clicking Events and select Frame Event (on this frame only). Since this Event is indicative of a participant's keypress, the trigger would be the User Input → Keyboard Trigger. Here we can establish two possible keypresses (see Figure 12), which are “D” and “K.” After clicking next, the action sequence will proceed with Control Actions → Requirement Actions (If...then).
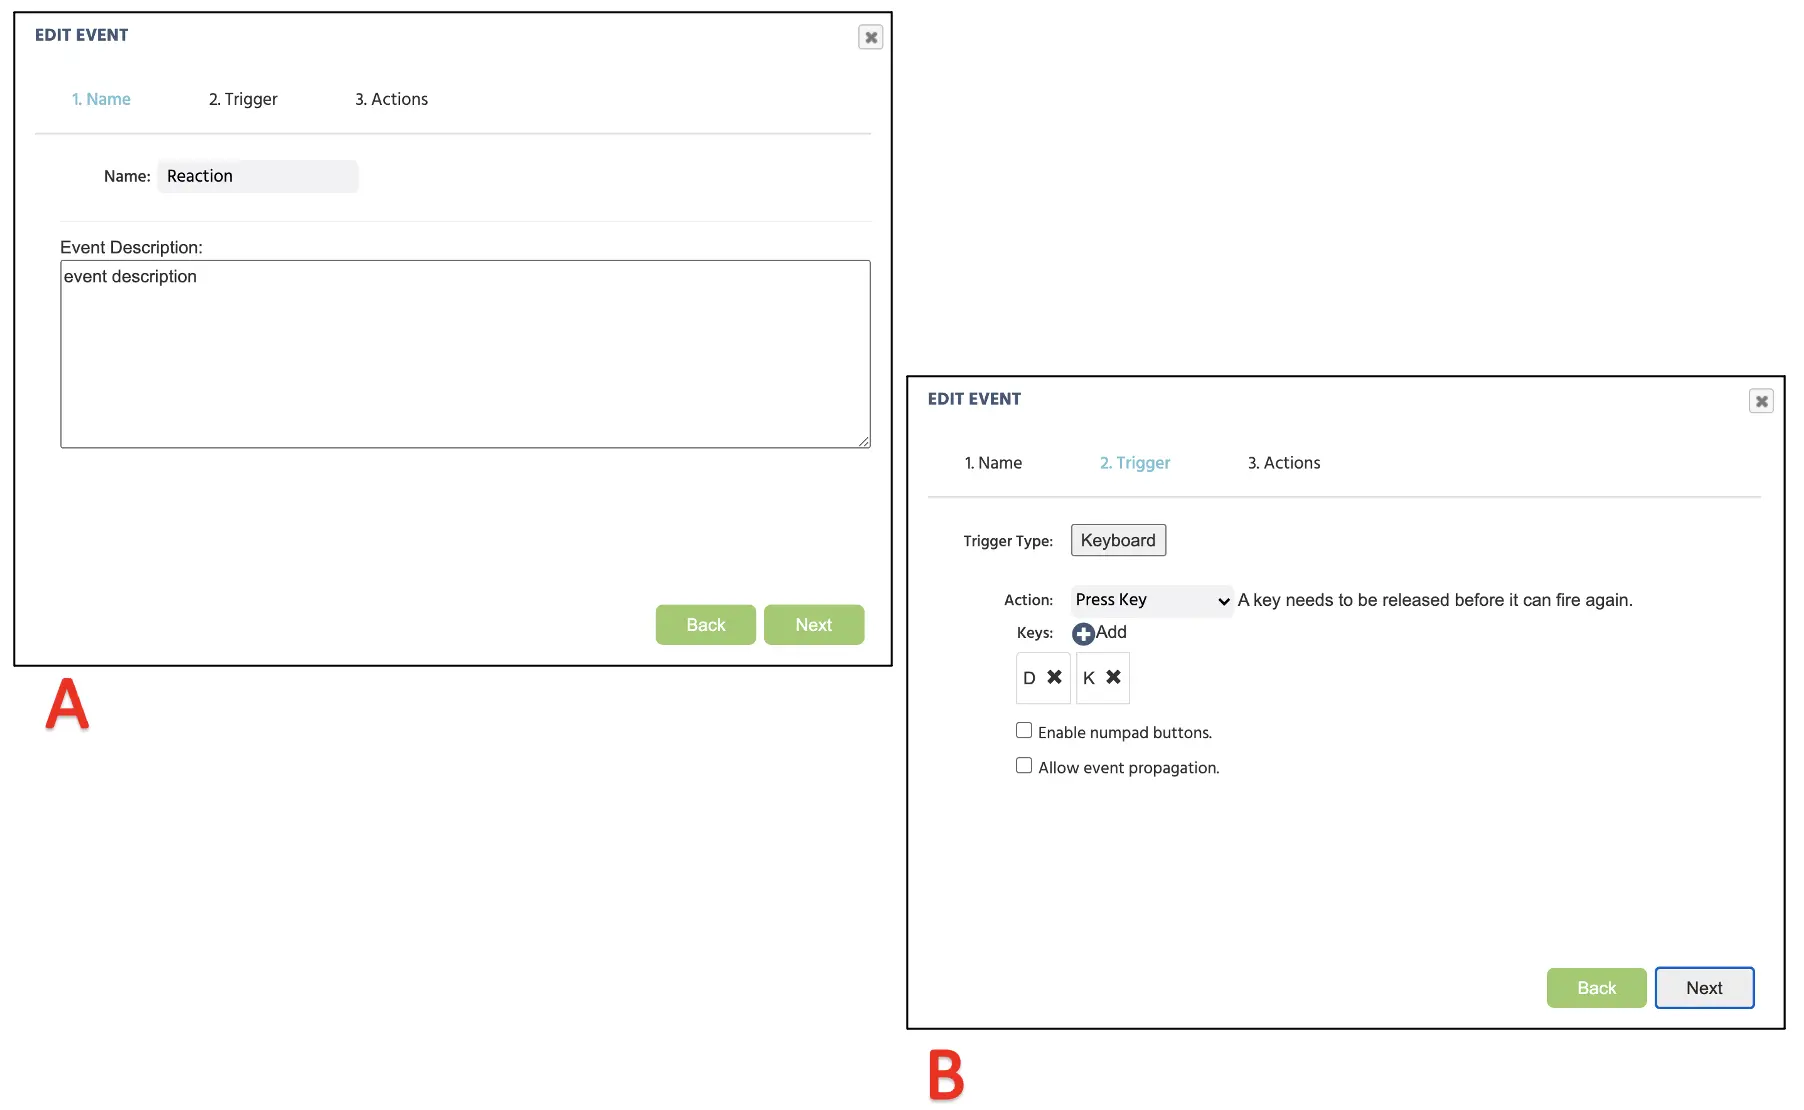 Figure 12. Display of Event creation for keypress assignment following Event naming (A), Trigger assignment with allowable keypress responses (B).
At the If part of this dialogue, we want to establish the condition to associate the target with the keypress. Here, we can set the left part as the Text variable (see Figure 13) and set the right side by inserting a “red” string. Right below, we need one more set of conditions and set the left side Trigger(keyboard) → ID of Key. On the right side, we can type in the letter “D” (make sure this is capitalized).
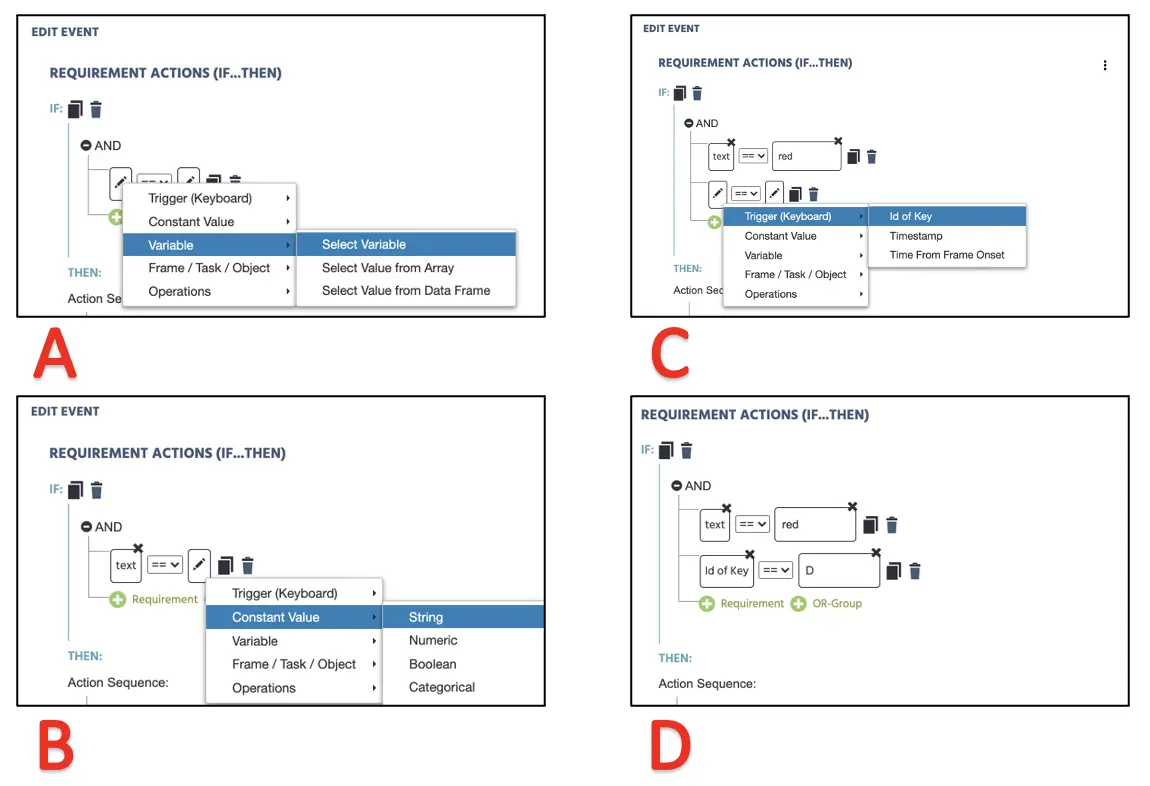 Figure 13. Display of Event creation for keypress assignment following variable determination (A), associated condition (B), and keypress response assessment (C & D).
Proceeding to the Then part below, we want to establish what action the program should execute based on the established IF condition above. Since the “D” key is the correct response when the text “red” is present, we would want to associate this as correct in the Correct variable and present the Correct feedback message. To do this, we can Set/Record variable: Correct on the left and insert integer 1 on the right (see Figure 14). Right below, click on the Add Action to add Jump Action (similar to fixation frame), but this time we would want to select Specific Frame (Correct) to display the “Correct” feedback message. With this, we have established the conditional sequence to ask the Labvanced program to record the participant response as correct if the D keypress was made with the presentation of the “red” text display.
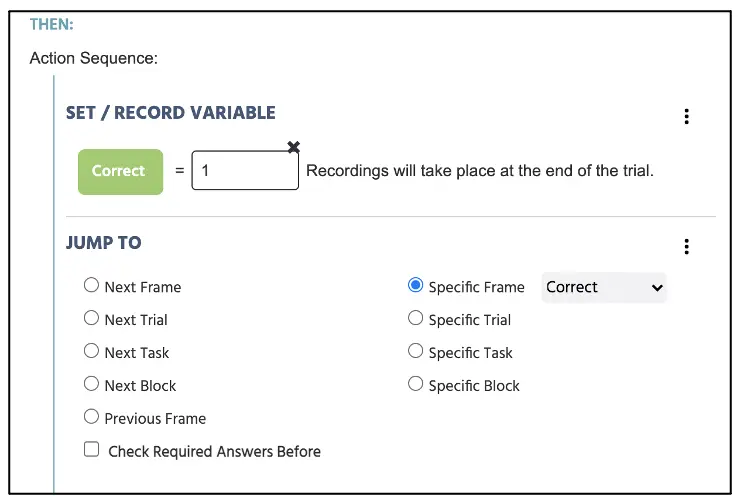 Figure 14. Display of Event creation proceeding figure 13. The Set/Record determines the Correct variable with 1 = correct (0 if otherwise) if the conditions are satisfied with the figure 13 setup.
Replicating this step, we need to create this process for the “green” text as its correct key press (see Figure 15A). We can then click on the Else to add the final Set/Record variable: Correct to 0 with the Jump Action sequence to Incorrect feedback frame (see Figure 15B). This final argument pertains to if the keypress response does not satisfy the previous two correct arguments, we ask the program to record as incorrect (0).
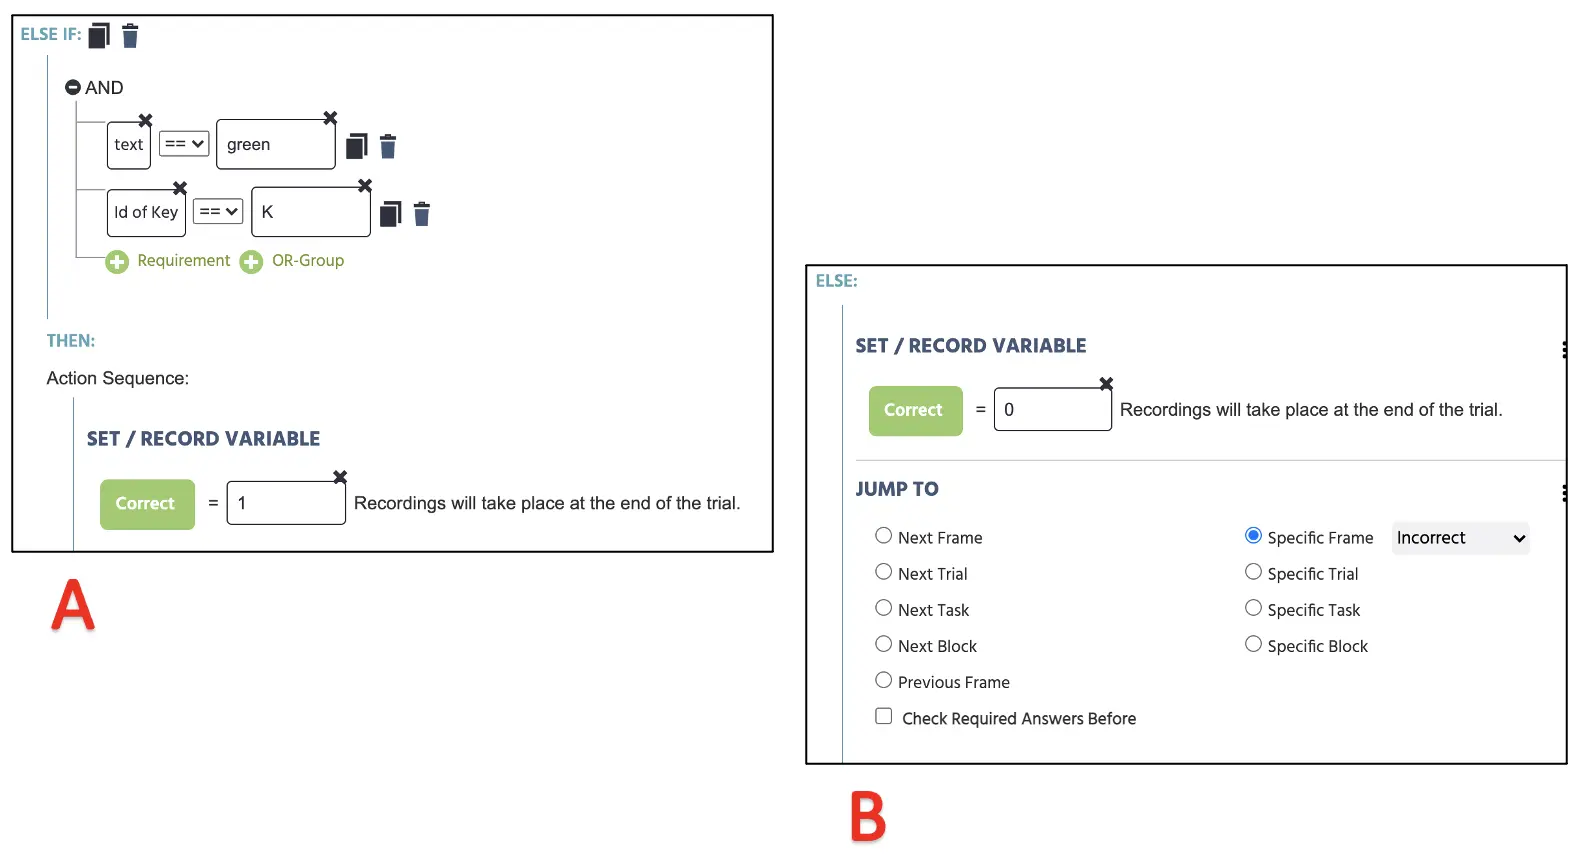 Figure 15. Display of Event creation proceeding figure 14, replicating the process for the green text condition (A) and setting the incorrect (0) response if none of the conditions are met in figures 13 & 14 (B).
Frames 3 & 4 Events: Feedback presentation
The Events in the feedback frames containing correct (frame 3) and incorrect (frame 4) messages will mirror the same process as the fixation frame. Whichever keypress the participant makes, we want to present the feedback at the center of the display for 1000 ms and proceed to the next trial. Therefore, the logical sequence we will approach is:
- As soon as the frame starts
- Wait 1000 ms
- And then jump to the next trial
To implement this in Events, click on the Events on the top right next to the Variables and select Frame Event (on this frame only). In the first window dialogue, we can name the Events as “Start” and click next to proceed to the Trigger option. The trigger type is Trial and Frame Trigger → Frame Start (following the 1st logical sequence above). With this trigger, we want to initiate the 1000 ms frame delay action (2nd logical sequence); therefore, this can be set with Add Action → Delayed Action (Time callback) and set 1000ms in the delay box. Finally, to execute the last logical sequence, click on Add Action in the Action Sequence box and proceed with Jump Action → Jump to → select the Next Trial. With this setup, the Labvanced will always follow this logical sequence for the feedback presentation for both frames 3 & 4 across all trials. In general, this step mirrors the same procedure and figures that could be used as the reference.
So far, we have created a block where the participant’s main task is discriminating the presented text while actively ignoring the concurrent color and audio presentation. With this established setup, we can also create a new task to discriminate the color or audio with minor changes to the current build. This procedure is commonly used in psychology experiments to compare the performance during the target discrimination across different stimuli.
To add a new block for color discrimination, we could simply copy the existing task in the main Study Design and change the name to color identification (see Figure 16).
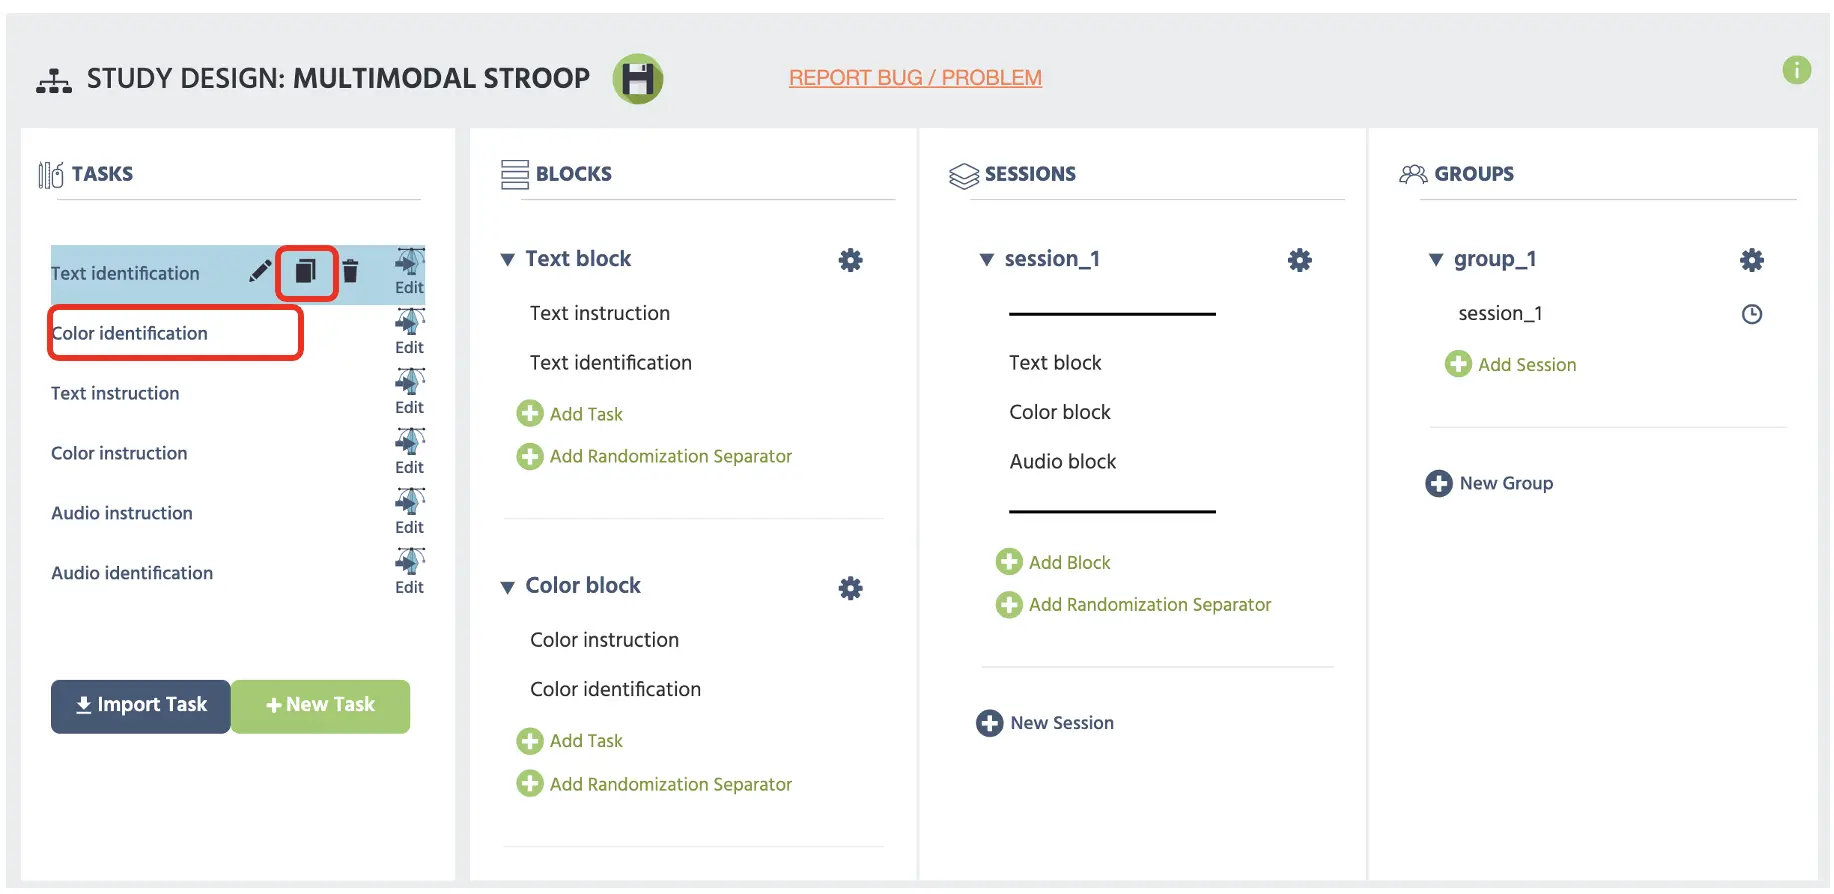 Figure 16. Display of main Study Design page with the top red box displaying the copy task option that results in the second redbox with edited task name.
There is only one thing to change in the task screen, which is the variable assignment in Frame 2. In the Response setup, we can simply change the text variable to color so that the program will compare the keypress to the presented color rather than the text from the previous build (see Figure 17). Similarly, we can also create the Audio discrimination task by replicating the same step and changing the variable assignment from the text (or color) to audio. We have created three experimental stasks with different tasks, where we can organize this into blocks for the overall study presentation.
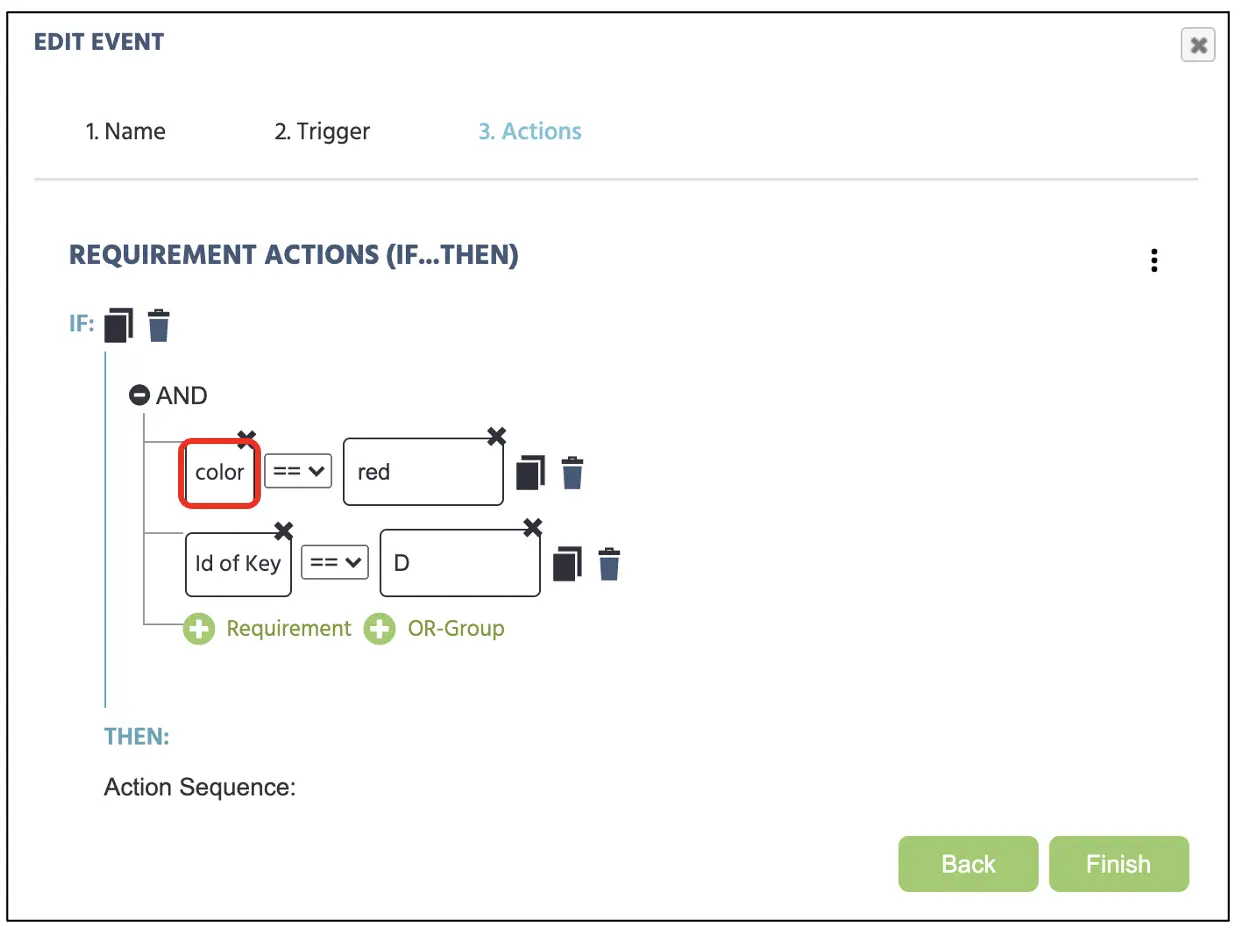 Figure 17. Display of Event creation for keypress assignment following the new color variable determination. Color could be replaced with audio to change the primary target discrimination.
Part V: Blocks setup
Now that we have experiment tasks set up, we will not structure the blocks and counterbalance such that each task would be randomly present for a participant. Before proceeding, it would be ideal for creating instruction messages (see Figure 18) before each task, informing participants that the primary task is now discriminating text, color, or audio depending on the upcoming task.
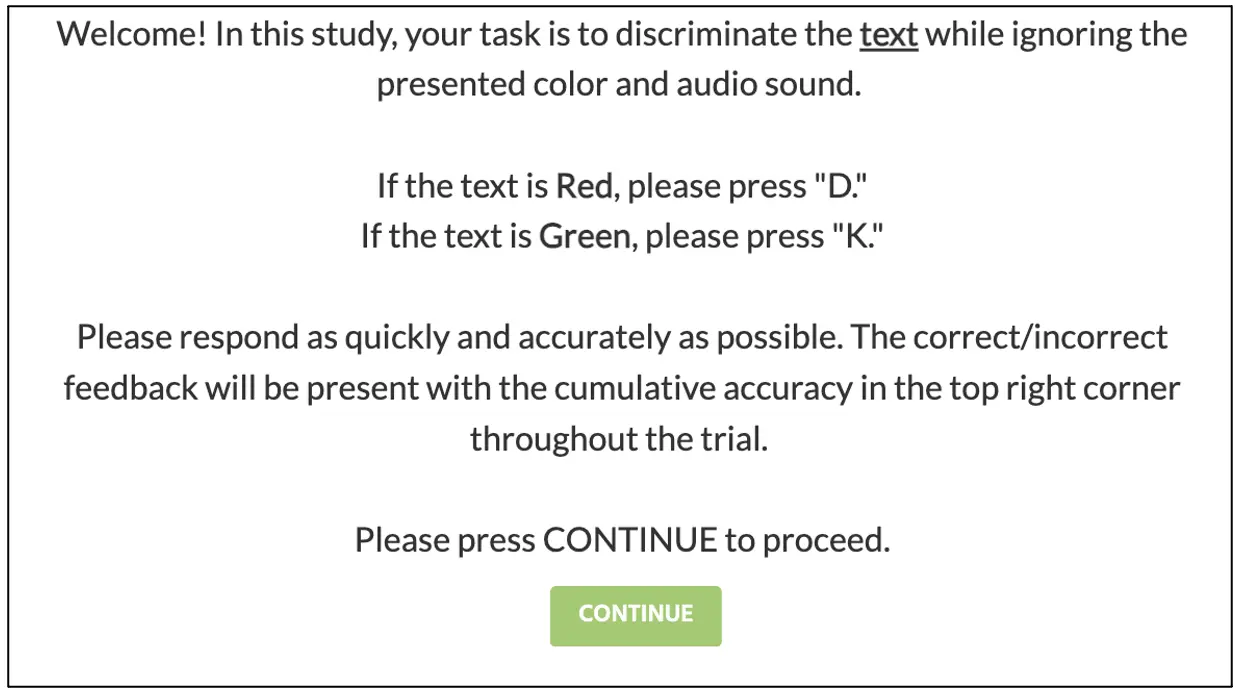 Figure 18. Instruction display for the target (text) discrimination task. Instruction for the color and audio discrimation could be used with the same format with the underlined word edit.
After creating each instruction message, we can now set up the block according to its task assignment. Importantly, organizing the block in this manner allows us to implement the Randomization Separator as seen in the Session column (see Figure 19). Having this structure allows the Labvanced to counterbalance the block presentation, allowing researchers to compare performance differences across all block sequence combinations.
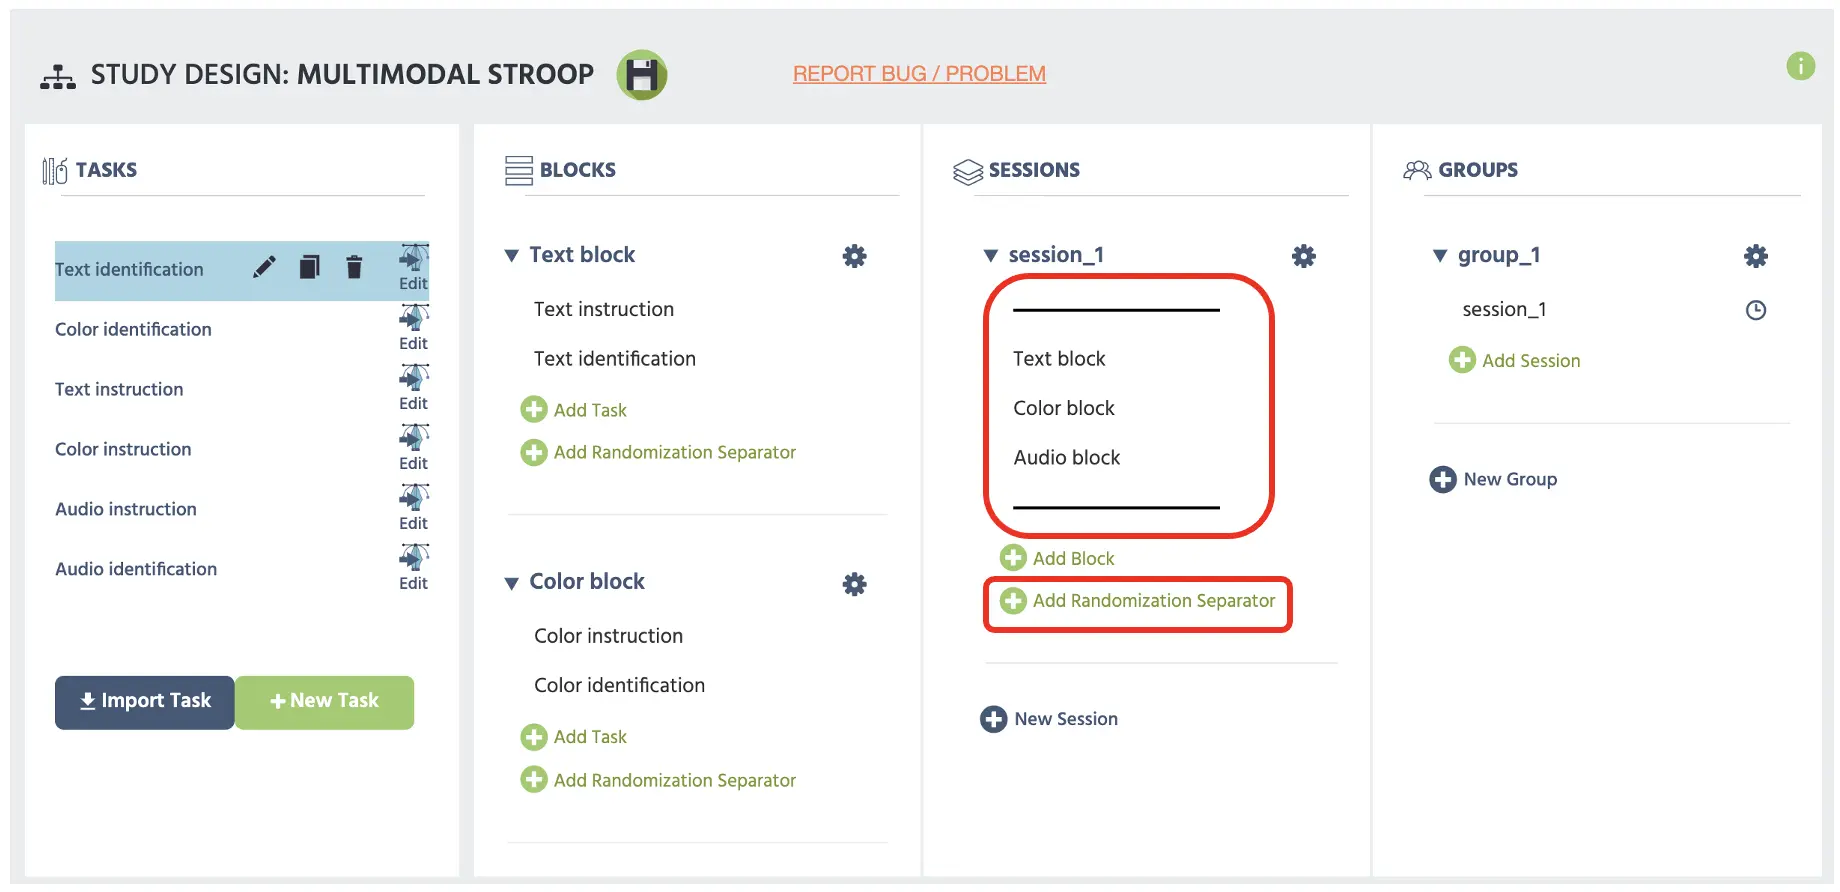 Figure 19. Display of main Study Design page with the top red box displaying two parallel bars serving as the Randomization separator added by the Add Randomization Separator below.
The only thing that remains in this walkthrough are the consent form, instruction document, demographic questions, and other protocols, but that varies based on the researcher and institution so that this walkthrough will halt here. For more information on text creation, this link will provide additional information. With that said, we hope for the best in all your scientific endeavors and hope that this walkthrough serves as an important cornerstone for your study construction.