Building Infant Eye-Tracking Study: Object Discrimation Task
Welcome to another Labvanced walkthrough for study creation! In this walkthrough, we will create an eye-tracking study to assess the children’s object discrimination and spatial attention. Throughout each trial, we will set up the two object displays where the child could voice their preferred object and have the parent select using the mouse press response (see Figure 1 below). With the implementation of the eye-tracking feature, this form of experimental paradigm would allow researchers to gather data to investigate the following, but not limited to:
- Spatial attention
- Language development
- Object categorization
- Facial recognition
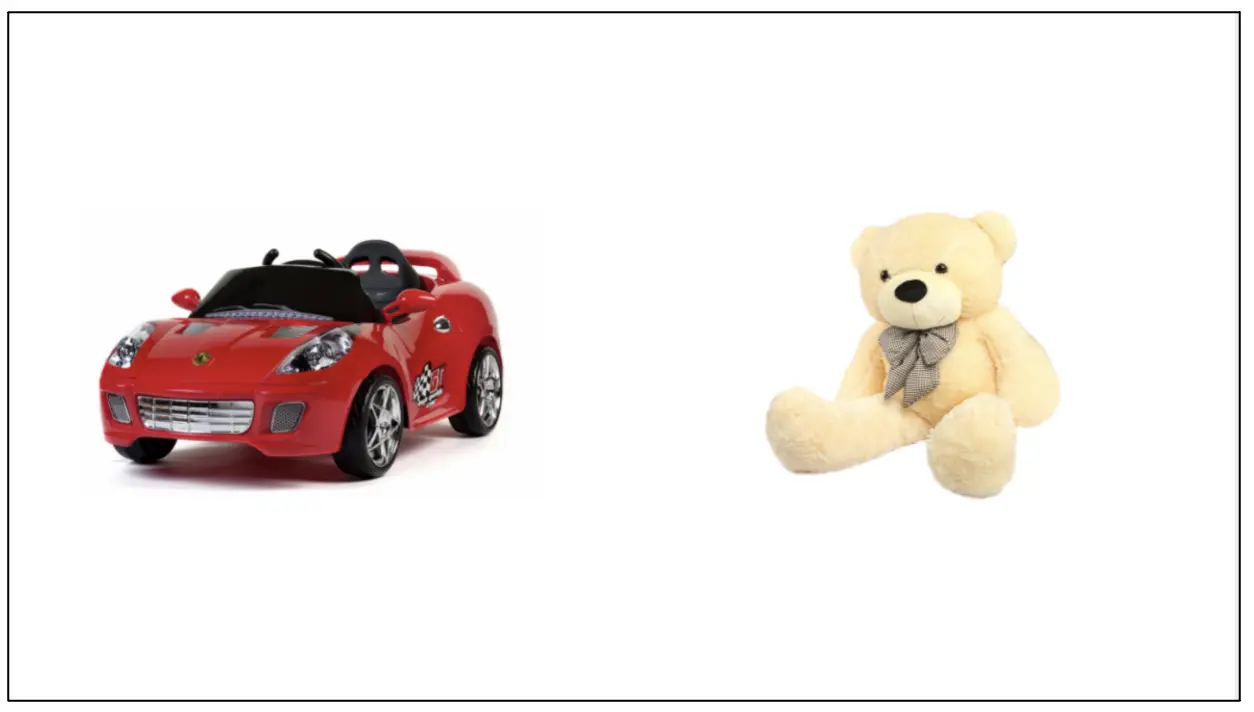 Figure 1. Display of sample trial containing two objects under the same ‘toy’ categorization. In this paradigm, a child will communicate their preferred object to their parent, and the latter will initiate the mouse click response on the same object.
Furthermore, we will construct the experiment using the infant-friendly mode option that allows shorter calibration duration with attention capturing sounds to reduce the chance of boredom and fatigue in children. It is noteworthy to mention that the shorter calibration intervals are subject to lower gaze accuracy recordings. However, this option nevertheless places minimal restrictions on children’s behavior who typically can’t sit still for prolonged periods with shorter attention spans.
As with other study creations, we will approach this in 6-parts, comprising:
- System setting
- Variable determination (IVs & DVs)
- Frames setup
- Stimuli setup
- Events setup
- Block setup
For the display sequence that the participants will see (see Figure 2 below), the trial will comprise of:
- Frame 1: 500ms of fixation display
- Frame 2: Target display of two objects that will remain until the mouse click response
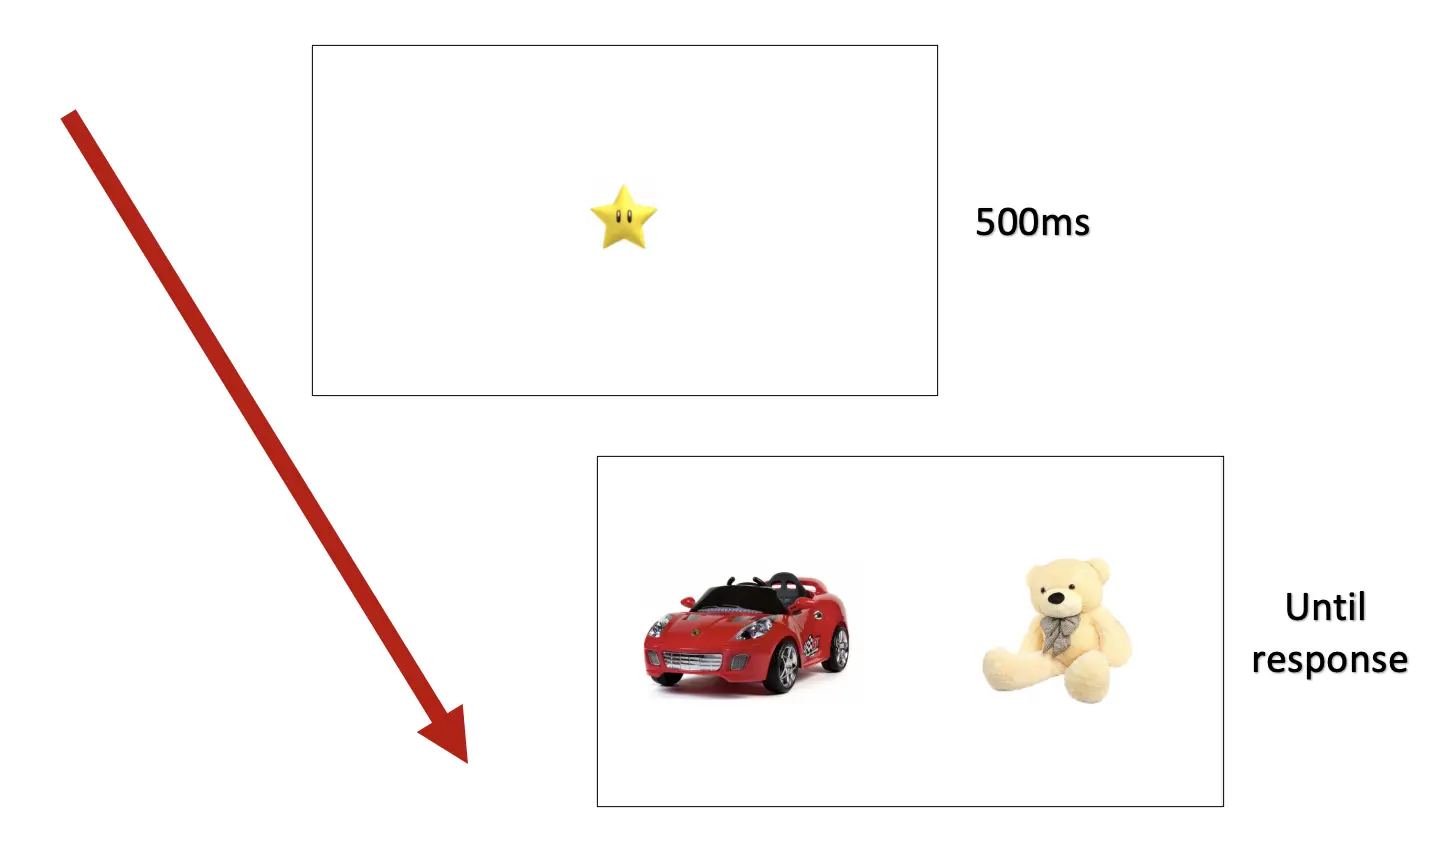 Figure 2. Sample display of a trial sequence.
Beyond this step-by-step walkthrough, the complete study template is also available using this link. Furthermore, we also have multiple eye-tracking video contents available using the following link.
Let’s dive into Part I: System setup to set the eye-tracking options with that context and introduction.
Part I: System Setting
First, it is essential to select the Labvanced V2 for the eye-tracking measurement (Figure 3 below) using our deep learning algorithm. Afterward, we will turn on the Infant-friendly mode feature that will automatically adjust the calibration time to <1 min and allow sound presentation and animal gaze pictures to assist with infant’s interest towards the screen. In the same section, we could also let the Show Grid option could help the participant anticipate the next point of the calibration to help with the optimal calibration process.
We could also select the Head Pose Alignment option that serves as the virtual chin rest in the same display. This added measurement aims to mimic the function of the physical chin rest used in the laboratory setting, where the chin is positioned on the head mount to maintain the head stillness. However, such control could be difficult involving infants, so we could choose to disable or ignore this feature (by the parent) throughout the study. For the current setup, we will disable this option. For more extensive information regarding the other options in the system settings, please refer to this link that navigates general eye-tracking content.
Last but not least, we will also choose the Highest Sampling rate when calculating the gaze measurement that provides the highest sampling rate of 30Hz (providing 30 individual gaze points per second). For more specific information on different calculation modes, please refer to this link for basic comparison.
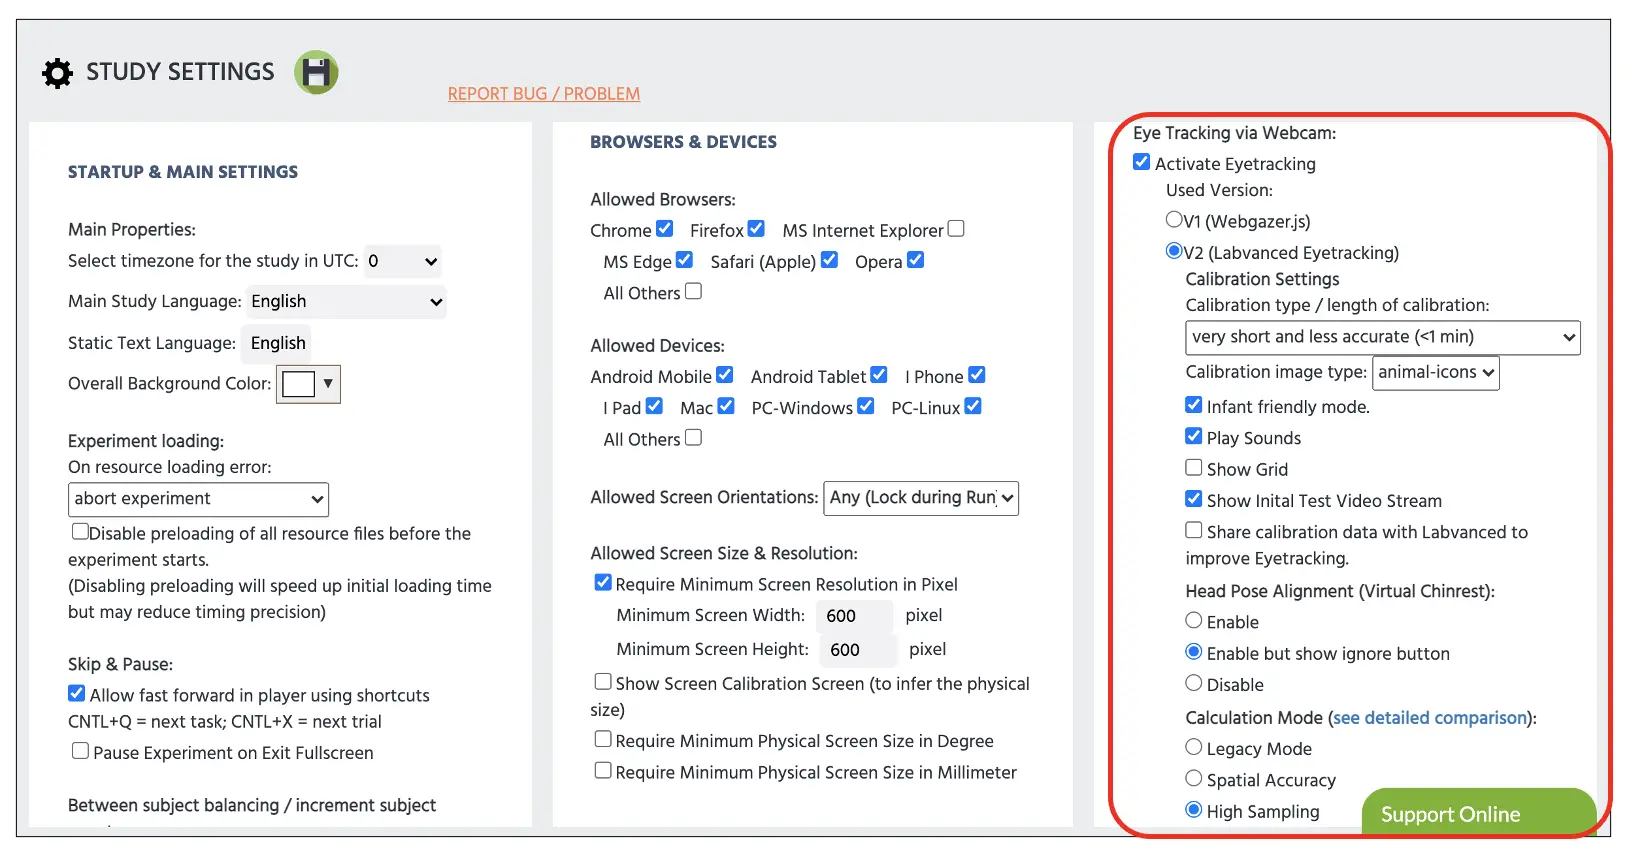 Figure 3. Display of Study Setting page. The experimenter must select the Activate Eyetracking option to adjust the following selections within the displayed red box.
Part II: Variable Determination with Lavanced Factor Tree
Consistent with the other study walkthroughs, determining the variables and their levels (or categories) would be the crucial first step to plan the conditions and subsequent trial setup. First, refer to the Factor Tree located on the left side of the Labvanced display to determine the factors (or independent variables) and their associated levels. For the current Infant Eye-tracking study, the factor and its levels will be as follows:
Trial Group → Main trials
- Factor 1 - Object category
- a. Fruits
- b. Toys
- c. Snacks
- d. Characters
- e. Pets
The full display of this setup in the Factor Tree is also depicted below (see Figure 4A) with five different conditions in the Trials & Conditions (see Figure 4B). We can also determine the number of trials per condition, and we will evaluate six trials per condition, allowing 30 total trials in the current setup.
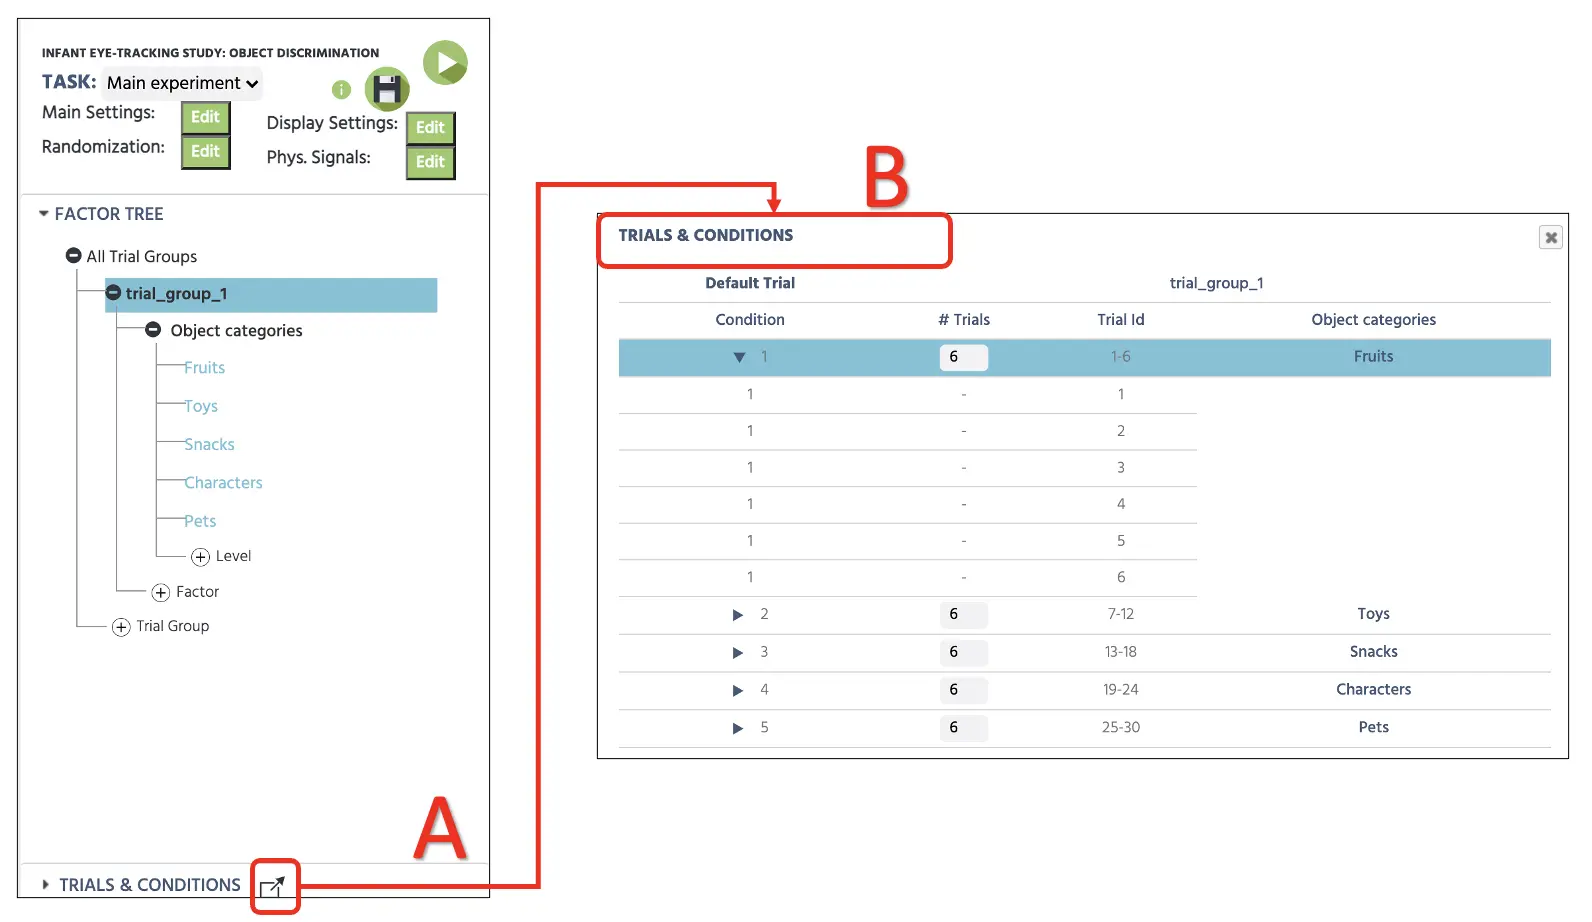 Figure 4. Display of factor determination with levels in the Factor Tree (A) and subsequent combinations with six trials in each condition (B). Condition 1 displays six different trial rows displayed by click the triangle icon next to the condition number.
For the trial randomization, the Labvanced will automatically vary the trial presentation of all 30 trials depending on the Randomization Setting (see Figure 5). The default setting will remain the first Random option that will generate a random trial sequence, but this could be pre-determined with different options (Fixed by Design or Hand). For now, the current study will proceed with Random without any constraints, and this will randomly vary the trial presentation among the main and catch trials. For more information about the Randomization setting, please use this link for more details.
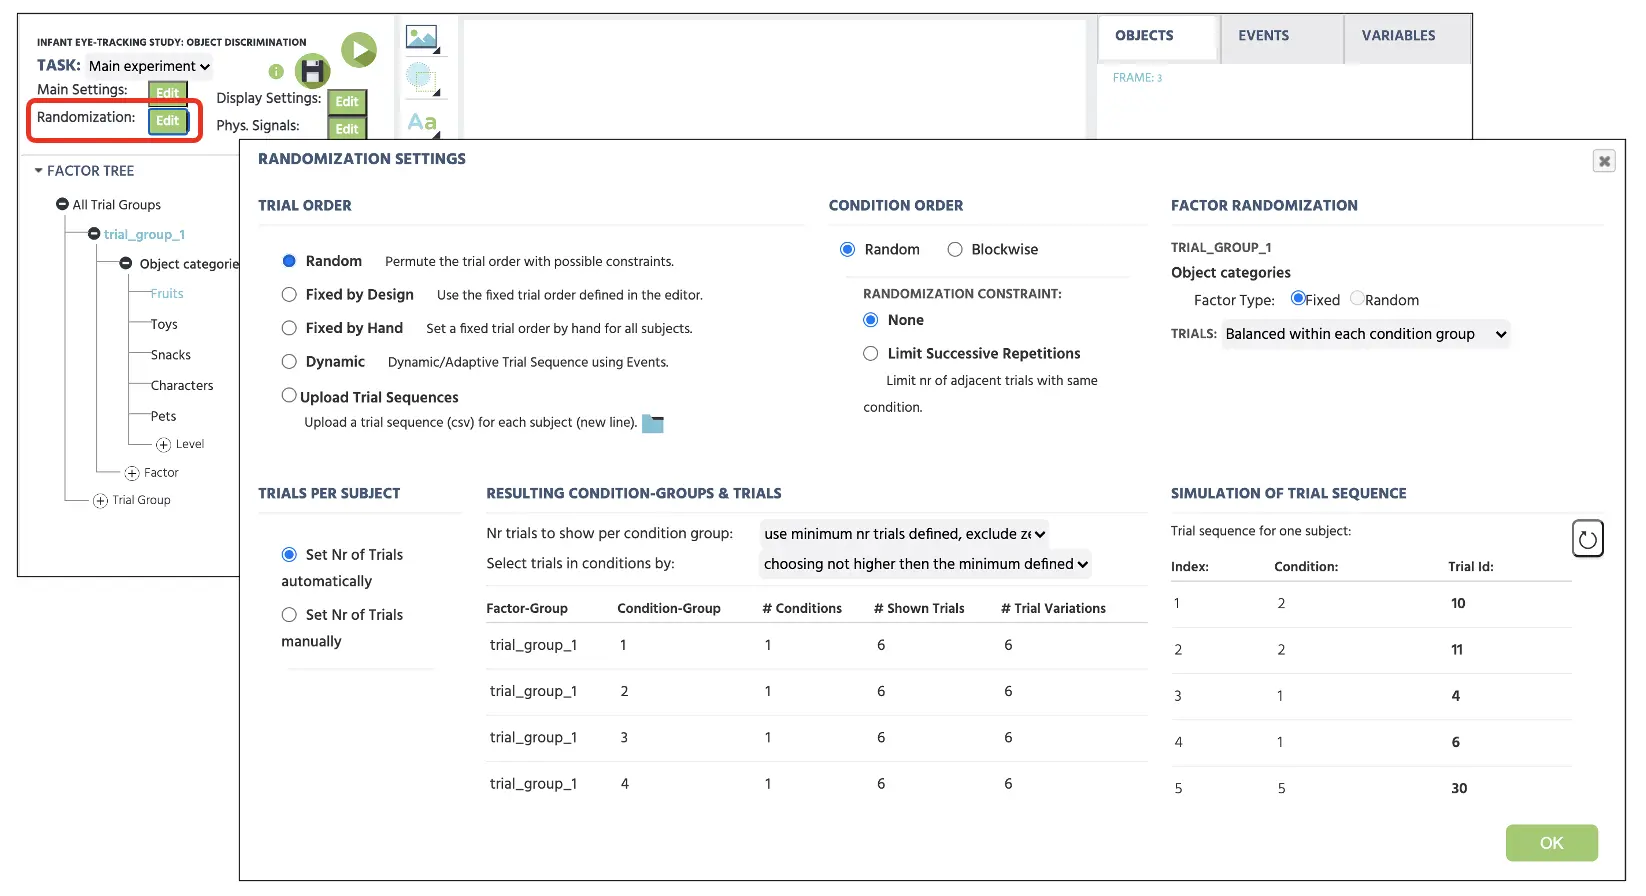 Figure 5. Display of Randomization setting with selected Random option to randomly present the trials without any constraints.
Part III: Frames setup
Before creating the frames, we will need to set the physical signals to allow Labvanced to implement the eye-tracking feature in the subsequent frames. To set the physical signal, click on the Physical Signals button on the top left-hand of the canvas screen (see Figure 6). In the opening dialogue, we would need to enable eye-tracking in the task editing to allow the gaze measurement in our study.
It is noteworthy to consider that the main calibration will always occur before the first eye-tracking task. For example, if we were set up four different tasks in our study (e.g., visual search, lexical decision, object discrimination, and attentional blink) but only the second task (lexical decision) will record the gaze measurement, Labvanced will prompt the calibration before that second task and not before. This way, the experimenter could also control the timing of the calibration depending on their experimental control.
The other option in the same option display is the Number of Fixations to show during the validation stage between each trial (see Figure 6). For the current setup, we will proceed with displaying 1 fixation between each trial to validate the eye-tracking measurement during the intertrial periods. When studying a healthy adult population, an increased number of fixation between each trial would aid in the eye-tracking measurements. However, considering the infants that this current study is targeted towards, we will proceed with 1 to account for the attentional demand. Lastly, we will set the Number of fixations to use for drift correction as 3 to calculate for drift correction. During the correction, past trials are factored into the calculation to account for the participant’s error from the main calibration.
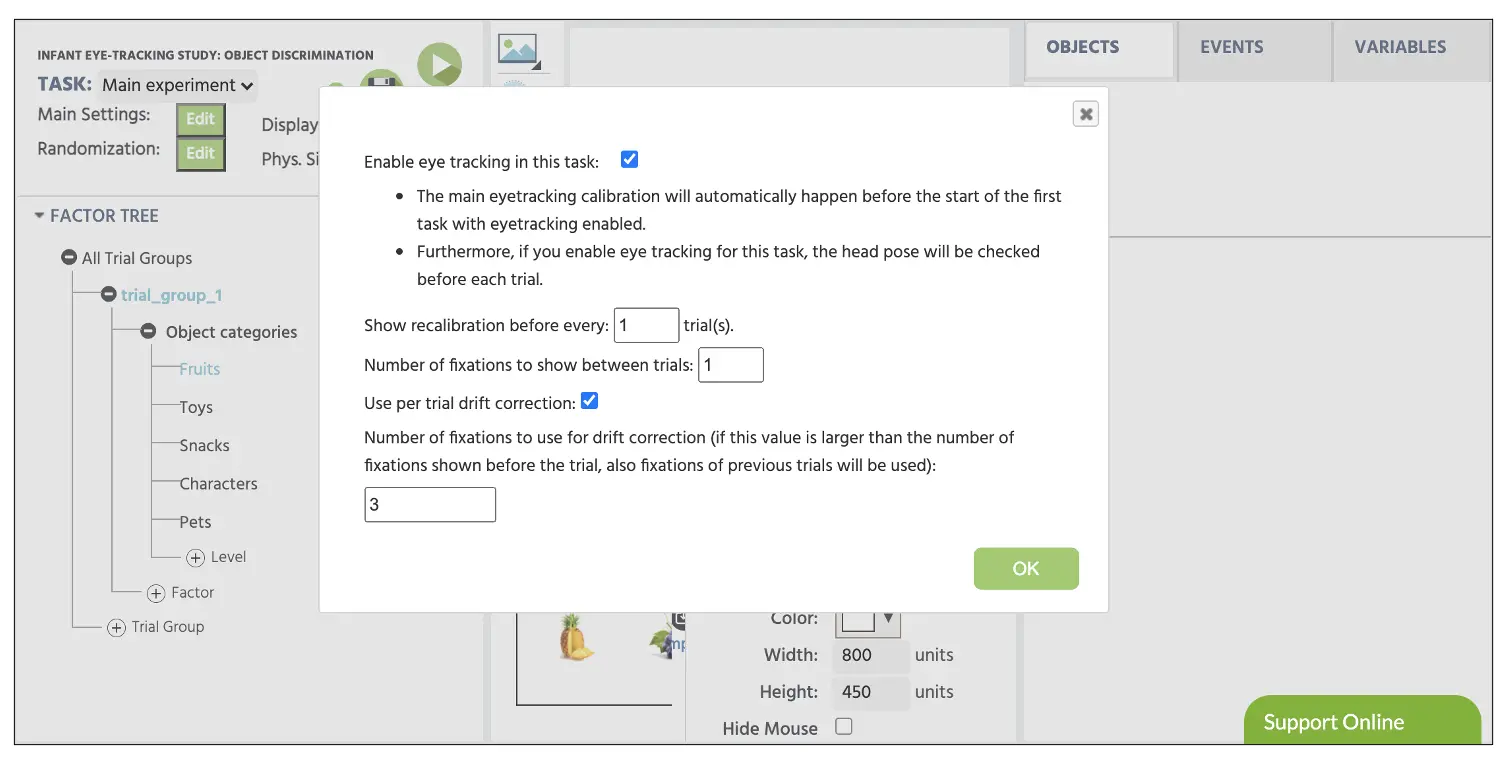 Figure 6. Display of Physical Signals with the standard fixations value of 1 between every trial and drift correction value of 3.
Afterward, we will create the frames (stimuli presentation) that the participants will see during their participation. Again, the object discrimination task will follow the general procedure mentioned above (see Figure 2 above). As depicted, a trial will begin with a fixation image (frame 1) for 500 ms, followed by the presentation of the two images (frame 2) that will remain until object selection using the mouse response.
The construction of these frames will begin by clicking on the Canvas button at the bottom of the Labvanced display (see Figure 7A). Clicking this twice will display two new frames, and it would be ideal to name each frame immediately (e.g., fixation and target, respectively) to maintain the study organization (see Figure 7B). Before proceeding, it would be essential to click on the Default trial to make sure this row is highlighted (see Figure 7C). This part serves as the default template for all the conditions below. While highlighted, any changes in the frames will apply to all conditions (i.e., adding a fixation image in the 1st frame will apply to all 30 trials), so this would be convenient to avoid unnecessary and repetitive setups.
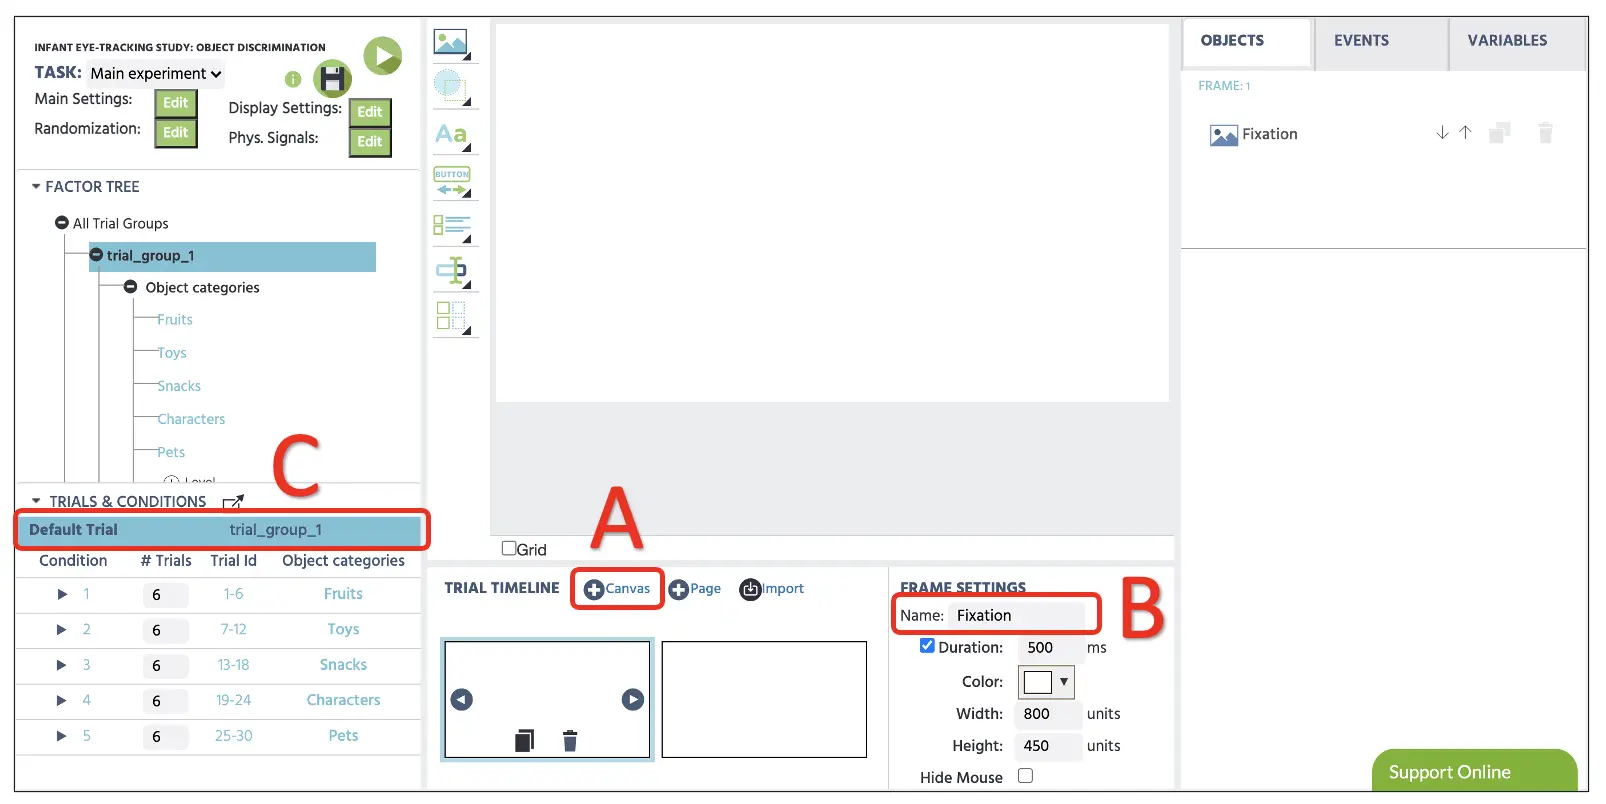 Figure 7. Display of sample trial with Canvas frame creation (A), frame name change option (B), and highlight Default Trial (C).
Part IV: Stimuli setup (fixation image and target presentation)
Frame 1
Before proceeding, make sure we have the Default trial selected to implement any changes in this frame across all 30 trials. With the two frames we have prepared in the previous part, we will now set the individual stimulus in each frame, starting with the fixation image in the 1st frame. For this, we can start by clicking on the Media option to select the Image object (see Figure 8). At the right side where the Object Properties is located, we will name the image as Fixation and set the following parameters:
- X-frame coordinate: 325
- Y-frame coordinate: 175
- Width: 150
- Height: 100
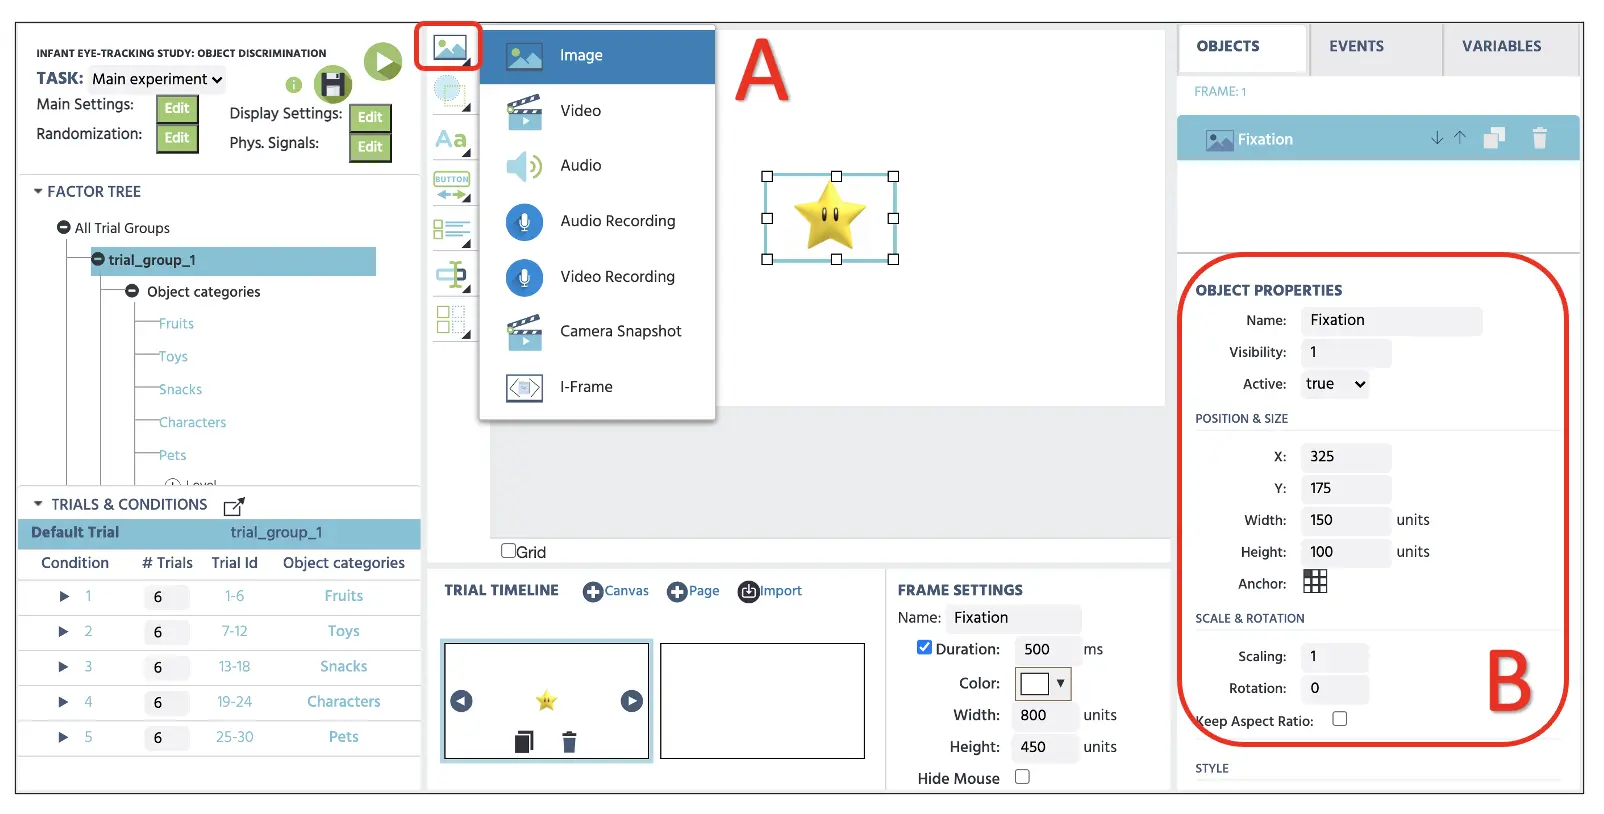 Figure 8. Display of fixation frame creation with the Display Image option(A) with object properties setting (B). The selected image file (fixation.webp) is also available using the Stimulus link below.
Right below, we can select the image from the Labvanced file storage that we want to display. To transfer the experimental stimuli (e.g., images, videos, audio, etc.) to the storage, we can click on the file icon (see Figure 9 below) to open the storage. Afterward, we can select the fixation image to display in this frame. This image, along with other stimuli, would be accessible using the link below.
Stimulus (fixation & target images)
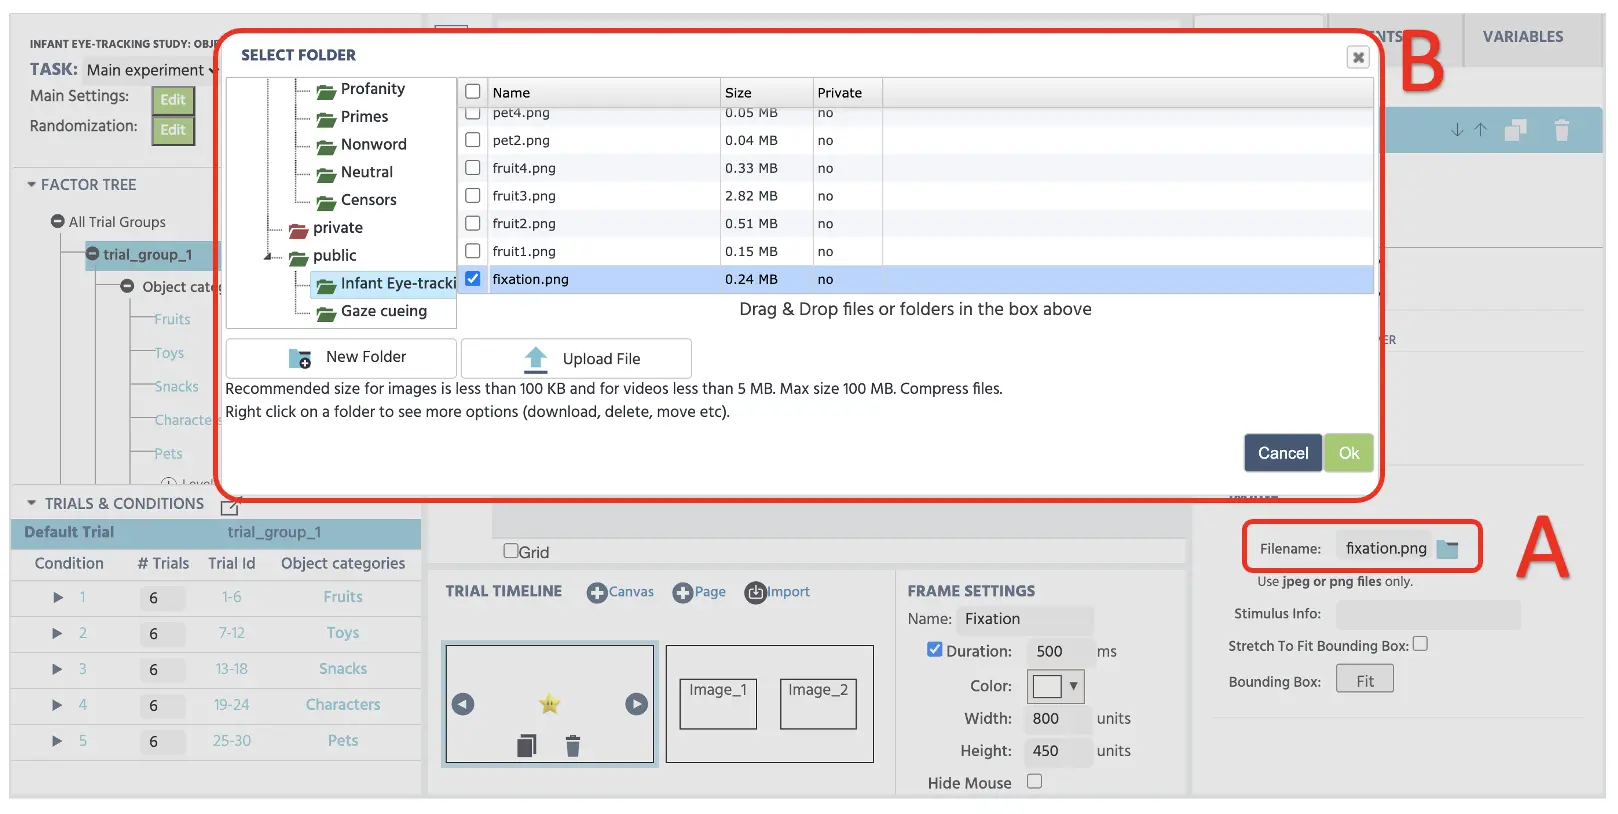 Figure 9. Display of fixation frame creation with the Labvance storage access by clicking the File icon (A) and the subsequent storage window with transferred stimuli files (B).
Frame 2
The 2nd frame setup will follow the same procedure as the previous steps above. However, we will not select the Default Trial at the Trials & Conditions section and instead will select each condition and set up specific categories of images. By looking at condition 1 (make sure condition 1 is selected), we are presenting six trials of two fruit images. Therefore, we will again use the Media option to set up two image properties on canvas and access the file storage to display two fruits (fruit2.webp & fruit1.webp) in this trial (see Figure 10 below). The remaining five fruit trials display different combinations of fruit images, and we will follow table 1 below to present all possible image combinations for all conditions.
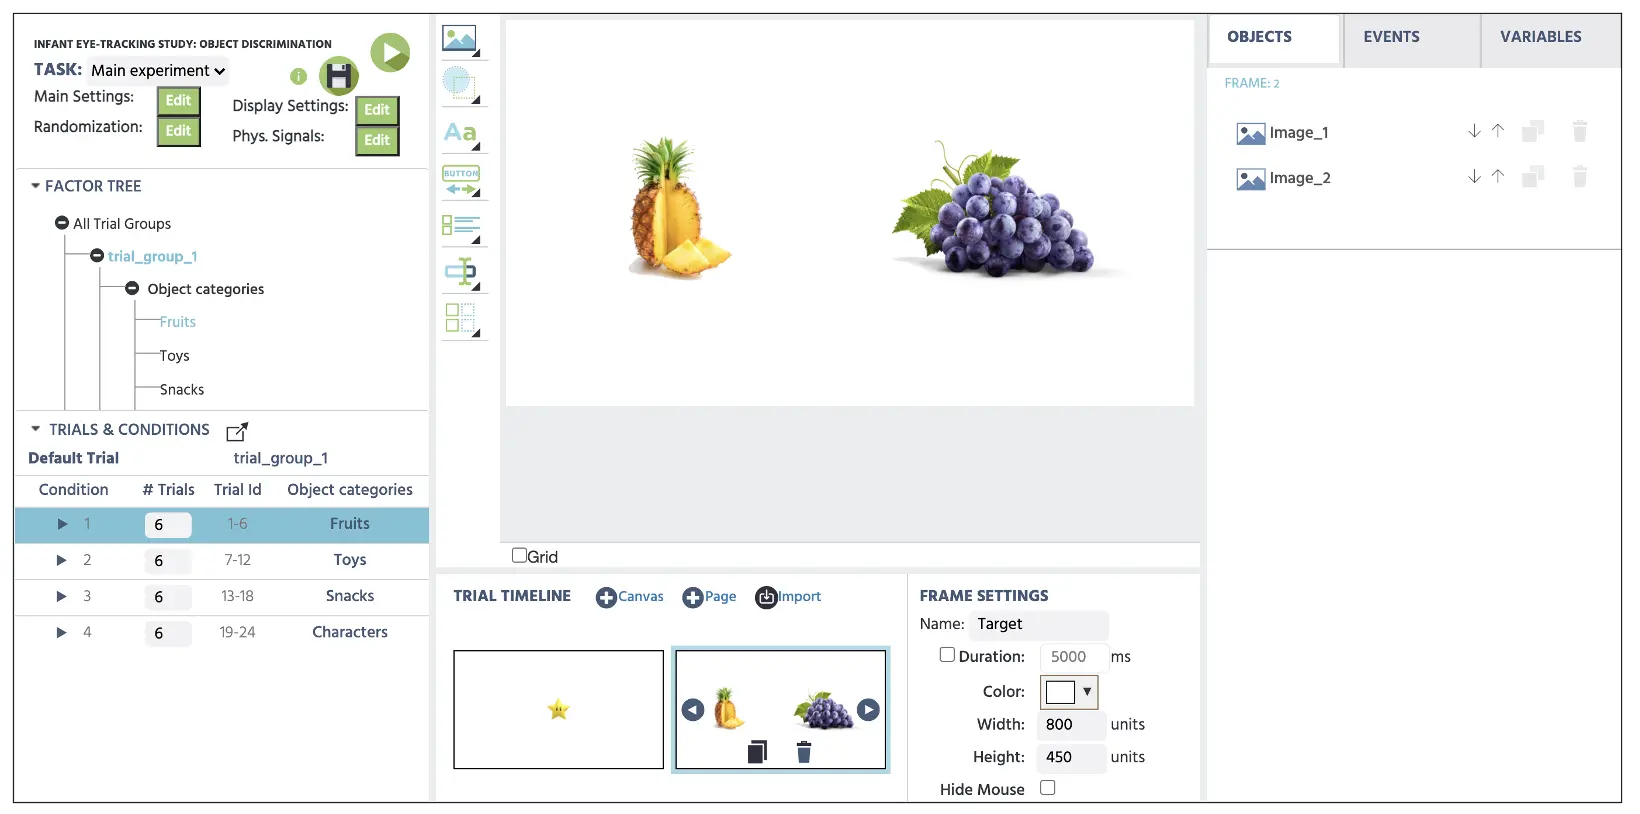 Figure 10. Display of target frame with condition 1 images (fruit1 & fruit 2).
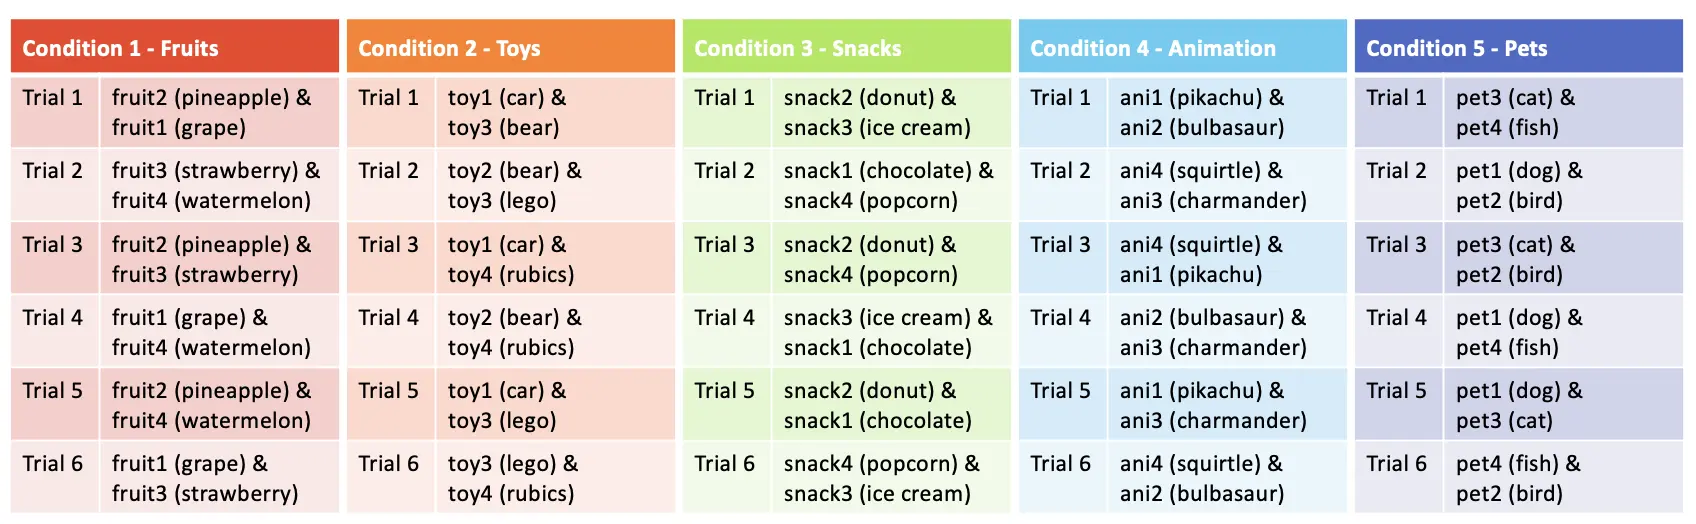 Table 1. Display of stimuli presentation plan for each condition and its associated trials.
Part V: Events setup (programming display duration, response evaluation, and variable recording)
Before proceeding, we will create two new variables. First is the Reaction time that will store mouse click duration in milliseconds, and second is the Image variable that will store which image participant chose with mouse response per each trial. We will click on the Variables on the top-right display and select Add Variable. From the new variable window, we will proceed with the following steps for the names, and variable types indicated below in Figure 11.
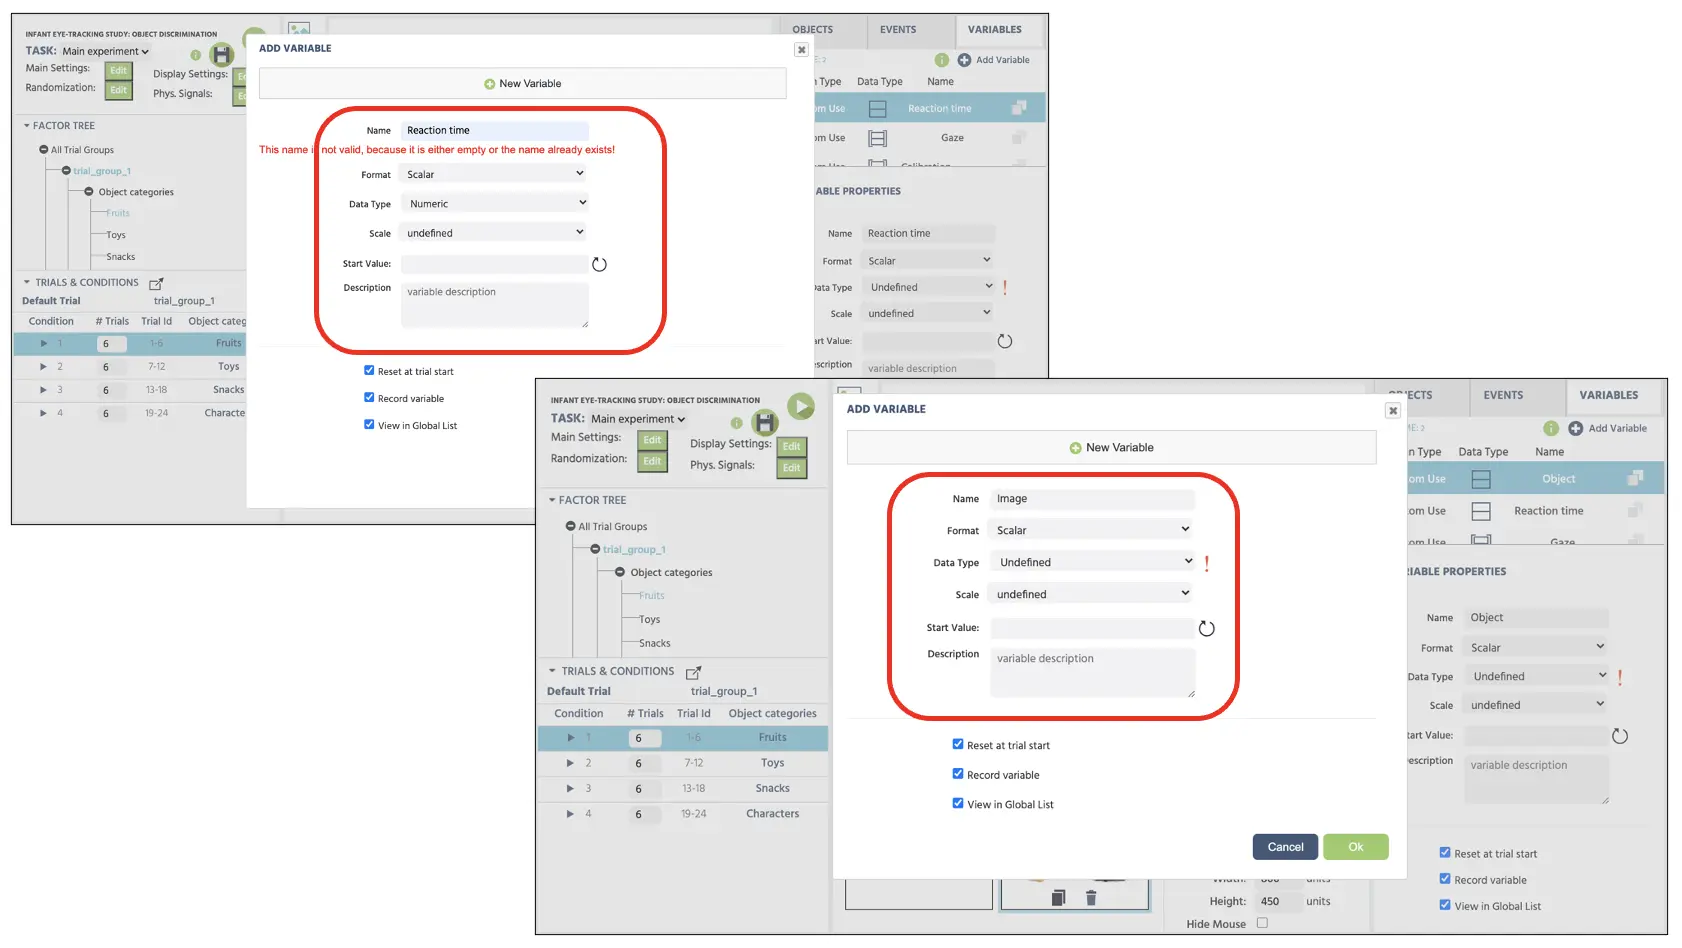 Figure 11. Display of new variables (reaction time & image) creation. The reaction time variable is set with numeric data type, and the image variable is set as the undefined default type.
Afterward, we will create one more variable that will hold eye-tracking data in a time series format that will record multiple gazes in a trial. To create this variable, again select Add Variable and proceed with the same step above. Unlike the previous variables, we need to set the Recording Type as the time series format, such that it will store multiple gaze measurements in any given trial (see Figure 12 below).
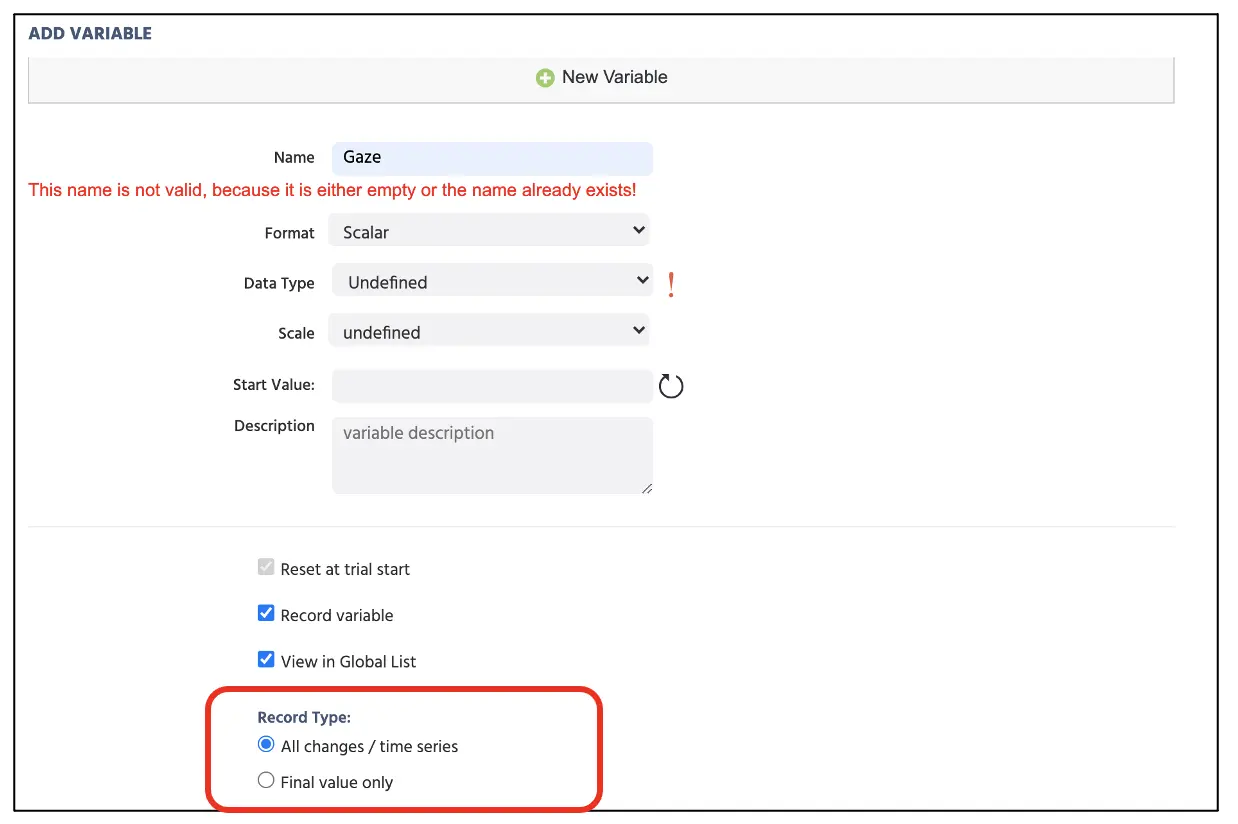 Figure 12. Display of new variable created for the eye-tracking data with the time series recording format indicated in the red box.
Following the general frame sequence from Part I (see Figure 2 above), we will create the Event structure separately per frame, starting with programming the fixation image display for 500ms.
Frame 1 Event: Fixation image display
In this frame, we want to present the fixation image at the display center for 500 ms. Therefore, the logical sequence in this frame is:
- As soon as the frame starts
- Wait 500 ms
- And then jump to the next frame
To create this Event, click on the Events on the top right next to the Variables and select Frame Event (on this frame only). In the first window dialogue, we can name the Events as “Start” (Figure 13A) and click next to proceed to the Trigger option. The trigger type is Trial and Frame Trigger → Frame Start (following the 1st logical sequence above; see Figure 13B). With this trigger, we want to initiate the 500 ms frame delay action (2nd logical sequence); therefore, this can be set with Add Action → Delayed Action (Time callback) and set 500 ms in the delay box (see Figure 13C). Finally, for the last logical sequence, click on Add Action in the Action Sequence box and proceed with Jump Action → Jump to → select the Next Frame (see Figure 13D). The Labvanced will always follow this logical sequence for the fixation image presentation for all the trials with this setup.
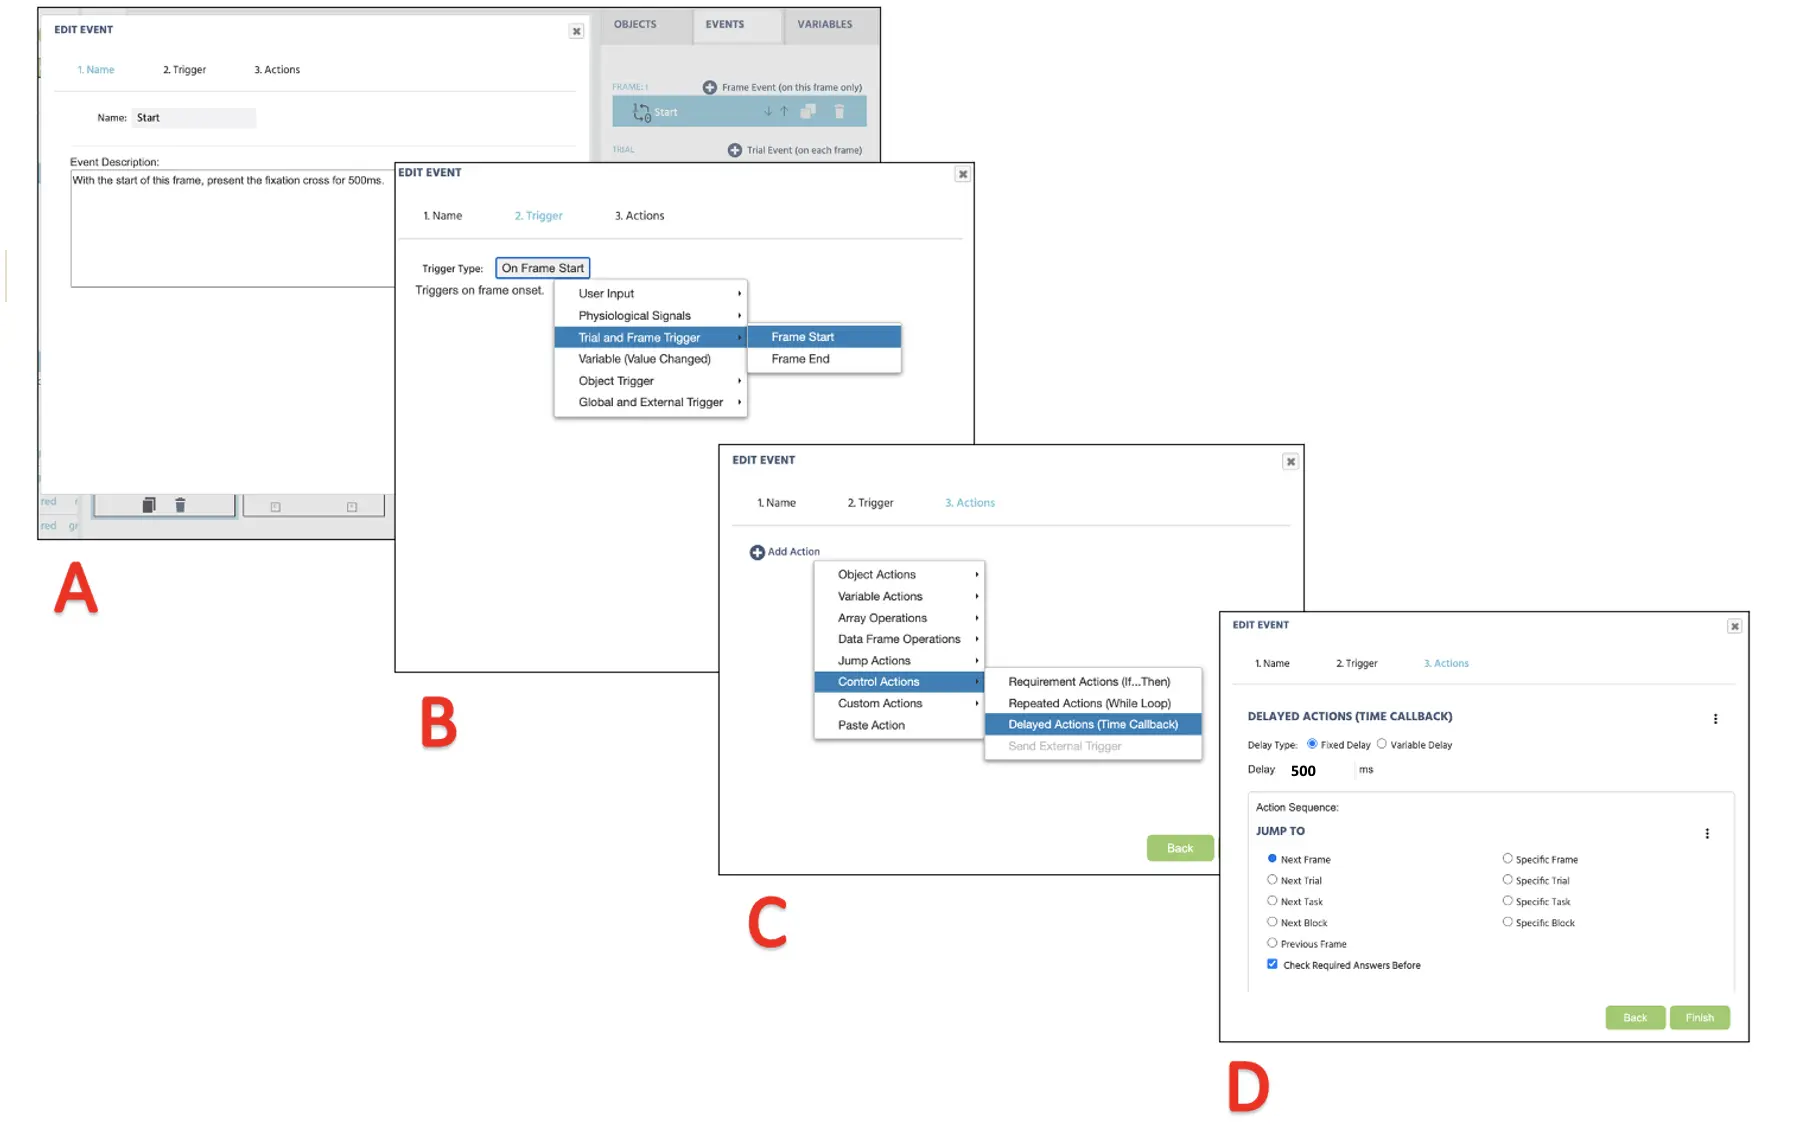 Figure 13. Display of Event creation for fixation cross (frame 1) presentation following Event naming (A), Trigger (B), Action determination (C), and Action execution (D).
Frame 2 Event: Images presentation, mouse click evaluation, and gaze recording (main trials)
In this last frame, we want to present the target images and record the mouse click selection while recording the gaze movements. Therefore, the logical sequence we will approach is:
- As soon as the frame starts containing the images
- Wait for the mouse click input (triggered by left click)
- Record the selected image and store it in the Image variable
- And then jump to the next trial
To set up the Event, we will first make sure that the Default Trial is highlighted to apply the new changes to all the trials. We will then click the Events on the top right corner of the screen and select Frame Event (on this frame only). Here we can name the Event as the “Decision.” Since this Event is indicative of a participant's mouse click, the trigger would be the User Input → Mouse Trigger. Here we can establish two images as available targets (see Figure 14 below).
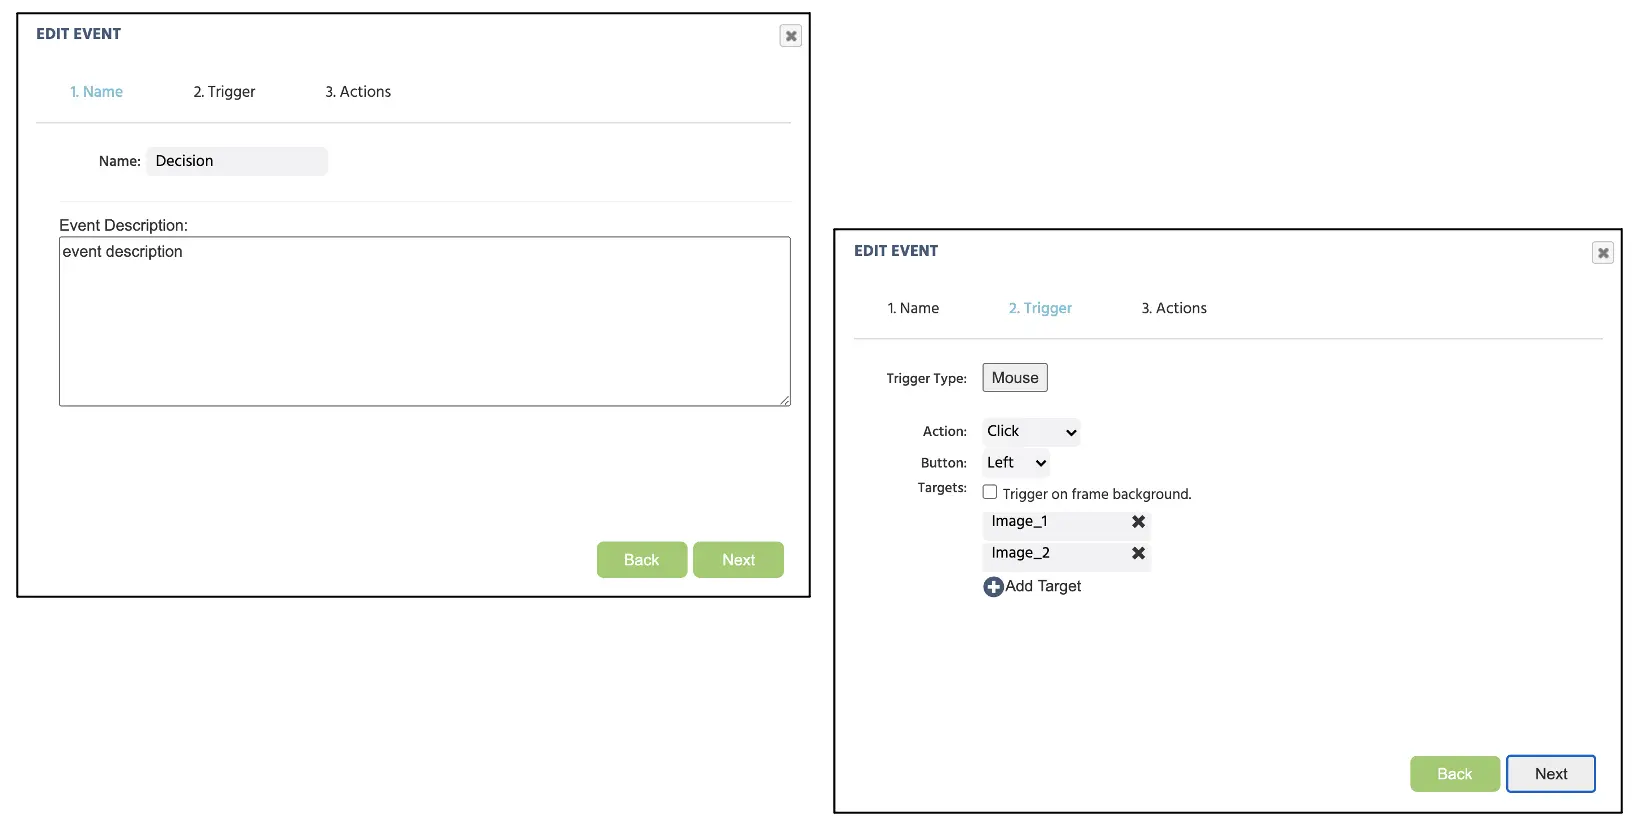 Figure 14. Display of Event creation for keypress assignment following Event naming (A), Trigger type assignment with allowable responses (B).
After clicking next, the Action Sequence will proceed with Variable Actions → Set/Record Variable and select Image variable on the left side (see Figure 15A). On the right, proceed with Trigger (Mouse) → Stimulus Name (see Figure 15B) to record the selected image name. To record the mouse response duration, look below to click Add Action → Variable Actions → Set/Record Variable and select Reaction time variable on the left side. On the right, proceed with Trigger (Mouse) → Time From Frame Onset (see Figure 15C).
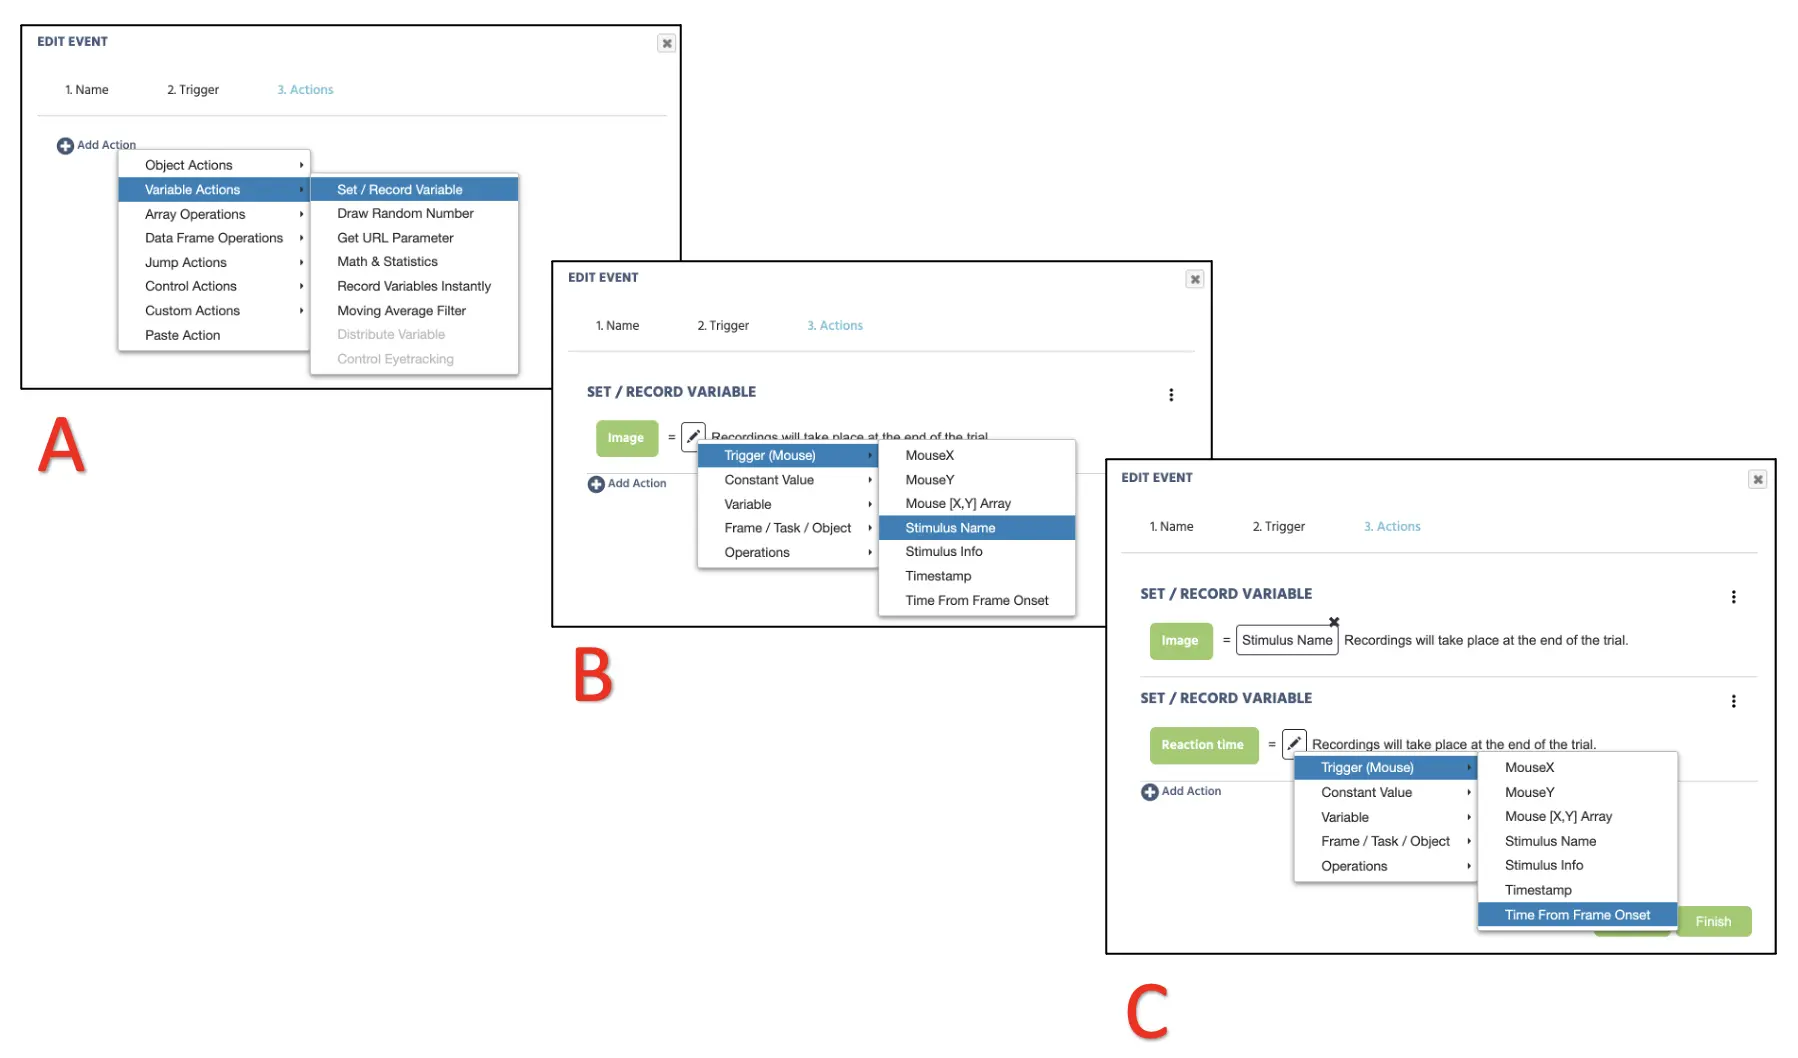 Figure 15. Display of Event creation for mouse click recording (A & B) and response time recording (C).
Finally, we would need the trials to continually proceed after every response, so we will select Add Action → Jump Actions and select Next Trial (see Figure 16 below). Click Finish at the bottom of the window to complete the final Events setup for this study.
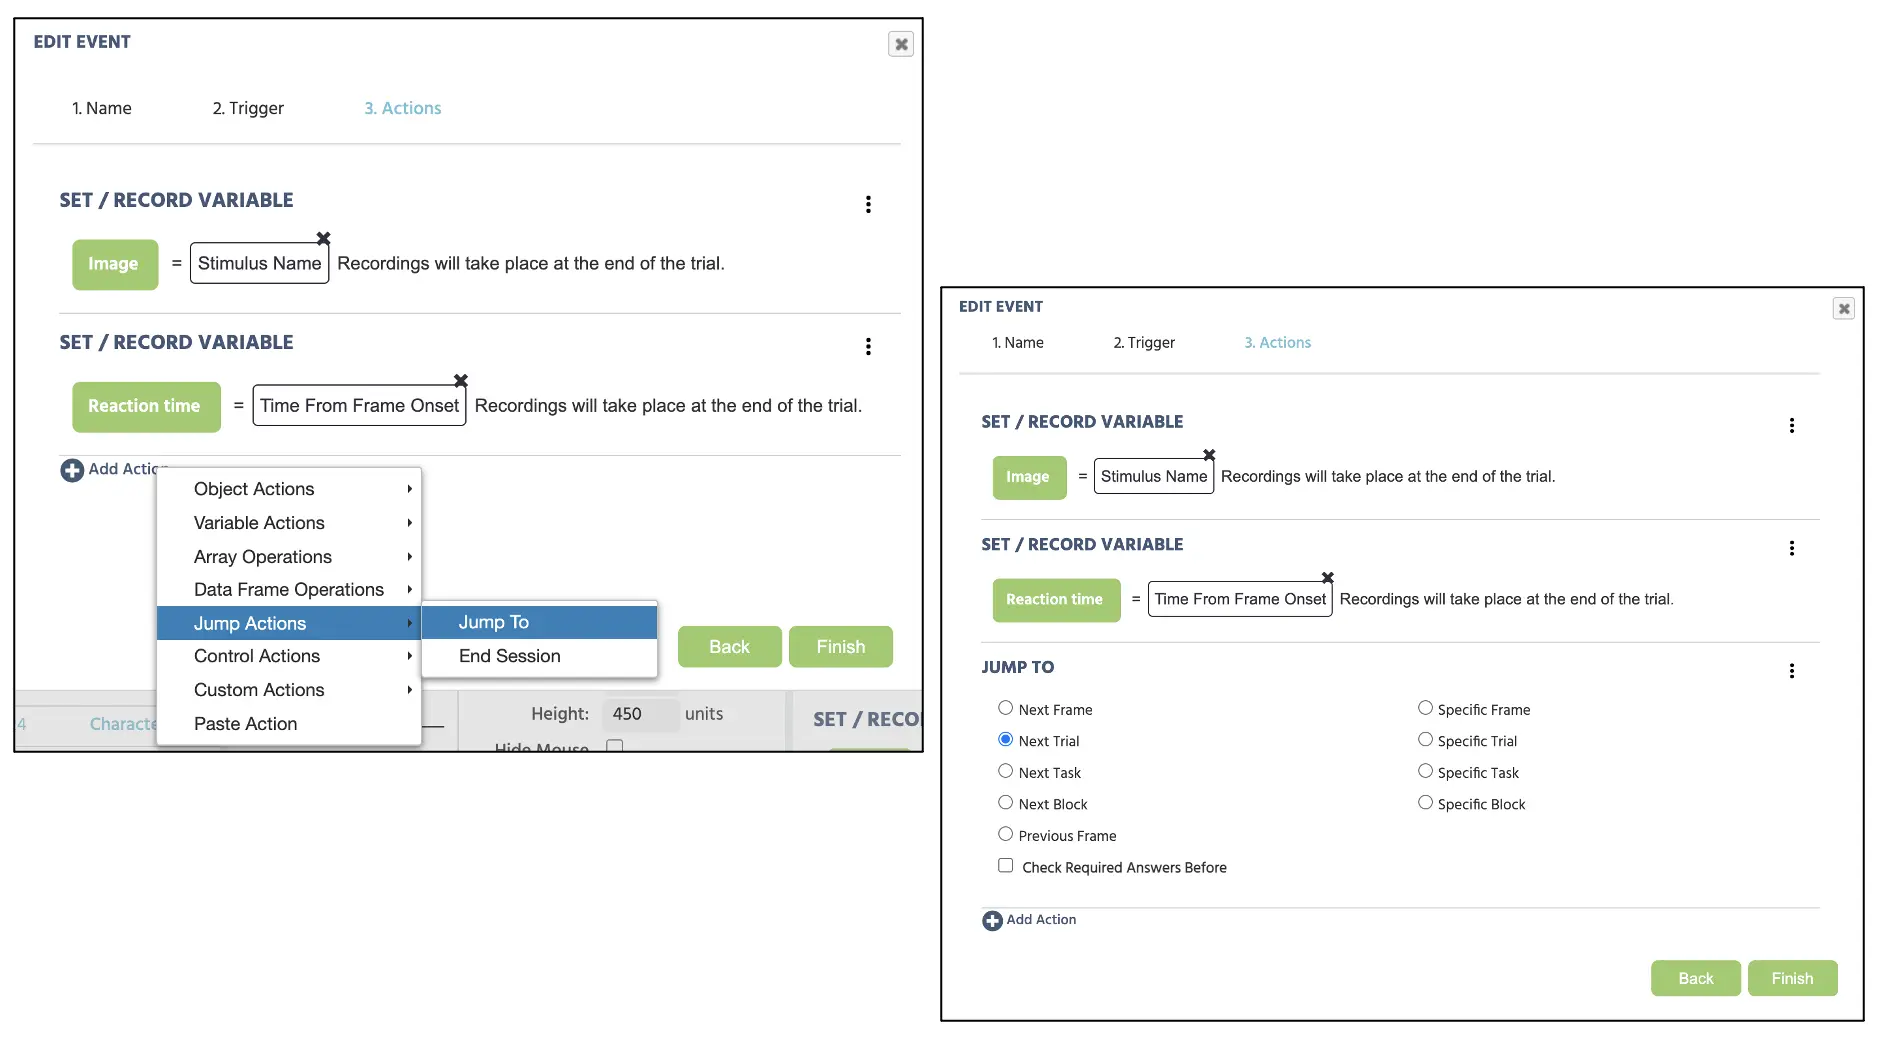 Figure 16. Display of Event creation for jump action proceeding the setup from figure 14.
Separately, we will create a new event for the gaze measurement proceeding this sequence below:
- As soon as the frame starts
- Record the gaze measurements and store them in the Gaze variable
To set up the Event, we again view Events on the top right corner of the screen and select Frame Event (on this frame only). Here we can name the Event as the “Gaze” and set the trigger Physiological Signals → Eyetracking (Figure 17). After clicking next, the Action Sequence will proceed with Variable Actions → Set/Record Variable and select Gaze variable on the left side (see Figure 17). On the right, proceed with Trigger (Eyetracking) → Coordinates (X & Y) + Time (T) + Confidence (C) [X, Y, T, C] Array. In terms of understanding this array data, refer to part IV of the general Eyetracking blog that details each [X, Y, T, C] measurement. For the current walkthrough, this will complete the Event structure set up, and we will now proceed to the final part of this walkthrough with setting the block structure.
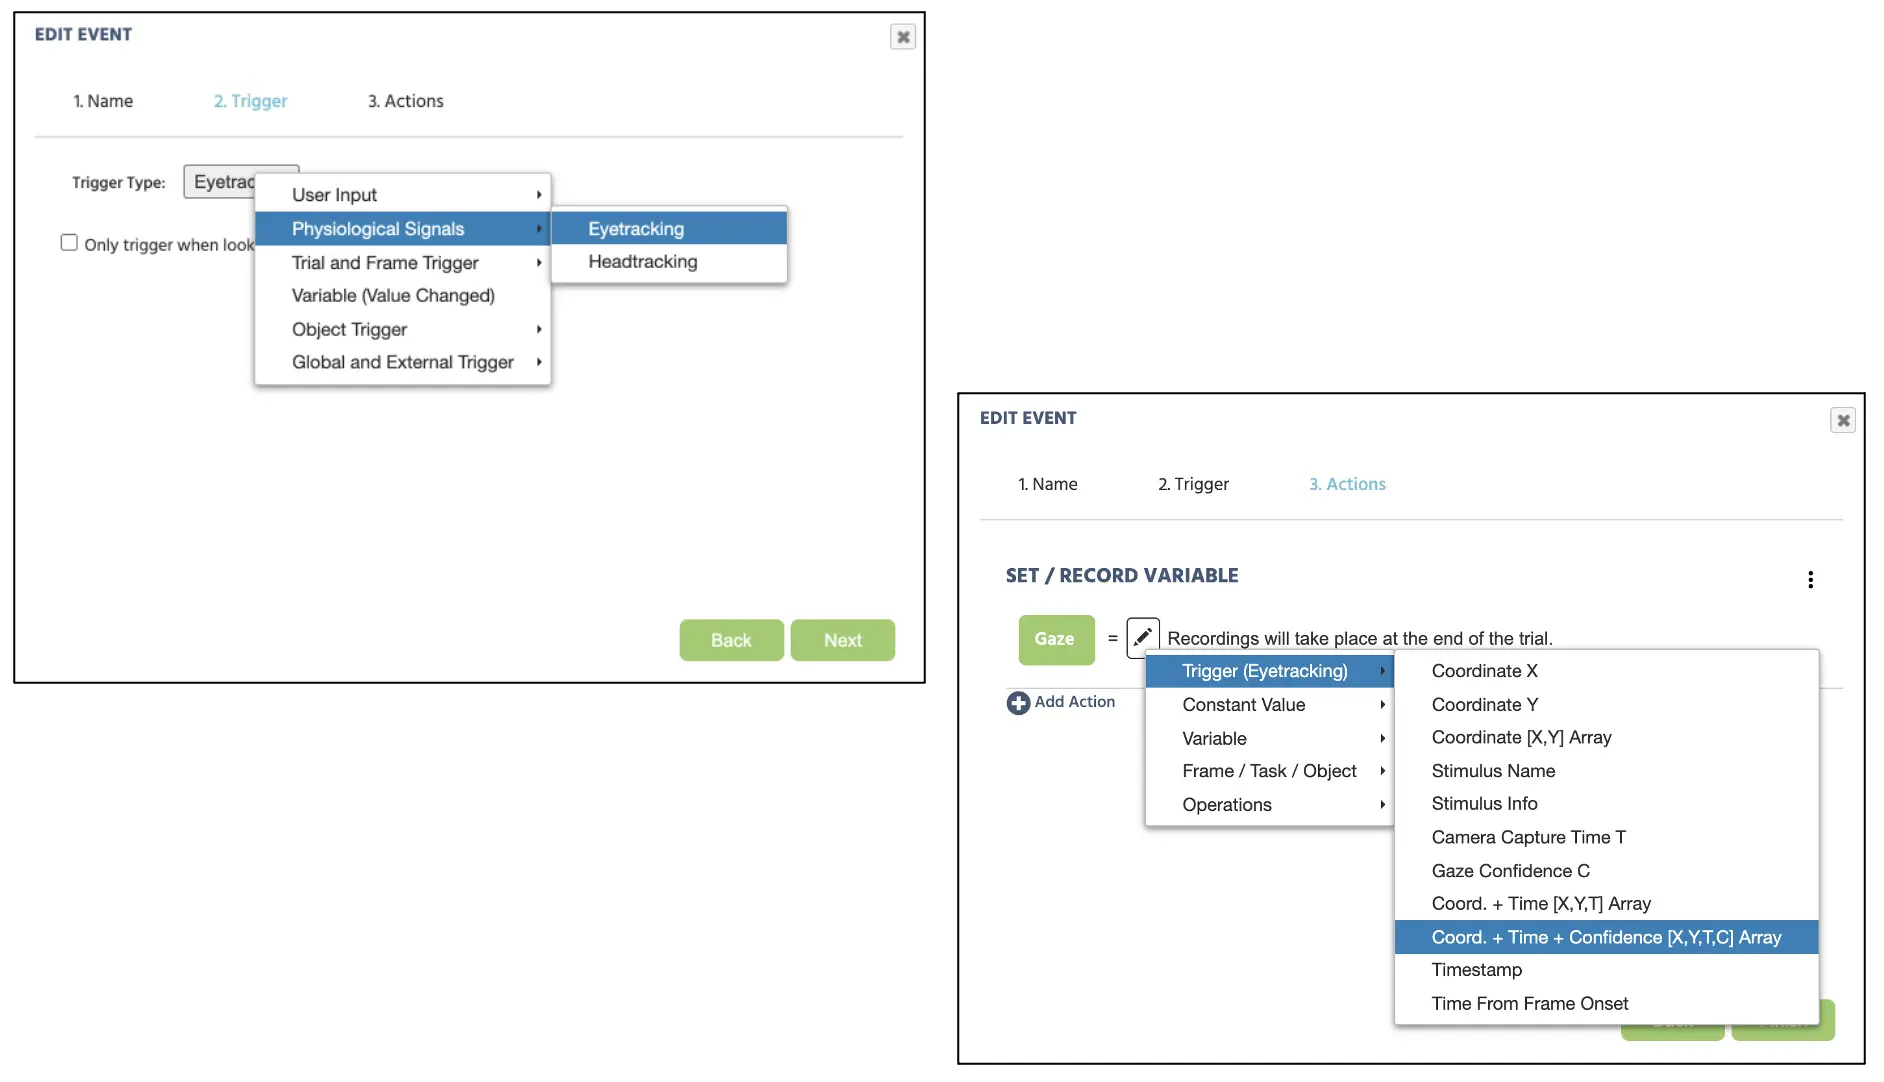 Figure 17. Display of Event creation for gaze recording.
Part VI: Block setup
With the completion of the main experimental trials, this final part will create the instruction screen for the participants and combine it with the main task as one complete block. At the initial Study Design screen, we will create a new task with the name “Instruction,” and click edit. To create an instruction display in this new task, we will proceed with clicking Image Object → Display Text (see Figure 18A) to implement the textbox in canvas. Here, we can type in any message for the instruction, and we will use the following message below.
 Figure 18. Display of text object creation (top) for the following instruction message (bottom).
As displayed in figure 18, we can also set up the button press display to proceed to the next task after the instruction screen. For this, we can proceed with clicking the Button Object below the Display Text and type in “START” inside the button. Afterward, we can establish the new Event by clicking the Events on the top right corner of the screen and select Frame Event (on this frame only). Here we can name the Event as the “Start” and set the trigger Physiological Signals → Button-Click (Figure 19). After clicking next, the Action Sequence will proceed with Add Action → Jump Actions and select Next Task (see Figure 19 below). Click Finish at the bottom of the window to complete the Events setup for this instruction task.
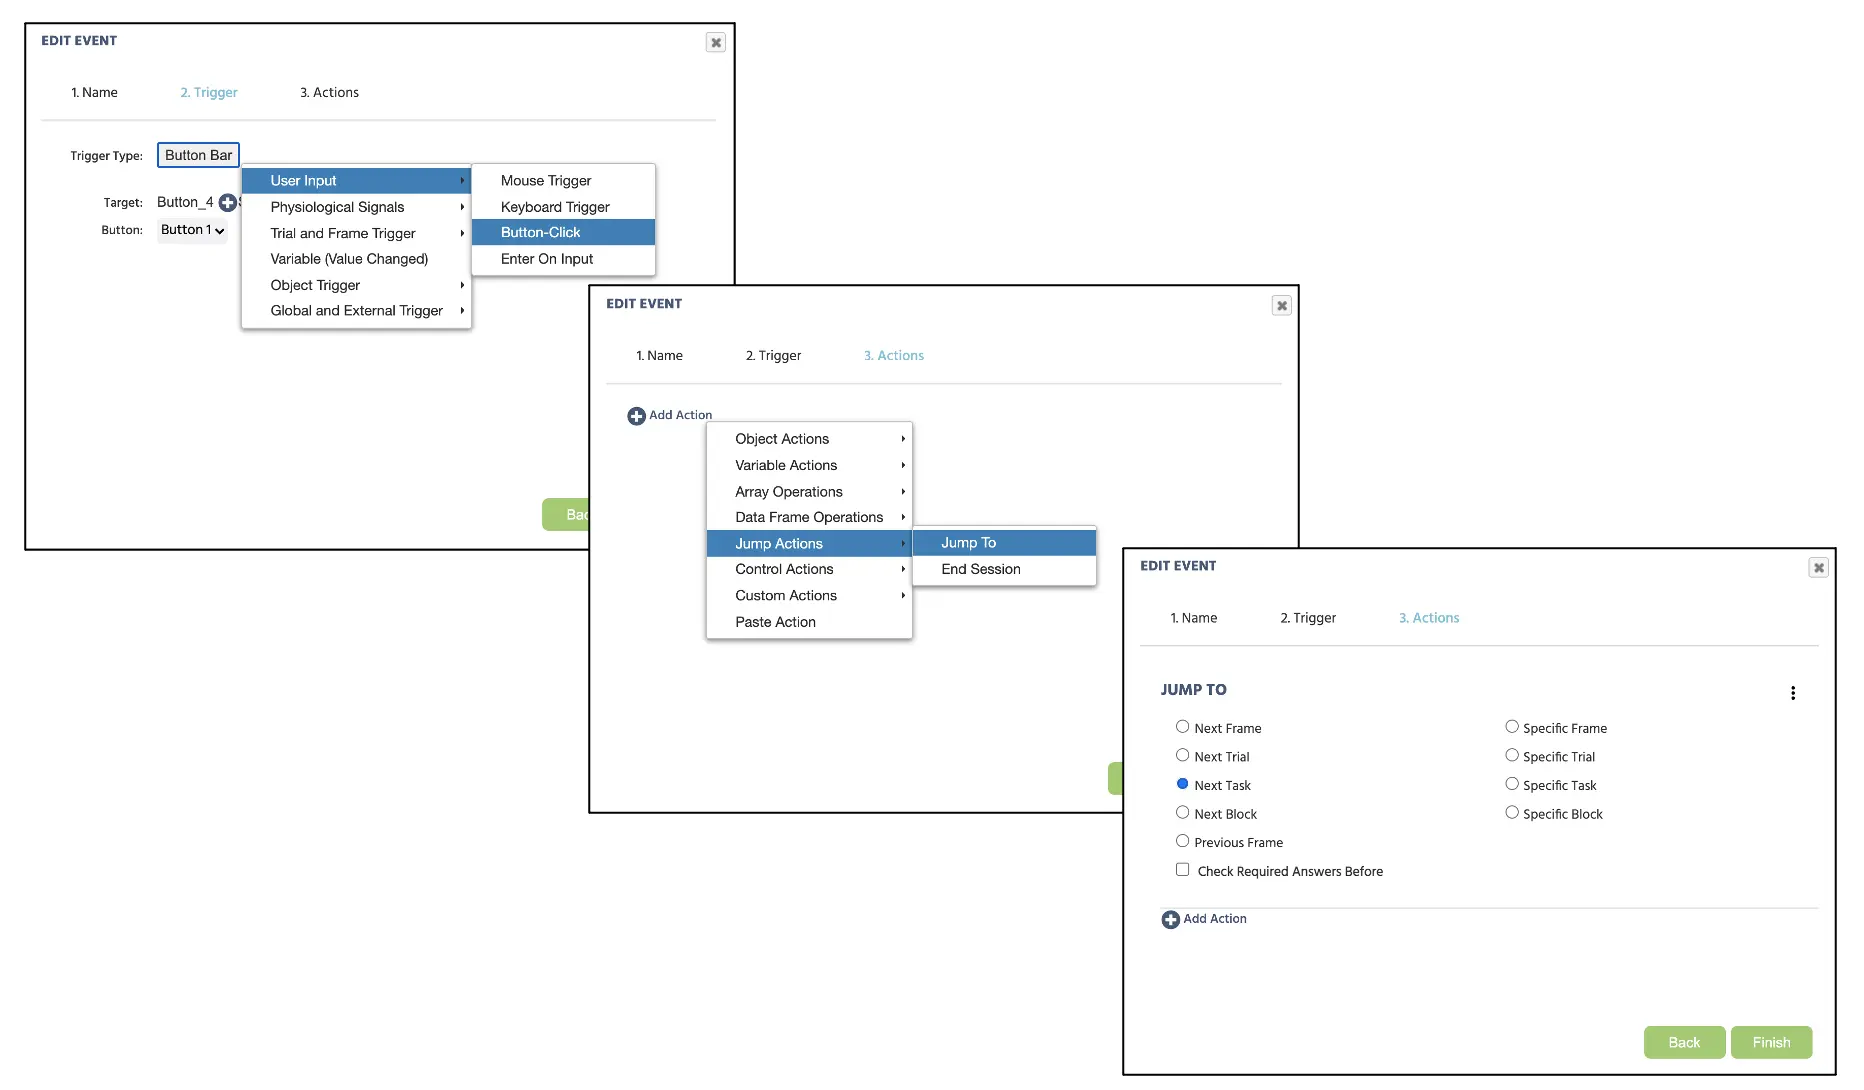 Figure 19. Display of Event creation for the button-click response in the instruction task.
Afterward, we can replicate this entire procedure in the instruction task creation to create the final thank you message for the participant. Here, we will add the following message below (Figure 20) with the “COMPLETE” button that will terminate the experiment. To set this final Event to end the experiment, we will again click Events → Frame Event (on this frame only). Here we can name the Event as the “Complete” and set the trigger Physiological Signals → Button-Click. After clicking next, the Action Sequence will proceed with Add Action → Jump Actions and select End Session (see Figure 20 below). Click Finish at the bottom of the window to complete the Events setup for this instruction task.
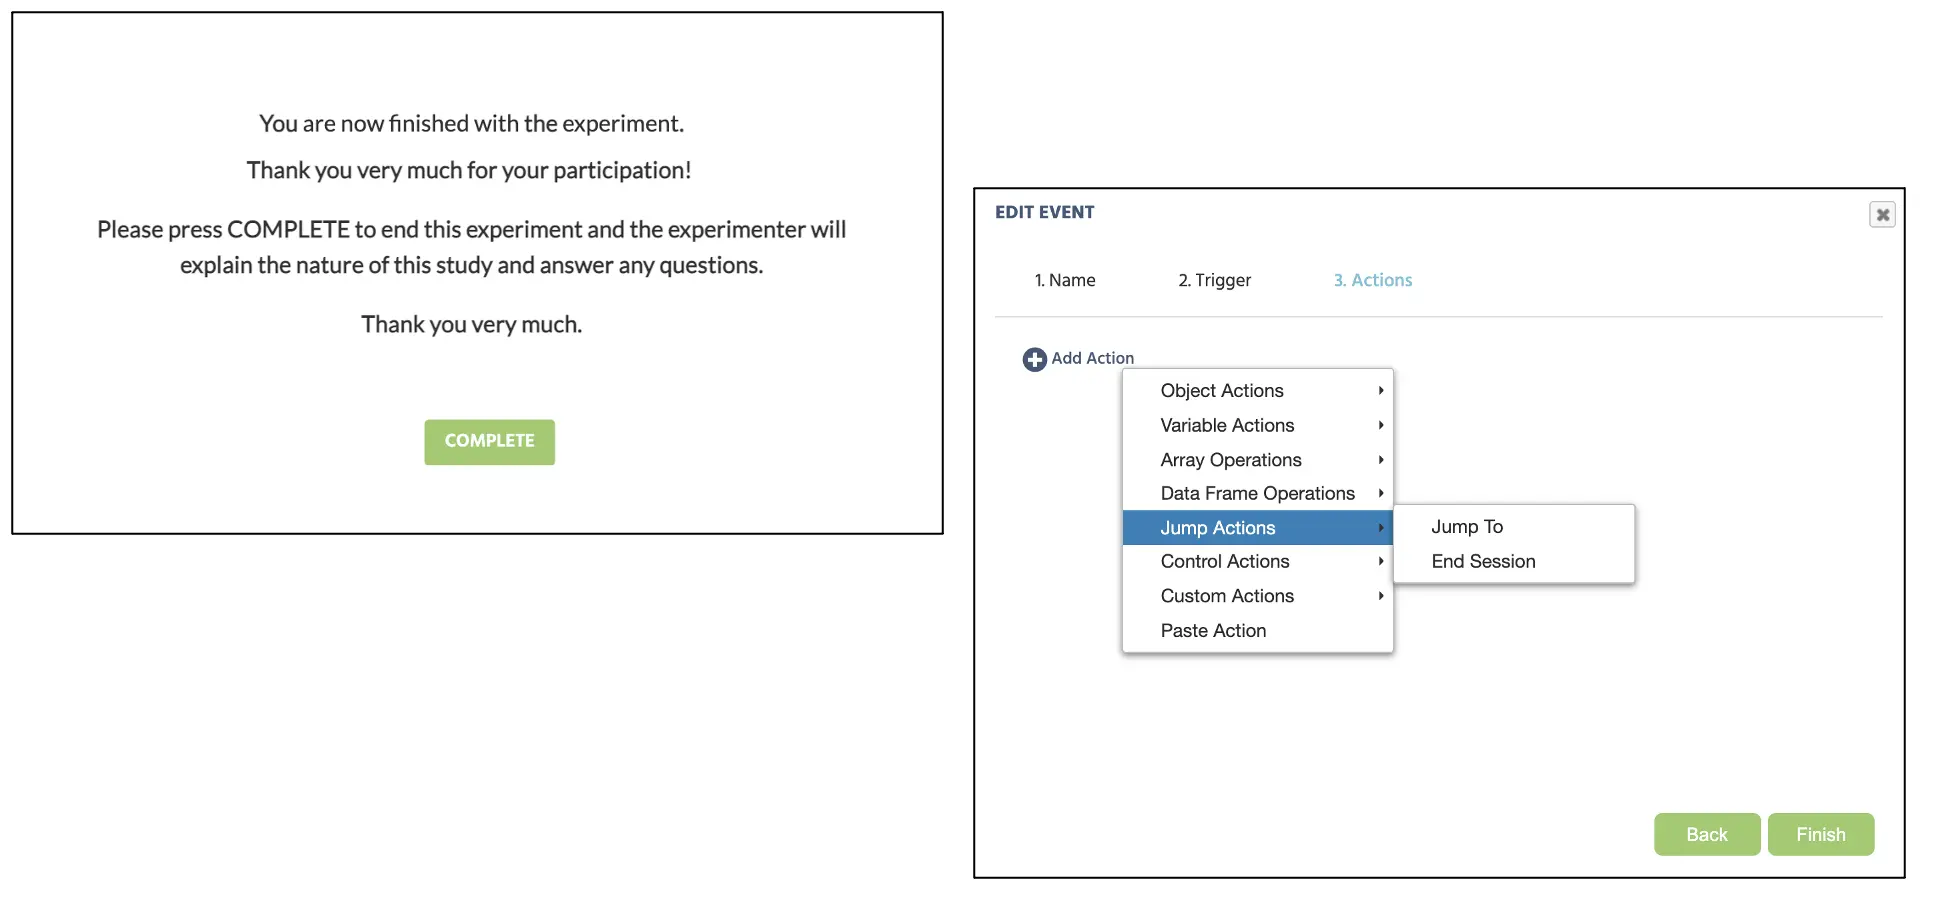 Figure 20. Display of final message and the Event creation for the button-click response to end the study.
With that, we now have three completed tasks in the Study Design comprised of the Main experiment task, Instruction, and End. We will then group this under the blocks column (denoted as “Study”) that will follow the overall study presentation sequence (see Figure 21 below). Finally, make sure that the Study block is set under the Session block.
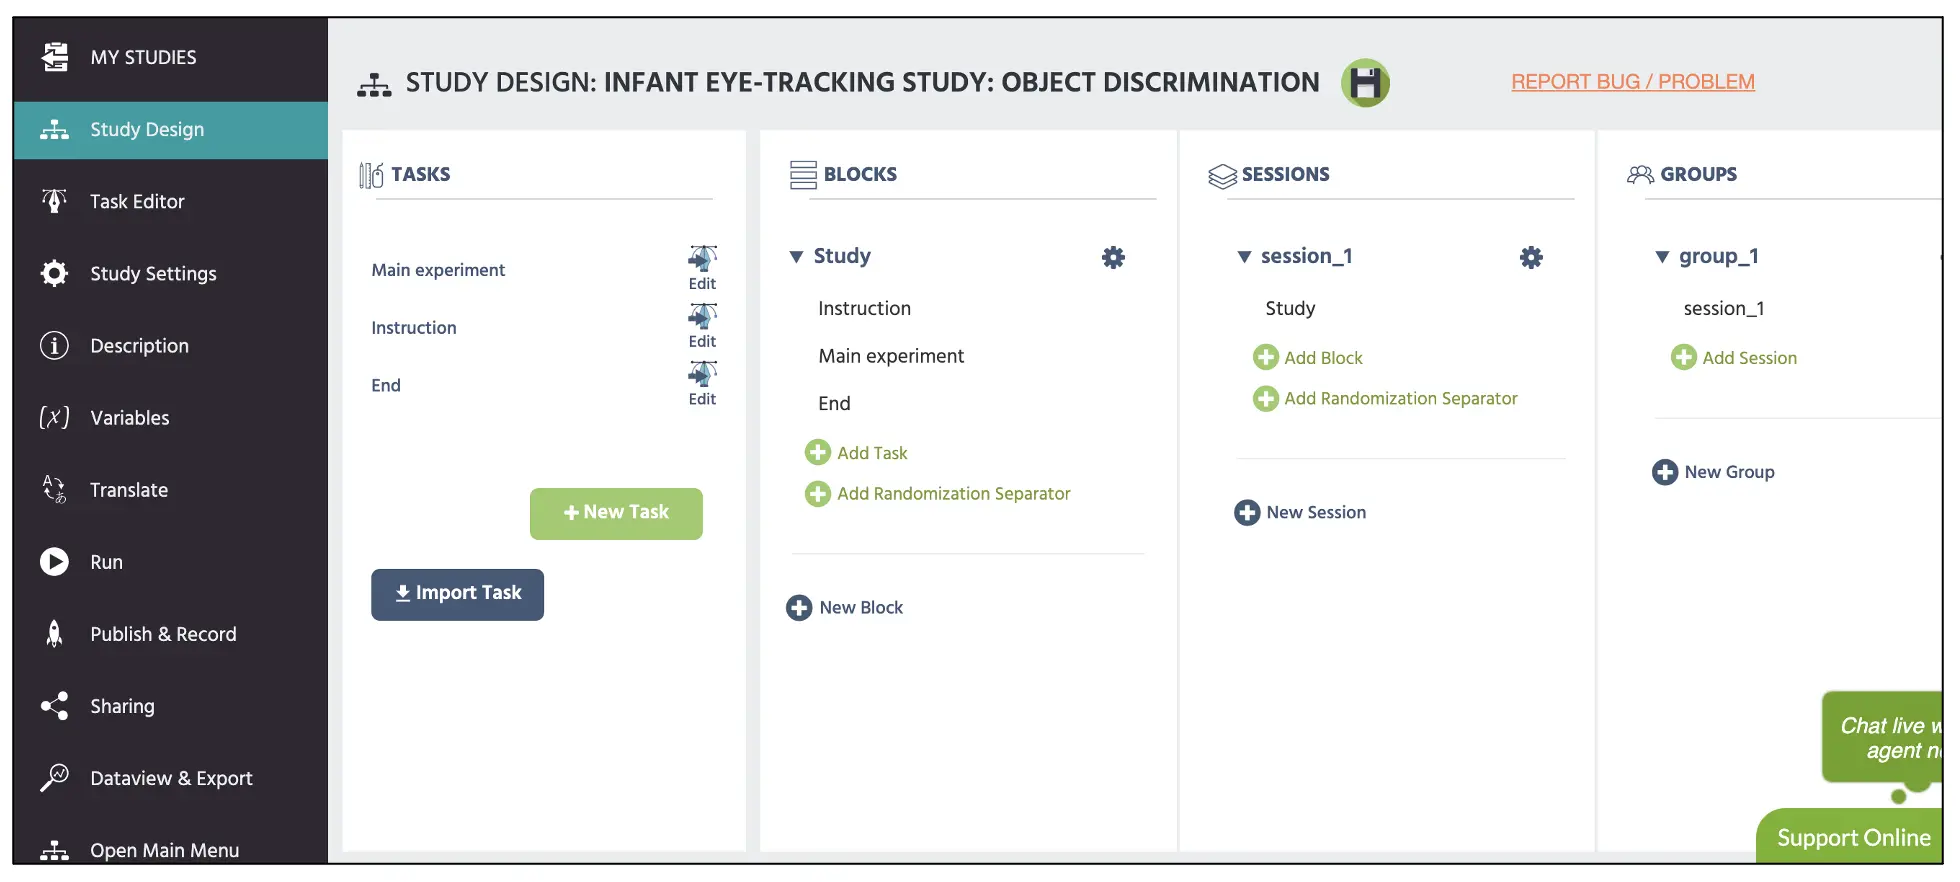 Figure 21. Display of main Study Design page with the top red box displaying block set up with the three tasks (main, instruction, end) that were created throughout this walkthrough.
The only thing that remains in this walkthrough is the consent document, practice block, demographic questions, and other protocols, but that varies based on the researcher and institution to halt this walkthrough. For more information on text creation, please view our resources link for additional information. Furthermore, the constructed study is also available as the template in our Library using this link along with other experimental paradigms. With that said, on behalf of the Labvanced team, I hope for the best in all your scientific endeavors and pray that this walkthrough serves as an important cornerstone for your study construction.