Posner Gaze Cueing Task Creation Walkthrough
Welcome to another Labvanced walkthrough for the study creation walkthrough! For this session, we will create one of Posner’s Task’s popular neuropsychological assessments, also known as Posner’s paradigm. Initially formulated by Michael Posner, this study is commonly used to study an individual’s attentional performance and assess brain injury disorders and deficits in spatial attention.
In general, the study tasks participants fixate at the central point at the center of the computer screen marked by a dot or across. Conventionally, two boxes are presented at either left or right side of the screen, followed by a brief cue that flashes one of the boxes. After this brief cue, the target (usually a simple shape) appears in one of the boxes, and the responder must detect the target appearing left or right with appropriate keypress as quickly and accurately as possible. There is a blank screen between each trial lasting 2500 and 5000ms, and the whole process is repeated a set number of trials predetermined by the researcher. Critically, a target appearing at the same side of the briefly cued location is considered as the valid cues (e.g., a flash at the location where a to-be target will appear) leading to better performance (faster reaction time and accuracy). Otherwise, the target appearing at the opposite side is known as the invalid cue (e.g., a location where nothing relevant occurs following a brief cue) leading to worse performance.
The implication of better performance with valid cues, also known as the cueing effect, is related to an attentional spotlight. In essence, Posner suggested that when an individual sees a cue, their visual attention is oriented towards that cue, which affects the visual processing at the cued (or attended) location. Because human attention is a limited process (i.e., we can’t pay attention to everything at once in our visual scene), this also explains the decreased performance if the target appears away from the cued (or attended) location. Therefore, for valid cues, the individual respond faster because their attention is already oriented to the cued location. In contrast, invalid cues lead to slower performance due to their attention is directed away from the target and requires shifting back to the target location.
Furthermore, additional studies in this realm also revealed that a type of cue could affect attention orientation. For example, when the researchers presented a schematic face with the gaze moving left or right of the screen, this influenced the cueing effect even further, seemingly suggesting humans are “hard-wired” to follow the gaze or eye information of the others automatically.
There are many more variations to Posner’s task that revealed:
- Our attentional shifts to a target occur before moving our eyes
- Spatial attention is not completely dependent on the conscious visual input
- Children with ADHS have a lower performance in both valid and invalid conditions than the typical childing
- Patients with Parkinson’s disease tend to exhibit lower performance as their orienting ability in directions is compromised
- Cueing effect is dependent on age as the older responders display lower performance compared to younger responders.
Beyond those findings and other cue variations, the current walkthrough will focus on building the basic Posner’s paradigm with gaze cueing by presenting letter targets on either side of the display followed by the schematic face in the center display. To systematically cover from beginning to the end, this walkthrough the steps in 5-parts, comprising:
- Variable determination (IVs & DVs)
- Frames setup
- Stimuli setup
- Events setup
- Block setup
Furthermore, we will use the following downloadable stimuli that contain schematic faces with the right, left, and neutral gaze displays to construct the experimental paradigm.
Left gaze
Right gaze
Neutral gaze
For the display sequence that the participants will see (see Figure 1 below), the trial will comprise of:
- 900ms of fixation cross
- 900ms of neutral gaze
- 200ms of right or left gaze
- Target letter (B or Y) presentation until keypress response
 Figure 1. Display of sample trial. In this valid trial example, the target Y is congruently present on the left side cued by the gaze. Following the target letter, Y-keypress is associated with a correct response and B-keypress is associated with the incorrect response.
Depending on the target, we will construct the study so that the responder will have to discriminate the target letter (B or Y) and make the same keypress on the keyboard (B-key or Y-key). Critically, the half of the trials will present the target on the cued location (i.e., the letter appears on the same side of the gaze cue), which could occur both on the left (target appearing on the left followed by the left gaze cue) and the right side (target appearing on the right followed by the right gaze cue).
With that context and introduction, let’s dive into creating the first task by determining the important variables for this study construction.
Part I: Variable Determination with Lavanced Factor Tree
Consistent with the other study walkthroughs, determining the variables and their levels (or categories) would be the important first step to plan the conditions and subsequent trial setup. To begin, refer to the Factor Tree located on the left side of the Labvanced display to determine the factors (or independent variables) and their associated levels. For the purpose of the Poster gaze cueing task, the factors and their levels will be as follows:
Trial Group → Main trials
- Factor 1 - Gaze
- Level 1 - Valid (target letter appearing at the gazed location)
- Level 2 - Unvalid (target letter appearing at the opposite gazed location)
- Factor 1 - Gaze
- Factor 2 - Letter
- Level 1 - Y (correct response = Y-keypress)
- Level 2 - B (correct response = B-keypress)
- Factor 2 - Letter
- Factor 3 - Location
- Level 1 - Left (Target appearing at the Left of gaze independent of Gaze factor)
- Level 2 - Right (Target appearing at the Right of gaze independent of Gaze factor)
- Factor 3 - Location
It is noteworthy that Factor 1 is the main independent variable for the research investigation, and Factors 2 & 3 are only specified for the study construction. Determining the target letter would help in the Events construction later to allow Labvanced to assess the keypress and record correct (or incorrect) responses. As far as the Location factor, this is to account for an equal rate of presentation for both the left and right sides of the gaze for both target letters to maintain the validity of the investigation. Later, a researcher could collapse Factors 2 & 3 during the data compilation process to prepare for the assessment of the gaze cueing effect through reaction times and accuracies.
The full display of this setup in the Factor Tree is also depicted below (see Figure 2A). With this 2 X 2 X 2 orthogonal setup, Labvanced will create 8 different conditions (see Figure 1B) in the Trials & Conditions with each factor combination. As depicted, this leads to all possible combinations of Gaze X Target X Location. Also, we can determine the number of trials per condition, and we will determine 4 trials per condition - a total of 32 trials.
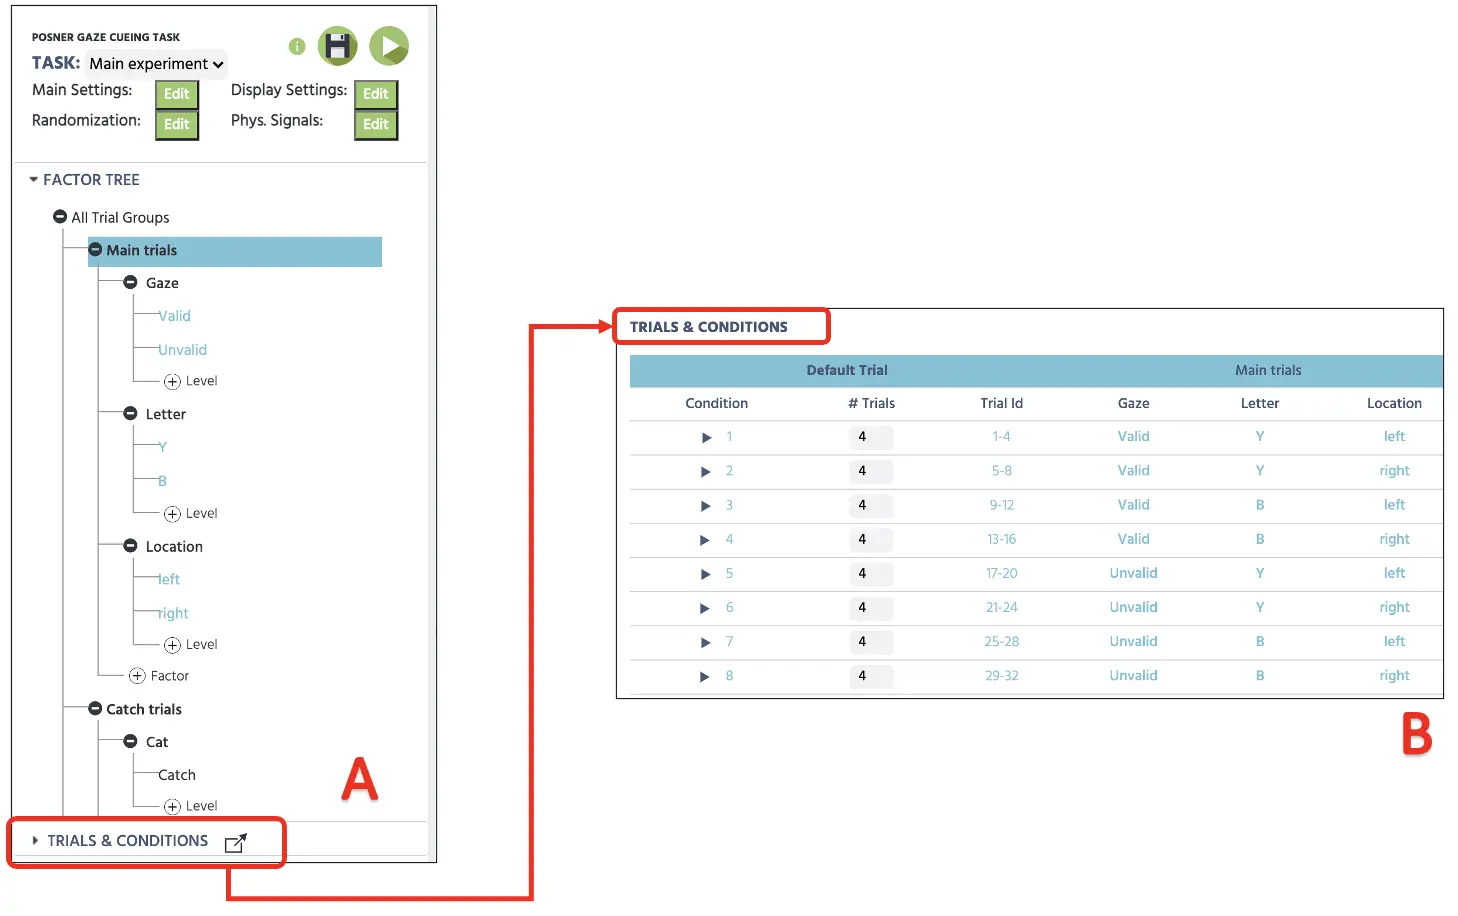 Figure 2. Initial canvas setup depicting determining factors with levels in the Factor Tree (A) and subsequent combinations with 4 trials in each condition (B).
Furthermore, it would be critical to also set up catch trials for this study where no target letter would be displayed. This is an important manipulation to account for the participant’s attention, making sure the response is not due to the arbitrary keypress responses (or “button mashing”). We will create 5 catch trials that will be interspersed throughout the main trials where the participants will be required to withhold the response without any target letter presentation. To implement this, we will create a new Trial group within the same Factor Tree and name it Catch trials. Then, we can name both the factor and level as the catch and set 4 trials; see Figure 3 below). Again, these 4 catch trials will be randomly present amongst the other main experimental trials cumulating to the total of 36 trials in this setup.
 Figure 3. Canvas setup depicting catch trial setup (A) and the four trials setup within the Trials & Conditions (B).
For the trial randomization, the Labvanced will automatically vary the trial presentation depending on the Randomization Setting (see Figure 4). The default setting will remain as the first Random option that will generate a random trial sequence, but this could be pre-determined with different options (Fixed by Design or Hand). For now, the current study will proceed with Random without any constraints, and this will randomly vary the trial presentation among the main and catch trials. For more information about the Randomization setting, please use this link for more information.
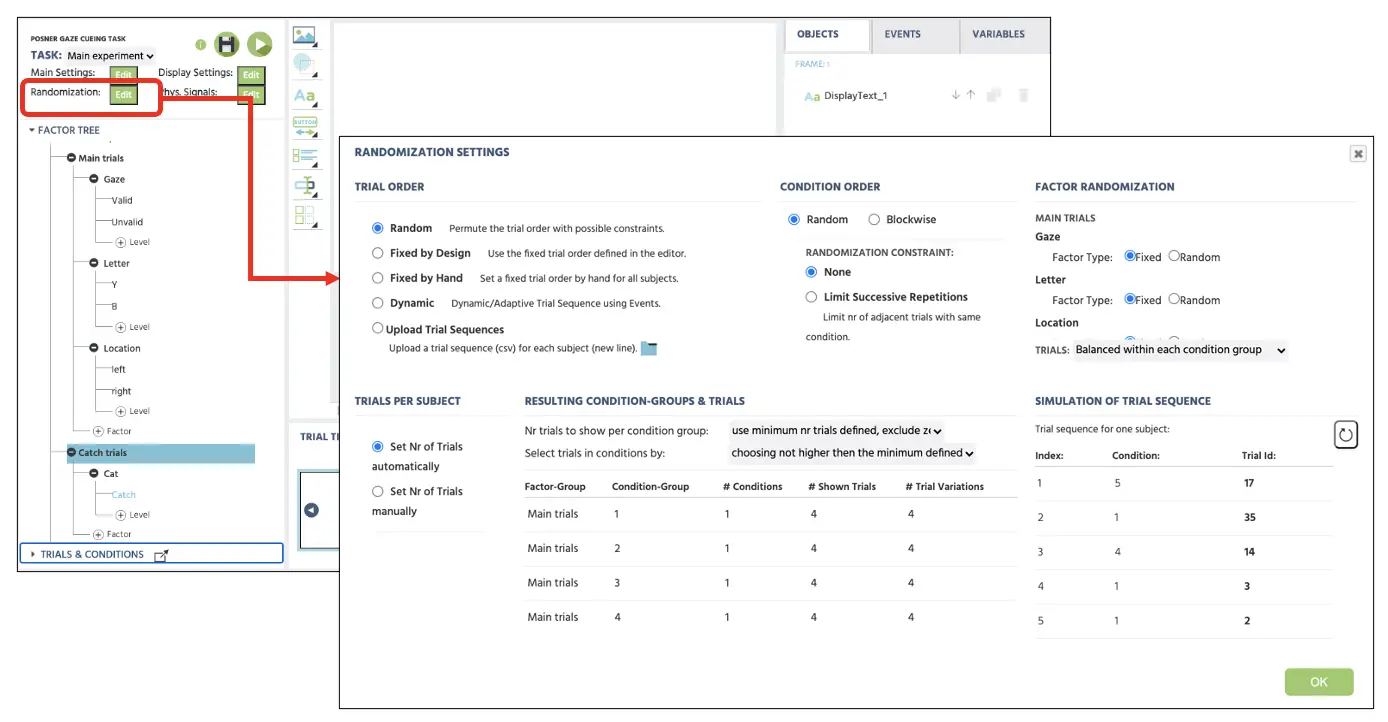 Figure 4. Display of Randomization setting with selected Random option to randomly present the trials without any constraints.
Part II: Frames setup
The second part of this walkthrough will create frames (stimuli presentation) that the participants will see during their participation. Again, the current Posner gaze cueing task will follow the general procedure mentioned above (see Figure 1). As depicted, a trial will begin with a fixation cross (frame 1) for 900 ms, followed by the presentation of the neutral gaze (frame 2) for 900 ms. This will then proceed to the right or left oriented gaze will display for 200 ms, and will lastly display the target letter that will remain until the keypress response. Here, the participants will press “Y” or ”B” depending on the displayed target letter.
The construction of these frames will begin by clicking on the Canvas button at the bottom of the Labvanced display (see Figure 5A). Clicking this 4 times will display 4 new frames, and it would be ideal to name each frame immediately (e.g., fixation, neutral, gaze, target) to maintain the study organization (see Figure 5B). Before proceeding, it would be essential to click on the Default trial to make sure this row is highlighted (see Figure 5C). This part serves as the default template for all the conditions below. While highlighted, any changes in the 4 frames will apply to all conditions (i.e., adding a fixation cross in the 1st frame will apply to all 36 trials), so this would be convenient to avoid unnecessary and repetitive setups.
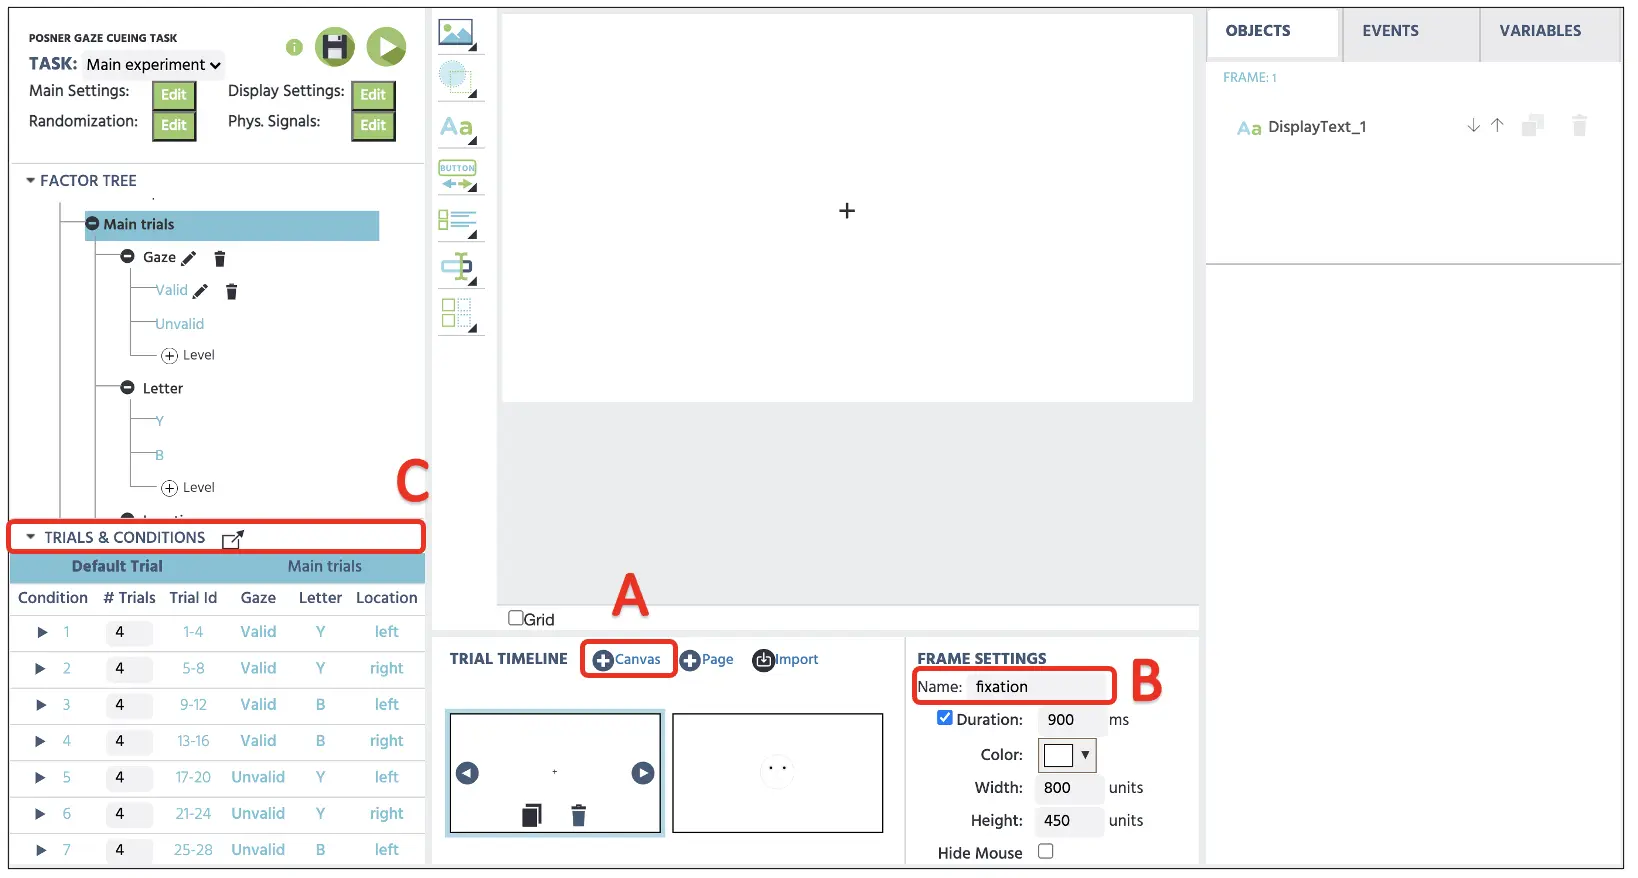 Figure 5. Display of sample trial with Canvas frame creation (A), frame name change option (B), and highlight Default Trial (C).
Part III: Stimuli setup (fixation cross, gaze display, and target presentation)
Frame 1
With the four frames we have prepared in the previous part, we will now set the individual stimulus in each frame, starting with the fixation cross in the 1st frame. For this, we can start by clicking on the Display Text (see Figure 6A) to implement the textbox in the canvas. Here, we can type in the + in the box with a font size 36 and position it in the center of the display. We could also type in the specific X & Y frame coordinates at the Object Properties on the right side for the precise center position. If we want to upload the image containing the fixation cross or different stimuli, the Media option (see Figure 6B) can present images, videos, audios, etc. We will simply type in the cross in the Display Text, but we will eventually use the Media option to present the gaze pictures. Lastly, we will also follow the same steps above for the 2nd group of Catch Trials. Although these four trials are grouped separately, they will get randomized together with the main trials.
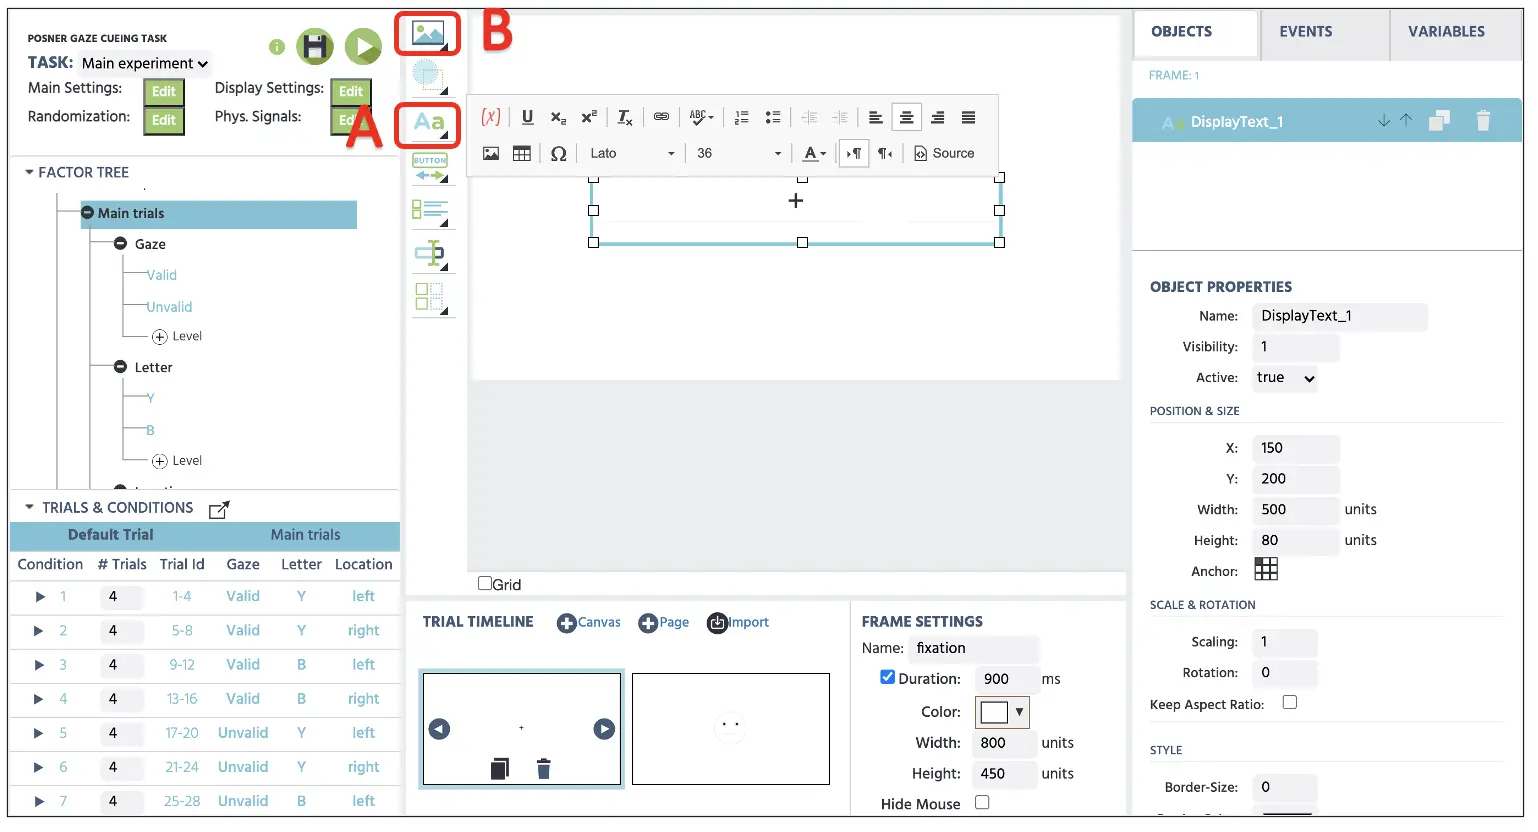 Figure 6. Display of fixation frame creation with the Display Text option(A). Images, videos, and audios could be presented via Media option (B).
Frame 2
Before proceeding, make sure we have the Default trial selected (see Figure 5 above) so that the neutral gaze presentation will be implemented throughout the 36 trials. To create the 2nd frame containing the neutral gaze, click on the Media option (see Figure 5 above) and selecting Image. This will prompt the Image Property in the canvas display, which we could use the Object Properties on the right side to adjust the position, size, and what image we want to display from the Labvanced file storage. Let’s access the file storage to import all the gaze images by clicking on the File icon (see Figure 7). This will open the file storage window to upload and select the stimuli of that we will display.
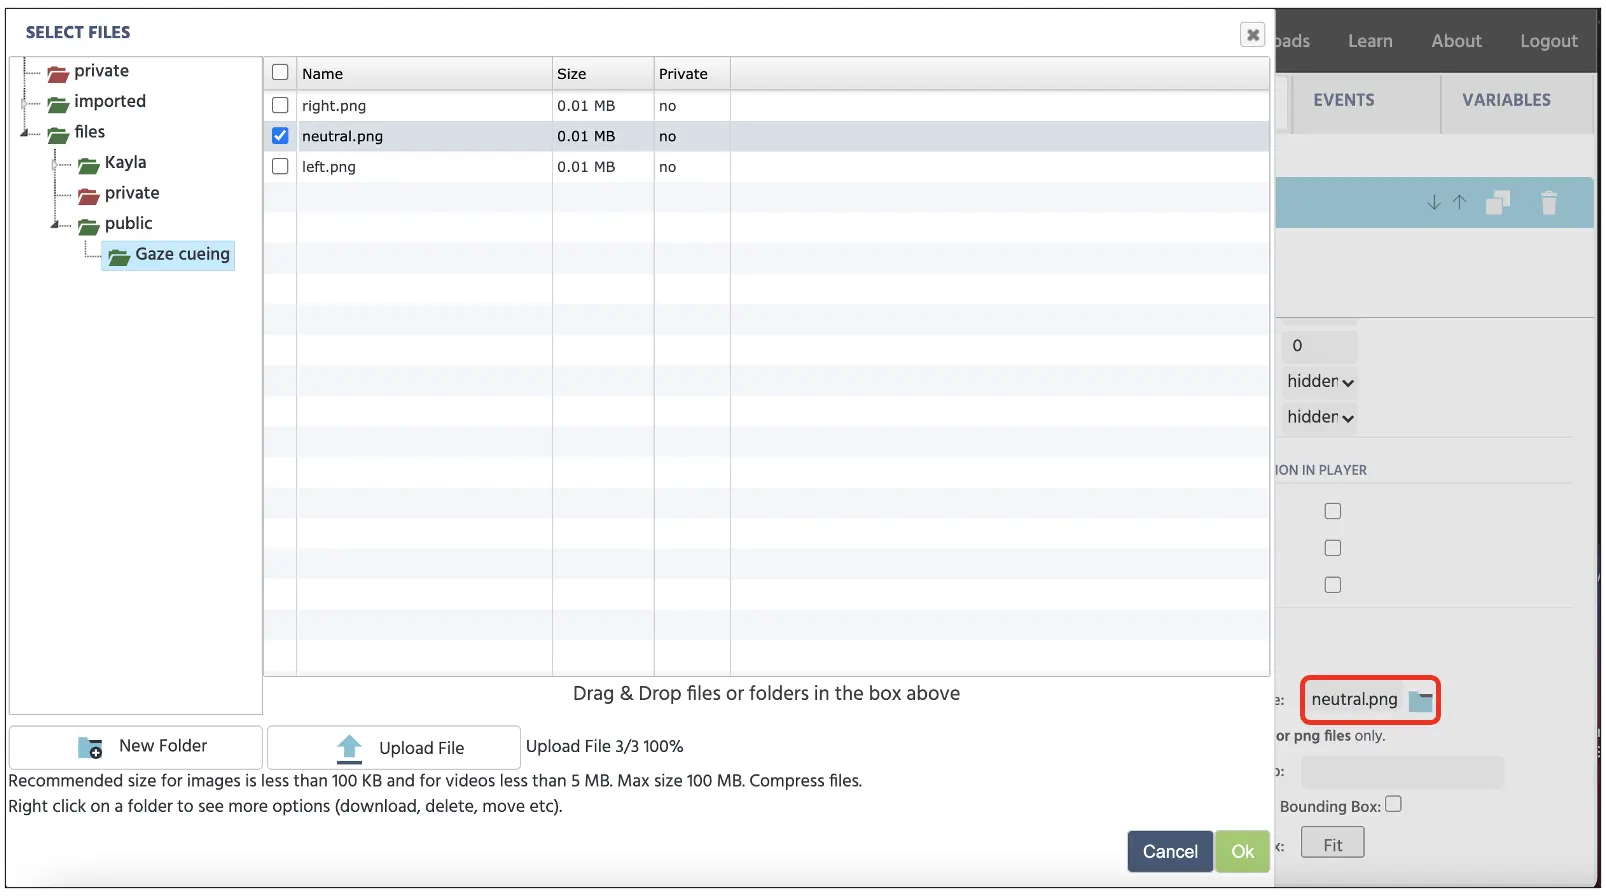 Figure 7. Display of file storage accessed by the file icon in the red box.
Following the neutral gaze selection from the storage, the canvas will display the image according to the orientation and size determined by the Object Properties set up at the right side of the display (see Figure 8 below). Again, we will also follow the same steps above for the 2nd group of Catch Trials.
 Figure 8. Display of neutral gaze image with object properties option in the red box.
Frame 3
The 3rd frame setup will follow the same procedure as the 2nd frame instruction above. However, we will not select the Default Trial and will select each condition below to use as the guideline to display a specific gaze direction (left or right gaze). By looking at condition 1 (make sure condition 1 is selected), we are presenting four trials of valid trials that will display the target “Y” located on the left side of the gaze. After using the same Media option and opening the file storage, make sure to select the left gaze (left.webp) to display on canvas (see Figure 9) below. This will then apply to all four trials in this first condition. Make sure that the image has the exact same options as the neutral gaze by double-checking the Object properties. Again, we will also follow the same steps above for the 2nd group of Catch Trials.
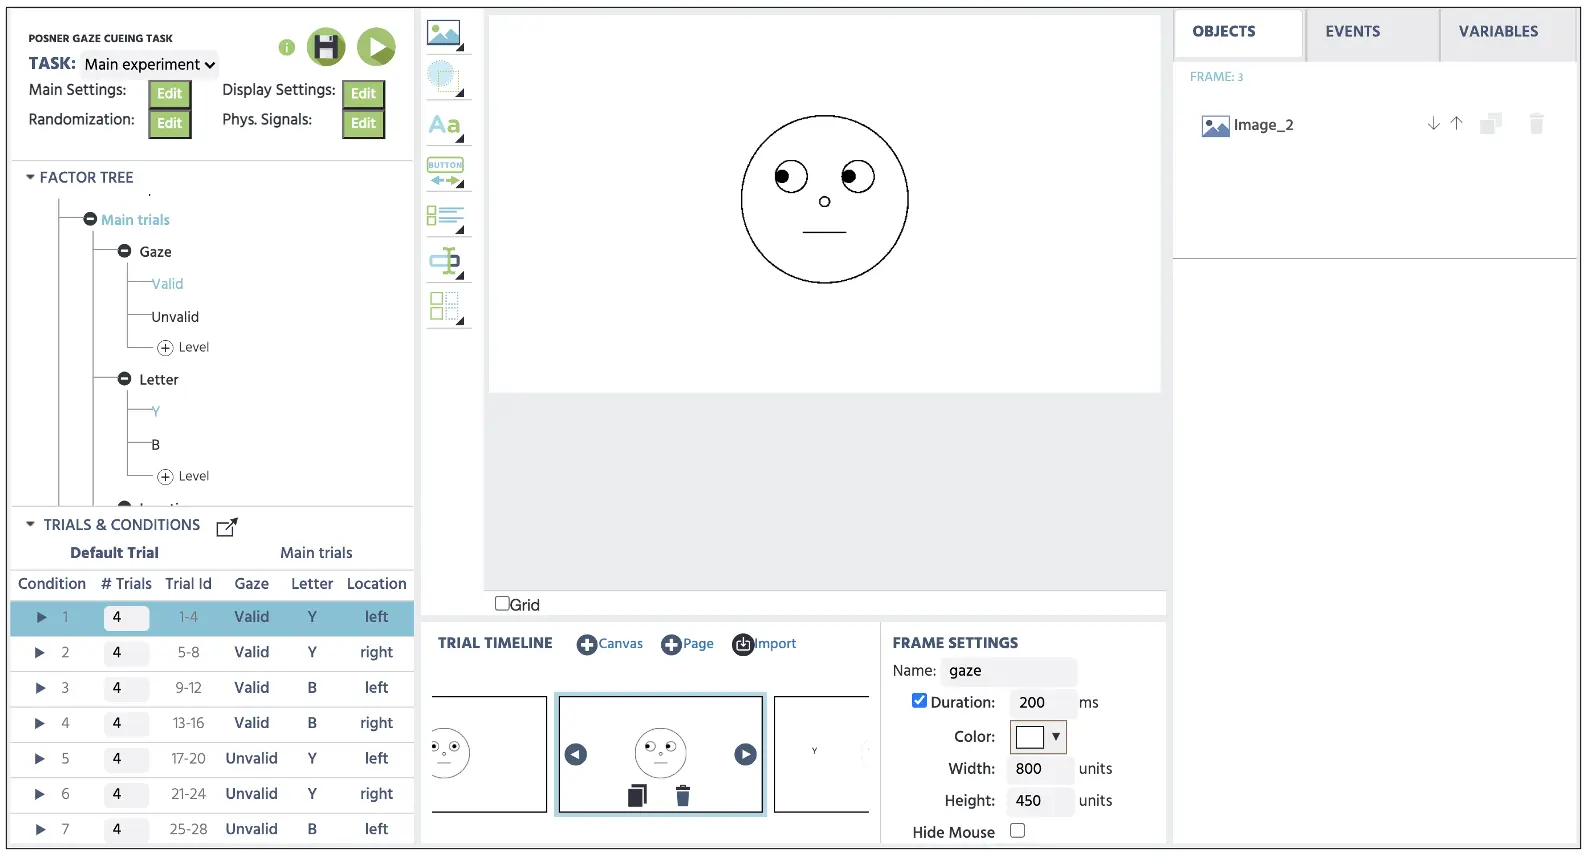 Figure 9. Display of 3rd frame presenting eft gaze image following the 1st condition selection.
Frame 4
In this frame, we will present the same gaze image from the third frame with the same Object Properties options. This will pair with the target letter display associated with each condition. Again by looking at condition 1 (make sure condition 1 is selected), we are presenting four trials of valid trial that will display the target “Y” located on the left side of the gaze. Here, presenting the target letter next to the gaze will exactly mirror the fixation cross display by clicking on the DisplayText and type in the letter “Y.” Again, by referencing Trials & Conditions, make sure that the target is presenting on the left side of the gaze. Because this is a valid trial, the gaze should orient to the same target location (see Figure 10 below). Again, the stimuli setup will apply to all four trials in each condition, and we could continually refer to the Trials & Conditions to set the rest of the conditions. With that completion, we now have all the stimuli display in this section and will not move onto Part 4 to program the logical sequence that the Labvance will initiate in each frame. Again, we will also follow the same steps above for the 2nd group of Catch Trials, but we will not present any target letters, as participants are required to withhold their response during this time.
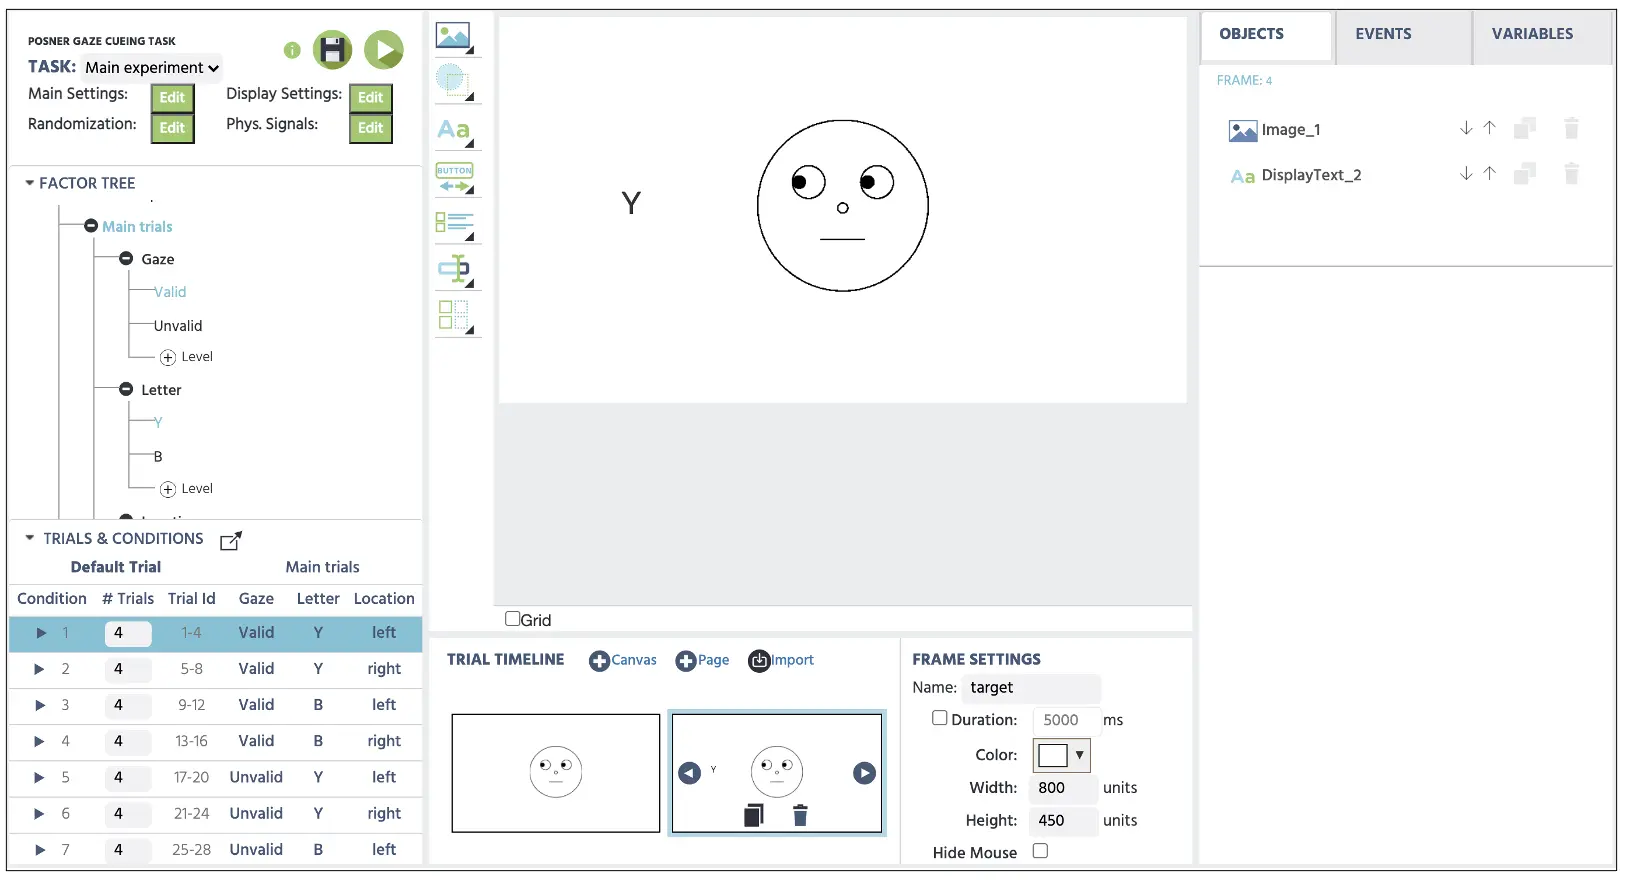 Figure 10. Display of 4th frame presenting left gaze image with the target letter presentation following the 1st condition selection.
Part IV: Events setup (programming display duration, response evaluation, and variable recording)
Before proceeding, we will create two new variables (reaction time and correct response) that will serve as the dependent variable measurements. To create new variables, we will click on the Variables on the top-right display and select Add Variable. From the new variable window, we will proceed with the following steps for the names and types indicated below in bulletpoins (also in Figure 11 below). These variables will store important behavioral measurements of how quickly the participant discriminated the target letter and their respective accuracy performance.
- Reaction time - measured in milliseconds from the frame onset
- Correct - response accuracy (1=correct; 0=incorrect)
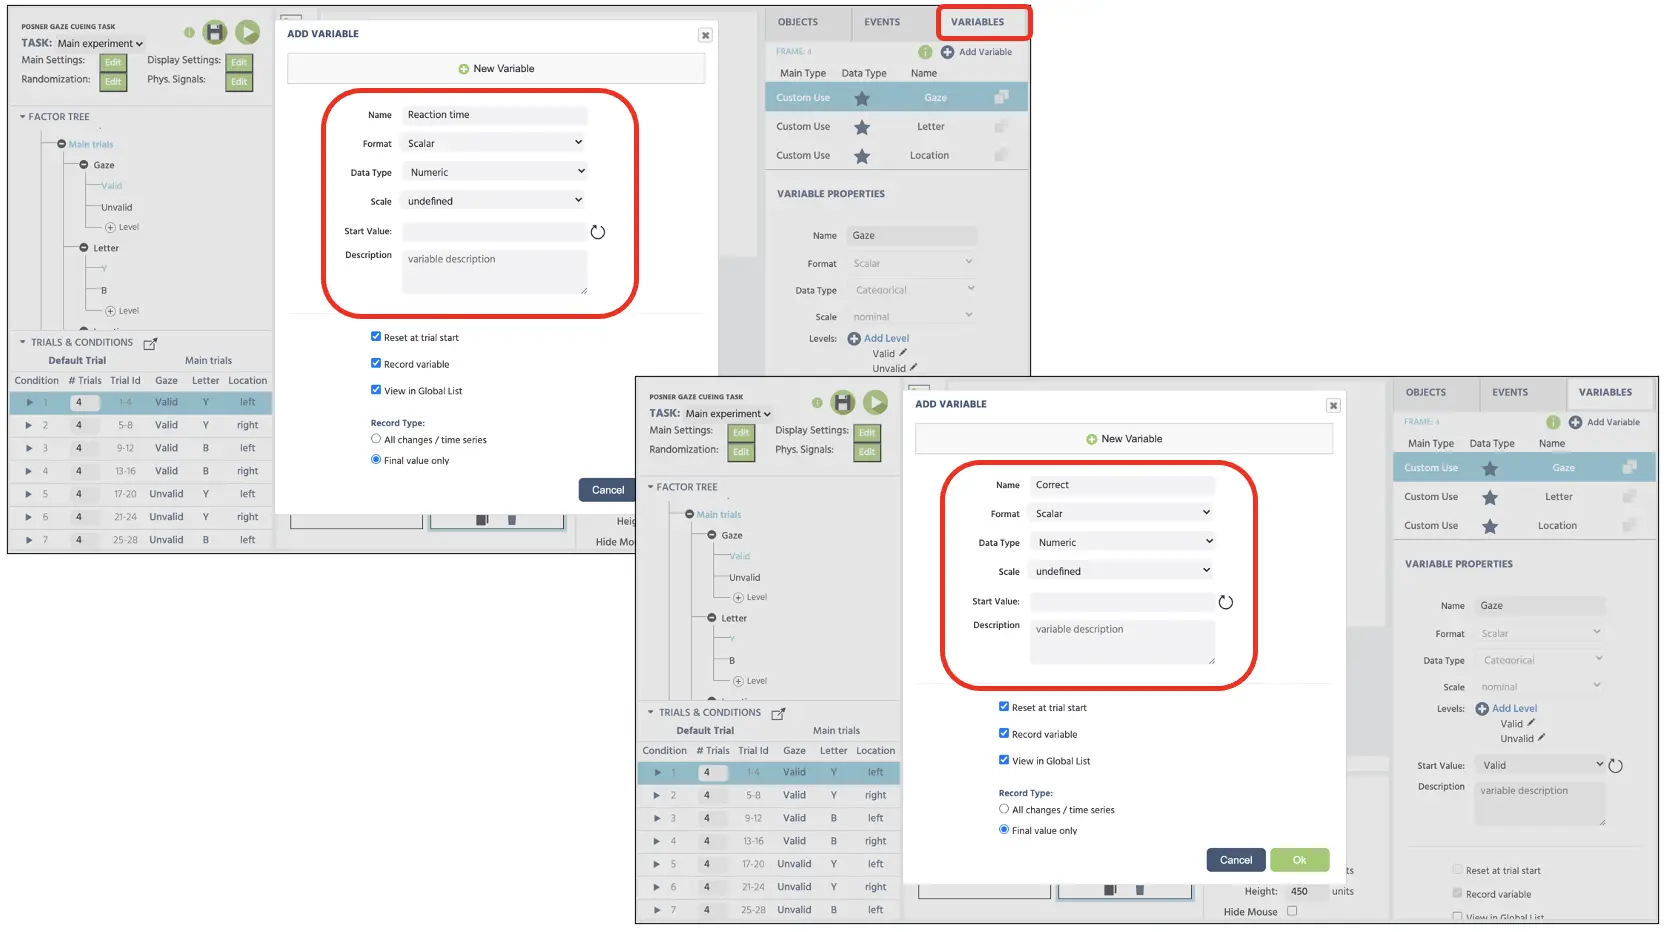 Figure 11. Display of new variables (response time & correct) creation. Both variables are set with the numeric data type.
Following the general frame sequence from Part II (see Figure 1 above), we will create the Event structure separately per frame, starting with programming the fixation cross display for 900ms.
Frame 1 Event: Fixation cross display
In this frame, we want to present the fixation cross at the center of the display for 900 ms. Therefore, the logical sequence in this frame is:
- As soon as the frame starts
- Wait 900 ms
- And then jump to the next frame
To create this Event, click on the Events on the top right next to the Variables and select Frame Event (on this frame only). In the first window dialogue, we can name the Events as “Start” (Figure 12A) and click next to proceed to the Trigger option. Here, the trigger type is Trial and Frame Trigger → Frame Start (following the 1st logical sequence above; see also Figure 12B). With this trigger, we want to initiate the 900 ms frame delay action (2nd logical sequence); therefore, this can be set with Add Action → Delayed Action (Time callback) and set 900 ms in the delay box (see Figure 12C). Finally, for the last logical sequence, click on Add Action in the Action Sequence box and proceed with Jump Action → Jump to → select the Next Frame (see Figure 12D). The Labvanced will always follow this logical sequence for the fixation cross-presentation for all the trials with this setup. Again, we will also follow the same steps above for the 2nd group of Catch Trials.
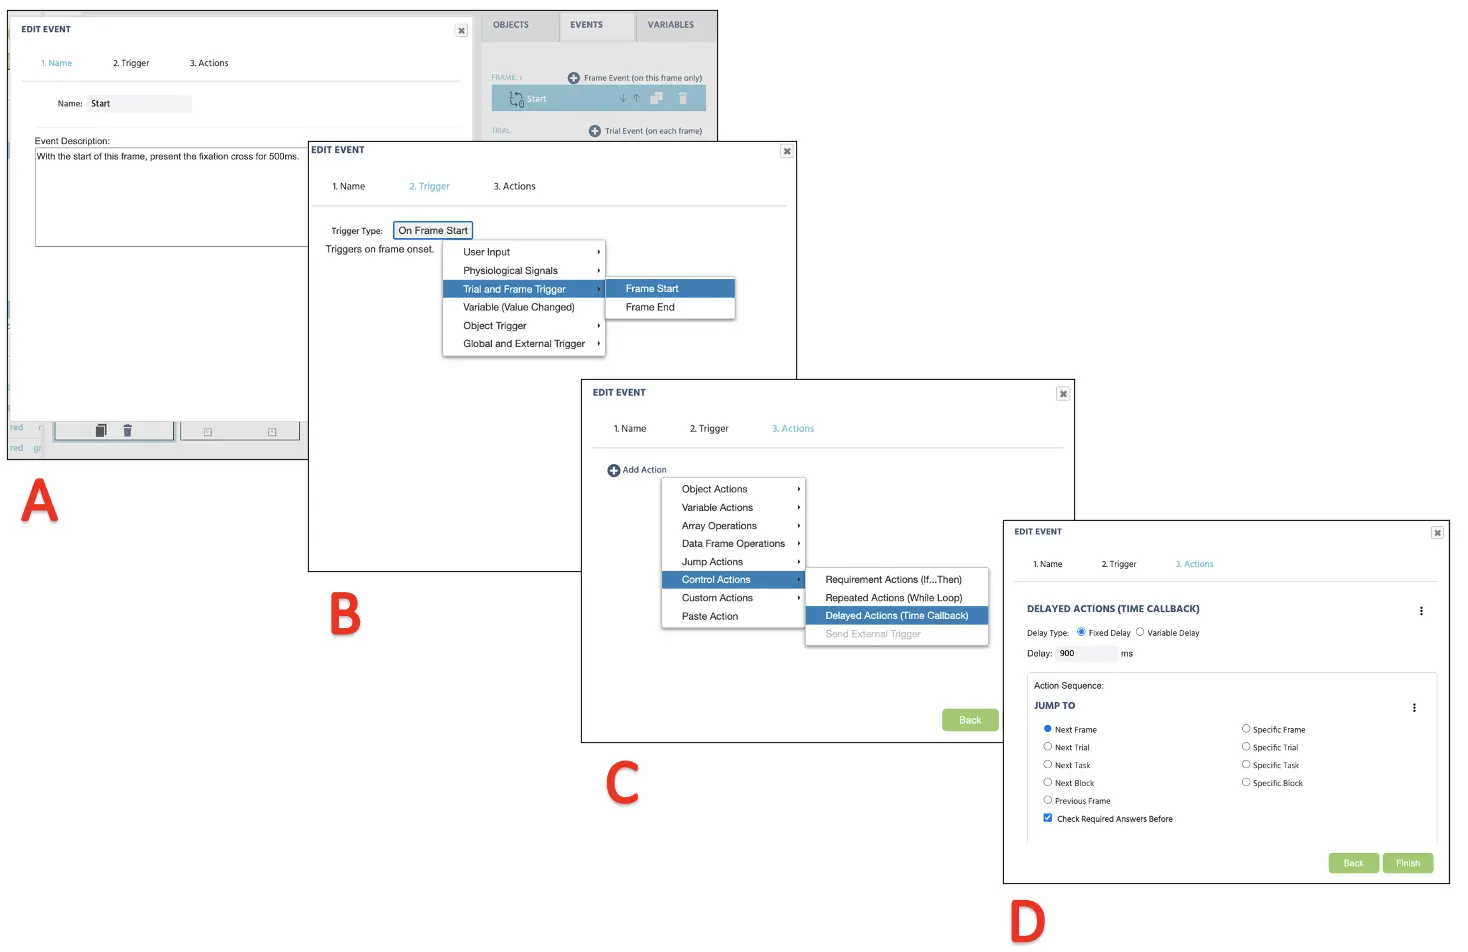 Figure 12. Display of Event creation for fixation cross (frame 1) presentation following Event naming (A), Trigger (B), Action determination (C), and Action execution (D).
Frame 2 Event: Neutral gaze display
In this frame, we want to present the neutral gaze for 900 ms. The setup will mirror the fixation cross above with the following logical sequence:
- As soon as the frame starts containing the neutral gaze
- Wait 900 ms
- And then jump to the next frame
The procedure will be the same as displayed in Figure 12 above. Again, we will also follow the same steps above for the 2nd group of Catch Trials.
Frame 3 Event: Oriented gaze display
In this frame, we want to present the left or right-oriented gaze for 200 ms. The setup will resemble the fixation cross and neutral gaze setup above with the following logical sequence:
- As soon as the frame starts containing the oriented gaze and target letter
- Wait 200 ms
- And then jump to the next frame
Besides the shorter duration of the 200 ms display, the rest of the procedure will be identical to Figure 12 above. Again, we will also follow the same steps above for the 2nd group of Catch Trials.
Frame 4 Event Part 1: Target letter presentation and keypress evaluation (main trials)
- In this last frame, we want to present the target letter and have the program evaluate the participant’s keypress response and determine its correctness. Therefore, the logical sequence we will approach is: As soon as the frame starts containing the oriented gaze and target letter
- Wait for the keypress input (triggered by “Y” or “B” keypresses)
- Compare the keypress with the target letter in this condition referencing the Letter variable (i.e., if condition 1 Letter is Y, examine if it matches the keypress response).
- If the letter and keypress match, assign Correct == 1indicating correct response
- Otherwise, assign Correct == 0 indicating incorrect response
- And then jump to the Next Trial
As previously mentioned, the main task requires participants to pay attention to the presented letter and discriminate using the same letter keypress. Subsequently, we will ask the Labvanced program to refer to the Letter factor under Trials & Conditions and evaluate whether the participant’s keypress matches the letter in that condition. To create this Event, we will begin by clicking the Events and select Frame Event (on this frame only). Here we can name the Event as the “Reaction.” Since this Event is indicative of a participant's keypress, the trigger would be the User Input → Keyboard Trigger. Here we can establish two allowable keypresses (see Figure 13 below), which are “Y” and “B.” After clicking next, the Action Sequence we will proceed with Control Actions → Requirement Actions (If...then).
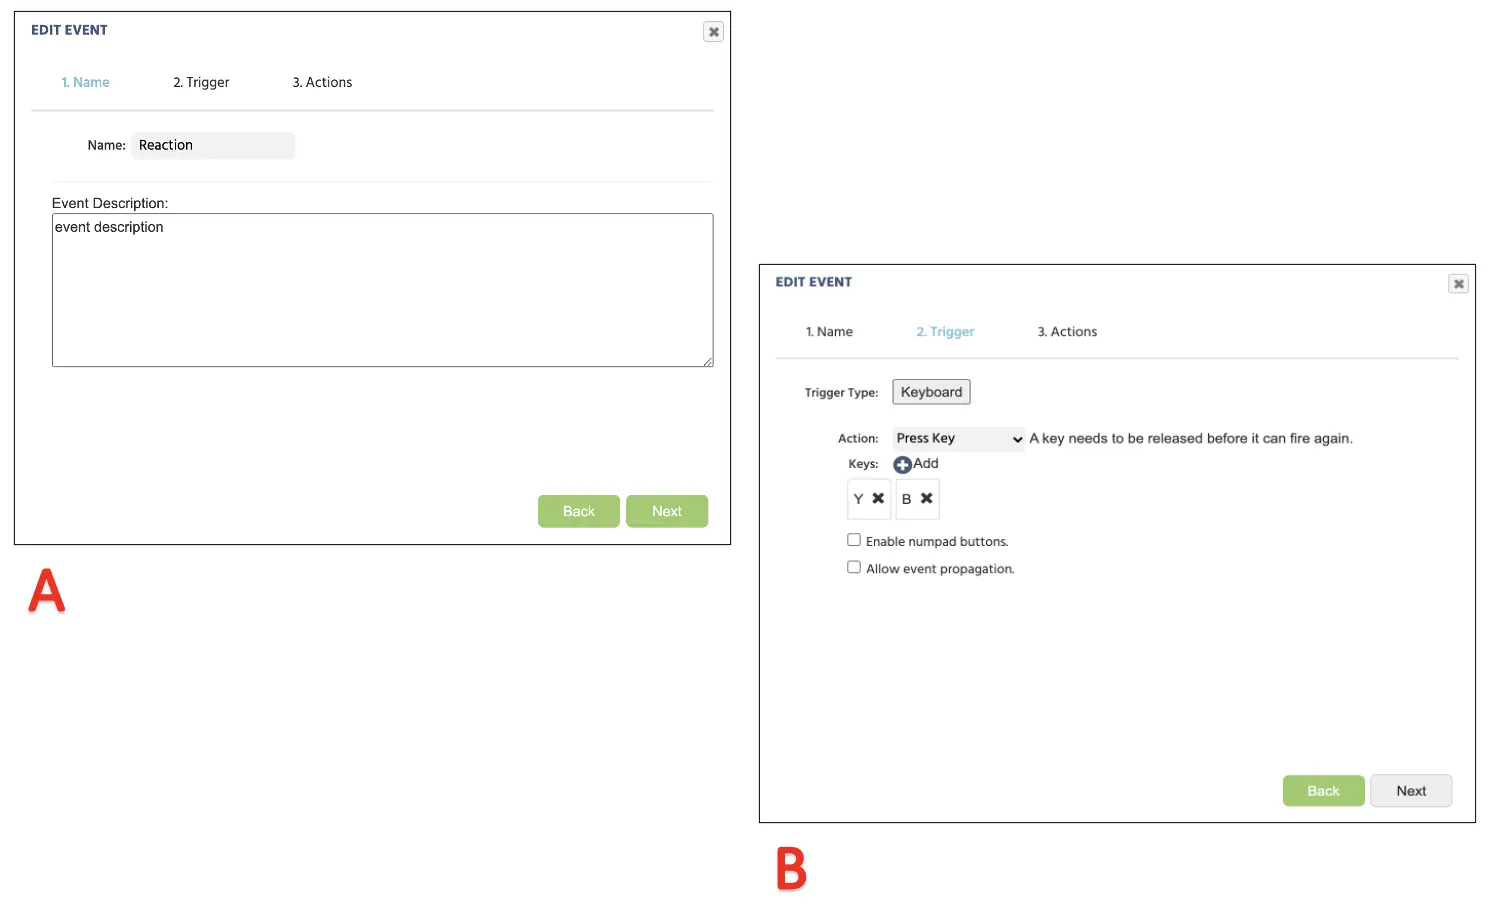 Figure 13. Display of Event creation for keypress assignment following Event naming (A), Trigger type assignment with allowable keypress responses (B).
At this point, the conditional argument established through the Requirement Actions separates into two parts: If and Then. We will begin by constructing the If portion first, creating conditions for the program to follow before proceeding to the Then part.
For the If part, we will establish if the keypress response matches the determined letter presentation established at the Trials & Conditions. Click on the left pencil icon to select a variable and set it to Letter (Figure 14A). On the right side, set the String value and type in “Y” (Figure 14B). Underneath, click on the Requirement to create one more set of conditions and set the new left side as Trigger(keyboard) → ID of Key (Figure 14C). On the right side, we will set the String value again and type in “Y” once more (Figure 14D). The basic idea of this setup is:
- IF the target letter is Y in this condition and the keypress is also Y, THEN make X action
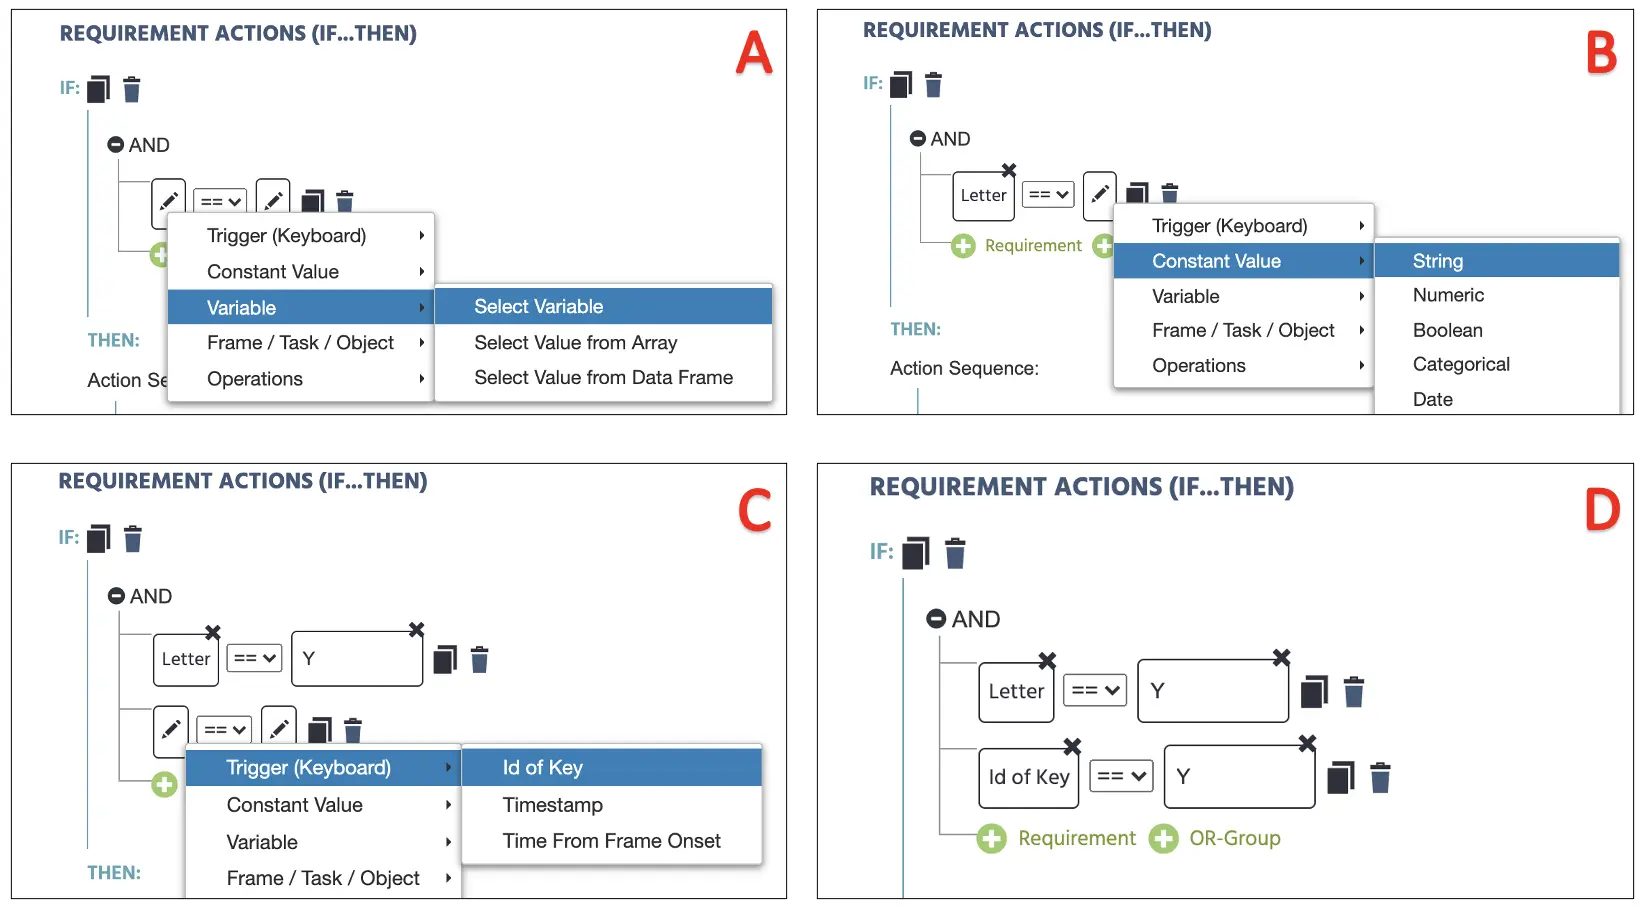 Figure 14. Display of Event creation for keypress assignment following variable determination (A), associated condition (B), and keypress response assessment (C & D).
Proceeding to the Then part below, we will determine what course of action the program will follow. Since the “Y” keypress is the correct response when the target letter is “Y,” we will record this as the correct response by assigning a numeric value 1 to the Correct variable. To do this, click Add Action → Variable Actions → Set/Record variable. On the left side, select Correct variable, and on the right, insert the Constant Value → Numeric value of 1 (see Figure 15).
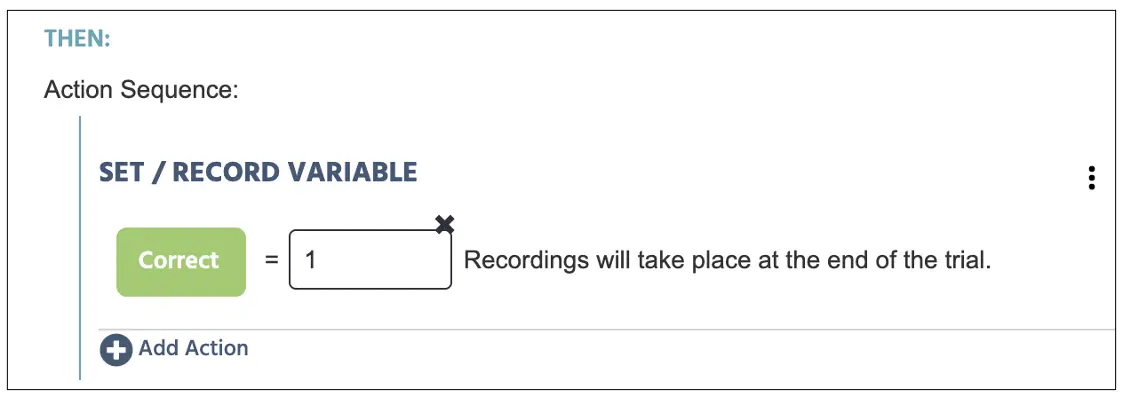 Figure 15. Display of Event creation proceeding figure 14. The Set/Record determines the Correct variable with 1 = correct (0 if otherwise) if the conditions are satisfied with the figure 14 setup.
Afterward, click on the Add Else If Case to establish the correct “B” letter response as well. The procedure will remain the same as above, except we will type in B on the right side for both letter display and keypress conditions. The Then part will stay the same where we will store the Correct variable with numeric 1 value (see Figure 16 below).
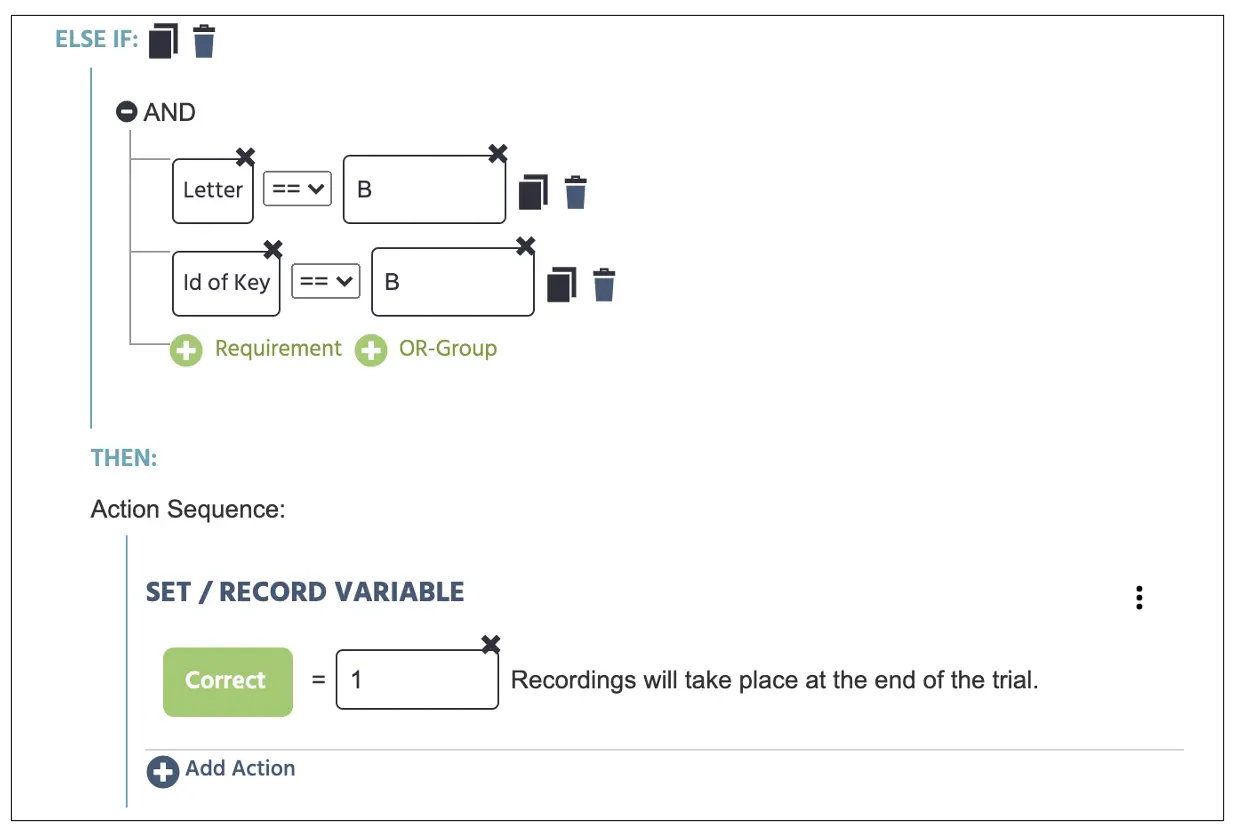 Figure 16. Display of Event creation for keypress assignment for the Else If case beyond figures 14 & 15.
Lastly, we need to set the final condition where the keypress response does not satisfy the aforementioned correct response requirements established above. Here, we can click on the Add Else Case below and set the Correct variable to a Numeric value of 0 (see Figure 17A below). With this final setup, the Labvanced will store any incorrect response as 0 in the Correct variable in any given trial. Afterward, click Add Action → Variable Actions → Set/Record variable once more and select Reaction variable on the left side. On the right, proceed to Frame/ Task/ Object → Frame → Time From Frame Onset (see Figure 17B below). With this, not only are we asking the program to evaluate and record the Correct responses, but the program will also measure the keypress Reaction time in ms. Finally, we would need the trials to proceed after every response continually, so we will select Add Action → Jump Actions and select Next Trial (see Figure 17C below). Click Finish at the bottom of the window to complete the final Events setup for this study.
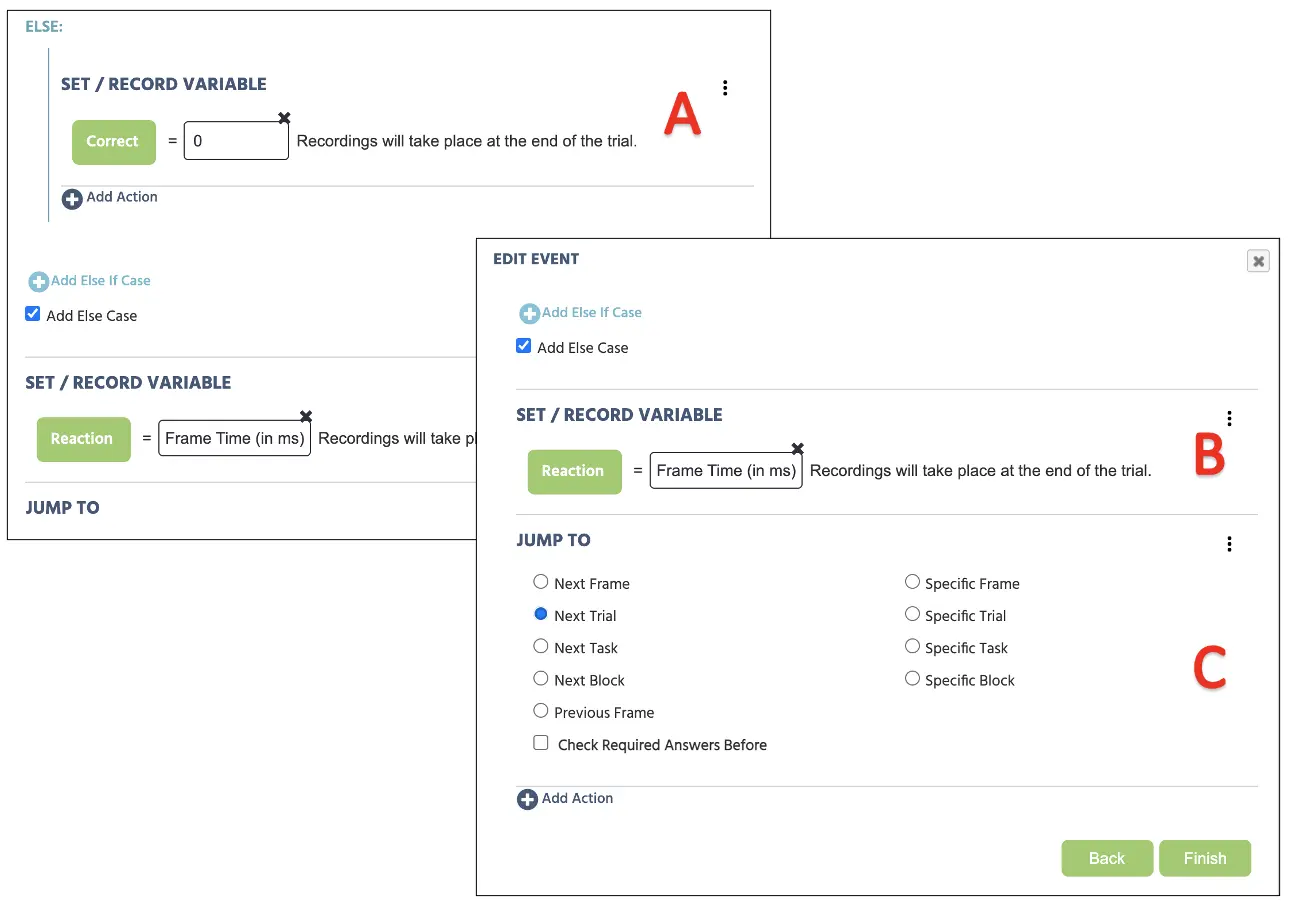 Figure 17. Display of continuing Event creation from Figure 16 for keypress assignment for the Else If case (A), reaction time recording (B), and jump action to subsequent trial (C).
Frame 4 Event Part II: No letter presentation and keypress evaluation (catch trials)
For the last frame involving the catch trials, we are not presenting the target letter and the gaze will remain 2000 ms. Here, any keypress would be considered incorrect, and the correct response would be considered withholding any keypress for the entire 2000 ms duration. Here we have two Events. First Event pertains to wait 2000 ms, and the second Event will log any keypress response and assign the value 0 to the Correct variable. Therefore, the two logical sequences we will approach is:
First Event: 2000ms frame time
- As soon as the frame starts containing the oriented gaze
- Wait 2000 ms
- Jump to the next trail
Second Event: Keypress evaluation
- IF keypress is “Y” or “B,” THEN assign assign Correct == 0 indicating incorrect response
To create the first Event, click on the Events on the top right next to the Variables and select Frame Event (on this frame only). In the first window dialogue, we can name the Events as “Start” (see also Figure 12A above) and click next to proceed to the Trigger option. Here, the trigger type is Trial and Frame Trigger → Frame Start (following the 1st logical sequence above; see also Figure 12B). With this trigger, we want to initiate the 2000 ms frame delay action (2nd logical sequence); therefore, this can be set with Add Action → Delayed Action (Time callback) and set 2000 ms in the delay box (see also Figure 12C above). Finally, for the last logical sequence, click on Add Action in the Action Sequence box and proceed with Jump Action → Jump to → select the Next Frame (see also Figure 12D above).
For the second Event creation, the general procedure will follow the Figure 14 above. However, in the Requirement Action (If...Then) section, we will assign both keypresses as the incorrect responses with the OR setup (see Figure 18). This allows the program to recognize if “B” OR “Y” keypresses to associate as the Correct == 0. Click Finish at the bottom of the window to complete the final Events setup for this study.
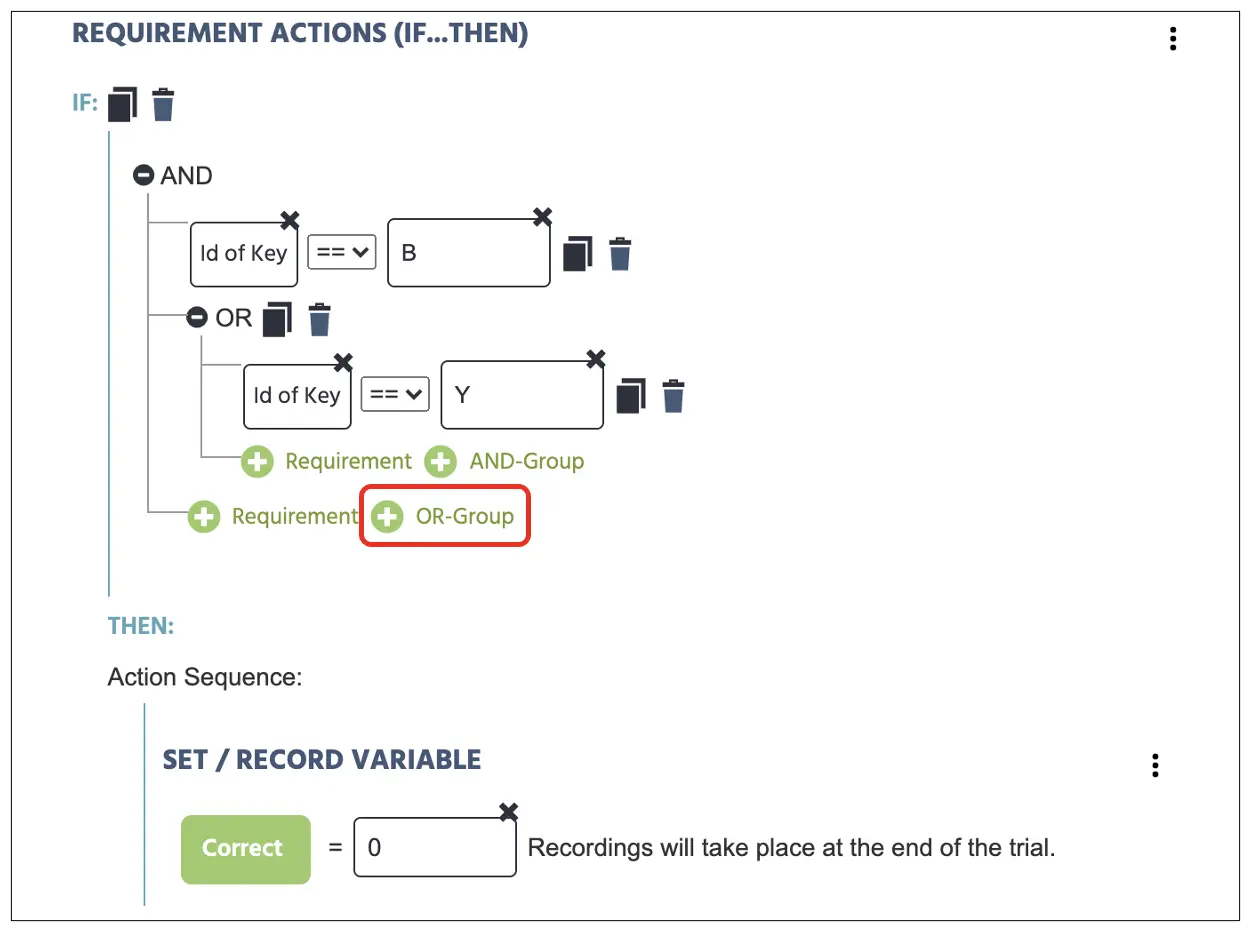 Figure 18. Display of Event creation for the catch trials assigning both keypresses as the 0 (incorrect) response. Both keys are combined in the logical sequence by pressing the OR option indicated in the red box.
Part V: Block setup & Final note
With this final setup, we now have a working Posner’s gaze cueing paradigm comprised of 36 trials in this block. Depending on the study, researchers may need to present multiple blocks of 36 trials to the participants depending on their investigation. Fortunately, Labvanced allows organizing the study in the Study Design page to organize different blocks (see Figure 19). Furthermore, we can also implement the Randomization Separator as seen in the Sessions column (see Figure 19). Having this separator allows to counterbalance the blocks within the two horizontal separators that could aid researchers with their particular manipulation and theoretical investigation.
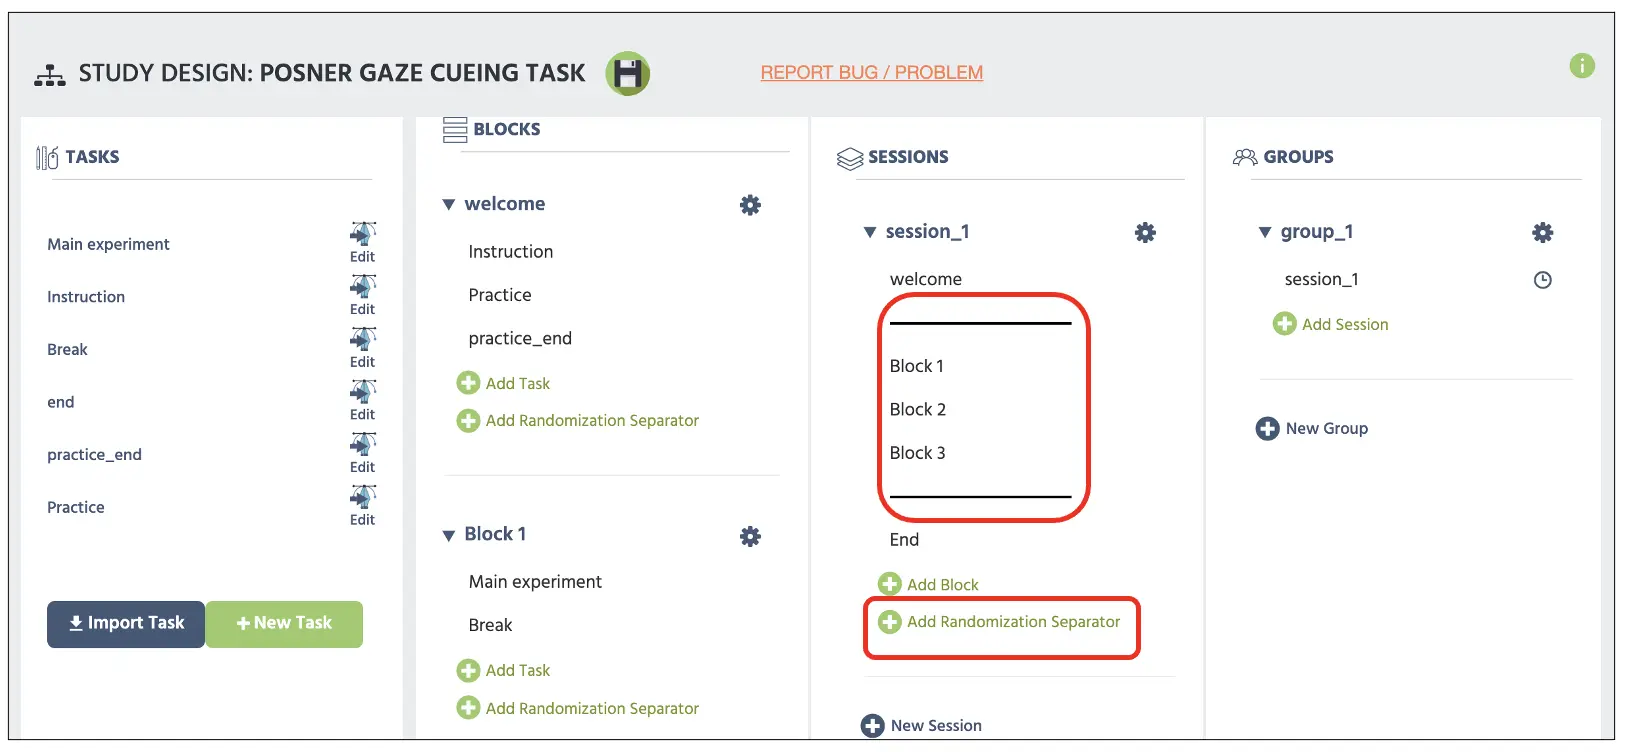 Figure 19. Display of main Study Design page with the top red box displaying two parallel bars serving as the Randomization separator added by the Add Randomization Separator below.
The only thing that remains in this walkthrough is the instruction/consent document, practice block, demographic questions, and other protocols, but that varies based on the researcher and institution to halt this walkthrough. For more information on text creation, please view our resources link for additional information. Furthermore, the constructed study is also available as the template in our Library using this link along with other experimental paradigms. With that said, on behalf of the Labvanced team, I hope for the best in all your scientific endeavors and pray that this walkthrough serves as an important cornerstone for your study construction.