Rapid Serial Visual Presentation (RSVP) Task Walkthrough
Rapid serial visual presentation (RSVP) task is a method of displaying texts or images in the central display that streams in quick succession. The observers are required to read or identify the target as quickly as possible in the stream and are notably used in the field of linguistics, neuroscience, and cognitive psychology. This paradigm is commonly used to examine individual reading rates, assessing visual impairments, dyslexia, and attention research (e.g., attentional blink, repetition blindness). There are many different ways to set the RSVP task depending on the researcher’s investigation, but the current walkthrough will create a task that requires detecting word repetition as quickly as possible (see Figure 1 below).
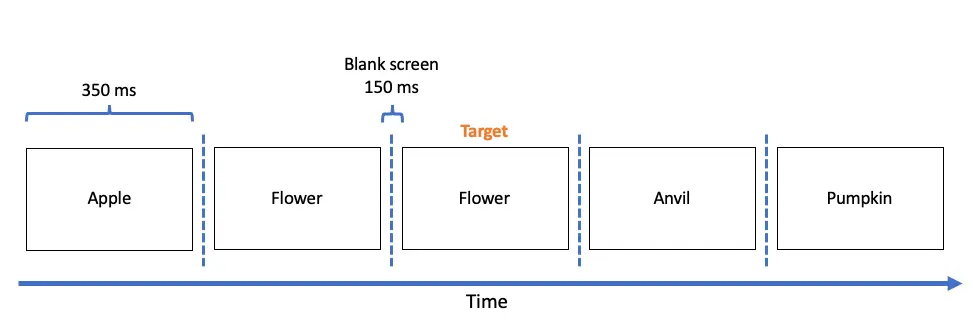 Figure 1. Schematic representation of the primary task of word repetition. Repeated words serve as the target in the identification task (e.g., “Flower”).
Unlike the previous experiments that required manually assigning texts and images, we will use the Data Frame feature in Labvanced to allow the program to reference the CSV datasheet and present the words according to its prepared structure. The Labvanced Data Frame is an ongoing improving feature in the platform that will allow more efficient stimuli presentation and error avoidance during the stimuli setup. Using the Data Frame feature, the current walkthrough will proceed into four parts, comprising:
- Data Frame preparation
- Frames setup
- Stimuli setup
- Events setup
As indicated in the first figure above, the trial display sequence will comprise of:
- Frame 1: 500ms of the fixation cross
- Frame 2: 350ms of the first word presentation (referenced by the Data Frame)
- Frame 3: 150ms of a blank screen
- Frame 4: 350ms of the second word
- Frame 5: 150ms of a blank screen
- Frame 6: 350ms of the third word
- Frame 7: 150ms of a blank screen
- Frame 8: 350ms of the fourth word
- Frame 9: 150ms of a blank screen
- Frame 10: 350ms of the fifth word
Beyond this step-by-step walkthrough, the complete study template is also available using this link. With that context and introduction, let’s dive into creating the Data Frame of this study.
Part I: Data Frame Preparation and variable setup
To prepare the Data Frame in Labvanced, we will prepare a separate Google Sheet. Here, we will list the strings of words that we will present, and the figure below will represent the words that will use for the current task build (see Figure 2 below). It is worth noting that each word is presented an equal number of times as a target. The row indicates the number of trials we will set, and each column represents each frame to display the texts. For example, we will show the serial presentation of pumpkin-plane-flower-flower-anvil in the first trial, with the second flower text serving as the target.
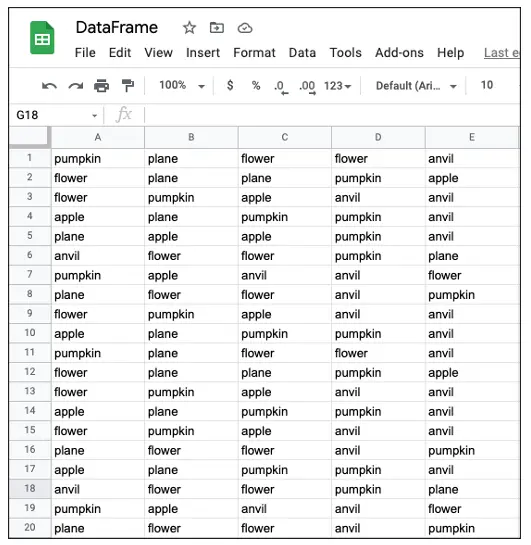
Figure 2. Display of Google Sheet with text setup to display each trial respective of individual rows. Note that the 20 rows depicted will serve the same number of trials in the task editor.
Proceeding to the Labvanced Task Editor, we will open a new canvas frame and create some variables. First, click Add Variable on the top-right display and proceed with the following options depicted in the figure below (see Figure 3). Afterward, click on the green Edit Data Frame button and select Upload 2D CSV Data. This will open the Labvanced File Storage, which will transfer the CSV data from the Google Sheet to this repository. After the transfer, select the same data (named DataFrame.csv in this case) to complete the Data Frame preparation. Proceed to click Ok and save the Data Frame in the Data Frame variable.
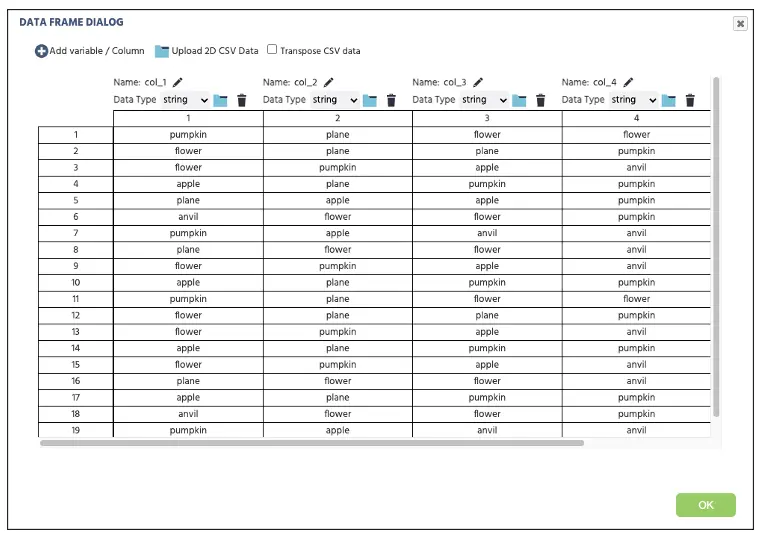 Figure 3. Display of Labvanced Data Frame setup transferred from the Google Sheet in Figure 2.
Before proceeding to the next part, we will create a couple more variables. Similar to the previous steps, locate and click on Add Variable. We will name the variable Word1 with the Data Type set as String (see Figure 4 below). We will replicate this step four more times for variables Word2, Word3, Word4, and Word5. Later in this walkthrough, we will assign each Data Frame column to each variable and link to the frames to display the RSVP texts.
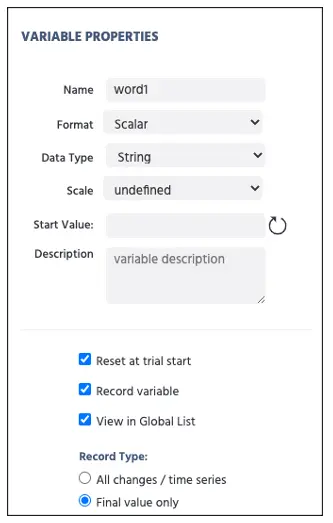
Figure 4. Display of variable creation for word1 with the string data type.
Part II: Frames setup
The second part of this walkthrough involves frames creation that the observers will view during participation. Again, the current task will follow the general procedure mentioned back in Figure 1 comprised of 10 frames. As depicted, a trial will begin with a fixation cross (frame 1) for 500 ms, followed by the presentation of five combinations of text screen (e.g., frame 2) for 350 ms followed by the blank intertrial interval (e.g., frame 3) for 150 ms. To create these frames, we will click on the Canvas button ten times at the bottom of the Labvanced display (see Figure 5A) and name each frame (see Figure 5B) as follows:
- Frame 1: fixation
- Frame 2: word1
- Frame 3: blank
- Frame 4: word2
- Frame 5: blank
- Frame 6: word3
- Frame 7: blank
- Frame 8: word4
- Frame 9: blank
- Frame 10: word5
Afterward, we will input 20 for the # Trials on Trials & Conditions (see Figure 5C) as we present twenty text stream trials as we determined from the Data Frame setup. With this, we now have all the necessary frames to show the trial sequence. In the next part, we will add all the stimuli in each canvas that the participants will view during their participation.
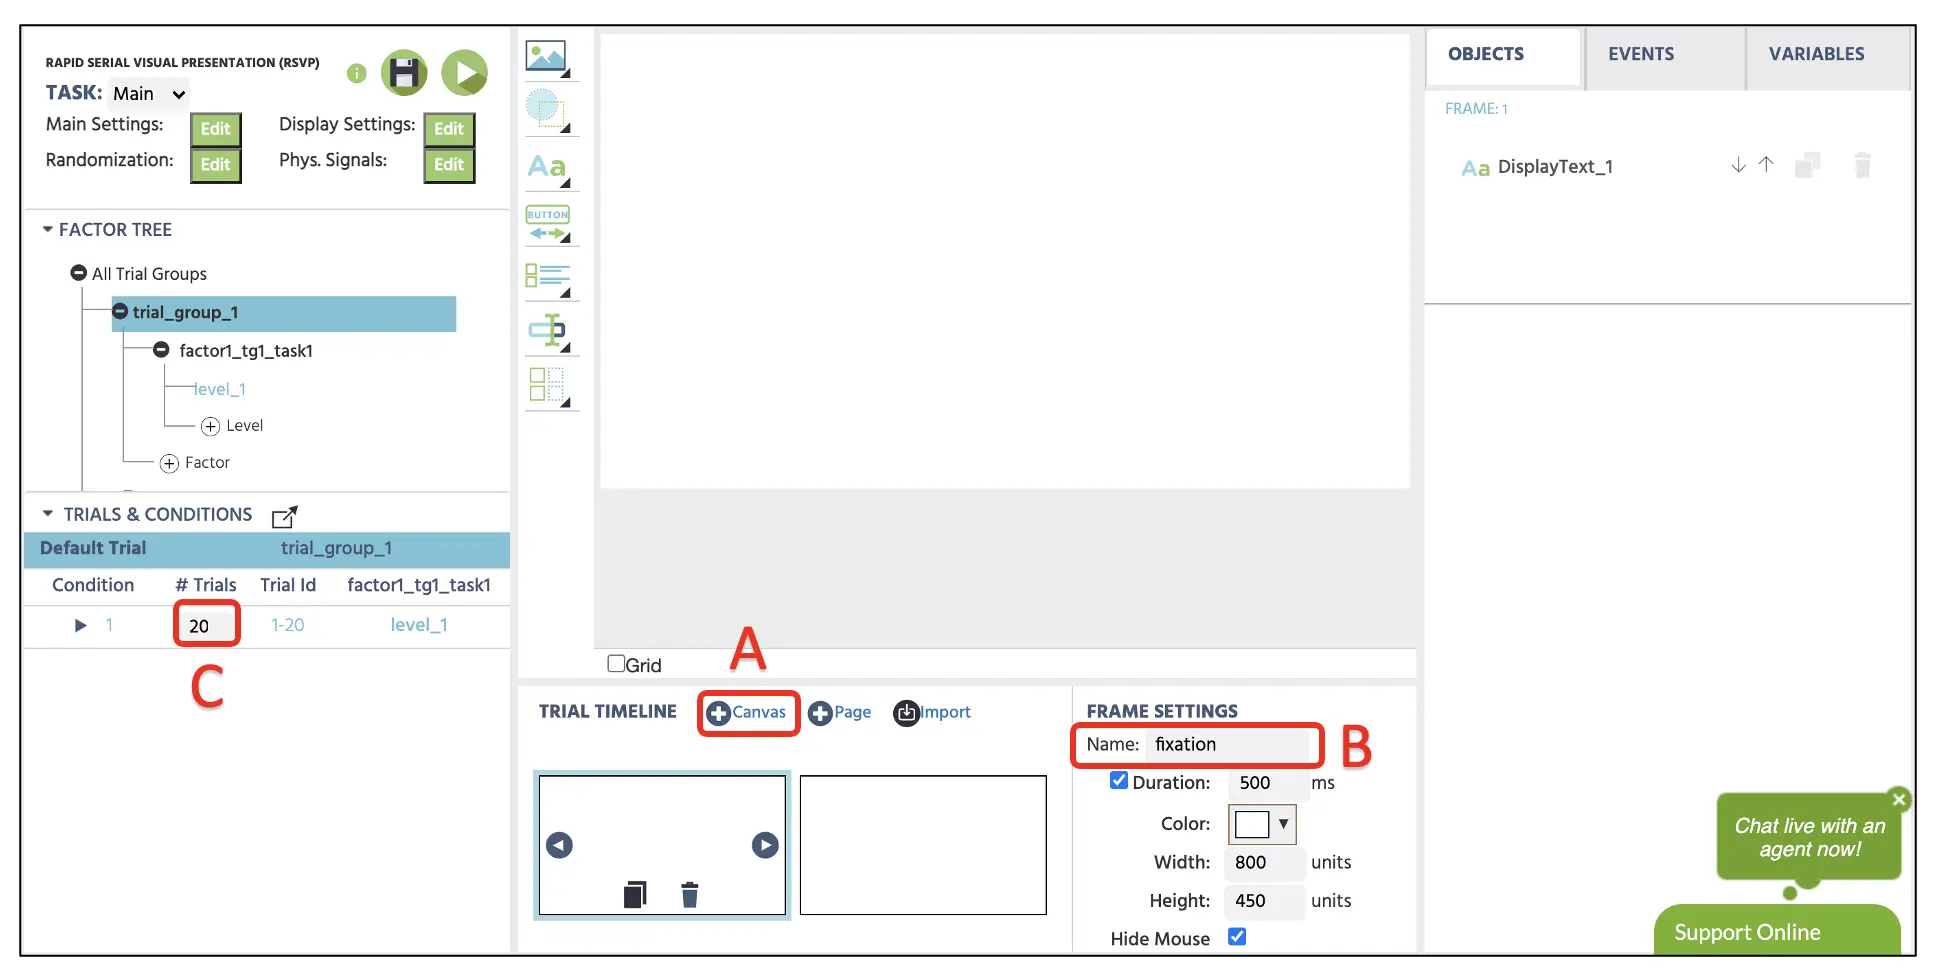 Figure 5. Display of sample trial with Canvas frame creation (A), frame name (B), and the number of trials input (C).
Part III: Stimuli setup (fixation cross, text presentation, and frame duration)
Frame 1
With all the frames we have prepared in the last part, we will now set the individual stimulus in each frame, starting with the fixation cross in the 1st frame. To create a fixation cross, we can start by clicking on the Display Text (see Figure 6A) to implement the textbox in the canvas. Here, we can type in the + in the box with a white-colored font size 36 and position it in the center of the display. We could also type in the specific X & Y frame coordinates at the Object Properties on the right side for the precise center position. If we want to upload the image containing the fixation cross or different stimuli, the Media option (see Figure 6B) can present images, videos, audios, etc. Lastly, we will set 500 ms presentation duration by inserting numeric info in the duration box below the frame name.
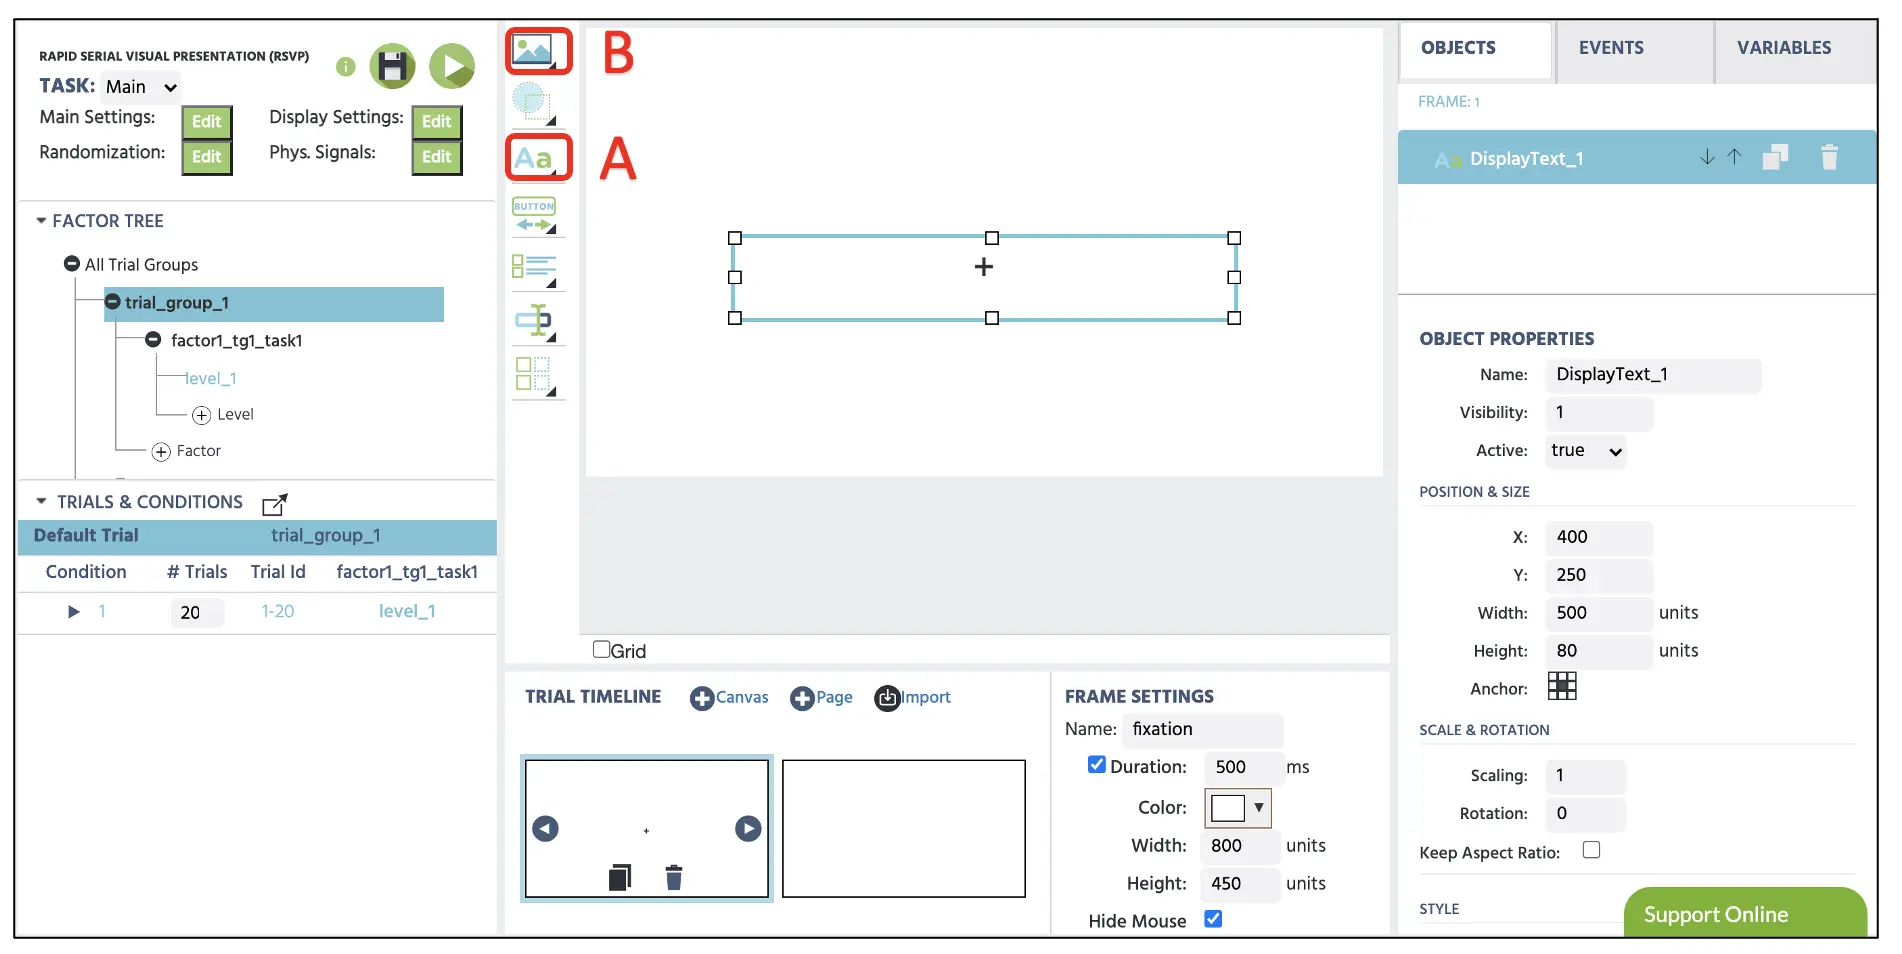 Figure 6. Display of fixation frame creation with the Display Text option(A). Images, videos, and audios could be presented via Media option (B).
Frames 2, 4, 6, 8, 10 (text presentation)
In the second frame, we will present the text linked to the Data Frame. Similar to the first frame, we will set the text display at the central text position. Delete the default message inside the text box, and click the Insert Variable icon (see Figure 7 below). Here, we will insert the variable (e.g., word1) we have established in the previous part corresponding to the identical frame name (e.g., insert word1 variable in the word1 frame). Lastly, we will set 350 in the duration box for the presentation time. For the remaining blank frames (3, 5, 7, 9), we will only place 150 in the duration box as these frames only serve as the intertrial interval between each text presentation.
 Figure 7. Display of text setup with inserted word1 variable. The red box indicates the Insert Variable icon to link a particular variable to the text display.
Part IV: Events setup
In this part, we establish a logical sequence to the Labvanced to execute specific actions in each frame (e.g., frame duration and response assessment). Creating this sequence of actions is known as Events in the Labvanced platform. Before proceeding, we will create a new Reaction time variable to measure the keypress response time when the observer detects the text repetition. Click Add Variable on the top-right display and proceed with the following options depicted in the figure below (see Figure 8).
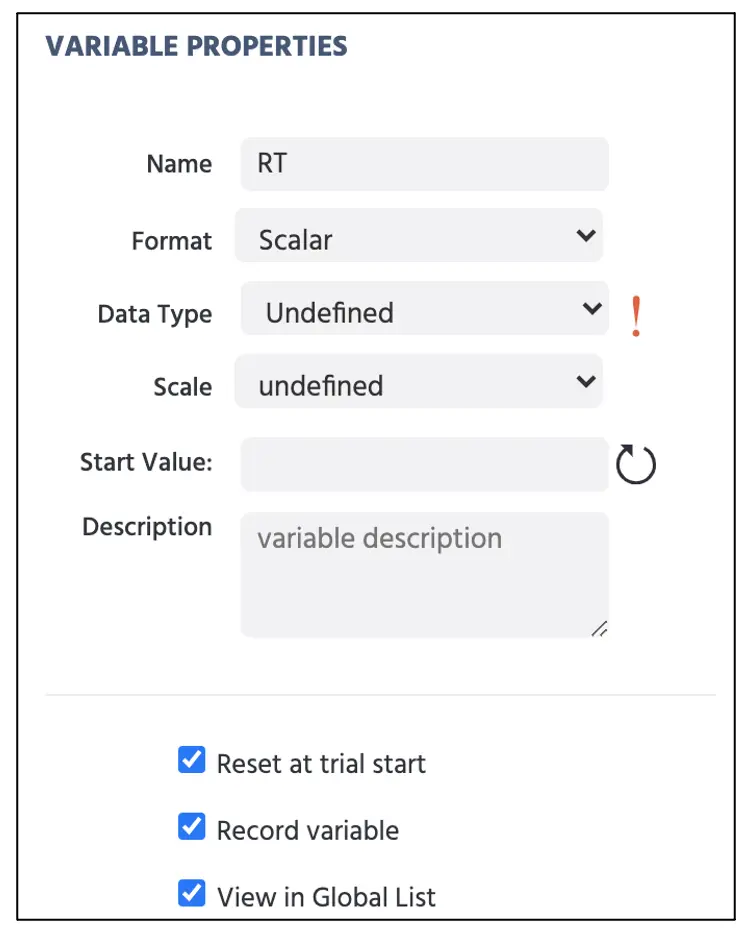 Figure 8. Display of reaction time (RT) variable creation.
Proceeding forward, we will create the first Event linking the Data Frame to each word variable established in the previous part. To create this Event, click on the Events on the top right next to the Variables and select Frame Event (on this frame only). In the first window dialogue, we can name the Events as “Data Frame Link” (Figure 9A) and click next to proceed to the Trigger option. Here, the trigger type is Trial and Frame Trigger → Frame Start. With this trigger, we will add Action → Variable Actions → Set/Record variable and select the word1 variable on the left side. On the right, select Variable → Select Value from Data Frame → Data Frame. We will select the Trial_Nr variable in the row option and place the numeric value of “1” in the column option. We will repeat the steps to set the word2, word3, word4, and word5 variables to the Data Frame. Please note that each variable should be set with a corresponding column number (e.g., word2 with column 2 in the Data Frame event). It is noteworthy to mention that the Trial_Nr in the column option will present the word sequence in the exact order of rows following the Data Frame, whereas Trial_Id will randomize the rows.
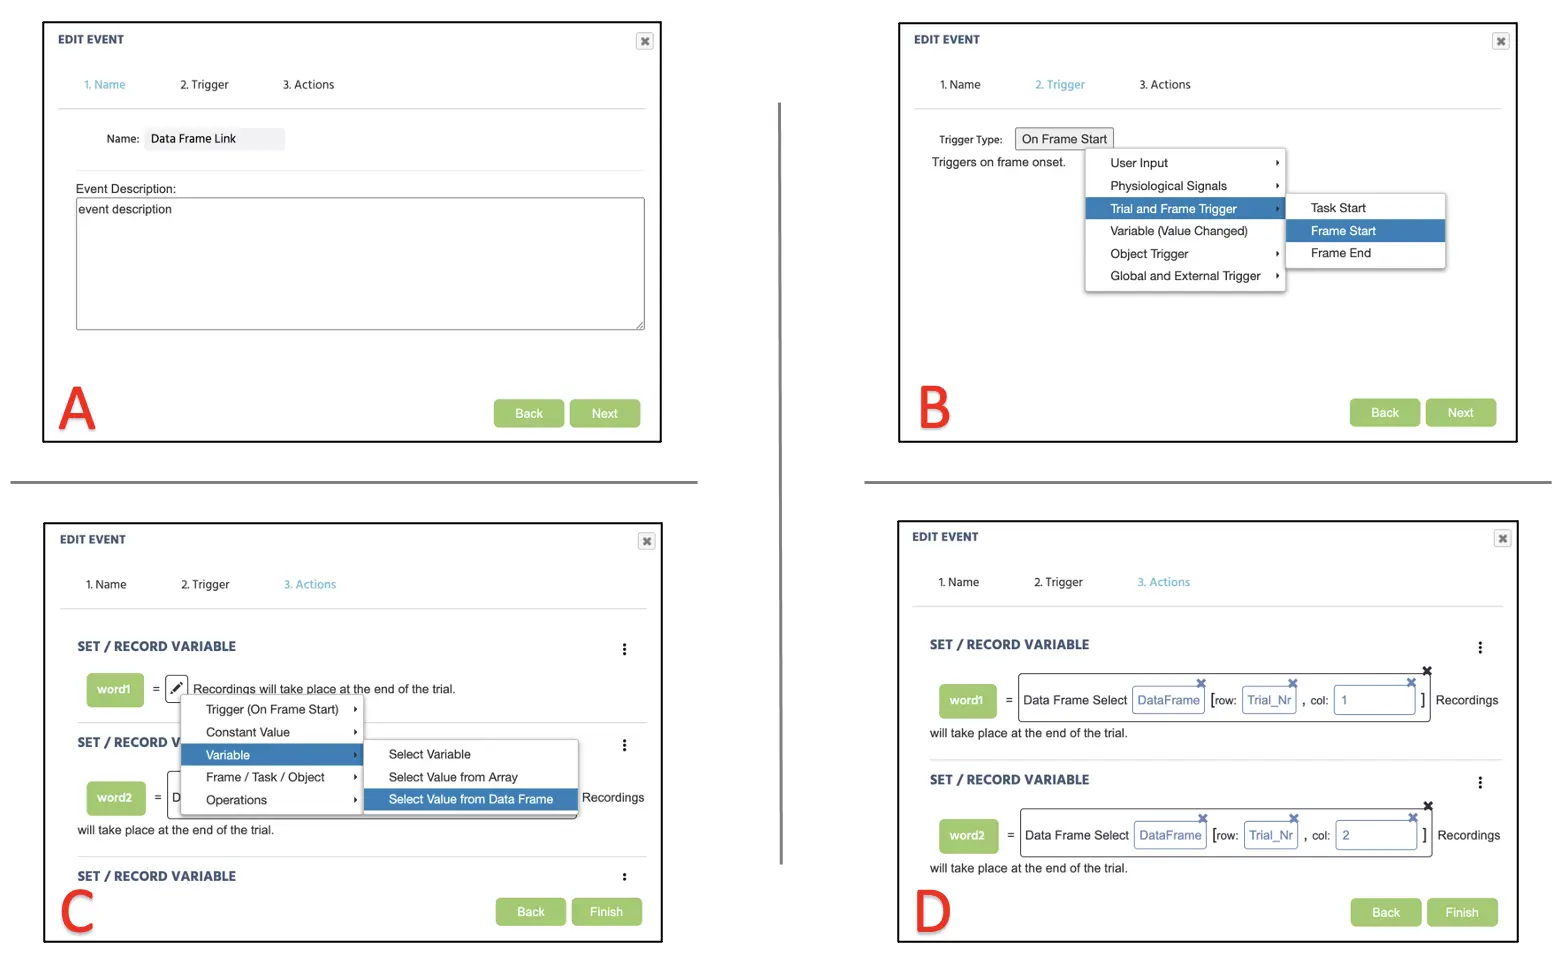 *Figure 9. Display of Event creation for data frame assignment following Event naming (A), Event trigger (B), Data Frame assignment (C), and row & col specification (D).
Afterward, we will create a new Event for the reaction time recording. For this, proceed with Trial Event (on each frame). In the first window dialogue, we can name the Events as “Reaction time” (Figure 10A) and click next to proceed to the Trigger option. Here, the trigger type is the Keyboard trigger with Space as the allowable response. Moving to the Action, add Action → Variable Actions → Set/Record variable and select the RT variable on the left side. On the right, proceed with Trigger (Keyboard) → Time From Frame Onset (see Figure 10B below). With this, we are asking the program to record the keyboard reaction to the target measured in milliseconds from the frame onset. In the same Action window, add Action → Variable Actions → Set/Record variable and select the Frame Name variable on the left side. On the right, proceed with Frame/Task/Object → Frame → Frame Name (see Figure 10C below). Click Finish at the bottom of the window to complete the Events setup for this study.
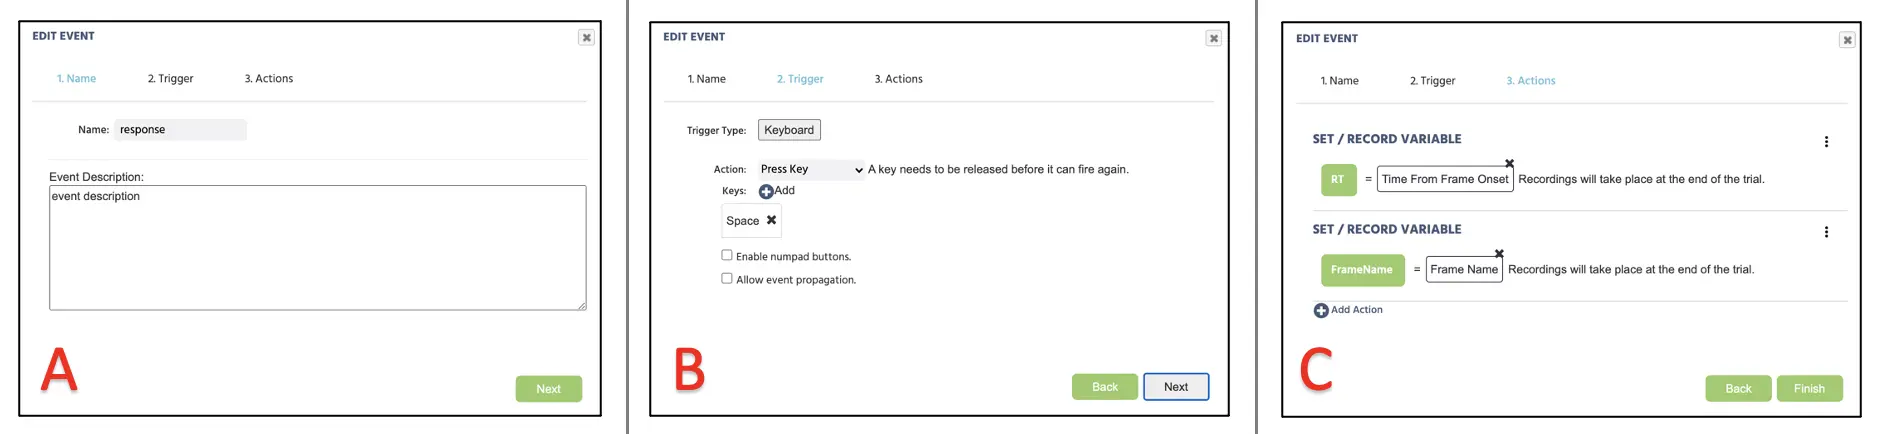 Figure 10. Display of Event creation for data frame assignment following Event naming (A), Event trigger (B), and variable recording (C).
The only thing that remains in this walkthrough is the instruction/consent document, practice block, demographic questions, and other protocols, but it varies based on the researcher and theoretical inquiry. For more information on text creation, please view our resources link for additional information. Furthermore, the constructed study is also available as the library template using this link and other experimental paradigms. With that said, on behalf of the Labvanced team, we hope this walkthrough provides an essential foundation for your study construction.