Implementing Reverse Scoring in Questionnaires
To reverse score an item in Labvanced, you can make use of the Arithmetic Operation setup within the Events system. You can do this by triggering a Variable Value Change and assigning an arithmetic operation action with respect to the Likert values of the scale. For example, if the target item is typically 5, but in a reverse score, it is graded as 0, then an arithmetic operation of 5-Original Value creates the reverse scoring effect.
In the following sections, we’ll explain each of these steps in greater detail. The video below also summarizes the process:
About Reverse Scoring and Context
A Likert scale is a common way to measure people’s attitudes, behaviors, or emotional states using numbers. In most cases, a higher score represents a greater level of the trait being measured. However, in some scales, we apply reverse scoring. Reverse scoring means that the numerical scoring scale runs in the opposite direction.
Let’s consider the Emotion Regulation Checklist (ERC) as an example. You can open the study from the Public Experiment Library for reference by clicking on the ‘Inspect’ button under the study description you can refer to the event setup in detail or Import it to your account to edit it freely.
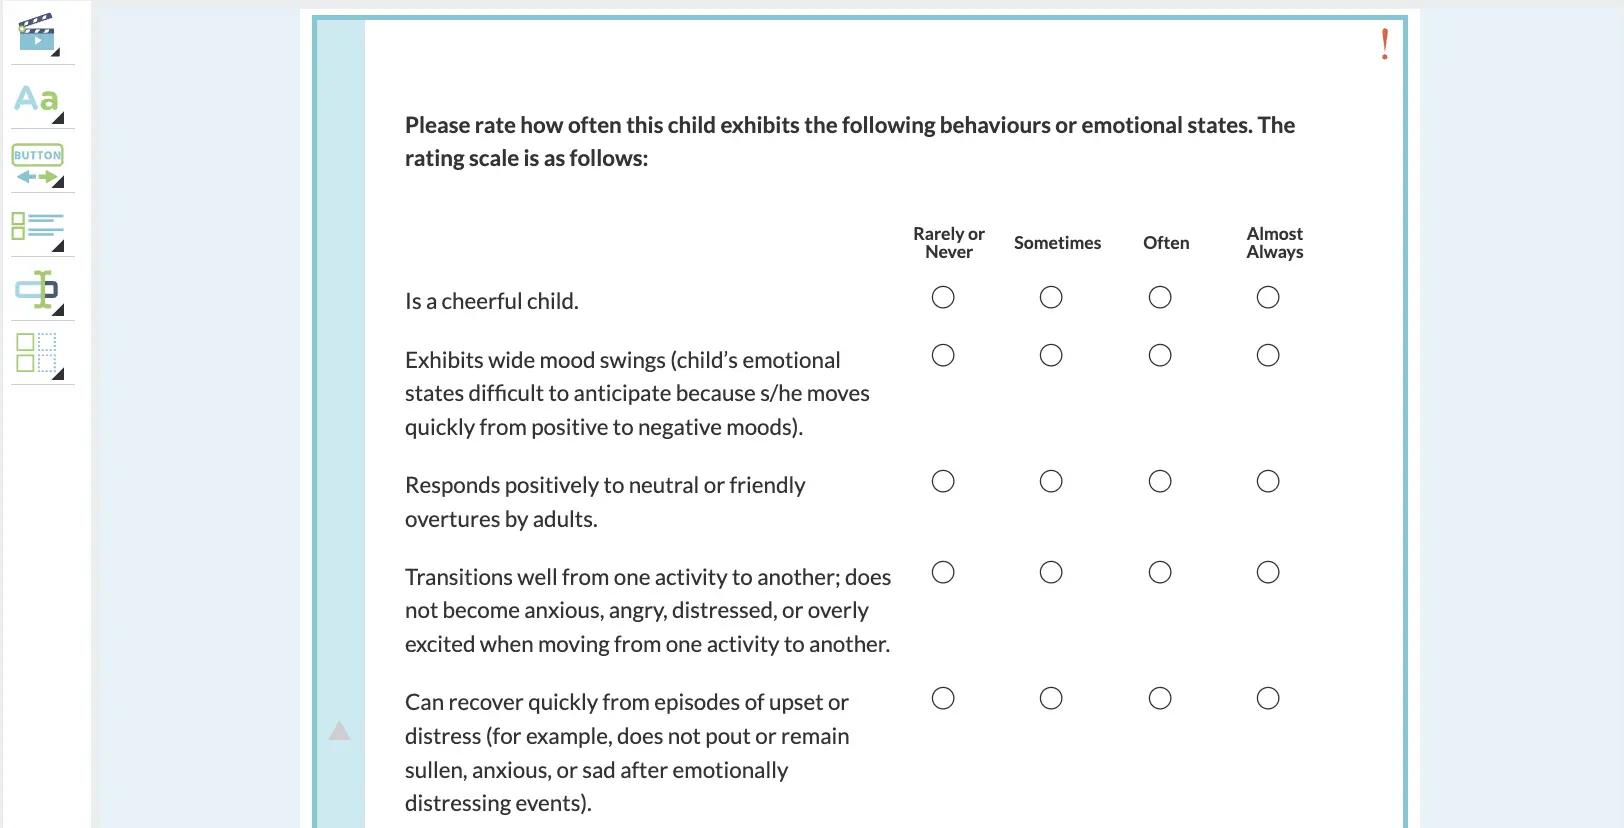
The ERC asks caregivers to indicate how often a child shows certain emotional or behavioral patterns using a 4-point Likert scale and the scoring goes:
- Rarely or never = 1
- Sometimes = 2
- Often = 3
- Almost always = 4
Some items in the ERC are reverse-scored. For those, the scale flips like this:
- Rarely or never = 4
- Sometimes = 3
- Often = 2
- Almost always = 1
This approach to scoring questionnaires helps ensure consistency when analyzing the results as the participant will not be able to easily predict how the scoring is tallied.
Setting Up Reverse Scoring in Labvanced
Let us look into the steps to implement reverse scoring in Labvanced using the ERC scale as an example. You can apply the principles below to any questionnaire that includes reverse-scored items.
Step 1: Add the Questionnaire
- Start by adding a questionnaire object, such as the Matrix object as done below, to your study frame in Labvanced.
- Add all items from the ERC scale into the matrix using the
Object Propertieswindow, as shown in the image below. - Set the number of Likert options to 4. Labvanced will automatically assign the choice options as numeric values 1, 2, 3, 4 (left to right), as shown in the image below.
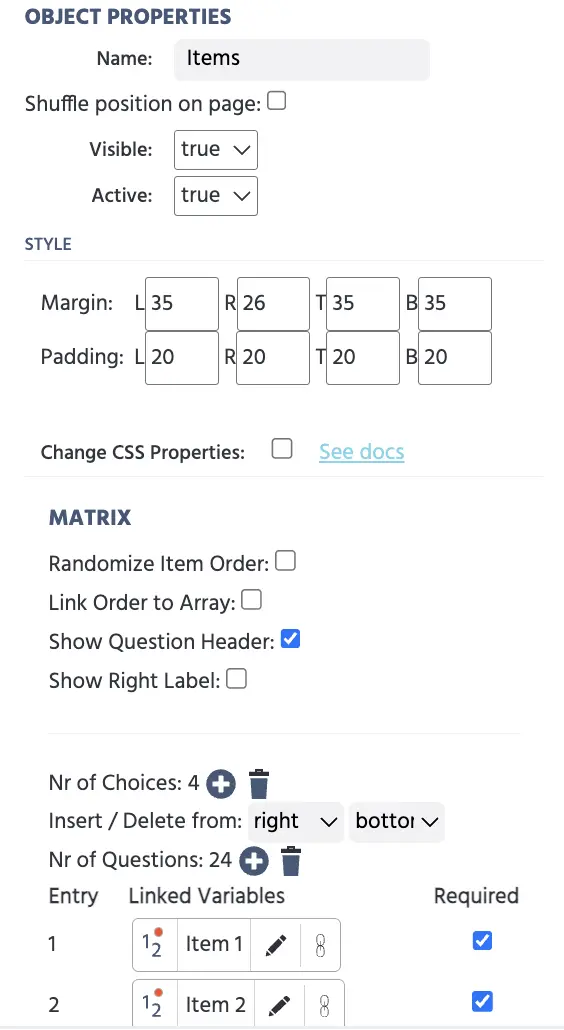
Remember that when you add each item to the matrix, it is set up as a separate variable. So, this would mean that the total number of questions added would be the total number of variables set up till then.
The image below shows what the ERC questionnaire looks like in the editor:
Step 2: Identify Reverse-Scored Items
Identify the specific question items in the scale that need to be reverse-scored. For those items, we want to flip the values so that:
- 1 becomes 4
- 2 becomes 3
- 3 becomes 2
- 4 becomes 1
We achieve this using a simple arithmetic operation setup. For the ERC scale, since the scale ranges from 1 to 4 we set the operation:
- Reversed Score = 5 - Original Score
Step 3: Create Reverse Score Using Events
Now we’ll use Labvanced’s Event System to apply the formula and store the reversed score. The event system is composed of triggers and actions. Here you set up rules, like ‘when this happens’ (trigger) then ‘do this’ (action).
A.) Name
- Go to the
Eventstab in the top-right corner of the Task Editor. - Click
Add Frame Eventto customize the event. - Give your event a name (e.g., “Reverse scoring”) and a short optional description. Clicking
Nextwould let you choose the trigger.
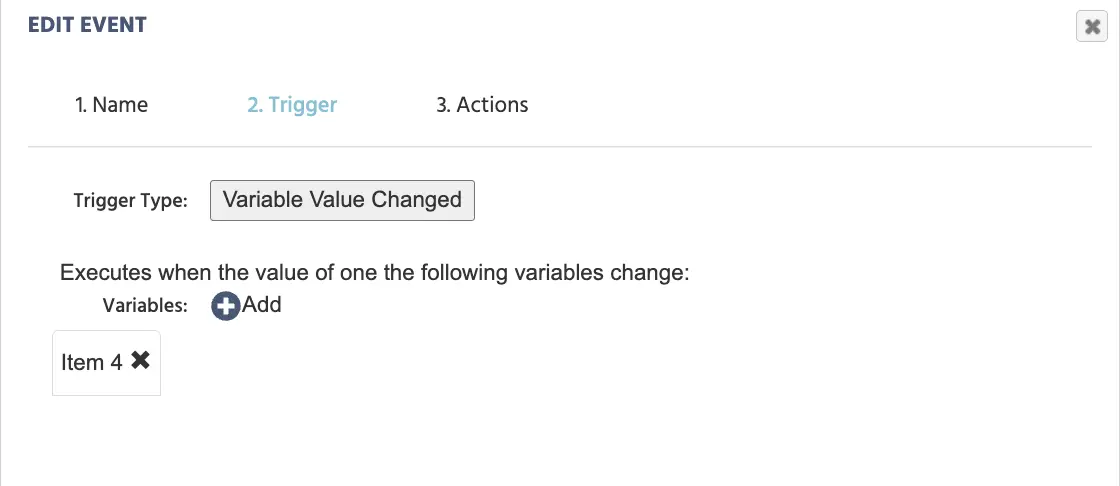
B.) Trigger
Triggers decide when something should happen or what causes this event to activate.
- From the list of Trigger Types, choose
Variable Value Changed. This tells Labvanced to activate the event as soon as a participant provides a response to the item you want to reverse. - Add the variable/s that should trigger this event. For example, if you are reverse scoring Item 4, select that item from the list of variables. This means the event will run every time the participant selects or changes their response to Item 4.
- Click
Nextto move on to defining the Action.
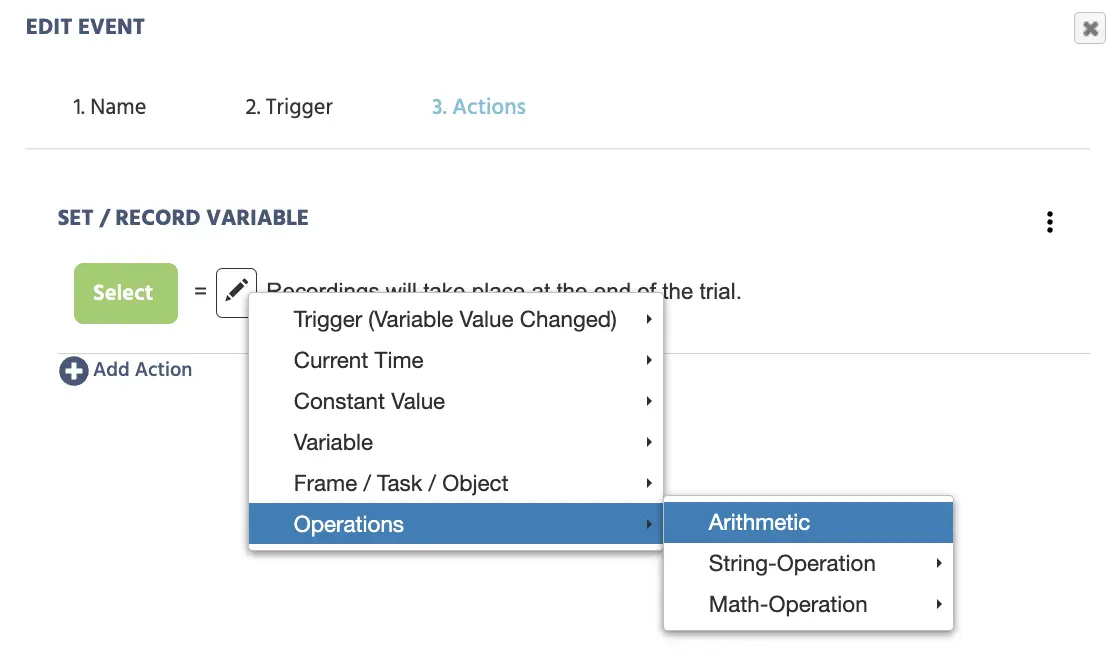
C.) Set the Action
Action defines what should happen when the trigger is activated and lets you decide where the recorded data should be stored.
- Click
Add Action. - Choose
Variable Actions. - From the list, select
Set/Record Variable. - You’ll now see a pencil icon (value-select menu). Click it. This brings up a list of options you can use to define the value to store.
- From the list, choose
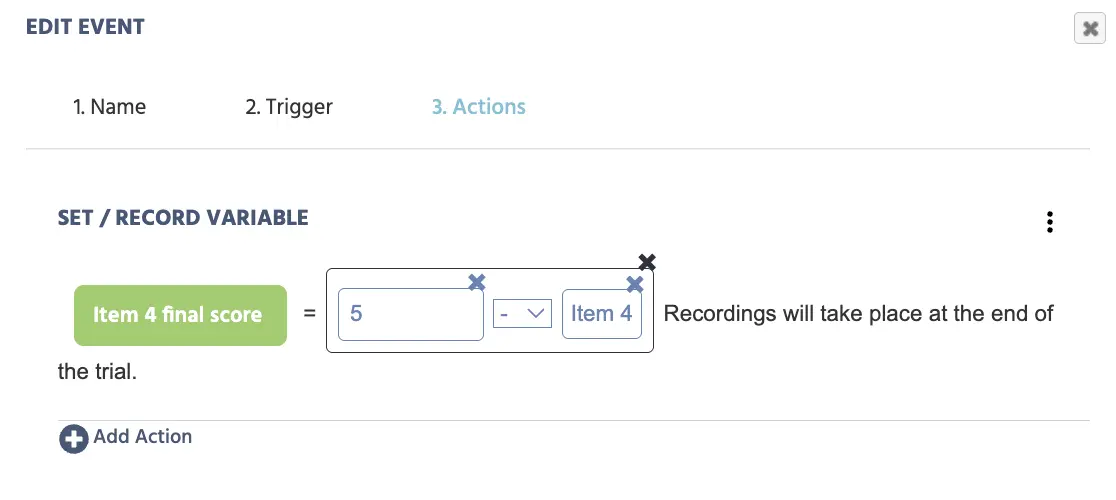
Operationsand thenArithmetic. This opens an arithmetic operation editor where you’ll implement the reverse score formula discussed earlier:- Reversed Score = 5 - Original Score
Here the original score is ‘Item 4’ and the reverse score variable has to be set up.
To set up the variable to record reverse score follow the given steps:
- Click
select. - Clicking on the
New variableoption will let you customize your variable. - Start by giving the variable a unique name, such as
Item 4 final score. - Set:
Format= Scalar andData Type= Numeric
To configure the arithmetic operation follow these steps:
- On the left side of the arithmetic editor, click the pencil icon. Choose
Constant Value→ thenNumeric→ enter 5. - On the right side, click the pencil icon again. Select
Variable→ thenSelect Variable→ chooseItem 4from the global variables list. (This variable was automatically created when you added it to the matrix and hence found in the global variables list.) - Finally, in the middle, change the arithmetic operator to
-.
This sets up: Item 4 final score = 5 - Item 4
Click Finish. Now, every time a participant responds to Item 4, Labvanced will automatically calculate and store the reversed score in Item 4 final score.
You can repeat the same steps for any other items in the ERC scale that require reverse scoring. Just change the trigger and variable name for each one.