Task Controls
Table of Contents
Overview of Task Controls
The main functions are located in the top left corner of the task editor.
Task Settings: Control task-level settings of your study, such as countdowns, display modes, eye tracking and fixation options, and randomization. Clicking theSettingsbutton will open a dialog box with a lot of powerful options. The rest of this documentation is dedicated to all of these options.- Task Switching Option: Opens a drop-down menu of all the tasks within your study. Clicking on a specific task will open it, so it allows for easy and quick navigation between tasks.
- Save Option: Allows you to save your work.
- Run Option: Clicking on this button will run / play your task so you can test out the specific task.
Task Settings Overview
Under the Task Settings you can change the following properties: Trial Activation, Initial Countdown, Editing Language, Display Mode, Randomization, Eye Tracking and Head Tracking. These properties are grouped under 3 main headings:
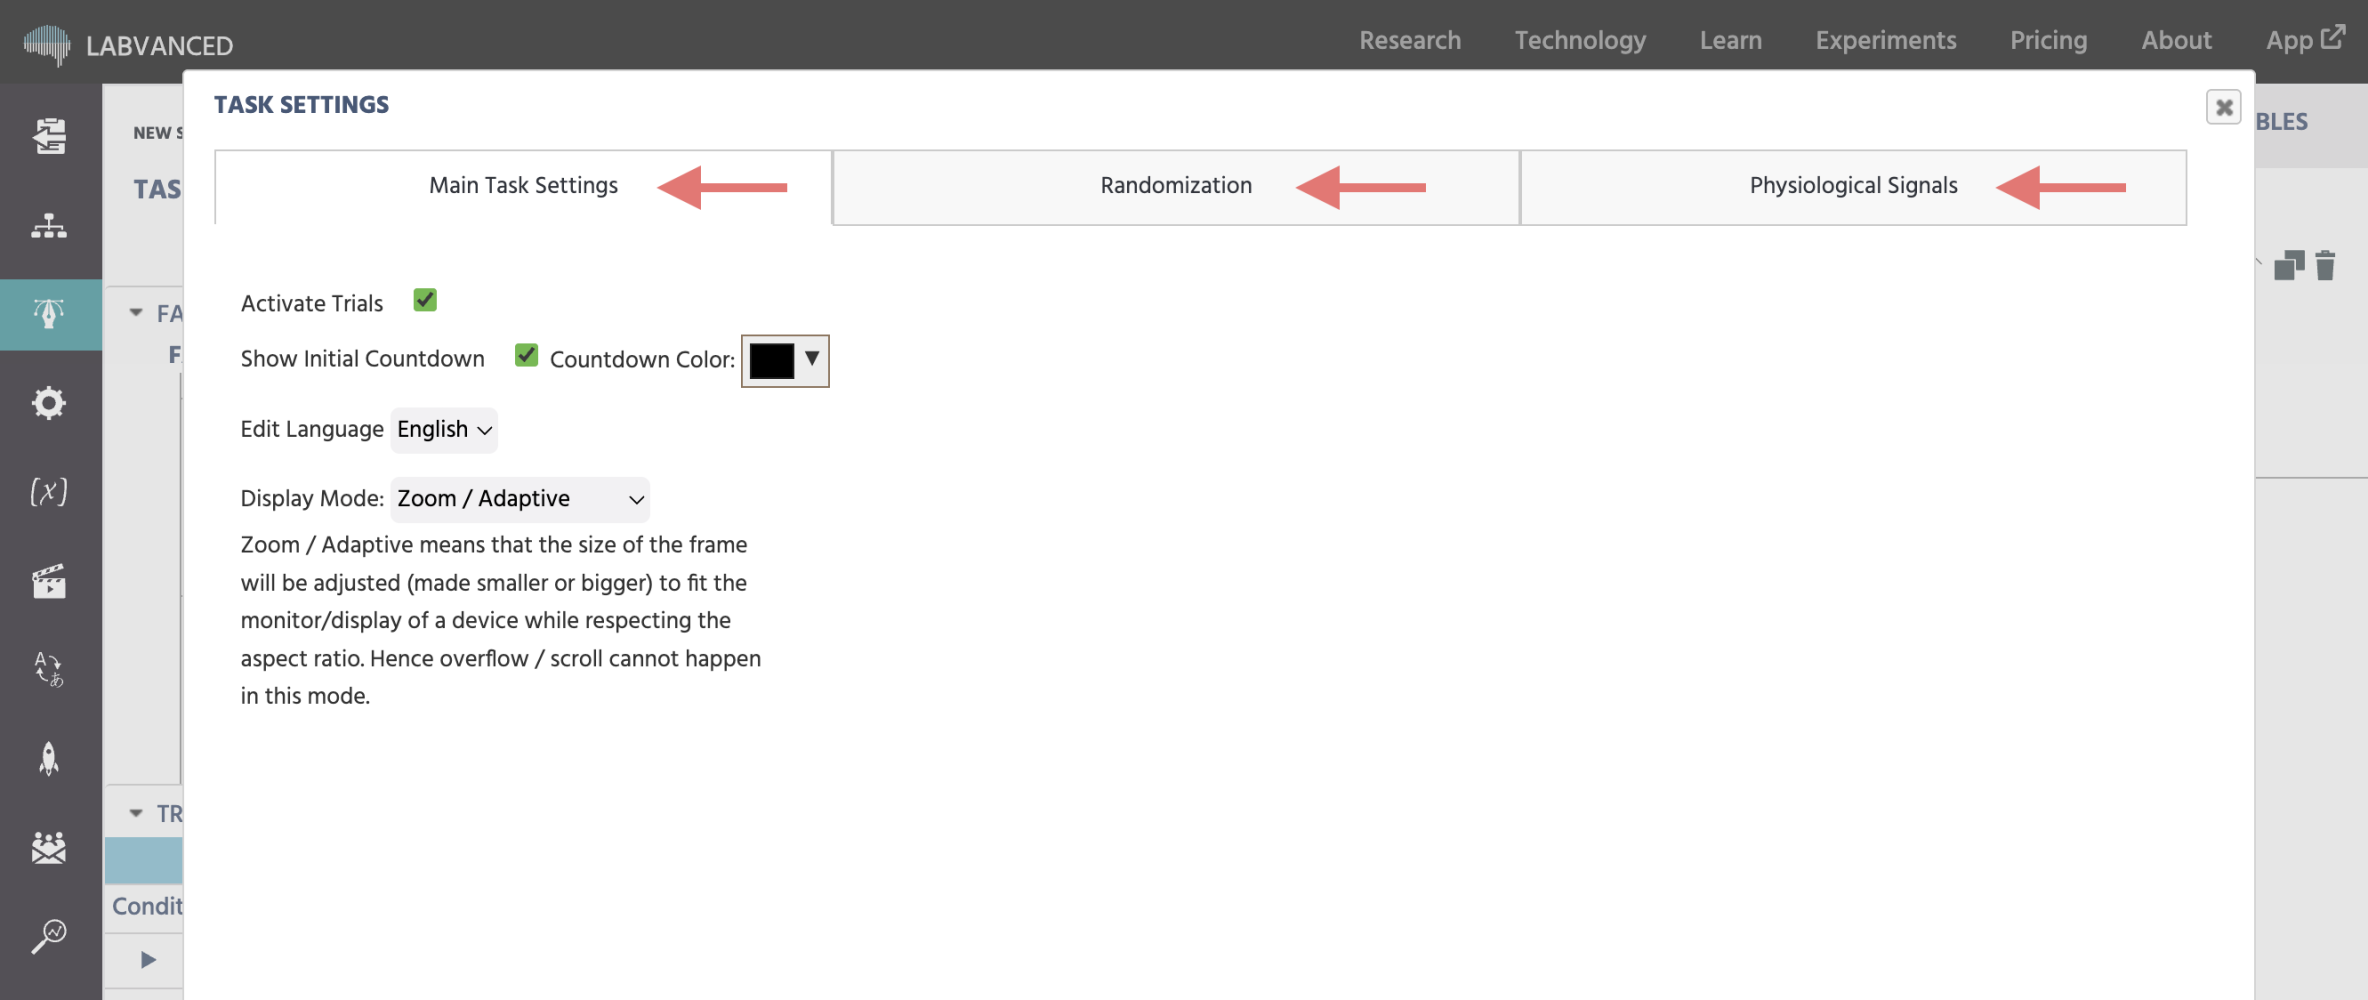
Main Task Settings
This section focuses on general settings that determine how the task behaves and how the tasks are displayed. Given below are the key settings:
Main Task Settings
Activate Trials
This option enables or disables the trial loop/ trial system. The trial system allows you to create multiple repeated presentations of the frames defined in a trial group and consists of two sub-components: the "Factor Tree" and the "Trials & Conditions" table.
Enabled:When enabled, the trial loop is activated. The task will be executed based on the various trials defined. There can be more than 1 trial / repeated presentation of frames.Disabled:On disabling the option, the trial loop is deactivated. There can be only 1 trial and repeated presentations will not occur.
Show Initial Countdown
The initial countdown is the timer before the task that would help participants prepare themselves. This is always enabled by default.
Enabled:When enabled, there will be a display of a countdown (3,2,1..) before the task starts.Disabled:On disabling the option, there will be no countdown and the task would start directly.
You can also modify the text color of the countdown. This is useful for studies that have a background color other than white.
Edit Language
The Edit Language option allows you to switch the task's language using the dropdown menu that appears. This option is only important for multilingual studies (studies in several languages). By default only the English language is available. To add a new language, you can make use of the Texts & Translate tab.
Display Mode
This setting changes how the study is rendered on the screen. The options provided include (covered in detail below):
Zoom / AdaptiveFixed in Visual DegreeFixed in MillimeterFixed in Pixels
Zoom / Adaptive
When choosing this option, the sizes are in "Design Units" (unit-less). Upon experiment execution, all frames are rescaled until a maximum size is reached either horizontally or vertically. The experiment will always use the whole screen. All objects on the frames are also rescaled (smaller on small displays, larger on large displays).
Fixed in Visual Degree
If this option is selected, all sizes are re-calculated to visual degree. The experimenter has to specify a re-calculation factor, which says how many "design units" equal 1 visual degree. For instance, if an object is 120 "design units" wide and the re-calculation factor is 20, then the object will be 6 visual degrees wide when the experiment is executed. To ensure this functions correctly, an external size calibration is carried out before starting the experiment. In the beginning of the experiment, the participant must either specify the size of the screen in inches, or use a standard plastic card to determine the size of the screen. Additionally, the participant needs to select his/her distance from the screen. Based on these two values, all frames and objects are then re-calculated to visual degrees.
Fixed in Millimeter
If this option is selected, all sizes are re-calculated to millimeters. There is no re-calculation factor. Similar to the "Visual Degree" option, there is a calibration at the beginning of the experiment to determine the screen size. However, distance from participant to screen is not needed in this case. All objects and frames are then rescaled based on their millimeter values.
Fixed in Pixels
If this option is selected, all sizes are re-calculated to pixels. There is no re-calculation factor. There is also no calibration needed. Frames and objects will be smaller or larger depending on the participant's screen resolution and the screen size.
Randomization Settings
The Randomization Settings is a powerful tool that gives you control over trial and condition order, factor allocation, and participant trial counts, providing you with precise control over experimental structure and outcomes.
Not
Randomization Settings
The complete randomization settings consist of 6 separate menus (as shown in the image below):
Trial Order: Determines the sequence in which trials are presented to participants.Condition Order: Specifies whether conditions are presented in a block-wise order or in random order.Factor Randomization: Controls how independent variables (factors) are randomized to determine which trials will be seen by a subject.Trials Per Subject: Defines the total number of trials each participant will be assigned with.All Trials Overview: Displays the final structure of conditions and trials based on the chosen settings.Simulation of Trial Sequence: Provides a preview of how trials will be presented based on the selected randomization settings.
While the Trial System outlines how many trials (trial variations) exist in total within the task, the Randomization menu regulates how many trials are seen by each subject, as well as how randomization and balancing ought to be handled within the task.
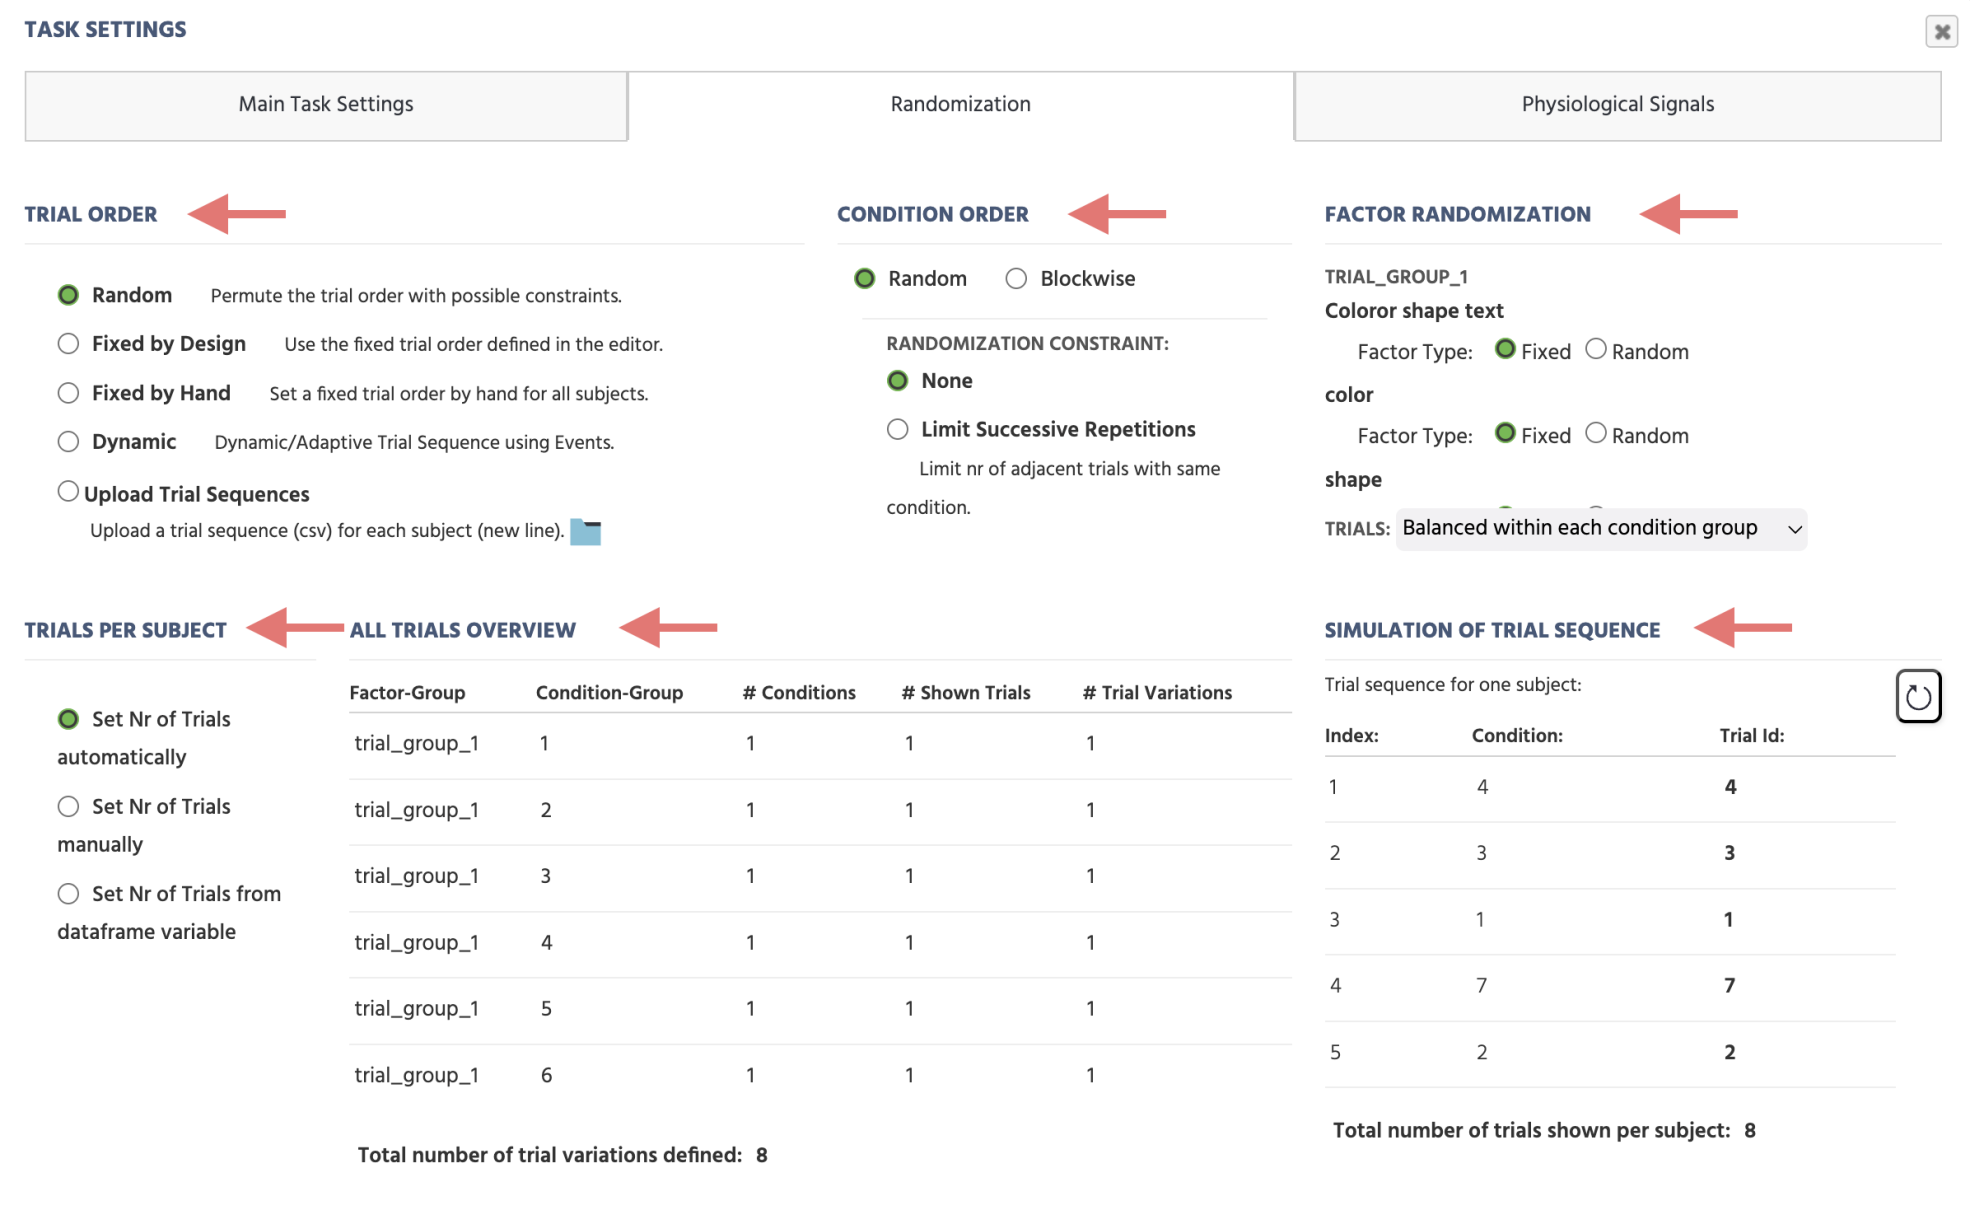
Trial Order
The Trial Order option is a key Randomization Setting, which will influence how trials are ordered /randomized.
There are 5 possible settings which are covered in greater detail below:
RandomFixed by DesignFixed by HandDynamicUpload Trial Sequences
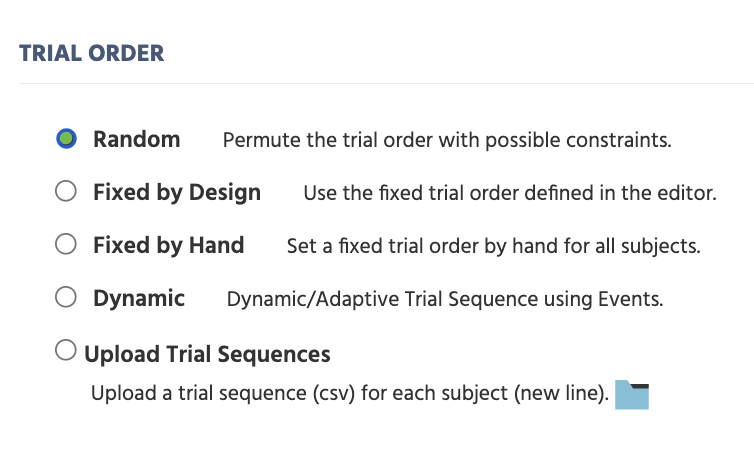
Random
This is the default option available. When this option is selected, the Labvanced randomization settings will be most adjustable. The core feature of this option is that all selected trials will be randomly reshuffled for each new subject / session. If there is more than one trial group, the trials of different trial groups will be presented in intermixed form.
Fixed by Design
If this option is selected, the trials will be presented in the order of how they are defined in the task editor (lower trial numbers will be shown first). This order will be the same for all subjects.
Fixed by Hand
If this option is activated, users can type a self-selected trial sequence. The sequence should be typed in the box "Specify Fixed Trial Sequence". To type in the sequence, use the trial numbers as defined in the editor and separate each number by a comma. This sequence will be the same for all subjects. As this option will specify both which trials are shown as well as the order of trials, the settings in other randomization menus will be ignored in this case.
Dynamic
This option can be used to create adaptive / dynamic trial sequences (e.g. jump to different trials based on the answer of the participant). Use the event system Jump to Specific Trial action to define the sequence at runtime.
When Dynamic is selected, the Starting Trial Id setting appears with two sub-options:
Fixed Id: Enter a specific trial number as the starting point. The experiment begins on that trial each time.Choose Variable: Link a numeric scalar variable whose value determines the starting trial. This lets you set the start trial dynamically based on prior events or participant state.
Upload Trial Sequences
If you select this option, you can specify an individual trial sequence for each subject using an external CSV file (trials separated by comma, subjects by a newline CR-LF). Then upload these sequences and and select how you want to count the subjects (have a separate counter for each subject group, or use a global subject counter).
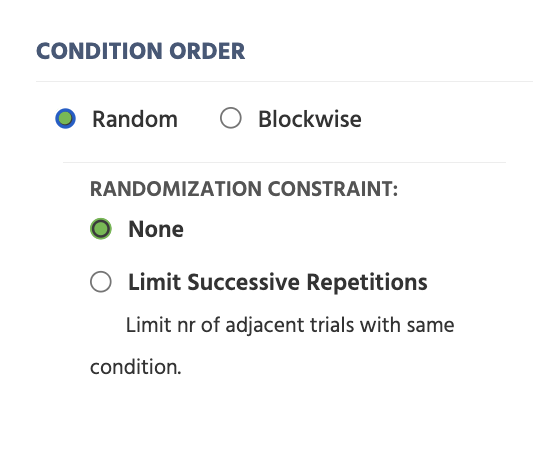
Condition Order
The Condition Order section of the Randomization Settings determines whether individual conditions are presented in a block-wise order or randomly intermixed (random). This could also influence the order of trials.
Random Condition Order
Random: This option will present all trials from various conditions in an intermixed manner. If you choose a random condition order, you will have options to select a ‘Randomization Constraint’:None: This option randomises the trials, but without any further constraints.Limit Successive Repetitions: This option would enable you to limit the number of trials shown from the same condition and further enforce "randomness”. On selecting this option, you could manually set the maximum number of trials you need in a row.
Blockwise Condition Order
Blockwise:This option will separate the trials, such that first trials from one condition will be shown, then another condition, and so on. Further options are provided to define the order of conditions:Fixed by Design: When this option is selected, the order of the conditions will be based on the design specified in the trial editor.Unbalanced Permutation: When this option is selected, the order of the conditions will be unbalanced/ can be randomly reshuffled.

Factor Randomization
The Factor Randomization section of the Randomization Settings specify whether factors created with the Trial System are:
FixedRandom

Fixed factors are the main experimental factors that encompass the research question. Whereas Random factors are typically introduced in order to increase experimental control and reduce bias, such as the position of a correct image.
For more information about Fixed and Random factors and how they are used in experimental design, refer to our documentation on the Trial System.
Random Factors
Overall, there are 5 possibilities for how the random factors select a level and thereby choose a certain trial variation. These 5 options are listed below:
| Random Factor Option | Description |
|---|---|
Unbalanced within task | For each trial, the level of the random factor is chosen randomly every time from all available options (levels). |
Balanced within task | For each trial, the level of the random factor is chosen such that each level will occur equally often within the whole task. |
Balanced within other Factors | This balances one factor within another or within several other factors. If, for instance, the factor "position" is balanced within the factor "image content", then for each level of the factor "image content" the factor position is balanced (e.g. level=left and level=right appear equally often in both cases image=face and image=house). A factor can also be balanced within several other factors, however, no circular dependencies may arise. |
Unbalanced between subjects | The level of the random factor will be always the same for one subject / execution of the task, but randomly vary between subjects / executions of the task. |
Balanced between subjects | The level of the random factor will be always the same for one subject / execution of the task, but systematically vary between subjects / executions of the task. As a result, when the factor has 3 levels, subject 1 will see level_1 of the factor, subject 2 level_2 of the factor, and subject 3 level _ 3 of the factor. Subject 4 will see again level_1 of the factor, and so on repeating the pattern. |
TRIALS
The last option of this menu section refers to the TRIALS: and it lets you change how the trials are selected within condition groups, i.e. the groups that are created under the factors.
The condition groups are calculated by crossing all of the fixed factors within a trial group, excluding the random factors.
As a result, one condition group consists of several trials (and conditions), which vary only in their levels of random factors. Many times, the trials within the individual conditions of a condition group are almost identical (e.g. they show the same stimuli but vary in their position). In certain cases, you may want to prohibit that 2 almost identical trials are selected. To change these, there are two options are available:
Balanced within each condition group: Trials which vary only by one or more random factors cannot be chosen more than once. Note: We believe that for the vast majority of cases the "Balanced within each condition group" option is the best choice and therefore, is the default setting.Unbalanced within each condition group: There is no restriction on the trial selection process within condition groups.
Trials per Subject
The Trials per Subject section of the Randomization Settings defines the number of trials assigned to each participant.
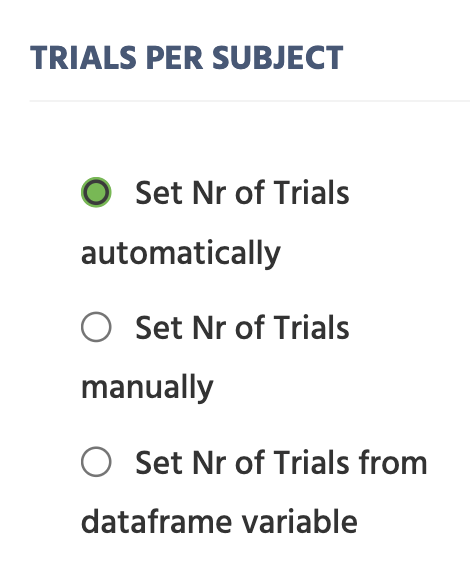
The options available are:
Set Nr of Trials automatically: This option is activated by default and the number of trials per subject is calculated automatically.Set Nr of Trials manually: When the manual option is activated, you can set the number of trials per subject by hand. This will also affect the internal functions of other randomization settings (i.e. Factor Randomization and Resulting Conditions-Groups & Trials).Set Nr of Trials from data frame variable: This option when activated, the number of trials will be defined based on the linked data frame.
All Trials Overivew
The All Trials Overview table of the Randomization Settings provides a quick overview of all the trials that are created within the task, as well as how many condition groups, how many trials will be shown, as well as how many variations exist.
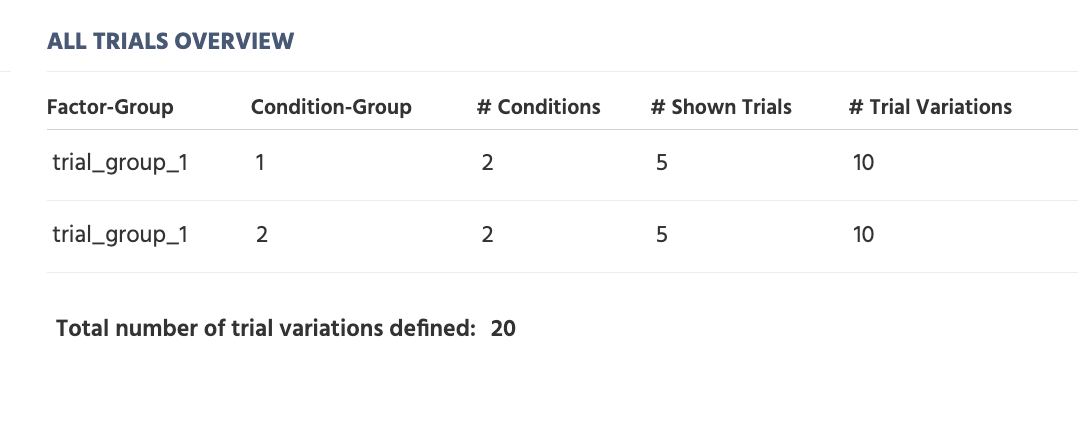
Factor-Group: The factor group where the factors of the condition group are defined.Condition-Group: The condition group index.#Conditions: The number of conditions inside the condition group.#Shown Trials: The number of trials shown for the condition group.#Trial Variations: The number of trials (variations) defined within the condition group. If you haveRandomizationsin your study, the number of trial variations increases, like in the image above.
On the bottom of this menu, you will also see the total number of trials (variations) within the overall task.
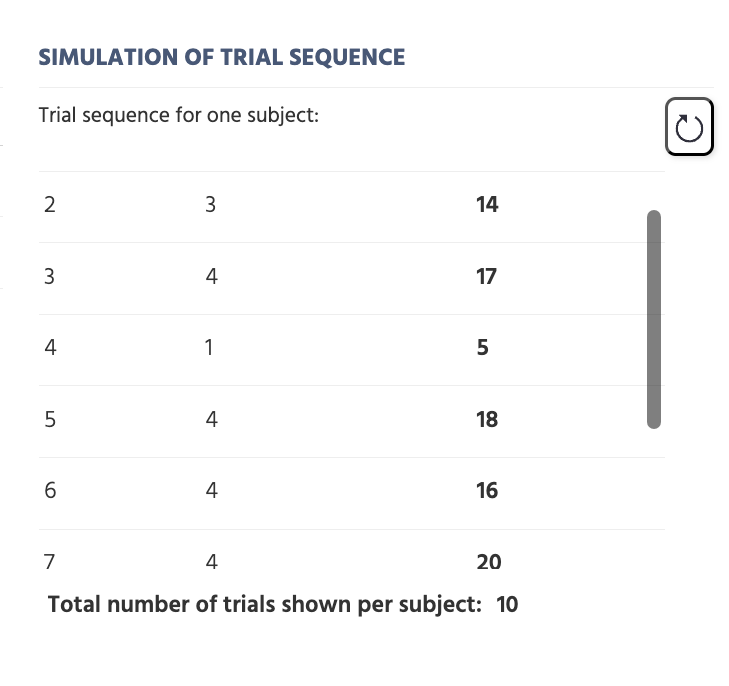
Simulation of Trial Sequence
The Simulation of Trials Sequence section of the Randomization Settings can be used to simulate a possible trial sequence for one subject. By clicking on the "Refresh" icon, a new possible sequence is calculated with the current settings taken into account. Here,the trial IDs and the condition number for each trial are displayed. On the bottom of this menu, you will see the total number of trials shown to each subject.
Note: By default, the simulation is for Participant 1 in Group 1.
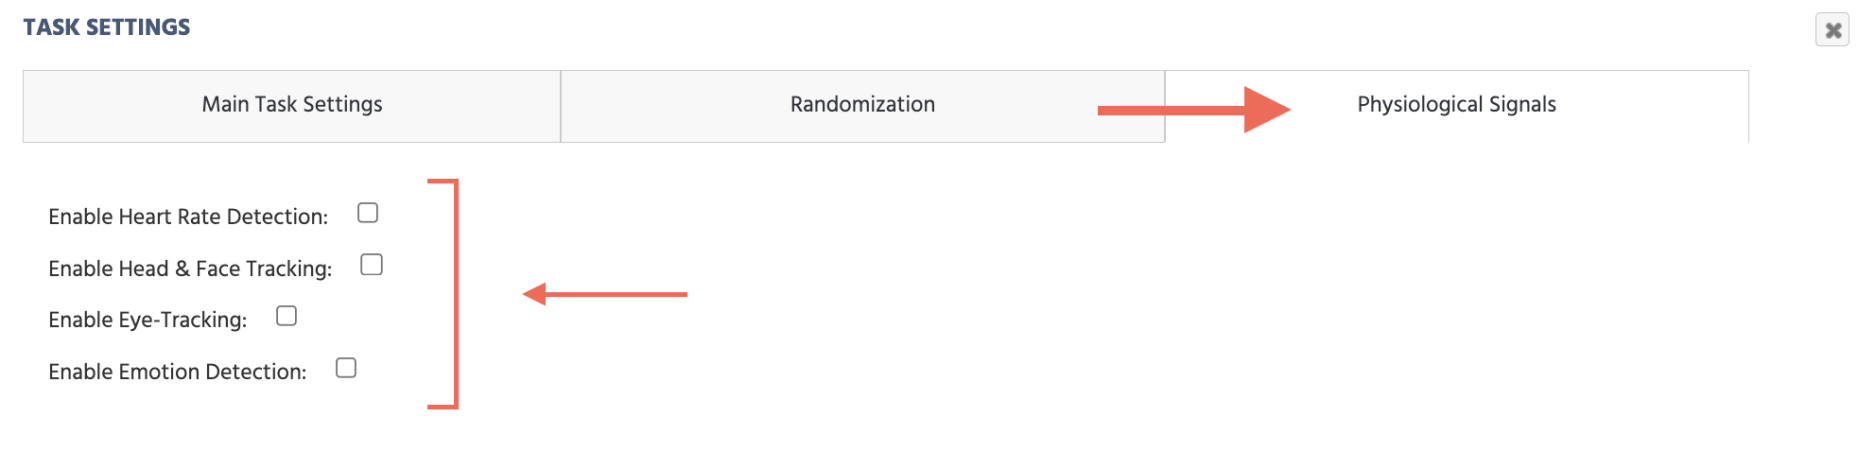
Physiological Signals - Settings
Under Physiological Signals section, you can activate which physiological signals should be active for the particular task.
Note: Upon activating a specific physiological signal, a dialog box will appear, prompting you to auto-create the necessary events for data recording.
Physiological Signals
Enable Heart Rate Detection:
Heart Rate Detection (rPPG) can be enabled to monitor and quantify heart rate during the space (or a specific frame).
Note: The Physiological Toolbox Version under (Settings tab → Physiology → Common Settings) must be set to v1.2 or higher for this option to appear.
Upon enabling this option under Task Settings in the Physiological Signals tab, a dialog box will appear prompting you to select whether you want particular events to be set up automatically for you.
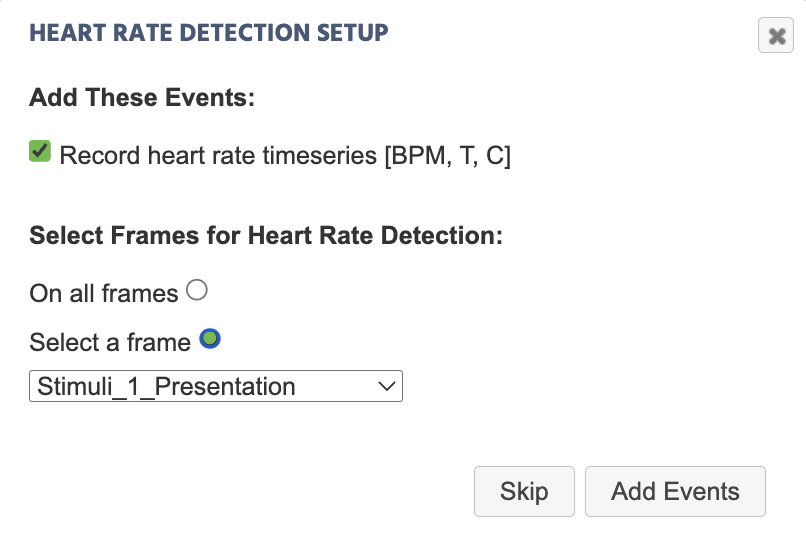
BPM= Beats Per Minute (Heart Rate)T= TimestampC= Confidence Interval of the measurement
Enable Head & Face Tracking:
Head Tracking can be enabled under Task Settings in the Physiological Signals tab to monitor and analyze head movements during the task. As a part of this, Face Tracking can also be established via events to collect the coordinates points of the face mesh during the task.
Enable Eye Tracking:
Upon enabling this option under Task Settings in the Physiological Signals tab, a dialog box will appear prompting you to select whether you want particular events (for recording gaze or fixation timeseries) to be set up automatically for you.
![]()
Upon selecting the relevant option above, the setting options described below will then be shown.
![]()
Drift Correction
When eye tracking is enabled the main eye tracking calibration will automatically happen before the start of the first task where eye tracking has been enabled.
Number of points shown: Defines how many points are displayed for recalibration (set to 0 to disable). ‘ 7 ‘ is set by default.Show recalibration before every: Lets you set calibration before a defined number of trials. ‘ 7 ‘ is set by default.Number of points used: Determines the total points to use (can exceed the number of points shown).Directly apply/ subtract drift values from gaze data: Enabling it will let you directly apply or subtract drift values from gaze data.Adaptive mode: When enabled, lets you apply drift correction based on cross-validation results.
Fixation Detection
For fixations to be measured, calculations on gaze data must be performed. There are several options that you can use to indicate how you want the algorithm / fixation analysis to behave.
Note: The Physiological Toolbox Version under (Settings tab → Physiology → Common Settings) must be set to v1.2 or higher for this option to appear.
![]()
No Fixation Detection
Disables the fixation algorithm so that only raw gaze data is collected during the task.
Real-Time Fixations
For real-time fixations, the calculations occur immediately as the gaza data arrives. There is about a 50 millisecond lag with this option. It's ideal for experiments that require instant participant feedback based on fixations (like gaze-contingent displays) and it produces more short-duration fixations.
Lagged Optimized Fixations
For lagged optimized fixations, the calculations do not occur immediately (as in the previous option), but wait to observe subsequent gaze points before finalizing fixation calculations, enabling optimal boundary detection. Thus, this option has a 500ms lag but leads to higher accuracy and is better at detecting longer fixations. It's recommended for post-experiment analysis or if the participant feedback can be slightly delayed.
Conclude Ongoing Fixations
Since calculating fixations is an ongoing process, the trial or frame can come to an end while the algorithm is still running. So this setting indicates what should happen when there is ongoing fixation but the trial/frame ends. The following options are available to control this part of the algorithm's behavior:
No- Keep buffer running:
Keep disabled for continuous tracking across all frames/trials.
Yes- At Frame End:
- Purpose: Forces detection of incomplete fixations still in the gaze buffer when the frame ends
- Why needed: Both algorithms have small detection lag, meaning some gaze points remain unprocessed at frame boundaries
- When to use: enable if you need to evaluate all gaze data in advance (Eg. determining if a participant fixated on a target before proceeding to the next frame or if there are two very different stimuli on consecutive frames). Also this will clear the gaze buffer so that the next frame will start in a clean state.
Yes- At Trial End:
- Purpose: Forces detection of incomplete fixations still in the gaze buffer when the trial ends
- Why needed: Both algorithms have small detection lag, meaning some gaze points remain unprocessed at trial boundaries
- When to use: enable if you need to evaluate all gaze data in advance (Eg. determining if a participant fixated on a target before proceeding to the next trial). Also this will clear the gaze buffer so that the next trial will start in a clean state.
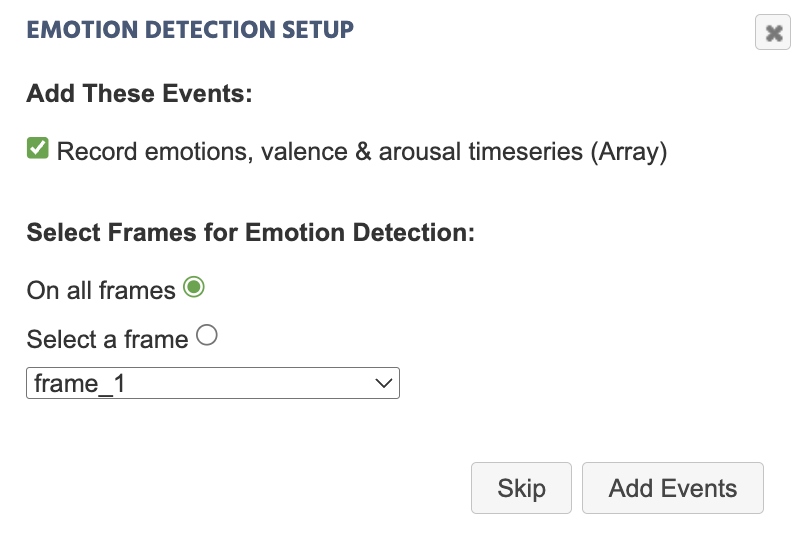
Enable Emotion Detection:
Upon enabling this option under Task Settings in the Physiological Signals tab, a dialog box will appear prompting you to select whether you want particular events (for recording emotion detection values) to be set up automatically for you.
Note: The Physiological Toolbox Version under (Settings tab → Physiology → Common Settings) must be set to v1.3 or higher for this option to appear.