Task Wizard | Guide to Quick Experiment Building
Overview
If you like to set up your experimental task using spreadsheets / CSV data, the Task Wizard is here to help you speed up the experimental task creation process!
Using the Task Wizard, you can create your entire experimental task structure, including stimuli, events, variables, factors, conditions, randomization and data recordings from a single CSV file plus stimulus files. With the Task Wizard, you can also choose stimuli pairings, and frame transitions and have a customized task structure with built-in randomization and data-recordings in just a few minutes.
Workflow Tip: It might be helpful for you to take a look below to get a sense of how to organize / name your stimuli and prepare your CSV file in advance before proceeding to using the wizard. If you have any questions, please feel welcome to contact us!
Accessing the Task Wizard
Based on where you are in the task creation process, there are slightly different paths to take to access the Task Wizard.
| Study Status | Path to the Task Wizard |
|---|---|
| New Study | Create New Study → Setup Tasks → Continue with Uploading Stimuli |
| Existing Study | Open the existing study, under the Study Design tab click + New Task select Experimental Task → Continue with Uploading Stimuli |
Progress Bar
Upon accessing the Experimental Task Wizard, a dialog box will appear with the steps and stages of preparing your task at the top:

- Stimuli Upload
- CSV Upload
- Stimuli & Factor Selection
- Stimuli Pairing
- Frames & Stimuli Arrangement
- Transitions
For a general introduction to the Task Wizard’s functionalities, please take a look at this video:
Stimuli Upload in the Task Wizard
For this initial step, you will upload the actual stimulus files.
- Upload all stimuli: Click here to upload all your experimental stimuli (if you have images, videos, etc). If you have text stimuli, simply click ‘Next’ and proceed to uploading your CSV file. You will specify later how stimuli assignment should work (described in the upcoming sections). Please note:
- All file extensions must be uniform per stimulus category! For example you cannot switch between .jpg or .jpeg across different columns (see the image below for an example)
- Based on how the File Uploader works here, all task-specific stimuli must be within a single folder.
- Upon clicking ‘OK’ you can immediately proceed to uploading your CSV.
- Next (I’ve uploaded all stimuli): Continue to the next stage of the Task Wizard.
📌 Hands-on Learning: If you’d like to download sample data to start trying out the Task Wizard now, please download the working materials we have available using this link:
https://www.labvanced.com/static/taskWizardExamples.zip
CSV Upload in the Task Wizard
Upon uploading your stimuli, it’s time to upload your CSV file. In the upcoming sections we explain in greater detail how to set up a CSV.
From CSV to Task Set Up
Basic ideas behind how the CSV is utilized in the task creation process:
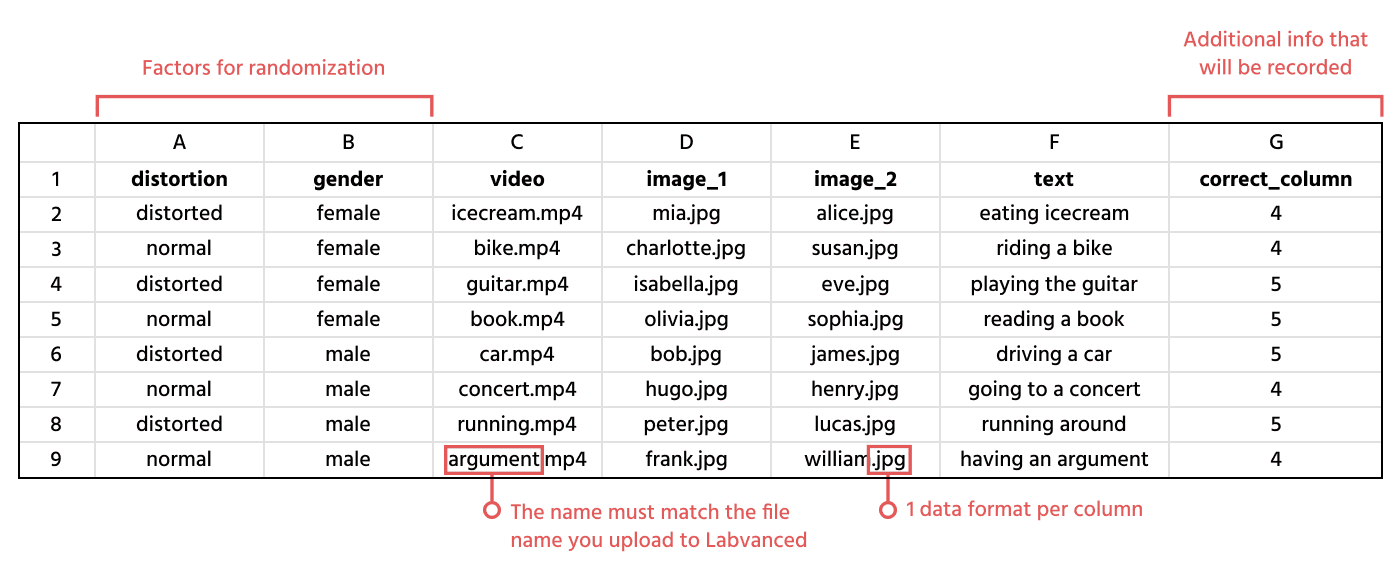
- Rows: Each row in your CSV file will create one trial in your experimental task. In the image below, the default process will generate 8 trials - of course, you can edit this later to change the trial count as per your experimental design needs.
- Columns: The first row can be used as a column header to name the stimulus. Each column must be a separate stimulus element (image, video, etc.) or data category (described in the next section). Please note that each column must be the same length (ie. all cells are filled).
We will explain the image above in greater detail now in the upcoming section.
Preparing Your CSV File
Now let's discuss what kind of information you should / can put into the CSV file.
The CSV file can contain 3 different categories of data, ie. Stimuli, Factors, and Additional Information:
| Data Category | Specification / Description | Example |
|---|---|---|
| Stimuli | Stimuli can be either file names (images, video, or audio) or they can be plain text strings. Please note: for all stimuli in the CSV file, corresponding objects will automatically be created. Then, at a later part during the Task Wizard, ie the Frames & Stimuli Arrangement step, you will have the opportunity to arrange them as you’d like on frames to be displayed to participants. Make sure to use file names with correct endings, e.g. "flower.jpg" | Column A in the image above represents video stimuli titles; Column B-C the title of image stimuli; and Column D represents text-based stimuli. |
| Factors | Factors are like category labels for your stimuli and they must include the levels / values related to the stimuli in the same row. For instance, if a factor is called "distortion", it could have two possible values "distorted" or "normal", and the image-stimuli in each row should therefore contain one of those factor values; a row where the image-stimuli is distorted will thus have the category "distorted", while a normal or control image will have the category will have the category "normal". Note: You can have multiple columns for assigning different factors so that in the end each row can contain values for several factors. For example, you can add a second factor called “gender” where for the image stimuli "alice.jpg" the value would be “female”. As a result this creates a categorization of this trial as “distorted x female”. These combined factors are later called conditions. | Columns F-G in the image above |
| Additional Information | This type of data can be used as additional (stimuli) descriptors that you want to record per trial, but which are neither stimuli themselves, nor factors / condition information. As an example, you might want to code which of two stimuli is the 'correct' one, in order to calculate if the answer given by the subject is correct or not. All stimulus information will automatically be recorded. | Column E in the image above |
Uploading the CSV File
Upon creating your CSV, you can proceed to uploading it. The following dialog box with options will appear:
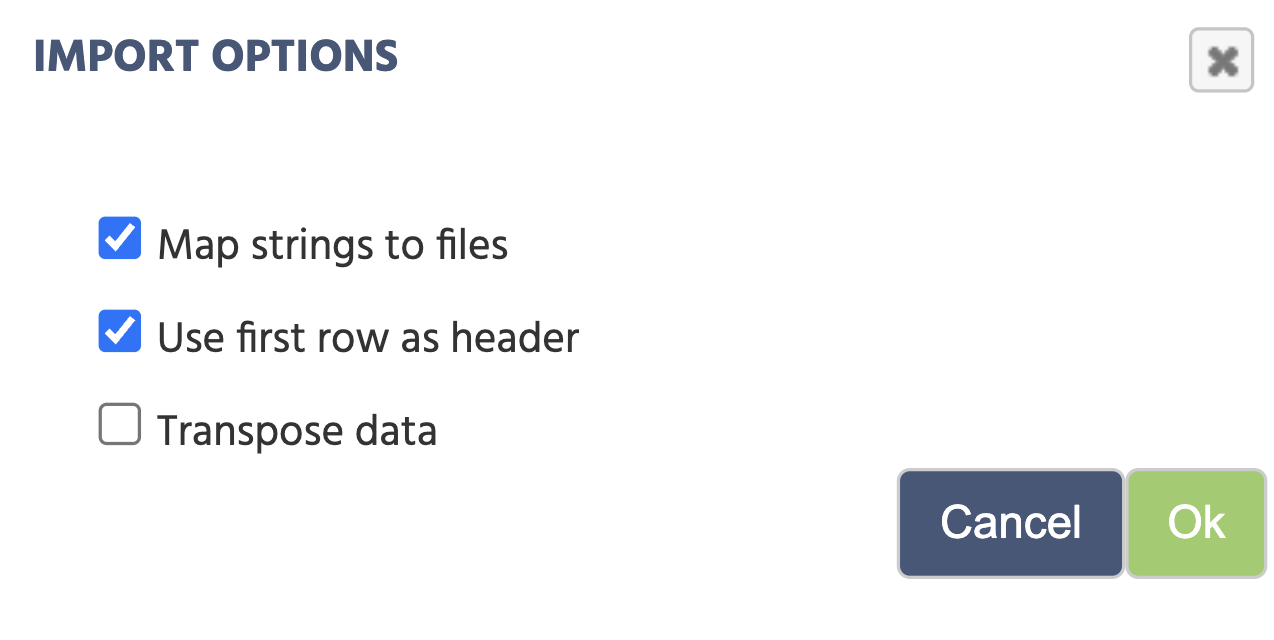
- Map Strings to Files: allows you to include the names of your files as strings, then use the map function to point to the folder where the files are stored. This will allow that column of file names to search for the corresponding files in a folder, provided the values in the data frame exactly match the names of the desired files. This function is only available if the column is populated by string values.
- Use First Row as Header: takes the values in the first row of your data frame and uses them as the variable names for each of the columns.
- Transpose Data: simply uploads the data frame as it is. This is useful if your data frame does not contain any file names.
Stimuli and Factor Selection in the Task Wizard
A preview of the CSV file will appear. You can also re-upload your CSV file here if you wish.
At this step you have the option to edit the top fields, as indicated by the image below:
Name: If the first cell of each column is the column-name, then you can edit it here. In the example below, the first column took on the title ‘direction,’ the second column is named ‘degree’ and so on…Data Type: The data type is automatically selected and identified based on the values you have in the CSV. Clicking on the ‘book’ icon allows you to reassign your stimuli while the ‘trashcan’ icon will delete the entire column, so be careful!Use As: This field is the one that requires the most attention at this post. You must indicate what type of category the data falls under as discussed above (ie. stimuli, factor or additional information). Based on the image below:- Column 1 will be used as a ‘factor’ because in this experiment design we aim to assess whether the type of word classification (ie. Bouba or Kiki) is correctly identified.
- Column 2 is the name of the image file
- Column 3 is a string of the text that will appear
- Column 4 is also a string of the second text that will appear
To proceed, you must assign values to all Use As fields.
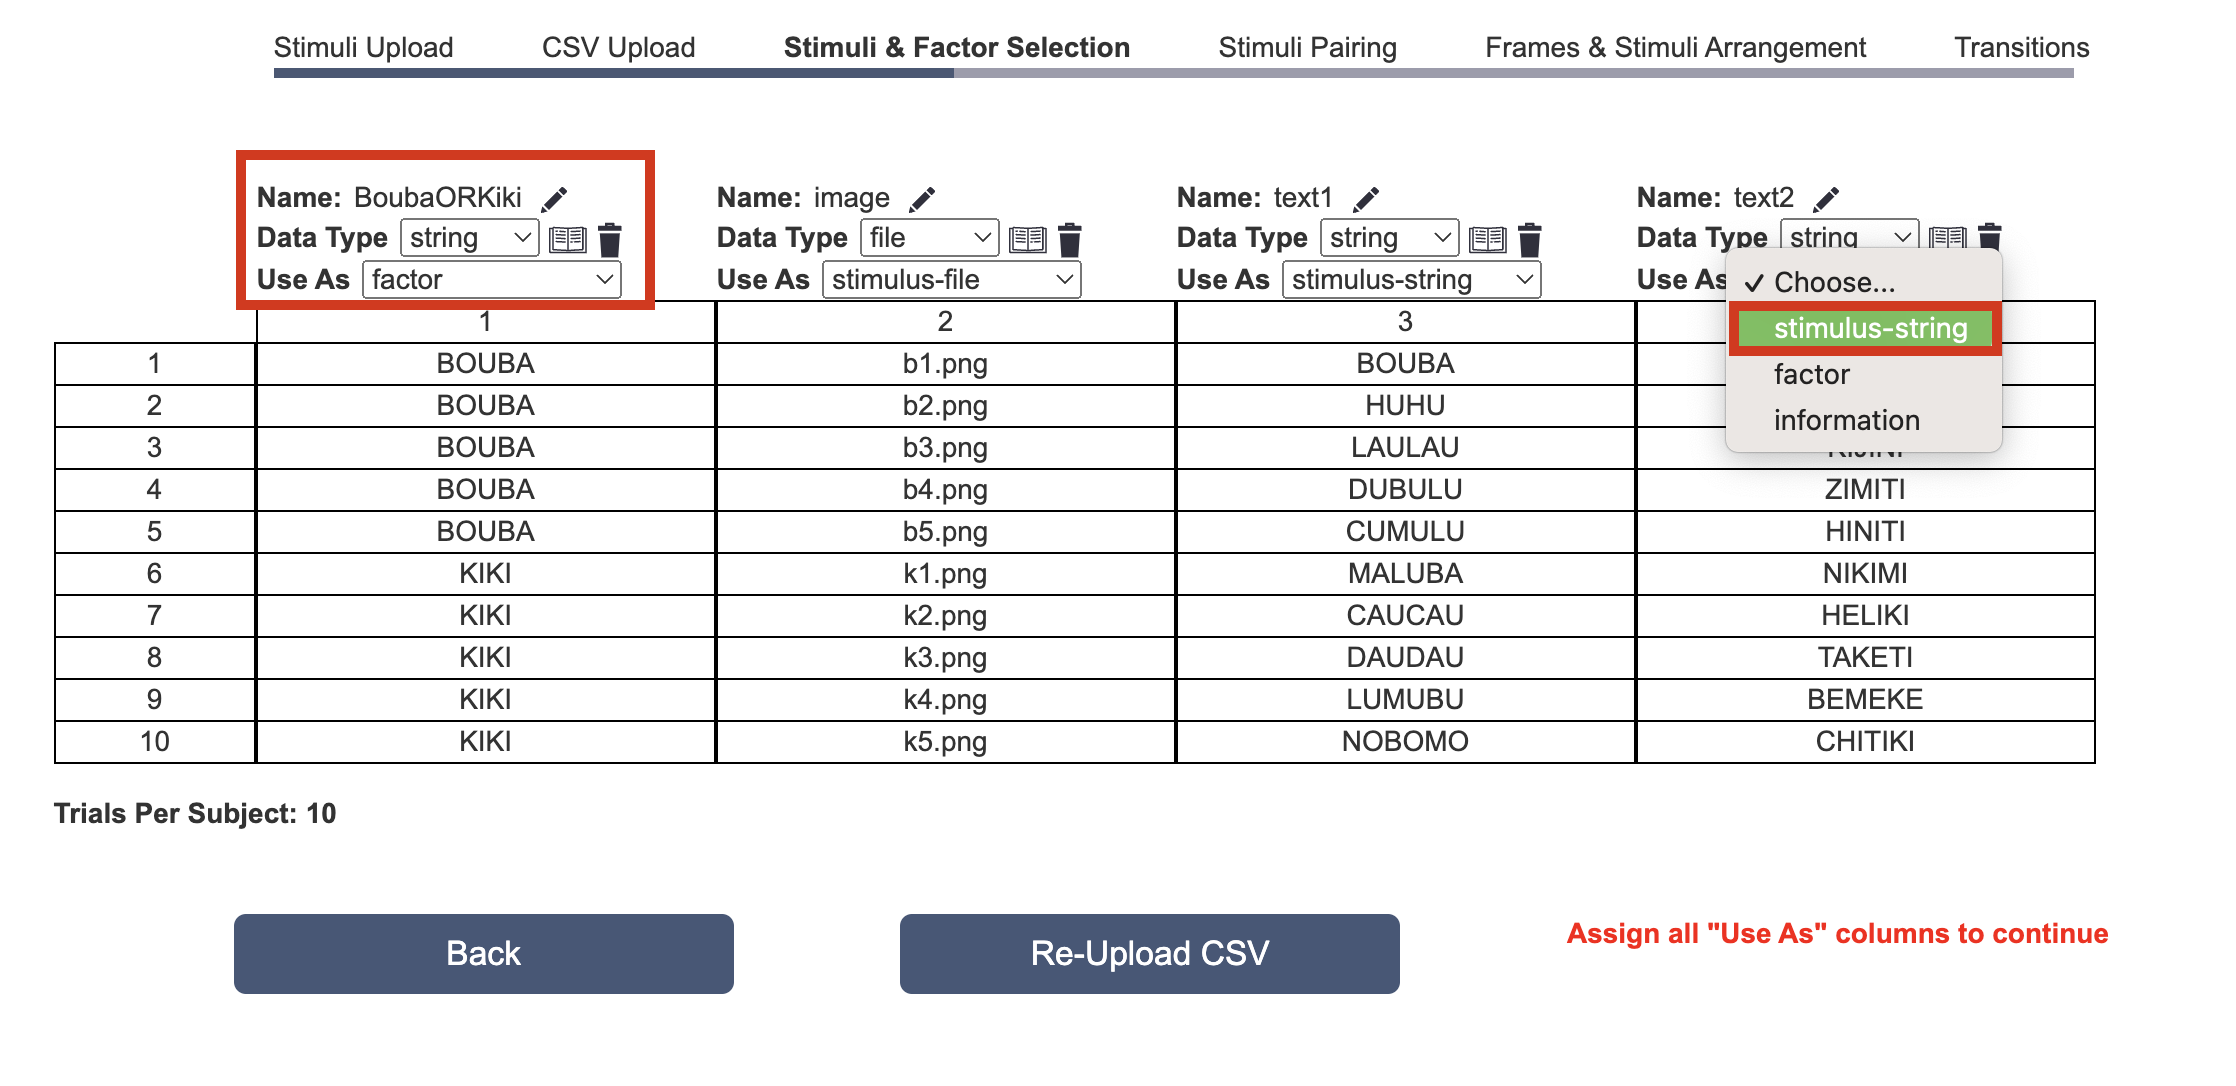
Upon doing so, a green ‘Next’ button will appear allowing you to progress to the next stage.
Stimuli Pairing in the Task Wizard
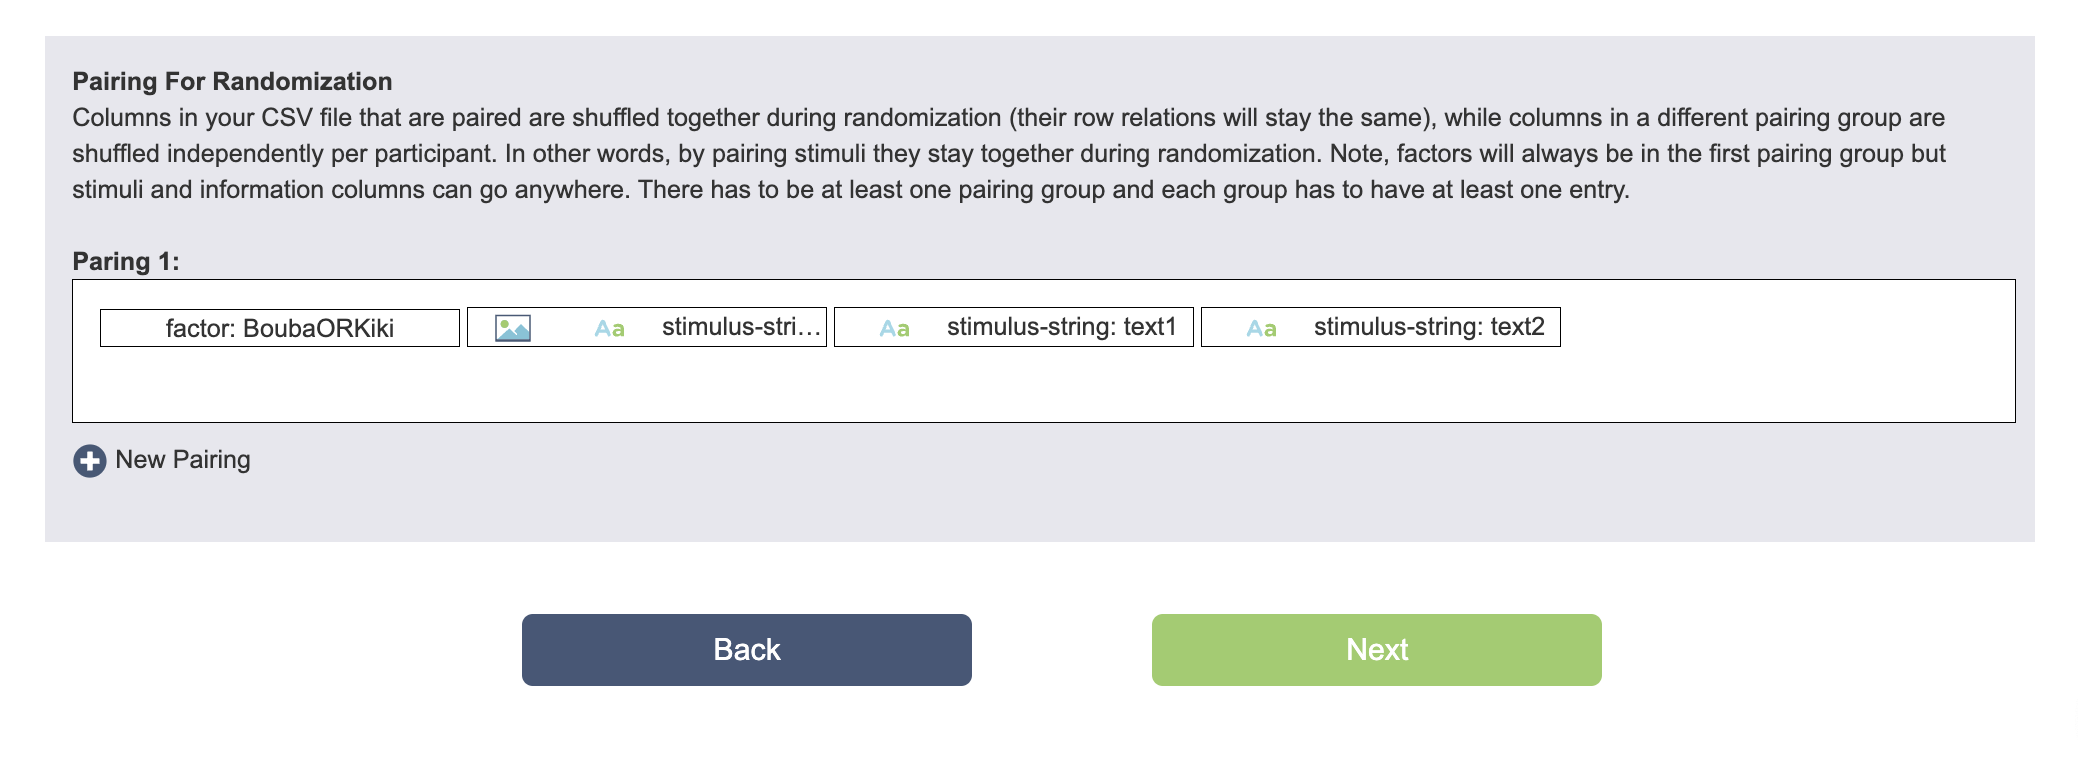
Pairing For Randomization
Columns in your CSV file that are paired are shuffled together during randomization (their row relations will stay the same), while columns in a different pairing group are shuffled independently per participant. In other words, by pairing stimuli they stay together during randomization. Note, factors will always be in the first pairing group but stimuli and information columns can go anywhere. There has to be at least one pairing group and each group has to have at least one entry.
Frames and Stimuli Arrangement in the Task Wizard
Place Stimuli on Frames
Now it's time to arrange your stimuli and decide how many frames you have per trial, as well as which stimulus should be on which frame. The kind of data that will be recorded and transitions are discussed in the upcoming section.

The Task Wizard will automatically place one stimulus type (column) per frame in the order you had them in your CSV file. The above image is the output from the CSV file shown two sections above. Stimuli on the same frame are shown simultaneously by default (you can change this using Events). Stimuli on different frames are always shown consecutively as per the Trial Timeline. Of course, all of this is editable to suit your experiment needs.
At this stage here in the Task Wizard, you can create new frames, delete empty frames, and drag&drop stimuli between frames (for example if you want the text and image stimuli to be together on the screen). You can also add static text content and fixation crosses on frames without any stimuli. Much more detailed editing options for frames and stimuli will be available later in the task editor, upon completing the basic setup processes offered by the Task Wizard. Frame branching logic, ie. how you want the experiment to progress within the trial between one frame and the next, can also be later adjusted in the editor. For example, if an answer is ‘correct’ and you want the frame where it says ‘correct’ as the feedback, this is fine-tuned within the task editor.
📌Hands-on Example: Rearranging the stimuli and adding a fixation cross: In the short video below, we drag and drop the stimuli so all three stimuli are together in a single frame. We delete the unused frames and create a fixation cross which will precede the stimuli in each trial.
Transitions in the Task Wizard
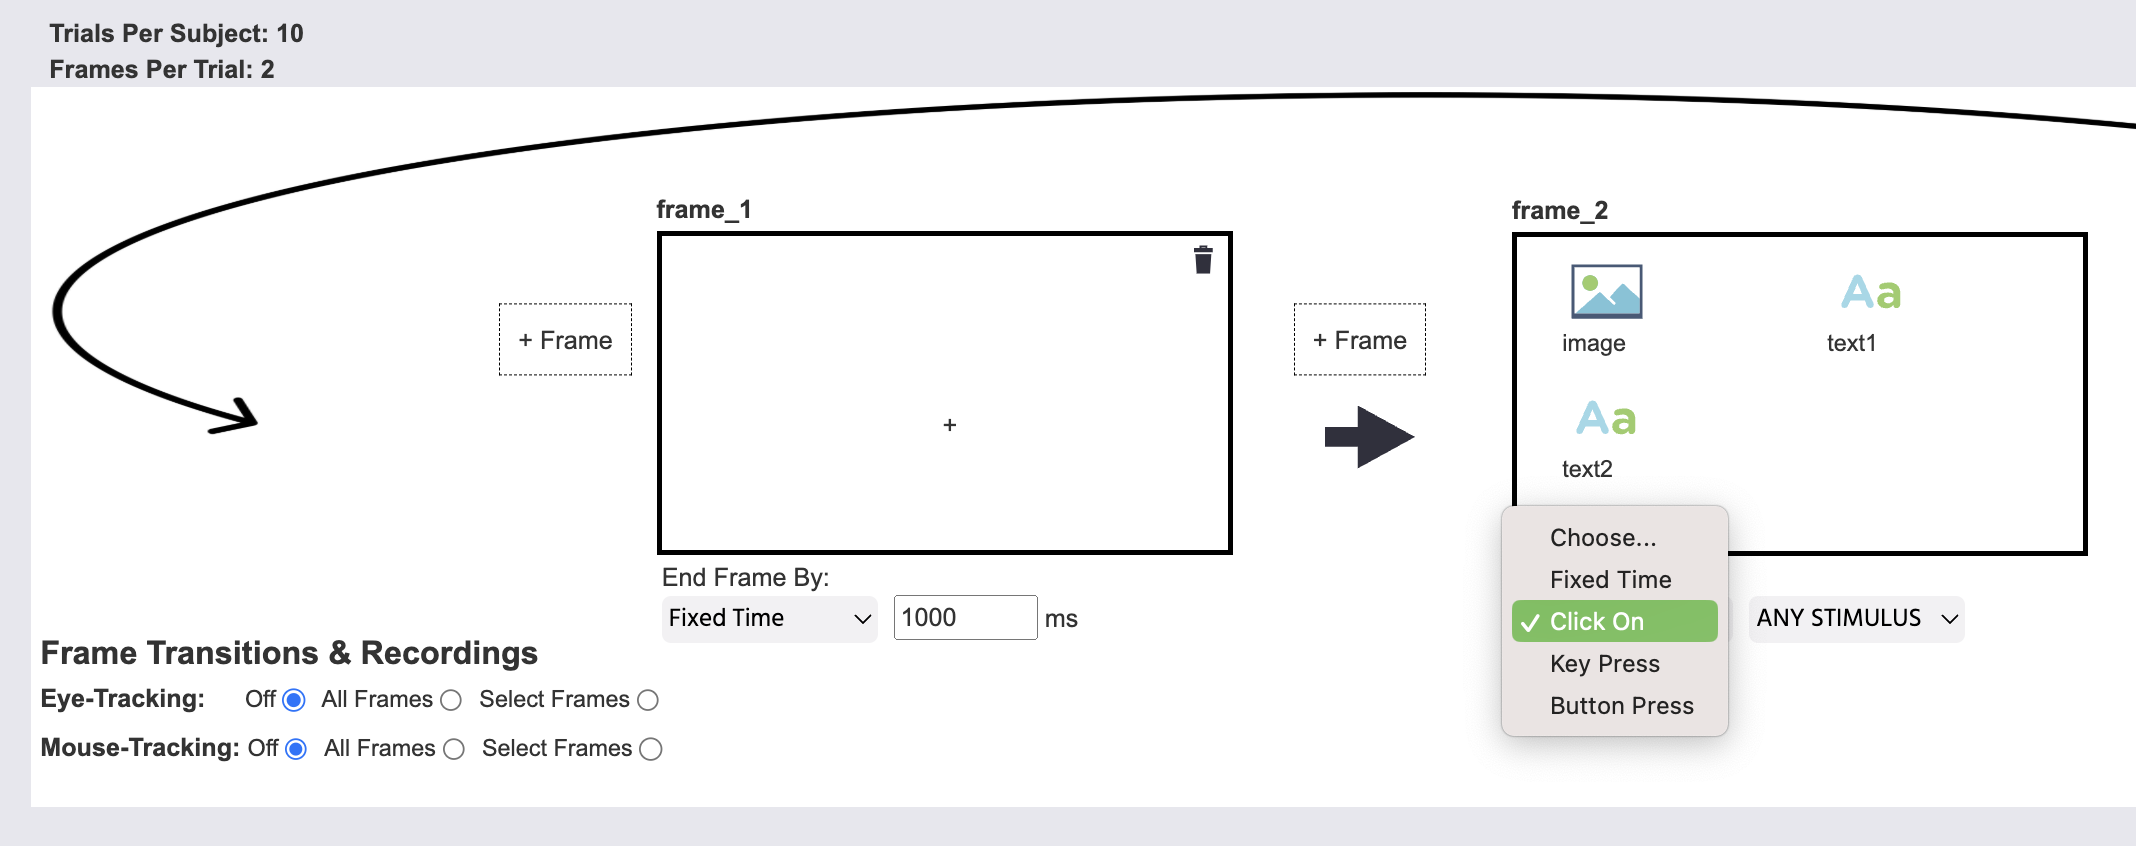
Upon arranging the frames, it is time to specify the frame transitions and the kind of recordings that will be made. From here, you can select whether you want to activate Eye-tracking or Mouse-tracking for all or specific frames.
In the image below, frame_1 will last for a Fixed Time that we specified to be 1000 milliseconds. Then, frame_2 will end upon clicking any stimulus. Note: for this study, we actually don’t want the frame to end if they click on the image object, but that can be disabled later in the Task Editor by selecting the image object and then under its Object Properties setting the Active option to False.
The Task Wizard is automatically set up to record what was clicked on and store that data in Variables.
Extra Note on Randomization
With regards to randomization, please note the following information:
- The trial order will be fully randomized by default.
- A more customized trial order (e.g fixed order, blocked conditions, staircases, etc.) can be set up in the
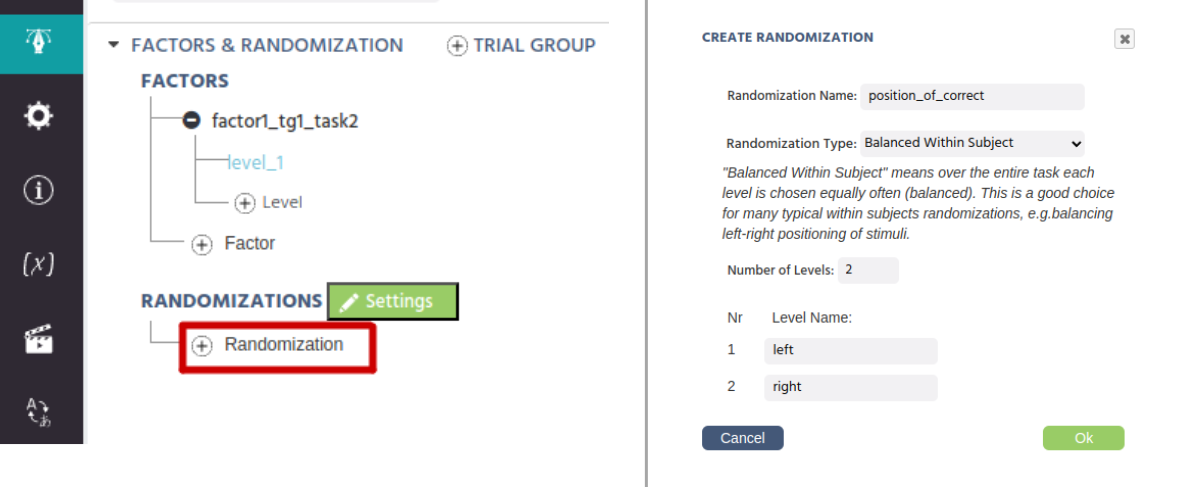
Randomization Settingsdialog. - Further balancing (e.g. left-right balancing of stimuli) can be done by adding randomizations (see image below).
- Between-subject balancing can also be done using groups or randomization separators via the
Study Designtab. - You can read more about randomization techniques here.
- You can also watch an in-depth video about Randomization In Labvanced.
For most studies, randomization can be simple and straightforward. However, if you need help or have questions regarding randomization/balancing for an advanced design, please feel welcome reach out to us via email or chat support!