labvanced logoLabVanced
  • Research
    • Publications
    • Researcher Interviews
    • Use Cases
      • Developmental Psychology
      • Linguistics
      • Clinical & Digital Health
      • Educational Psychology
      • Cognitive & Neuro
      • Social & Personality
      • Arts Research
      • Sports & Movement
      • Marketing & Consumer Behavior
      • Economics
      • HCI / UX
      • Commercial / Industry Use
    • Labvanced Blog
    • Services
  • Technology
    • Feature Overview
    • Code-Free Study Building
    • Eye Tracking
    • Mouse Tracking
    • Generative AI Integration
    • Multi User Studies
    • More ...
      • Reaction Time/Precise Timing
      • Text Transcription
      • Heart Rate Detection (rPPG)
      • Questionnaires/Surveys
      • Experimental Control
      • Data Privacy & Security
      • Desktop App
      • Mobile App
  • Learn
    • Guide
    • Videos
    • Walkthroughs
    • FAQ
    • Release Notes
    • Documents
    • Classroom
  • Experiments
    • Cognitive Tests
    • Sample Studies
    • Public Experiment Library
  • Pricing
    • Licenses
    • Top-Up Recordings
    • Subject Recruitment
    • Study Building
    • Dedicated Support
    • Checkout
  • About
    • About Us
    • Contact
    • Downloads
    • Careers
    • Impressum
    • Disclaimer
    • Privacy & Security
    • Terms & Conditions
  • Appgo to app icon
  • Logingo to app icon
Learn
Guide
Videos
Walkthroughs
FAQ
Newsletter Archive
Documents
Classroom
  • 中國人
  • Deutsch
  • Français
  • Español
  • English
  • 日本語
Guide
Videos
Walkthroughs
FAQ
Newsletter Archive
Documents
Classroom
  • 中國人
  • Deutsch
  • Français
  • Español
  • English
  • 日本語
  • Guide
    • GETTING STARTED

      • Task Editor
      • Stimulus Presentation
      • Correctness of Response
      • Objects
      • Events
      • Variables
      • Task Wizard
      • Trial System
      • Study Design
        • Tasks
        • Blocks
        • Sessions
        • Groups
    • FEATURED TOPICS

      • Randomization & Balance
      • Eye Tracking
      • Questionnaires
      • Desktop App
      • Sample Studies
      • Participant Recruitment
      • API Access
        • REST API
        • Webhook API
        • WebSocket API
      • Other Topics

        • Precise Stimulus Timings
        • Multi User Studies
        • Head Tracking in Labvanced | Guide
    • MAIN APP TABS

      • Overview: Main Tabs
      • Dashboard
      • My Studies
      • Shared Studies
      • My Files
      • Experiment Library
      • My Account
      • License & Services
    • STUDY TABS

      • Overview: Study-Specific Tabs
      • Study Design
        • Tasks
        • Blocks
        • Sessions
        • Groups
      • Task Editor
        • Task Controls
        • The Trial System
        • Canvas and Page Frames
        • Objects
        • Object Property Tables
        • Variables
        • System Variables Tables
        • The Event System
        • Text Editor Functions
        • Eyetracking in a Task
        • Head Tracking in a Task
        • Multi-User Studies
      • Settings
      • Variables
      • Media
      • Texts & Translate
      • Launch & Participate
      • Subject Management
      • Dataview and Export
        • Dataview and Variable & Task Selection (OLD Version)
        • Accessing Recordings (OLD Version)
  • Videos
    • Video Overview
    • Getting Started in Labvanced
    • Creating Tasks
    • Element Videos
    • Events & Variables
    • Advanced Topics
  • Walkthroughs
    • Introduction
    • Stroop Task
    • Lexical Decision Task
    • Posner Gaze Cueing Task
    • Change Blindness Flicker Paradigm
    • Eye-tracking Sample Study
    • Infant Eye-tracking Study
    • Attentional Capture Study with Mouse Tracking
    • Rapid Serial Visual Presentation
    • ChatGPT Study
    • Eye Tracking Demo: SVGs as AOIs
    • Multi-User Demo: Show Subjects' Cursors
    • Gamepad / Joystick Controller- Basic Set Up
    • Desktop App Study with EEG Integration
    • Between-subjects Group Balancing and Variable Setup
  • FAQ
    • Features
    • Security & Data Privacy
    • Licensing
    • Precision of Labvanced
    • Programmatic Use & API
    • Using Labvanced Offline
    • Troubleshooting
    • Study Creation Questions
  • Newsletter Archive
  • Documents
  • Classroom

Heart Rate Detection Trigger

Table of Contents

  • Overview
  • Recording Heart Rate Data
  • Enabling Heart Rate Detection
  • Trigger-specific Values
  • Practical Examples

Overview

Labvanced heart rate measurement is a physiological tracking system that uses standard webcams to estimate heart rate remotely—no specialized hardware required.

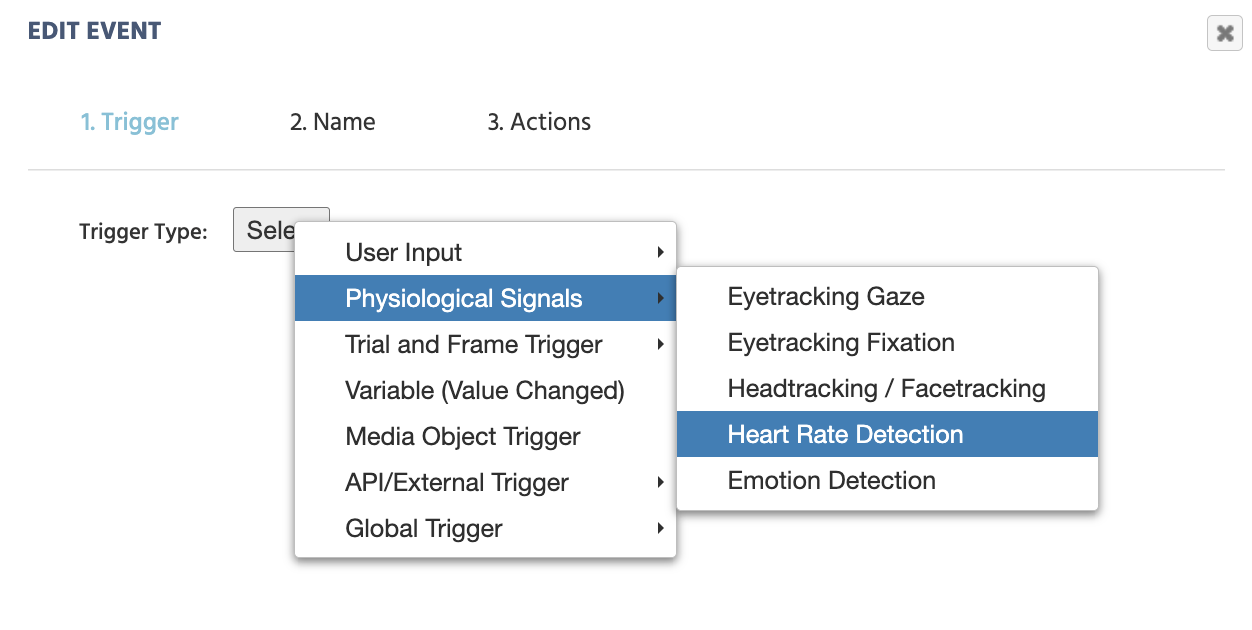
This event listener triggers on heart rate detection updates. Upon selecting this trigger, the BPM, a timestamp and confidence score can be measured.

Note: All processing occurs client-side, ensuring GDPR compliance and guaranteeing that no facial data is ever transmitted or stored externally.

The Emotion Detection Trigger menu in Labvanced.

Locating the Heart Rate Detection Trigger from the Event's trigger menu.

Recording Heart Rate Data

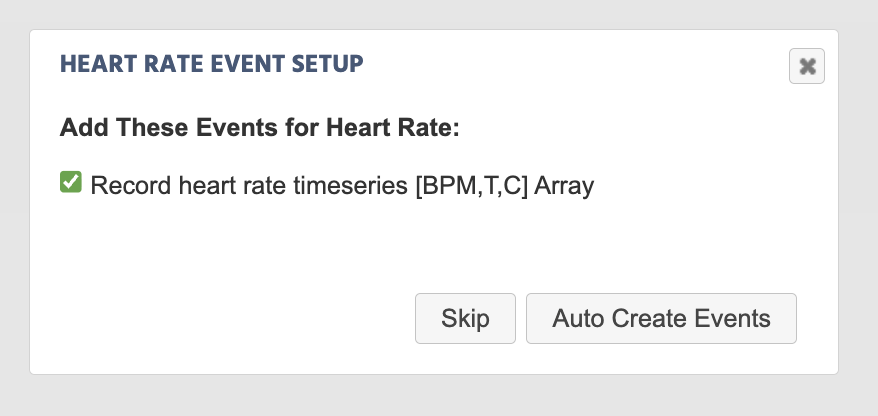
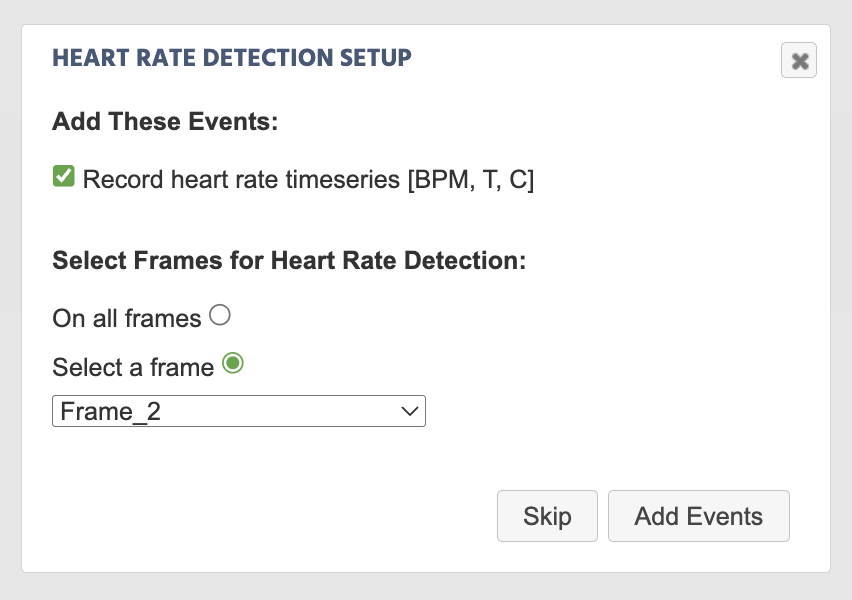
Upon selecting the trigger and giving the action a name, a dialog box will appear prompting you to set up the relevant events for recording data for heart rate detection:

Automated events creating for recording heart rate detection in Labvanced.

Upon selecting the Heart Rate Detection Trigger, a prompt will appear which sets up the event to record heart rate-related values. Note: See the data table image further below for a preview of the data that this event records.

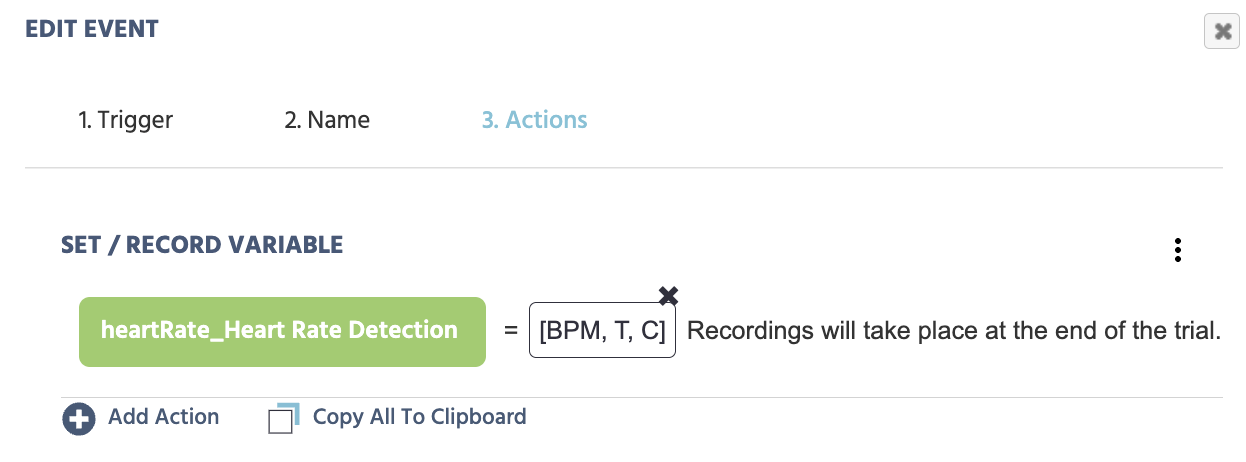
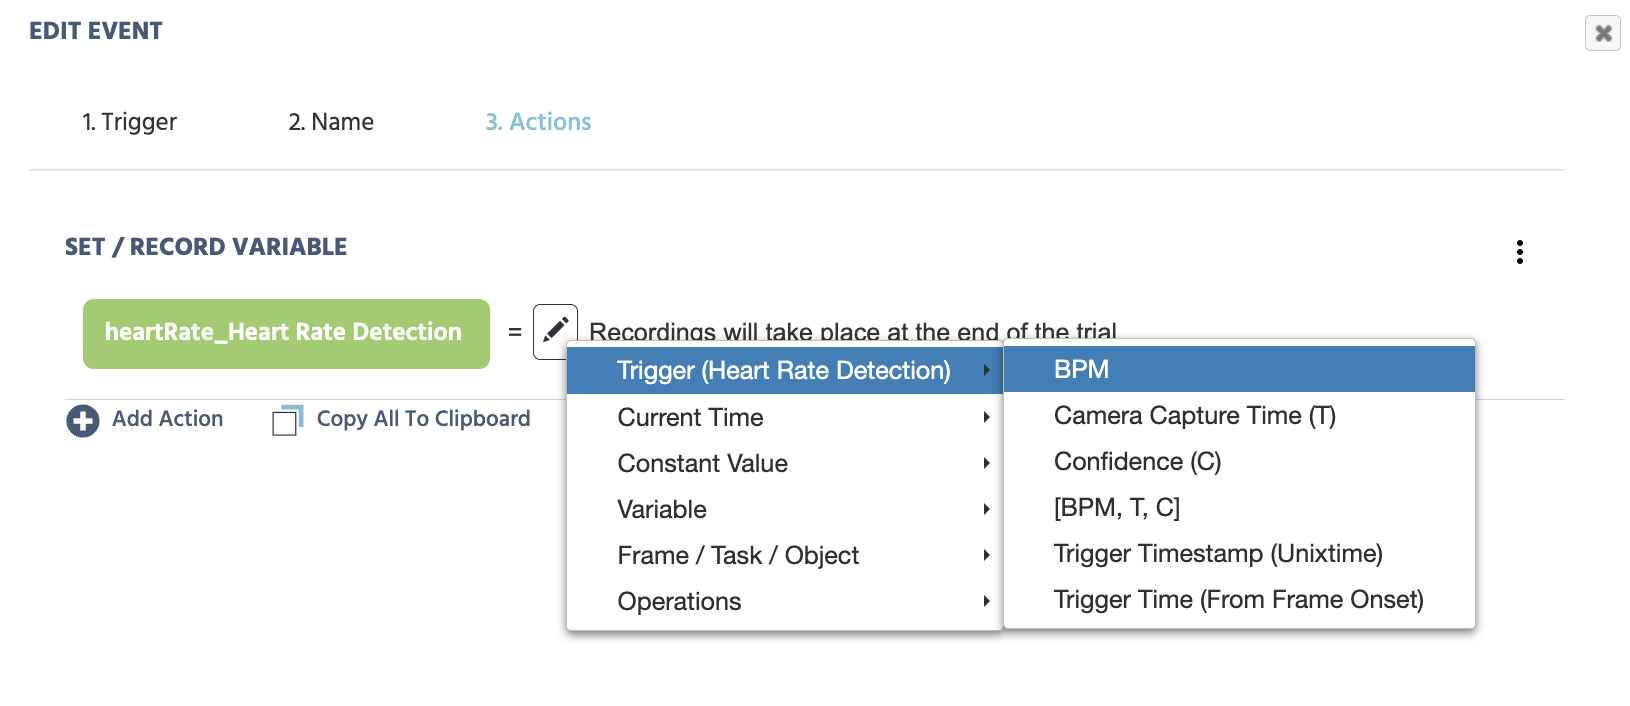
As a result of auto-creating this event, the following action will be created (as shown in the picture below). The variable name heartRate_Heart Rate Detection is assigned and the trigger-specific value of [BPM,T,C] Array is indicated as the values to be recorded during data collection.

From here, the variable name can be further edited via the Variables panel, and the trigger values can also be reassigned to be different values. See below for more options via the Value-select Menu.

Automated event for the trigger for emotion detection in Labvanced.

The event generated automatically for recording heart rate detection result of creating the event prompted, in the step from the image above.

Preview of Heart Rate Data Collected in Labvanced

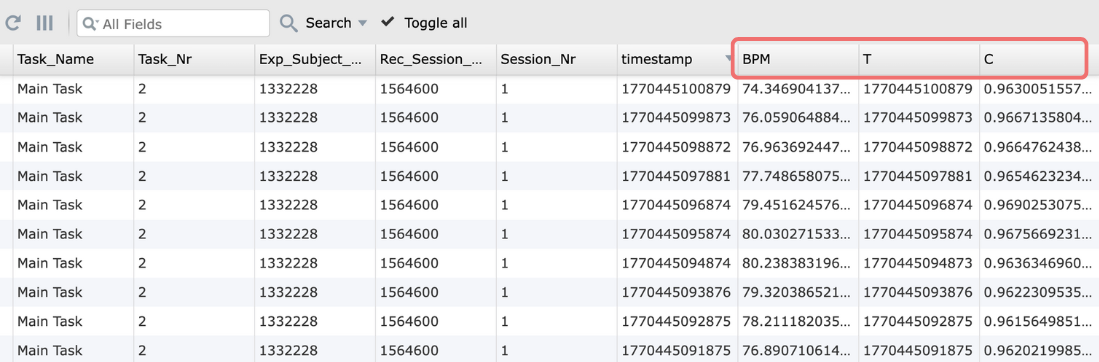
Below is an example of data recorded as a result of having the above event active in your task in Labvanced:

Heart rate detection data recorded in Labvanced

Preview of the data collected with the [BPM,T,C] trigger-specific value.

Enabling / Activating Heart Rate Detection

In order for the heart rate detection trigger to function, the relevant settings must be activated and enabled under both the Task Controls and Settings, as explained below.

Study Settings - Enable Heart Rate Detection

In the Settings tab, navigate to Physiology → Heart Rate Detection and check the checkbox in order to activate heart rate measurements in your study.

Note: As remote heart rate detection (rPPG) works by calculating weighted averages over time and therefore can take 10 or more seconds to initialize, there is a setting under the Settings tab called Initialize RPPG on Study Start that by activating helps ensure the rPPG measurements are ready before your main task starts (except where you have enabled RPPG in your first task). Furthermote, there is an additional setting called Wait for heartrate confidence that when enabled, the study will wait until the heart rate detection reaches the specified confidence level before proceeding. The study will also be paused if the heart rate confidence falls below the specified threshold during the experiment. This is useful for ensuring that the heart rate data is reliable.

Task Settings - Enable Heart Rate Detection

Under the Task Controls section in the Task Editor, navigate to the Physiological Signals tab and click the checkbox in order for heart rate detection to be active in the particular task.

Upon activating the heart rate detection by clicking the checkbox, a dialog box will appear prompting you to indicate whether an event for recording heart rate detection data values should be created, along with what frame should the recording occur on:

Creating an event to record heart rate detection data via the task controls

Via the Task Controls under Physiological Signals, it is also possible to auto-generate data recordings for Heart Rate Detection, as well as specify on which frame data recording should specifically occur.

Trigger-specific Values for Heart Rate Detection

Upon selecting the Heart Rate Detection Trigger, the following options are available in the Value-Select Menu.

Accessing the trigger specific menu in Labvanced via the variable select menu

Accessing the trigger-specific values of the Heart Rate Detection Trigger via the Value-select Menu.

ValueDescription
BPMNumeric value indicating the measured heart rate as beats per minute (BPM).
Camera Capture Time (T)The adjusted timestamp value based on when the image snapshot (ie the camera capture) occurred which is required in order to perform heart rate detection calculations.

Note: While the Trigger Timestamp is a value of when the trigger initiated, it takes a few milliseconds for the algorithm to then capture the image frame locally and then process the related heart rate score. Thus, the Camera Capture Time T value is a more accurate timestamp to use.
Confidence (0)A value from 0 to 1 indicating the confidence of the measured heart rate value.
[BPM, T, C]An array holding the values for heart rate (BPM - beats per minute), the camera capture time (T), and the confidence interval of the measurement (C).

Refer to the image preview in the data recording section above for a sense of the data collected with this trigger-specific value selected.
Trigger Timestamp (Unixtime)The trigger timestamp in UNIXTIME.

Note: Refer to the Camera Capture T value as this is a more accurate value for when the emotion detection occurred, as explained above.
Trigger Time (From Frame Onset)Time (in milliseconds) that the trigger occurred from the frame onset / start.

Practical Examples Featuring the Heart Rate Detection Trigger


Remote Heart Rate Detection (rPPG) Demo

In this demo, remote heart rate detection is activated. The relevant values (BMP, timestamp, and confidence intervals of the measurement) will be displayed in real-time.