labvanced logoLabVanced
  • Research
    • Publications
    • Researcher Interviews
    • Use Cases
      • Developmental Psychology
      • Linguistics
      • Clinical & Digital Health
      • Educational Psychology
      • Cognitive & Neuro
      • Social & Personality
      • Arts Research
      • Sports & Movement
      • Marketing & Consumer Behavior
      • Economics
      • HCI / UX
      • Commercial / Industry Use
    • Labvanced Blog
    • Services
  • Technology
    • Feature Overview
    • Code-Free Study Building
    • Eye Tracking
    • Mouse Tracking
    • Generative AI Integration
    • Multi User Studies
    • More ...
      • Reaction Time/Precise Timing
      • Text Transcription
      • Heart Rate Detection (rPPG)
      • Questionnaires/Surveys
      • Experimental Control
      • Data Privacy & Security
      • Desktop App
      • Mobile App
  • Learn
    • Guide
    • Videos
    • Walkthroughs
    • FAQ
    • Release Notes
    • Documents
    • Classroom
  • Experiments
    • Cognitive Tests
    • Sample Studies
    • Public Experiment Library
  • Pricing
    • Licenses
    • Top-Up Recordings
    • Subject Recruitment
    • Study Building
    • Dedicated Support
    • Checkout
  • About
    • About Us
    • Contact
    • Downloads
    • Careers
    • Impressum
    • Disclaimer
    • Privacy & Security
    • Terms & Conditions
  • Appgo to app icon
  • Logingo to app icon
Learn
Guide
Videos
Walkthroughs
FAQ
Newsletter Archive
Documents
Classroom
  • 中國人
  • Deutsch
  • Français
  • Español
  • English
  • 日本語
Guide
Videos
Walkthroughs
FAQ
Newsletter Archive
Documents
Classroom
  • 中國人
  • Deutsch
  • Français
  • Español
  • English
  • 日本語
  • Guide
    • GETTING STARTED

      • Task Editor
      • Stimulus Presentation
      • Correctness of Response
      • Objects
      • Events
      • Variables
      • Task Wizard
      • Trial System
      • Study Design
        • Tasks
        • Blocks
        • Sessions
        • Groups
    • FEATURED TOPICS

      • Randomization & Balance
      • Eye Tracking
      • Questionnaires
      • Desktop App
      • Sample Studies
      • Participant Recruitment
      • API Access
        • REST API
        • Webhook API
        • WebSocket API
      • Other Topics

        • Precise Stimulus Timings
        • Multi User Studies
        • Head Tracking in Labvanced | Guide
    • MAIN APP TABS

      • Overview: Main Tabs
      • Dashboard
      • My Studies
      • Shared Studies
      • My Files
      • Experiment Library
      • My Account
      • My License
    • STUDY TABS

      • Overview: Study-Specific Tabs
      • Study Design
        • Tasks
        • Blocks
        • Sessions
        • Groups
      • Task Editor
        • Task Controls
        • The Trial System
        • Canvas and Page Frames
        • Objects
        • Object Property Tables
        • Variables
        • System Variables Tables
        • The Event System
        • Text Editor Functions
        • Eyetracking in a Task
        • Head Tracking in a Task
        • Multi-User Studies
      • Settings
      • Variables
      • Media
      • Texts & Translate
      • Launch & Participate
      • Subject Management
      • Dataview and Export
        • Dataview and Variable & Task Selection (OLD Version)
        • Accessing Recordings (OLD Version)
  • Videos
    • Video Overview
    • Getting Started in Labvanced
    • Creating Tasks
    • Element Videos
    • Events & Variables
    • Advanced Topics
  • Walkthroughs
    • Introduction
    • Stroop Task
    • Lexical Decision Task
    • Posner Gaze Cueing Task
    • Change Blindness Flicker Paradigm
    • Eye-tracking Sample Study
    • Infant Eye-tracking Study
    • Attentional Capture Study with Mouse Tracking
    • Rapid Serial Visual Presentation
    • ChatGPT Study
    • Eye Tracking Demo: SVGs as AOIs
    • Multi-User Demo: Show Subjects' Cursors
    • Gamepad / Joystick Controller- Basic Set Up
    • Desktop App Study with EEG Integration
    • Between-subjects Group Balancing and Variable Setup
  • FAQ
    • Features
    • Security & Data Privacy
    • Licensing
    • Precision of Labvanced
    • Programmatic Use & API
    • Using Labvanced Offline
    • Troubleshooting
    • Study Creation Questions
  • Newsletter Archive
  • Documents
  • Classroom

Set Object Property Action

The Set Object Property action in Labvanced is a core tool for dynamically controlling what participants see and experience during an experiment. It allows you to change the properties of any object on the screen in real time, based on logic, user input, or external data.

Table of Contents

  • Overview
    • Common use cases
  • How it works
  • Workflow Tips
  • Studies & Example Scenarios
    • Creating the Impression of Movement
    • Controlling the Visibility of an Object
  • Why it’s important

Overview

At its simplest, this action lets you modify an object’s attribute while the experiment is running. Instead of creating multiple static versions of the same element, you can reuse one object and update it on the fly.

Common use cases

  • Changing images or media (swap stimuli between trials)
  • Controlling visibility (show/hide elements based on conditions)
  • Adjusting styles (color, size, position, opacity)

How it works

The action typically involves three key components:

  • Target Object – the element you want to modify (text, image, button, etc.)
  • Property – the specific attribute to change (e.g., text, color, visibility)
  • New Value – the value assigned to that property (can be static or variable-based)

Example of an Object Action in Labvanced.

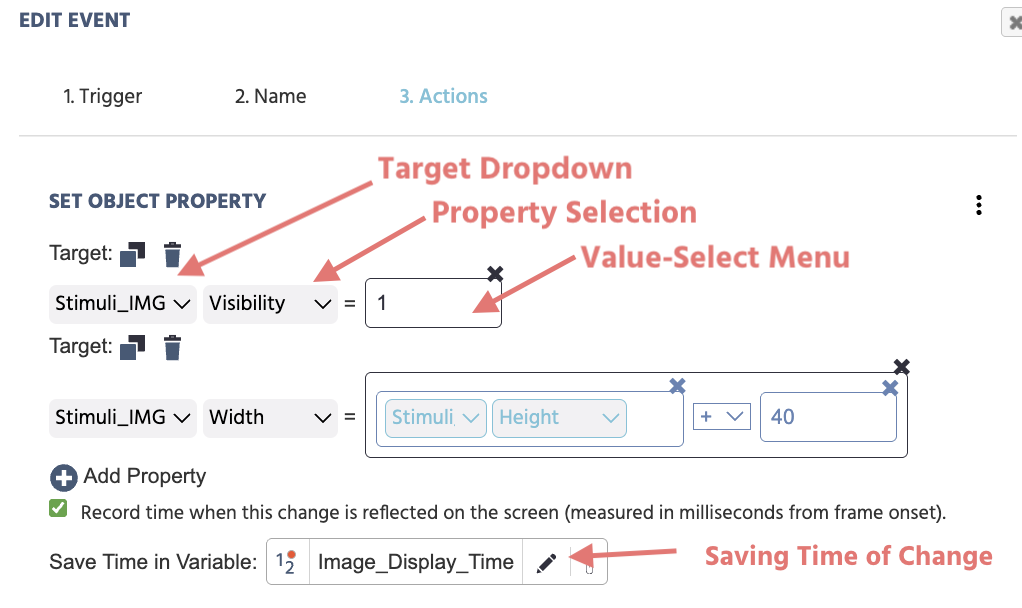
The Target Dropdown section allows you to select and specify from a list of available objects what the specific target should be.

The Property Selection section indicates which object property is to be changed. For example, visibility, scale, x- and/or y-coordinate position. For a full explanation of the available options and their parameters, please see the Object Properties Table.

The Same Time in Variable option allows you to quantify the time when the changed property is really visible on the next diplay refresh. When a property is changed, it will take a short amount of time (approx. ~10milliseconds) for these changes to be visible. Quantifying this change can be useful for reaction time-based tasks.

Possible values for the Value-Select Menu can be:

  • Constant value (eg. fixed string/text or numeric values)
  • Experiment variables (dynamic values)
    • Based on participant responses and behavior (eg. mouse movements / clicks / gaze). For example, if a participant's favorite color is blue, set the image border as blue.
  • Operational values (eg. referencing on the object's property and then adding/subtracting a value to change its appearance) such as that shown in the second entry in the image below where the image width is increasing by +40.

Below is a full overview of the fields you encounter when working with the ‘Set Object Property’ action:

Menu ItemMenu AreaSet Object Property Trigger Options
Target

object selection drop-down list:
Object Properties menu where the object is specified. The first drop-down list will display the objects you have in that frame for you to choose from. This indicates which specific object the action will be performed on.
Target

property selection drop-down list:
Object Properties menu where the property is specified.
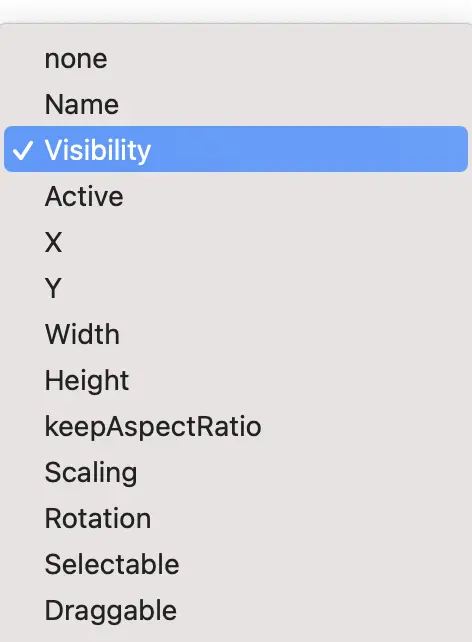
The second drop-down menu indicates which object property is to be changed. For a full explanation of the available options and their parameters, please see the Object Properties Table.
Value Select MenuThe Value select menu where the new value is specifiedDefine the new value, ie. what the value of the new object property should be as a result of the action utilizing the Value Select Menu.
‘+ Add Property’The button for adding more properties.Multiple properties can be added and changed under the action by clicking this icon.
Checkbox - Record time when this change is reflected on the screen (measured in milliseconds from frame onset).The checkbox for recording the time value of object property changes.When a property is changed, it will take a short amount of time (approx ~10ms for the changes to be visible. With this option you can record more precisely the time when the changed property is really visible on the next display refresh.

Note: Upon selecting this option, a dialog box will appear prompting you to indicate (or create a new variable) where this captured value should be stored. The variable should be numeric as the ‘data type.'

Workflow Tips

Use the duplicate icon and simply change the property for related property changes.

Using the Set Object Property action to specify an object's X-coordinate and the using the duplicate option to copy the specified property on the target-level.

Studies Featuring the Set Object Property Action & Example Scenarios

Creating the Impression of Movement

In the Balloon Analog Risk Task (BART), the Set Object Property Action is used to give the impression that the balloon is inflating by increasing the image's width with each button click . Once the probability value reaches a certain point of the balloon popping, the Set Object Property Action is then used again to show a popped balloon in place of the stimuli image. For an example, refer to the BART - Random task under the Pump - Draw Number + Increase Earnings event.

Balloon Analog Risk Task (BART)

The Balloon Analogue Risk Task (BART) is a computerized measure of risk-taking in which the participant pumps a virtual balloon to earn rewards. Each pump increases the potential reward but also the cumulative risk that the balloon will pop, resulting in the loss of all earnings for that round.

Controlling the Visibility of an Object

In this one-minute video, an event is created to make an image visible upon a button press.

In the editor, the image object is given the Visibility value of zero. An event is created specifying that when a button is pressed (trigger) --> Set Object Property action and specify the image object's Visibility should be equal to 1.

Why it’s important

The Set Object Property action is essential for building interactive and adaptive experiments. It enables:

  • Real-time feedback loops
  • Personalized participant experiences
  • Efficient experiment design (fewer duplicated elements)
  • Integration with dynamic systems like AI or sensors