
Objects
Objects are specific types of elements that can be used as the building blocks from which you can create your experimental task and stimuli! Getting a grasp of objects and the types of objects that are available in Labvanced is important in order to create not only interactive experiments but also to effeciently grasp stimuli creation!
For an overview of objects available in Labvanced, please watch this introductory video:
- Images & Drawing Objects: This is where you go to add images and drawing-related stimuli.
- Media Objects: Includes objects like video, video recording, video conference, audio recording and more.
- Text Objects: Text Objects allow you to present and edit text or render HTML within experiments, with options for inserting variables that dynamically update on the screen.
- Buttons & Navigation Objects: Include features for triggering events, recording responses, moving between frames, and for displaying experiment progress in percentages.
- Question Objects: Let the participants provide responses in various formats, with options to randomize response order, dynamically change the "required" property, and track item order using an array variable.
- Question Input Objects: Allow participants to provide short or long responses, supporting various formats like numbers, text, dates, times, and colors, with options specifically for longer text responses.
- Various Objects: Provide interactive response options, including a sliding tool for numeric input, a dropdown menu with dynamic responses, a drag-and-drop sorting feature, and a file upload option for participants to submit documents.
Working with Objects
Objects are the lowest instance in the Labvanced task hierarchy and are placed onto frames as a means of adding stimuli to your experiment! In the task editor, objects are grouped into 7 groups: Media, Shapes, Text, Buttons & Navigation, Question, Inputs, and Various, as shown in the image below:
In the upcoming sections, we will provide an overview of how to work with objects, from creating them to controlling their appearance or function within the experiment, and more.
Objects Menu
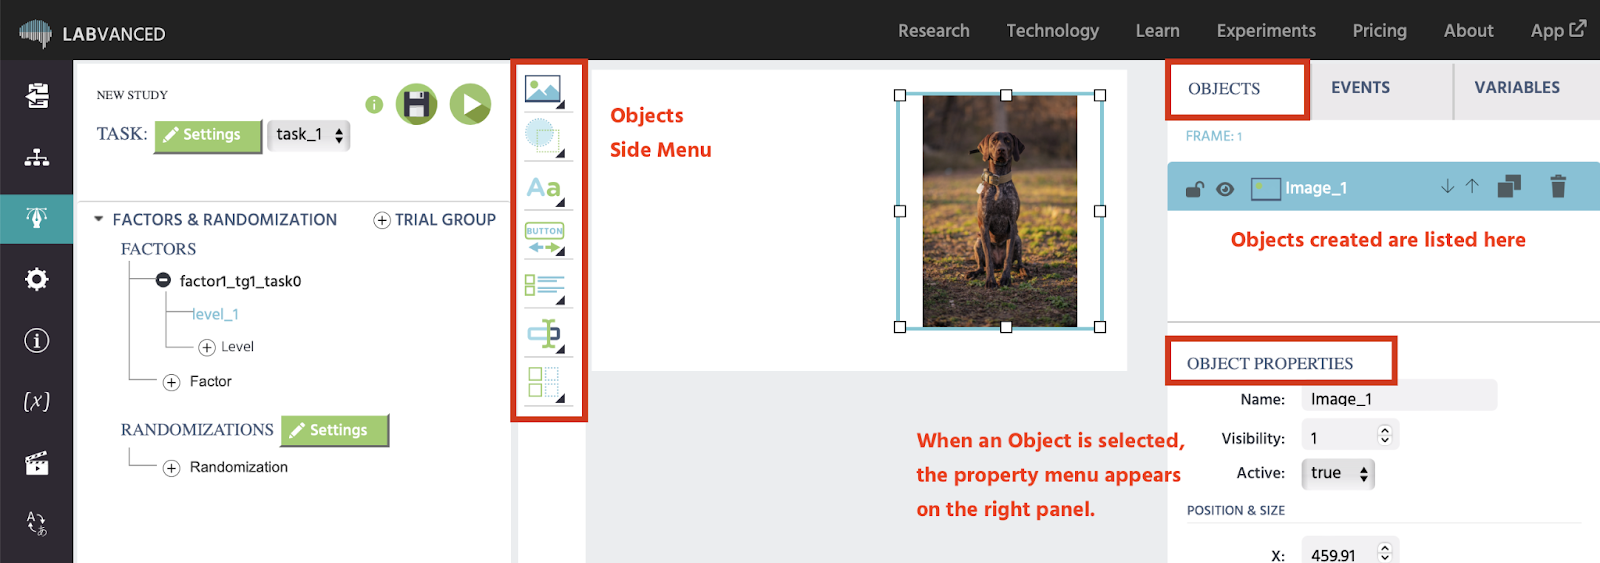
The Objects side menu is the object toolbar, which is located to the left of the frame. It lets you add different objects to the frame.
Objects Tab
A list of all objects that have been created and placed on the currently selected frame is shown on the right side of the editor under the "Objects" tab. The "currently selected object" or any particular object can be chosen either by clicking on the respective object in the objects tab or by directly clicking on the object in the frame where it appears.
When an object is actively selected, it becomes highlighted in the Objects Tab and several options appear, as shown below:
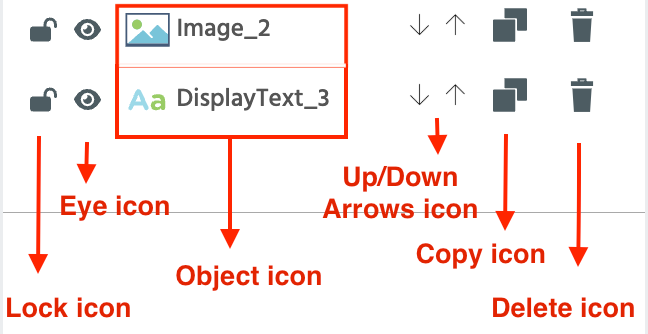
Each object displayed under the objects tab comes with several icons that lets you control how it’s displayed in the frame and how it's organized:
- Lock Icon: Lets you lock/unlock that specific object. When locked this object freezes in the frame preventing any further editing.
- Eye Icon: This is the visibility toggle that lets you hide/unhide the object in the frame. When enabled, the object becomes invisible in the frame.
- Object icon: This icon includes an object indicator and its name. For example, in the image above, the image and text indicators show that they represent an image and a text object, respectively. 'Image_2' and 'DisplayText_3' are the names of these objects.
- Up/Down Arrows Icon: This lets you Move Up/ Move Down the objects and reorder it. This doesn’t make any changes in the frame, but helps you organise the objects list.
- Copy Icon: The copy icon lets you create copies of the object selected.
- Delete Icon: This icon lets you remove the object from the frame and the objects list.
Object Properties
The object properties panel provides you with plenty ofoptions to review and edit all properties of an object. In this panel, all properties of the currently selected object are displayed and can be modified using the fields, checkboxes, etc. Read more about Object Properties here.
Object-associated Variables
Some objects that you add to your experiment come with a linked variable. For example, when you include an input field, Labvanced prompts you to give it a variable name because that’s where the participants' responses will be stored. Once the data is collected, this variable will appear in your dataset too!
Controlling Objects
Controlling objects is important because it allows you to have a dynamic experiment design. You could do this through the following:
- Trial System: The trial system is positioned on the left side of the task editor page and has two sub-components: the "Factor Tree" and the "Trials & Conditions" table. After selecting an object, the trial system can be used to modify the object using the options such as the default trial, factor levels, conditions, no. of trials etc. You could also make direct modifications using the "Object Properties" panel on the right.
- Events: The Event System lets you set up rules, like ‘when this happens’ (trigger)’ then ‘do this’ (action). You can do this by creating an event. An event often acts as a mediator between objects and variables. For example, if a participant clicks on an image object, then a feedback appears.
From creating simple tasks to advanced interactive studies, Labvanced’s object system offers everything you need to build and customize your experiment with full control and precision!