Setting Up Eye Tracking in a Task
When you create a new study, eye tracking can be activated either from a task's own Settings dialog, which is what this page covers, or from the main Settings tab at the study level (see How to Choose Eye Tracking Calibration Settings). Either way, Physiology Toolbox Version 2.0 is the default. Once eye tracking is enabled for your study, you still need to enable and configure it for each individual task where you want gaze data collected.
Enabling Eye Tracking for a Task
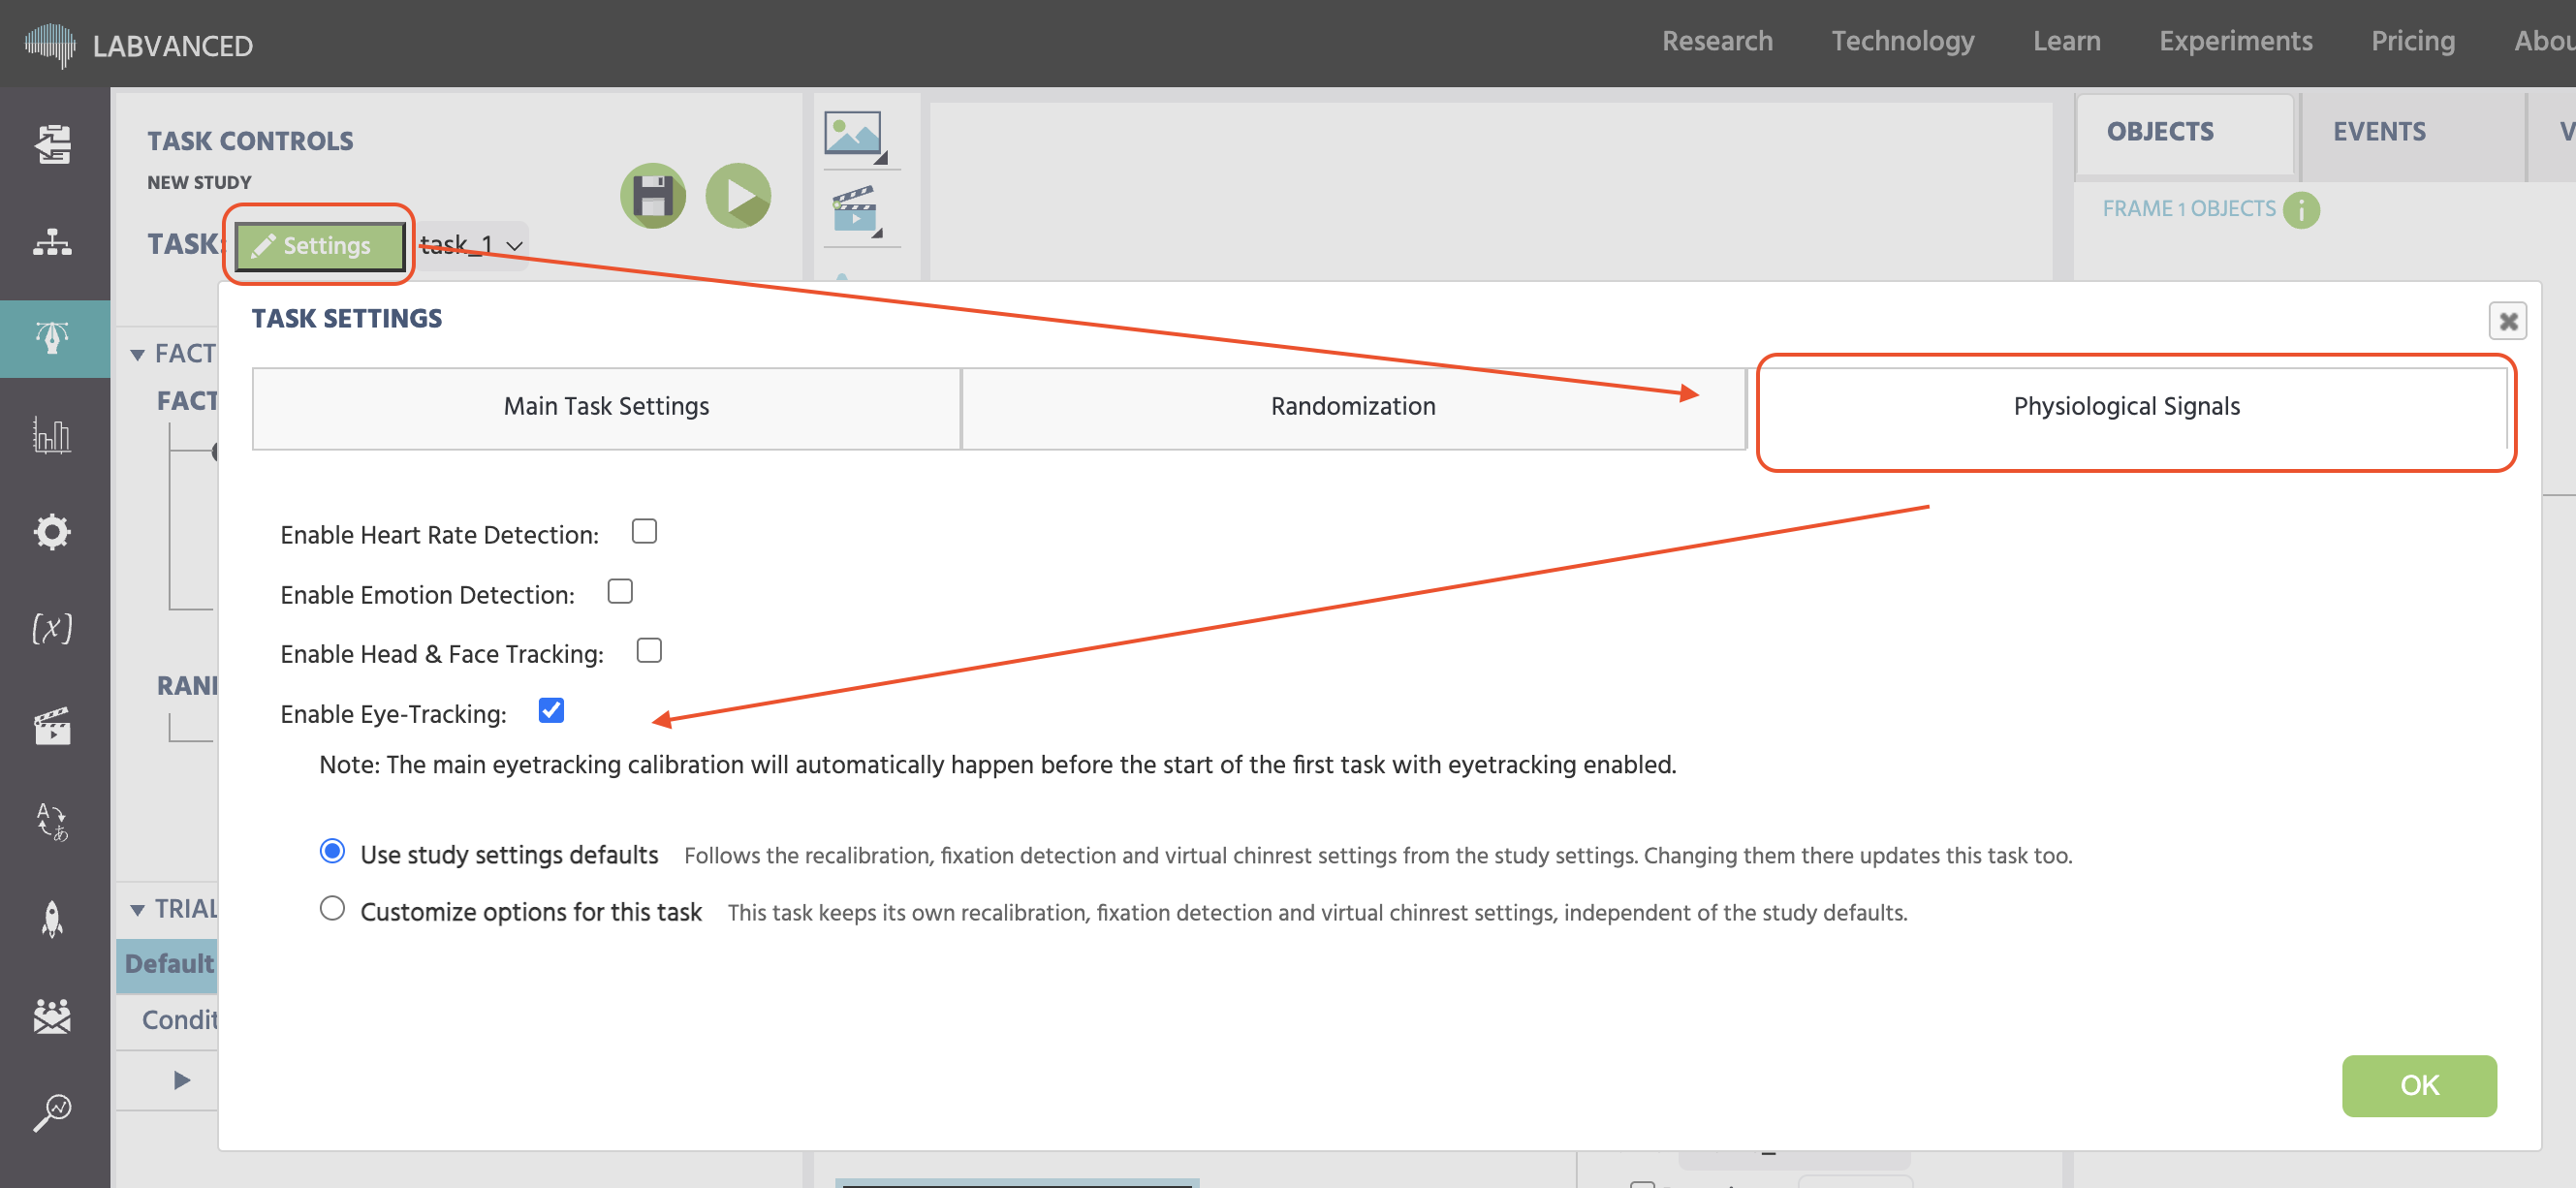
In the task editor, click the Settings button in the top-left corner, next to "Task:". In the dialog that opens, go to the Physiological Signals tab and check Enable Eye-Tracking:.
Eye tracking can be enabled for multiple tasks within the same experiment. The main calibration, configured at the study level, only runs once, before the first task in the study that has eye tracking enabled. Every subsequent task with eye tracking enabled uses the recalibration settings described below instead of running a full calibration again.
Checking Enable Eye-Tracking: is itself one of the ways a study on Physiology Toolbox Version 2.0 can trigger the Set up eye tracking wizard, the first time eye tracking is turned on anywhere in the study. See Choosing a Tier in the calibration settings guide for what that wizard asks.
Using Custom Settings for a Task
By default, a task uses Use study settings defaults, shown in the screenshot above: it follows the recalibration, fixation detection, and virtual chinrest settings from the study settings, and changing them at the study level updates every task still on this default. Switching to Customize options for this task instead gives the task its own recalibration, fixation detection, and virtual chinrest settings, independent of the study defaults. This choice only exists on Physiology Toolbox Version 2.0, on 1.3 and earlier, a task always configures its own settings directly, there is no inherit option. The three things Customize options for this task lets you set are below.
Recalibration
Choosing Customize options for this task exposes two dropdowns, Recalibration before the FIRST trial and Recalibration before LATER trials, each with the same five options:
Off (no recalibration)1 point — attention getter + error measurement (no correction)5 points — corrects offset and scale9 points — best chance of also correcting rotationGaze Control — re-verify accuracy, no dots
A single point measures drift without correcting it, acting as an attention getter that starts each trial from a known gaze position. Five or nine points can be cross-validated, so they also correct the drift they measure, with nine giving the model its best chance at catching rotation as well as offset and scale. If Recalibration before LATER trials is anything other than Off, a further choice sets how often it repeats: after a fixed amount of time, or after a fixed number of trials. If your study is still on Physiology Toolbox Version 1.3 or earlier instead, see Configuring Recalibration on Physiology Toolbox 1.3 and Earlier below.
Virtual Chinrest
Customize options for this task also exposes a per-task Virtual Chinrest override, independent of the study's own setting:
Head-pose enforcement:Enable (during calibrations and trials),Enable (only during calibrations), orDisable.Chinrest strength:Very Loose,Loose,Medium,Strict, orVery Strict.
On Use study settings defaults, the task follows the study's own Virtual Chinrest setting instead, and this override does not apply.
Fixation Detection Override
Customize options for this task also lets a task set its own Fixation Detection mode, independent of the study defaults. See Fixation Detection below for the algorithm choices and what each one does.
Fixation Detection
Fixation Detection determines how Labvanced identifies when a participant's gaze has settled on a location, rather than just reporting a raw stream of gaze coordinates. It requires the study's Physiology Toolbox Version to be set to v1.2 or higher. On 2.0, it can also be configured per task by selecting Customize options for this task (see Using Custom Settings for a Task above), the same switch that unlocks the per-task recalibration and virtual chinrest settings.
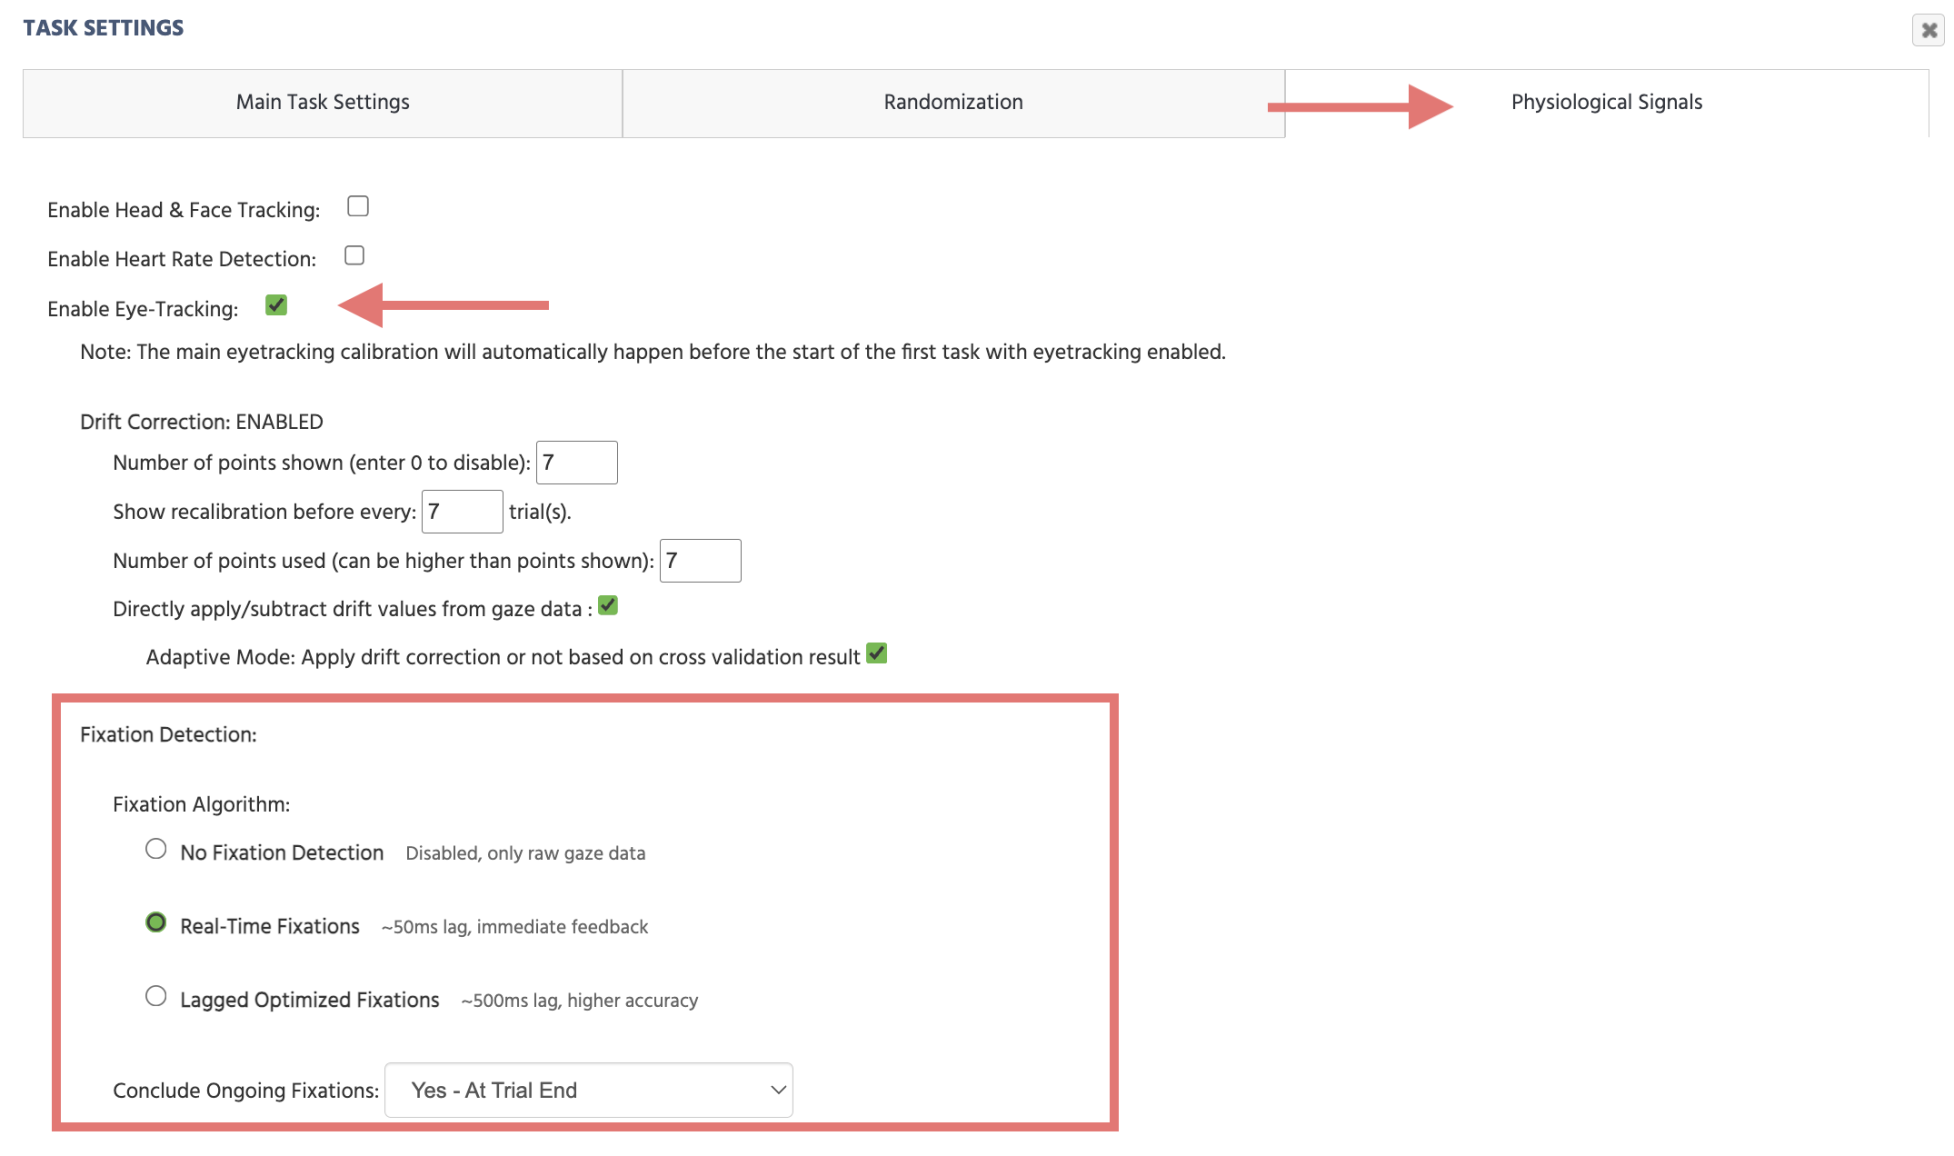
No Fixation Detection: disables fixation analysis; only raw gaze coordinates are collected.Real-Time Fixations: fixations are calculated as gaze data arrives, with about a 50 millisecond lag. Best for studies that need immediate participant feedback based on fixations, such as gaze-contingent displays.Lagged Optimized Fixations: fixations are calculated after observing subsequent gaze points, with about a 500 millisecond lag, producing higher accuracy and better detection of longer fixations. Best when feedback can be slightly delayed, or for post-experiment analysis.Conclude Ongoing Fixations: controls what happens to a fixation still being calculated when a frame or trial ends before the algorithm finishes. Options are to keep the buffer running across frame/trial boundaries, or to force the fixation calculation to conclude at the end of the frame or the trial. Forcing conclusion is useful when you need to know whether a participant fixated on a target before moving to the next frame or trial. OnPhysiology Toolbox Version2.0, the "keep the buffer running across frame/trial boundaries" choice is no longer available, every fixation must conclude at a frame or trial boundary.
Display Settings
Display Mode lives on a different tab from the rest of this page: in the task editor, click the Settings button next to "Task:", then go to the Main Task Settings tab, not Physiological Signals. The default display mode is Zoom / Adaptive, which scales your task's content to fit each participant's screen. For eye tracking tasks, switching to Fixed in Visual Degree or Fixed in Millimeter is often preferable, since gaze position is then reported in a physical unit rather than in frame units that vary by screen size, making measurements comparable across participants.
If you switch to Fixed in Visual Degree or Fixed in Millimeter for any task in your study, the Measure Screen Size (card calibration) option under Settings tab → Controls → Screen becomes mandatory and cannot be disabled. This asks participants to hold a standardized card (85.60 by 53.98 mm, the size of a credit card or ID card) up to their screen so Labvanced can calibrate the physical screen size, which is what makes millimeter and visual-degree measurements accurate in the first place.
Restricting Tracking to Specific Stimulus Objects
You can also limit a gaze or fixation event to fire only when the participant looks at specific stimulus objects, rather than anywhere on the frame. This is configured as part of building the event itself, covered in Recording and Exporting Gaze Data.
Configuring Recalibration on Physiology Toolbox 1.3 and Earlier
Once eye tracking is enabled for a task, four fields control how the system keeps gaze predictions accurate over the course of that task:
Number of points shown: how many recalibration points are displayed before the task begins. Set to 0 to disable recalibration entirely. Defaults to 7.Show recalibration before every: how many trials pass before recalibration runs again. Defaults to 7.Number of points used: how many of the shown points are actually used in the recalibration calculation, which can be set higher than the number shown.Directly apply/subtract drift values from gaze data: when enabled, corrects a participant's gradual, natural tendency to drift in one direction over the course of a task.Adaptive Mode: when this sub-option is enabled, drift correction is applied or withheld automatically based on a cross-validation check, rather than always being applied.
If your task is short, or gaze accuracy is not critical to your measure, disabling recalibration (Number of points shown set to 0) keeps the task moving faster for participants. For longer tasks, or ones where small errors in gaze position matter, the default recalibration settings help correct for accuracy drifting over time.
Directly apply/subtract drift values from gaze data and Adaptive Mode are specific to 1.3 and earlier: on 2.0, these two checkboxes are inert, they no longer do anything.
Worked Examples
For a full worked example of building a study around these settings, see the Eyetracking Walkthrough or the infant-friendly Object Discrimination Task walkthrough. Both reflect an older version of the settings interface, so field names and screenshots may not match what is described above, but the overall structure of the walkthroughs still applies.
Frequently Asked Questions
If I enable eye tracking for multiple tasks in the same experiment, does full calibration run every time?
I disabled Enable Eye-Tracking on task 1, but participants still get the camera-access prompt. Why?
Can I disable recalibration for a short task?
Which Fixation Detection mode should I use if I need to react to a fixation immediately, mid-task?
What happens to a fixation that hasn't finished calculating when a trial ends?
Do I need to set up the Measure Screen Size card calibration if I'm using the default display mode?
Further Reading
Recording and Exporting Gaze Data
Build the events that capture gaze data as recorded variables, and access the resulting export.
Presenting Stimuli in an Eye Tracking Task
How stimuli relate to eye tracking, before you get into task settings.
How to Choose Eye Tracking Calibration Settings
The study-level calibration settings that this task's recalibration builds on.