Building a Multi-user Study
How do you actually connect two participants so one's actions reach the other's screen?
This walkthrough covers the click-by-click mechanics: enabling multi-user mode, assigning roles, connecting participants, and keeping them synchronized. For when to use a multi-user design, best practices, and existing example studies, see Multi-user Experiment Design.
The four steps below are the same for every multi-user study, regardless of what it's actually testing. Once you have them working, the "Additional Examples" section shows the same four steps reused across three different designs.
Table of Contents
Prerequisite Knowledge
Fundamental knowledge of Labvanced is advised, such as how events work and how variables are used, in order to follow the terminology used below.
Frames
The building block that holds what participants see at each moment in a trial.
Events
What a trigger and an action are, and how they combine to build a study's logic.
Variables
What a variable is and how it stores and updates values during a study.
Setting Up the Skeleton
Enabling multi-participant mode
A Labvanced study is built for one participant by default. None of the multi-user tools, Role_Id, Distribute Variable, synchronization, exist until the study is told it will run with more than one person at once.
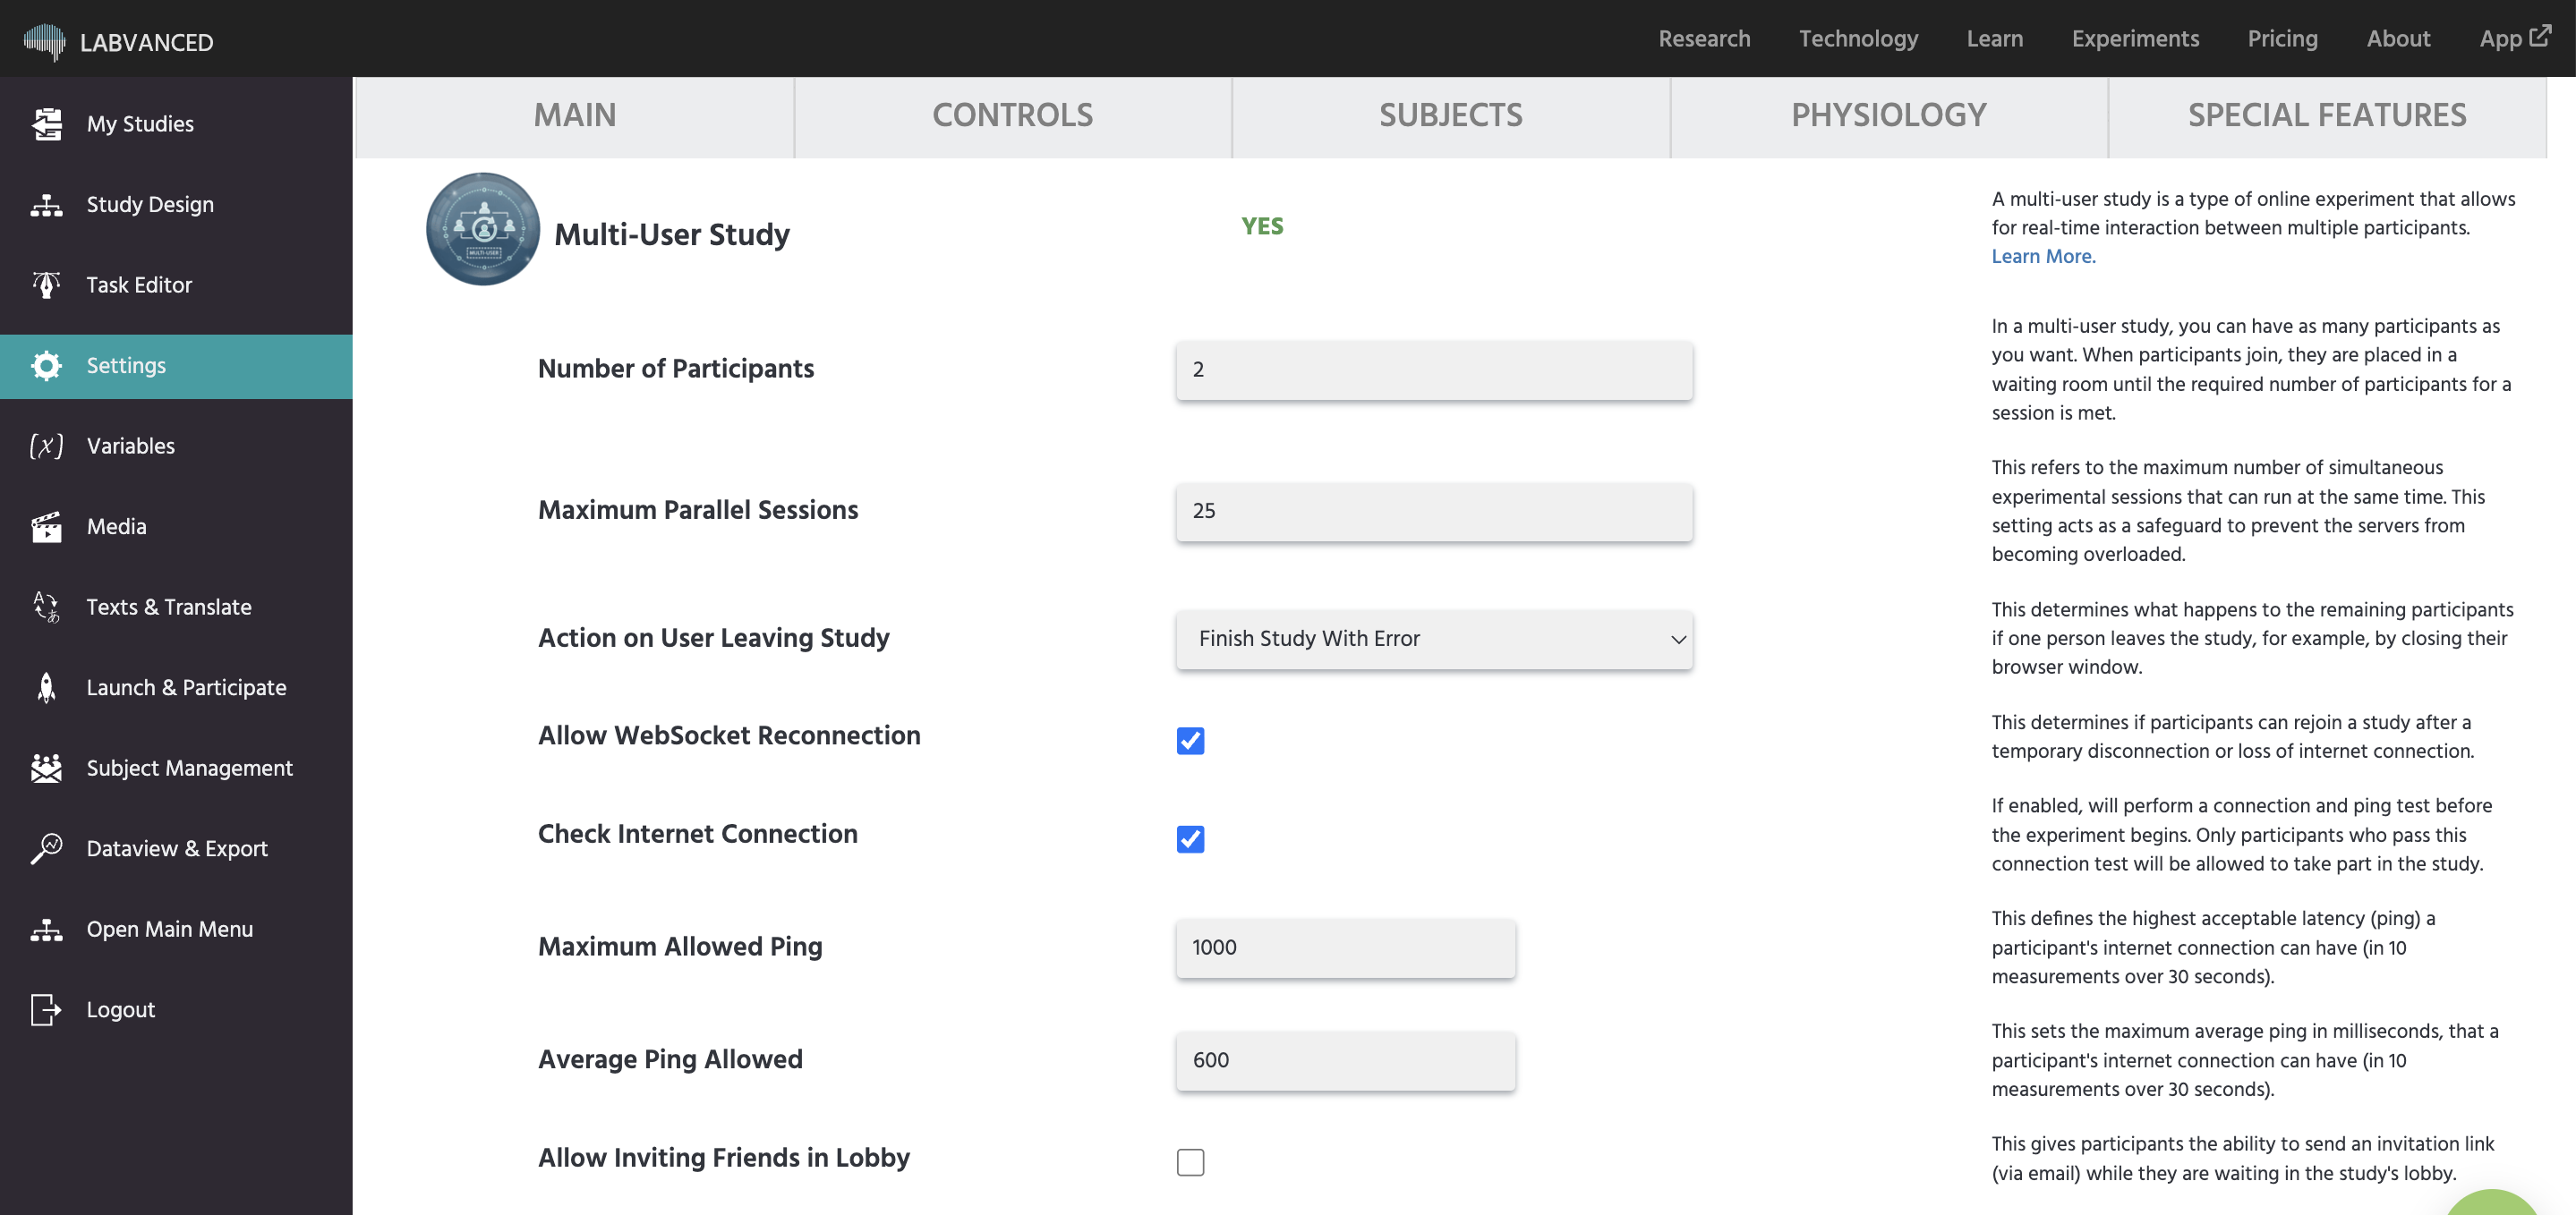
Open Settings in the right column, then under Special Features click through to Multi User Study and click Transform. This reveals two fields: Number of Participants (minimum 2) and Maximum Parallel Sessions. See Multi User Study for the full list of settings this unlocks.
This click cannot be undone (the confirmation dialog itself is labeled Transform Permanently). Decide your participant count first, and duplicate the study beforehand if you want a single-participant version too.
Assigning roles with Role_Id
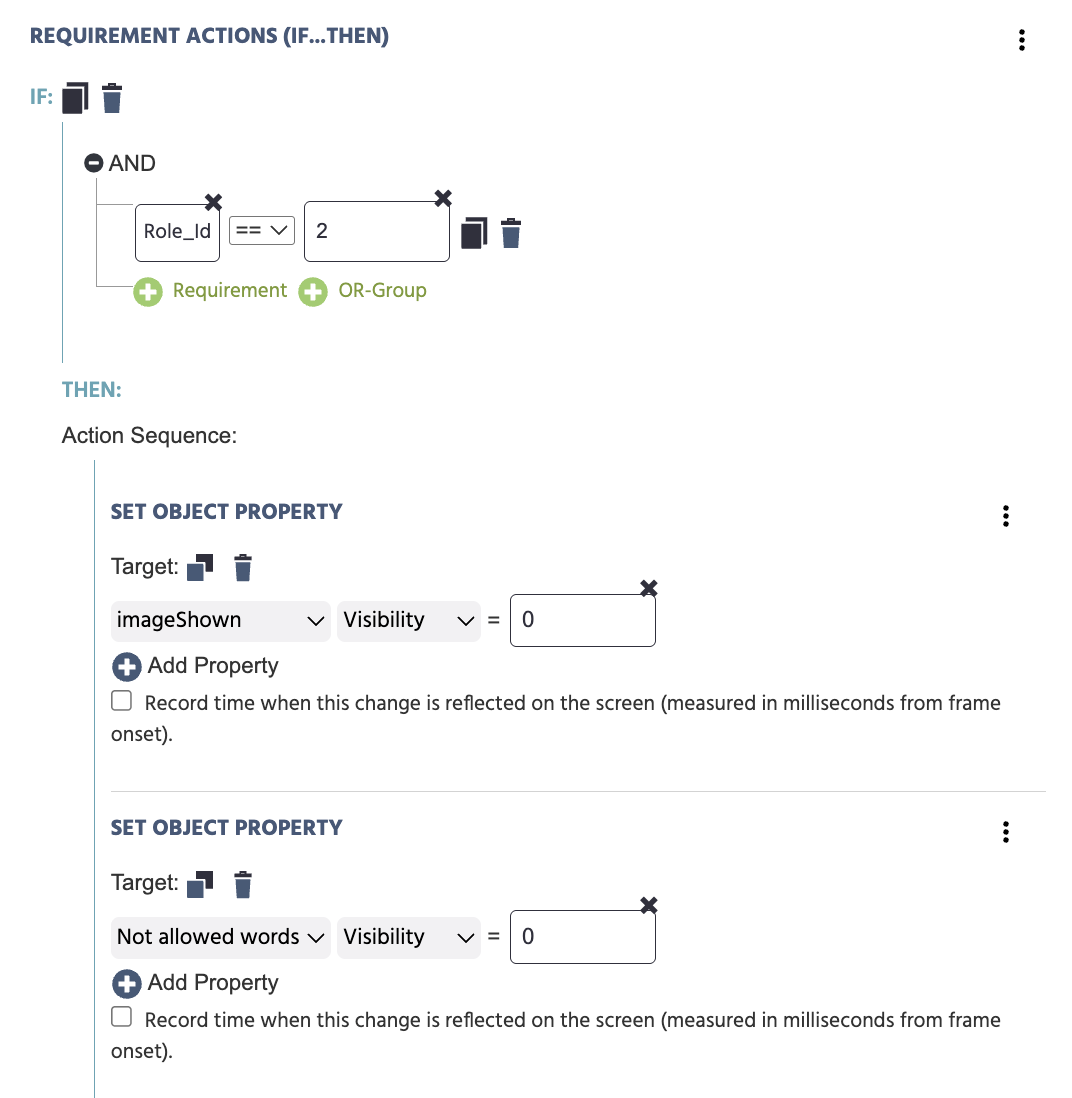
With multi-participant mode on, every participant is still running an identical, undifferentiated copy of the experiment; nothing yet tells them apart. Role_Id gives each participant an identity you can act on, without collecting anything personal, so their experiments can start doing different things.
Add an event with a Trial and Frame Trigger → On Frame Start, then a Control Actions → Requirement Actions (If... Then... Else If) action:
- Add Requirement: left side →
Variable→ selectRole_Id; comparison →equal; right side →Constant Value→Number→1 - Then: add whatever actions apply to role 1, for example
Set Object Propertyto show a target image - Add Else Case: add the actions that apply to every other role
Connecting participants with Distribute Variable
A different Role_Id can put different content in front of each participant, but it still can't move information between them; each participant's experiment is still running in isolation. Distribute Variable is the only action that pushes a value out of one participant's experiment and into another's, which is what actually makes the study feel shared rather than side by side.
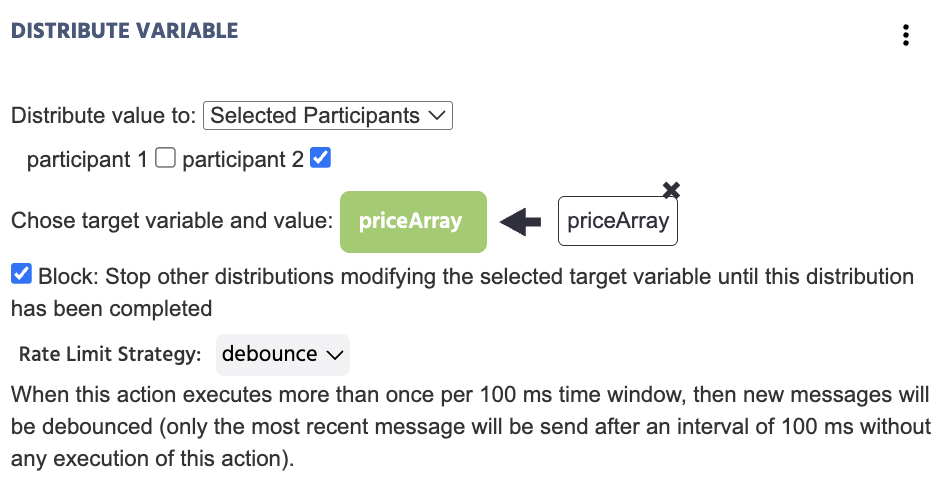
On whatever trigger fits your design, for example a Button Click Trigger or Enter on Input Trigger, add a Variable Actions → Distribute Variable Action:
- Distribute value to: all participants, or a selection
- Choose target variable and value: the variable on the receiving participant's screen, and what it should be set to
- Block: turn this on if more than one participant could write to the same target variable around the same time
priceArray, with Block enabled and a debounce rate limit. Keeping participants in sync
Participants don't move through the study at the same pace on their own. Without a synchronization point, one participant can reach a later frame before the value they're waiting on has even been distributed, seeing a blank or unfinished state instead of the other participant's response.
On the frame where participants need to stay in step, for example neither should advance before the other has responded, enable Sync Frame Start under Frame Settings. Everyone waits at that frame until all participants have arrived.

Additional Examples
The four steps above don't change. What changes is what gets distributed and where the sync point goes. Three worked variations, starting with the simplest:
- Shared Counter: the minimal version, one value kept in sync between two participants
- Director-Matcher Description Task: one participant describes, the other identifies
- Turn-Based Offer and Response: one participant proposes, the other accepts or rejects
Shared Counter
The simplest possible version of the skeleton: both participants see the same running total, and either one can add to it.
- Role_Id: not needed here since both participants act the same way.
- Distribute: on a
Button Click Trigger, distribute value to all participants, target variableSharedCount, value =SharedCount + 1. - Sync: none needed, since there's no trial boundary to hold participants at.
This confirms multi-participant mode and Distribute Variable are working before adding role-based logic on top.
Director-Matcher Description Task
A referential communication task: one participant (the Director) describes a target item, the other (the Matcher) identifies it from a set of candidates.
- Role_Id:
Role_Id1 is shown the target image and a text input.Role_Id2 is shown the candidate images and no target. - Distribute: on the Director's Enter-key trigger, distribute the text value to a
Descriptionvariable on the Matcher's screen, withBlockenabled since only one description should be in flight at a time. - Sync: enable
Sync Frame Starton the next-trial frame, so the Director can't move on before the Matcher has selected a candidate.
This is the same structure behind the Image Description Demo.
Turn-Based Offer and Response
An economic exchange: one participant proposes a split of a shared amount, the other accepts or rejects it.
- Role_Id:
Role_Id1 is shown an input for the proposed split.Role_Id2 is shown nothing until a proposal arrives. - Distribute: on the proposer's submit trigger, distribute the proposed value to an
Offervariable on the responder's screen. - Sync: enable
Sync Frame Starton the outcome frame, so neither participant sees the result before the responder has answered.
This is the same structure behind the Ultimatum Game.
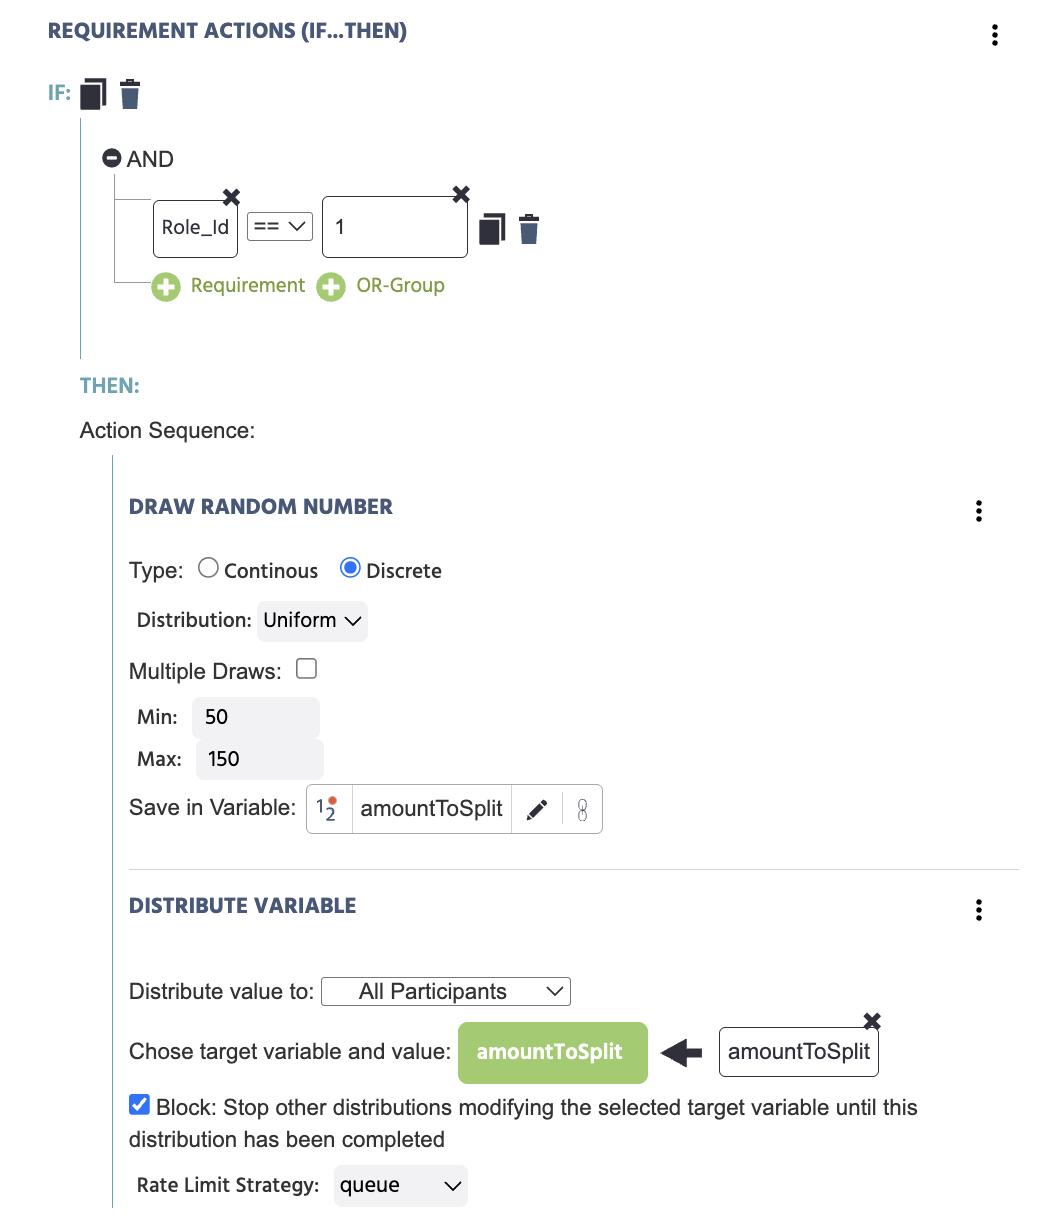
A real example of this pattern, using a randomly drawn amount instead of a manually entered one: Role_Id equal to 1 triggers a Draw Random Number action (a discrete uniform draw between 50 and 150, saved to amountToSplit), followed immediately by Distribute Variable sending amountToSplit to all participants, with Block enabled.
amountToSplit, then Distribute Variable sends it to all participants with Block enabled. Further Reading
Multi-user Experiment Design
When to use a multi-user design, best practices, and a gallery of existing examples built in Labvanced.
Multi-Participant Studies
The full reference for enabling multi-user mode, predefined participant groups, and frame/task synchronization.
Event System: Distribute Variable
Full parameter reference for Distribute Variable, including the Rate Limit Strategy option not covered here.