Building a Reading Study with the Text Segmentation Object
This walkthrough follows the exact steps used to build a real demo study: a word-frequency reading task where participants read ten sentences, each containing one critical word that is either high or low frequency, while webcam eye tracking records per-word gaze metrics. It uses the Text Segmentation Object's CSV-to-data-frame text source, the headline capability, rather than the array-variable fallback.
The real study this walkthrough builds: ten sentences, one per trial, with per-word AOI geometry and eye tracking metrics recorded automatically.
The Stimulus Set
The ten sentences are matched pairwise on critical-word character length (5 high-frequency and 5 low-frequency critical words, 6 to 7 letters each), to control for the word-length confound separately from frequency. Frequency values come from SUBTLEX-US (Brysbaert & New, 2009), the same corpus used on the Word Frequency Effect page.
| # | Condition | Critical word | SUBTLWF | Sentence |
|---|---|---|---|---|
| 1 | High | kitchen | 58.31 | Every morning she wiped down the small kitchen counter before breakfast. |
| 2 | Low | lantern | 2.02 | The old sailor carried a rusted lantern down to the dock. |
| 3 | High | teacher | 55.73 | On the first day the new teacher welcomed every nervous student. |
| 4 | Low | satchel | 1.47 | Before dawn the apprentice packed his heavy satchel and left. |
| 5 | High | window | 86.00 | Sunlight poured through the open window and warmed the whole room. |
| 6 | Low | turret | 0.88 | Arrows struck the ancient turret just as the sun rose. |
| 7 | High | letter | 82.61 | He carefully folded the short letter and placed it in an envelope. |
| 8 | Low | chisel | 0.88 | The sculptor used a sharp chisel to carve the marble block. |
| 9 | High | garden | 26.55 | They spent the entire weekend digging up the old garden fence. |
| 10 | Low | goblet | 0.37 | During the ceremony the knight raised a golden goblet to the king. |
Prerequisite Knowledge
Fundamental knowledge of Labvanced is advised, such as how frames and events work, to follow the terminology used below. This walkthrough also assumes you can launch a test run of your own study and find its exported data afterward: see Launch & Participate for running a session yourself and Dataview and Export for where the recorded tables in Step 7 actually live.
Frames
The building block that holds what participants see at each moment in a trial.

Events
What a trigger and an action are, and how they combine to build a study's logic.
Text Segmentation Object
Full object reference: properties, setup wizard, and the two recording actions.
Step 1: Add Text Segmentation Object and Upload Stimulus CSV
Add a Text Segmentation Object to a frame from the Text toolbar group.
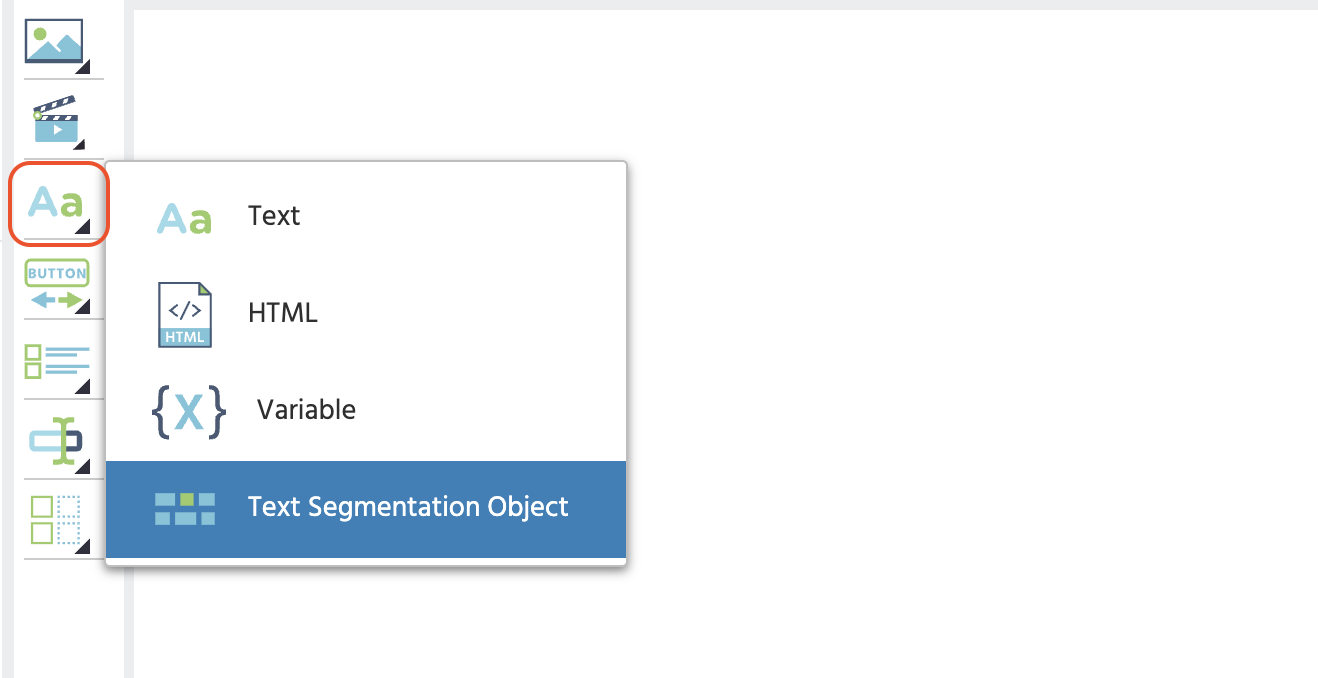
In the setup wizard's first step, choose Upload a CSV file of sentences and select the stimulus file. This parses it into a new data frame, one row per trial.
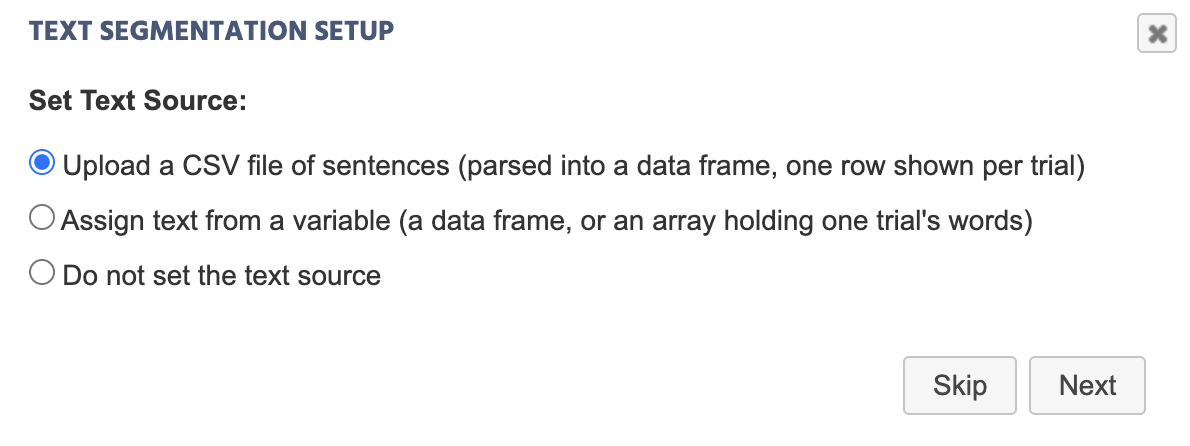
After selecting the file, an Additional Options dialog appears with three checkboxes: Map strings to files, Use first row as header, and Transpose data. For this stimulus set, all three should stay unchecked, which is already how they default for a sentence CSV, so just click Ok.
Note
A CSV is a commonly used text source for the Text Segmentation Object: one row per sentence, one cell per word. The source spreadsheet for this study has no header row and holds one word per column, one sentence per row, with row lengths left ragged (10 to 12 words depending on the sentence) rather than padded. A sentence's trailing period stays attached to its last word as its own cell.

The setup wizard offers two other text-source options not used in this walkthrough: Assign text from a variable, for a data frame or array that already holds the text rather than a fresh CSV upload, and Do not set the text source, to configure it later.
Step 2: Set the Row Index Method
With a data frame source, the wizard's second step asks how the row (sentence) is selected per trial. This study uses Use Trial_Id as row index, so the ten sentences appear in the experiment's randomized trial order rather than a fixed sequence.
Step 3: Turn On Eyetracking Metrics Recording
In the wizard's final step, leave Record the x, y, width and height of every word on each trial checked, and also check Record eyetracking metrics for every word on each trial. The per-word gaze metrics (dwell time, total fixations, total fixation duration, time to first fixation, mean fixation duration) are what makes this a reading eye tracking study rather than a plain stimulus display, and recording them needs this box checked.
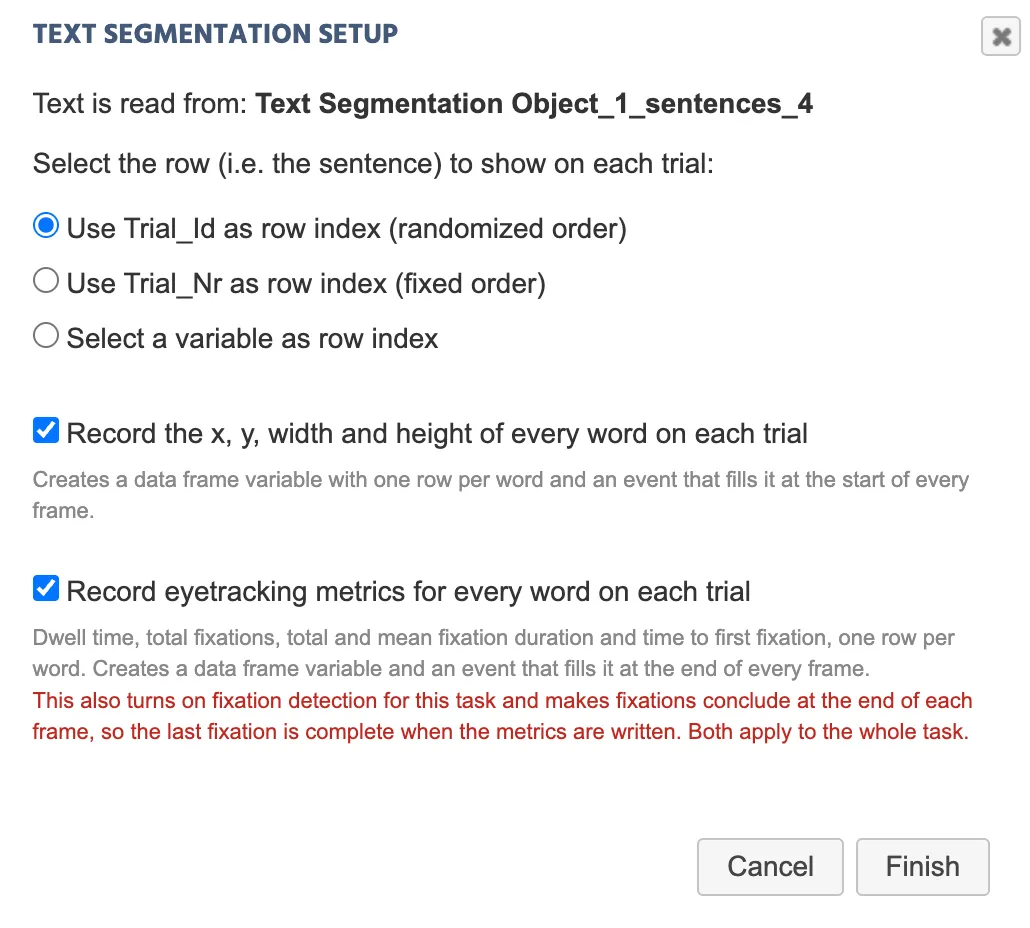
Note
Checking the metrics checkbox also turns on fixation detection for the whole task and sets fixations to conclude at frame end. This applies to the entire task, not just this object, and the wizard flags it before you can finish.
Checking this box is also what actually turns on eye tracking for the study, so it immediately opens the study's own Physiology Toolbox Version 2.0 setup wizard, asking who your participants are, then a tier (accuracy vs. effort) and, for tiers that support one, a screening level (accuracy vs. screen-out). See Choosing a Tier for what each choice means and how to change them later via the Settings tab, and also set up custom settings at the task level (see Setting Up Eye Tracking in a Task).
Step 4: Configure Layout & Trials
With the Text Segmentation Object selected, in Object Properties, set Split cells on whitespace to off, since the CSV already holds one word per column. Set Layout to Grid, which places every word into an equal-width cell and records the whole cell as its AOI, guaranteeing that no two words' recorded areas overlap or leave a gap between them.
See the Text Segmentation Object reference page for the full list of object properties, including the alignment, padding, and font settings not used in this walkthrough.
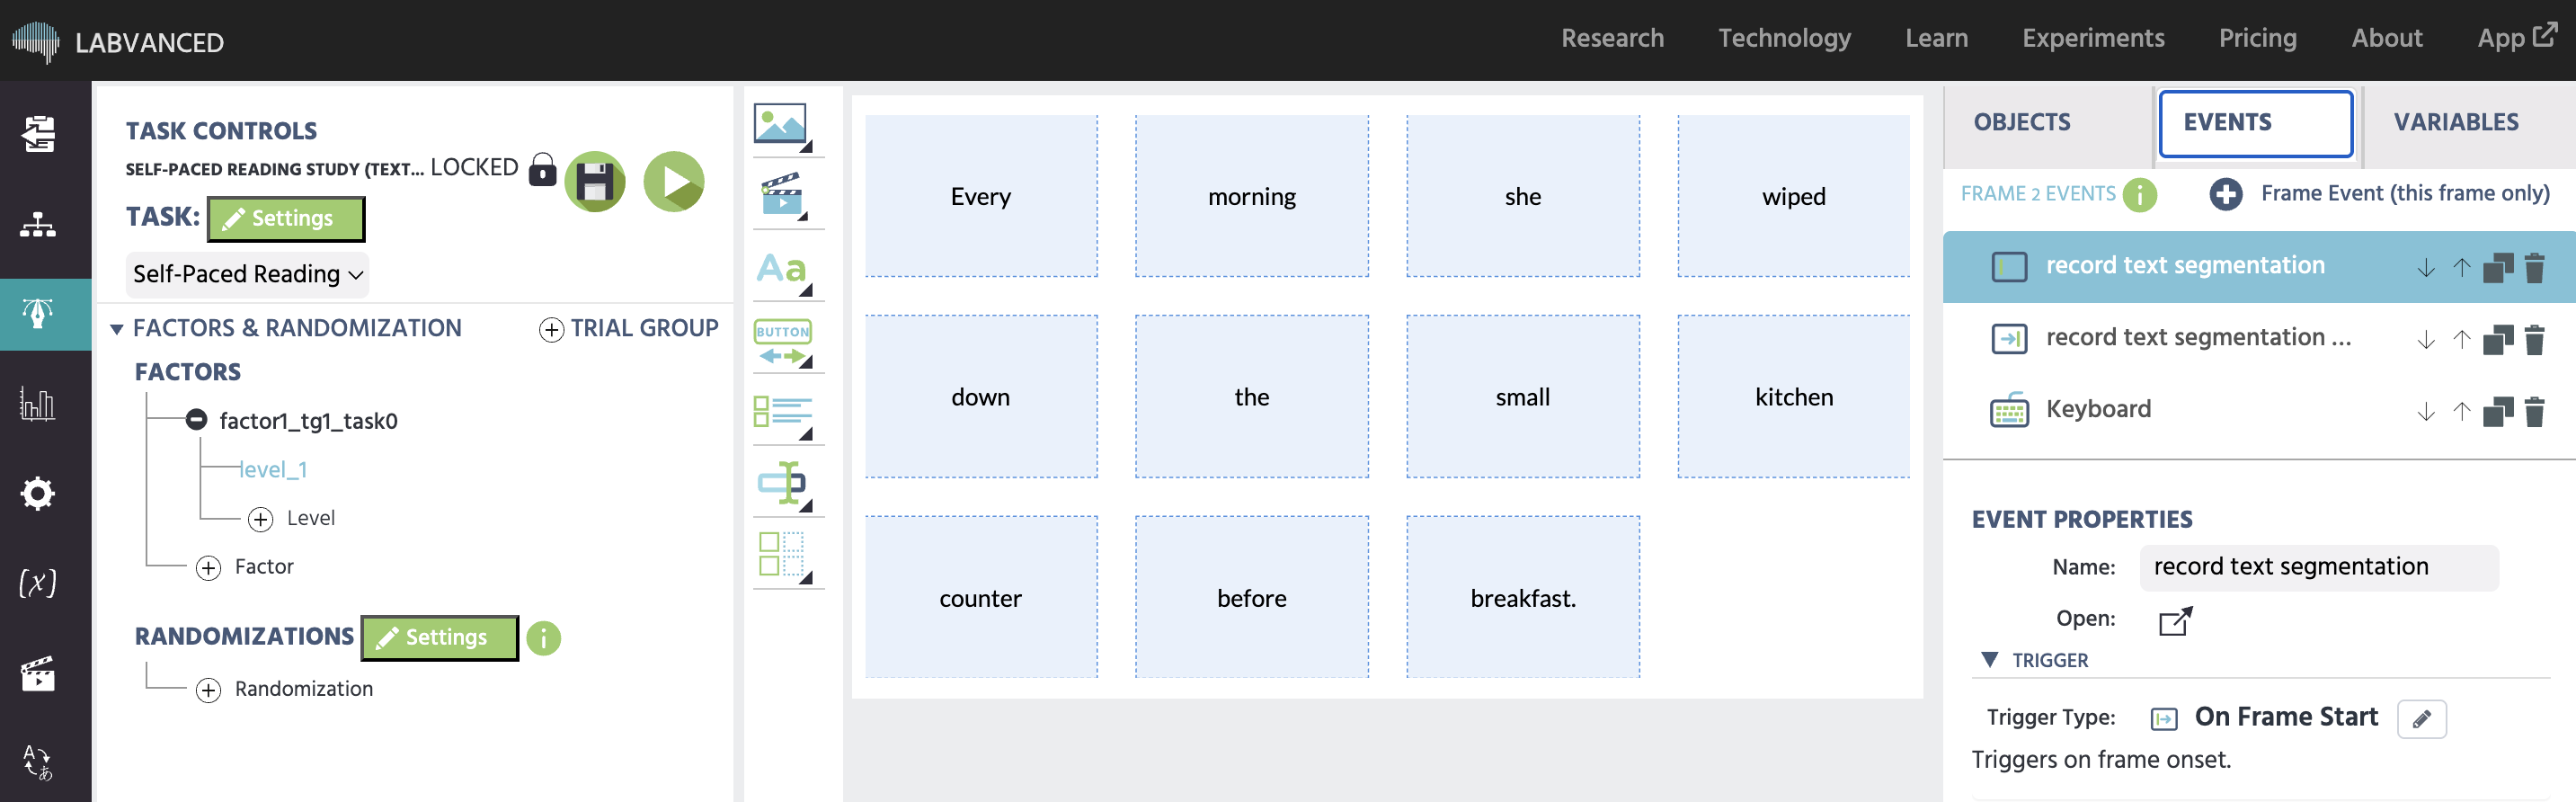
Gap Between Cells is worth setting deliberately rather than leaving at its default, and the right value depends on the expected gaze accuracy from the calibration tier chosen in Step 3's setup wizard, not on layout preference alone. A study on a higher-effort tier (longer calibration, tighter expected error) can run smaller gaps between word AOIs without much risk of a gaze sample landing on the wrong word. A study on a shorter, lower-effort calibration has a wider expected error radius, so the same small gap makes neighboring words harder to tell apart in the recorded data, and a larger gap is the safer choice. See Choosing a Tier for the expected accuracy figures behind each tier.
Matching Trial Count to the CSV
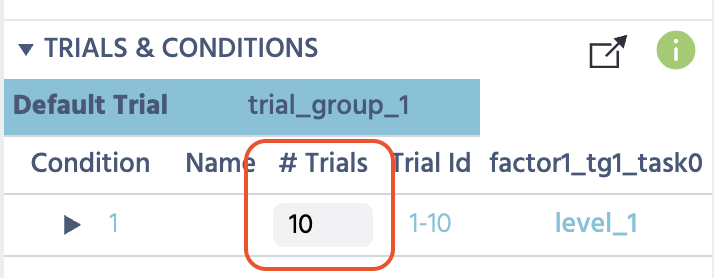
The row index method chosen in Step 2 depends on a setting outside the wizard entirely: Trial_Id only reaches 1 through 10 if the task is actually set to run ten trials. This is set separately, in the Trials & Conditions table, not from within the wizard's dialog box: set #Trials to 10 there, so it matches the ten rows in the uploaded CSV, a mismatch here means some rows never get shown, or the task errors on a trial whose Trial_Id has no matching row.
Beyond this basic count, Trials & Conditions and Factors & Randomization also support more advanced randomization, such as crossing factors or controlling condition order, see Randomization & Balance for the full set of options.
Step 5: Set Up Trial Progression
Each of the ten trials runs as two frames in sequence: a dedicated Fixation Cross frame, then the sentence frame holding the Text Segmentation Object. See Trial Timeline for how a trial is built from a sequence of frames like this.
Fixation Cross: build it as its own frame, not an element placed on the sentence frame. Add an Eyetracking Gaze Trigger targeting the fixation cross image itself, so the event fires once the participant is actually looking at it, not on a timer alone. Chain that into a Delayed Actions (Time Callback) action set to a fixed 1000 ms delay, with a Jump To action set to Next Frame as its sub-action. The delay is a one-shot timer, not a sustained-gaze check: it starts the moment the gaze trigger first fires and runs the Jump To once it elapses regardless of whether the participant is still looking at the cross a moment later.
This setup is inspired by the gaze-contingent fixation cross used in Serrano-Carot, Angele, Xu, & Vasilev (2025).
Advancing between trials: on the sentence frame, add a Keyboard Trigger set to any key with the Action dropdown set to Press Key, and give it a Jump To action set to Next Frame. Ending the frame this way is what causes the Frame End Trigger that Step 3's wizard already set up to fire, which is when the per-word metrics actually get recorded, so they are only written once the participant signals they are done reading that sentence, not on an arbitrary timer.
Resetting an interrupted trial: if a participant drifts out of the allowed head pose mid-trial, the virtual chinrest pauses the experiment and prompts them to realign. The realignment screen recenters their gaze on the middle of the display, which may not match where they actually were in the sentence when the interruption happened. Without handling this, the experiment would simply resume the sentence frame as-is, leaving the participant's gaze at center screen instead of the controlled starting position the fixation cross exists to establish. Wire a Global Experiment Event Trigger set to Experiment Continued, with a Jump To action set to Specific Frame targeting the Fixation Cross frame, so a realignment sends the participant back through the fixation cross and starts the trial over cleanly rather than resuming with a mismatched gaze position.
Import this study directly into your account to review exactly how the frames, events, and trial progression above were actually built and structured.
Step 6: Confirm Eye Tracking at the Study Level
Checking the metrics checkbox in Step 3 already turned on eye tracking for the study, by triggering the Set Up Eye Tracking wizard, so there is nothing new to enable here. Open Settings tab → Physiology to confirm Eye-Tracking is on and review the tier and screening level the wizard set. See Setting Up Eye Tracking in a Task for the full study-level versus task-level mechanism.
Step 7: Confirm Both Recordings
Run the study yourself and check the exported data rather than assuming the setup worked. Two data frame tables should populate, one row per word per trial:
- The AOI geometry table:
word_index,word,line_index,x,y,width,height - The per-word metrics table:
word_index,word,line_index,dwell_time,total_fixations,total_fixation_duration,time_to_first_fixation,mean_fixation_duration
A word you never looked at keeps its row with zeros across every metric column rather than a blank cell. Filter on total_fixations > 0 before averaging a time column, a zero does not distinguish "never fixated" from "fixated at exactly frame onset."
Further Reading
Text Segmentation Object
Full object reference: properties, setup wizard, and the two recording actions.
Text Segmentation Technology
The capability overview: mechanism, data output, and research use cases.
Setting Up Eye Tracking in a Task
The study-level vs. task-level Eye-Tracking toggle this walkthrough depends on.